
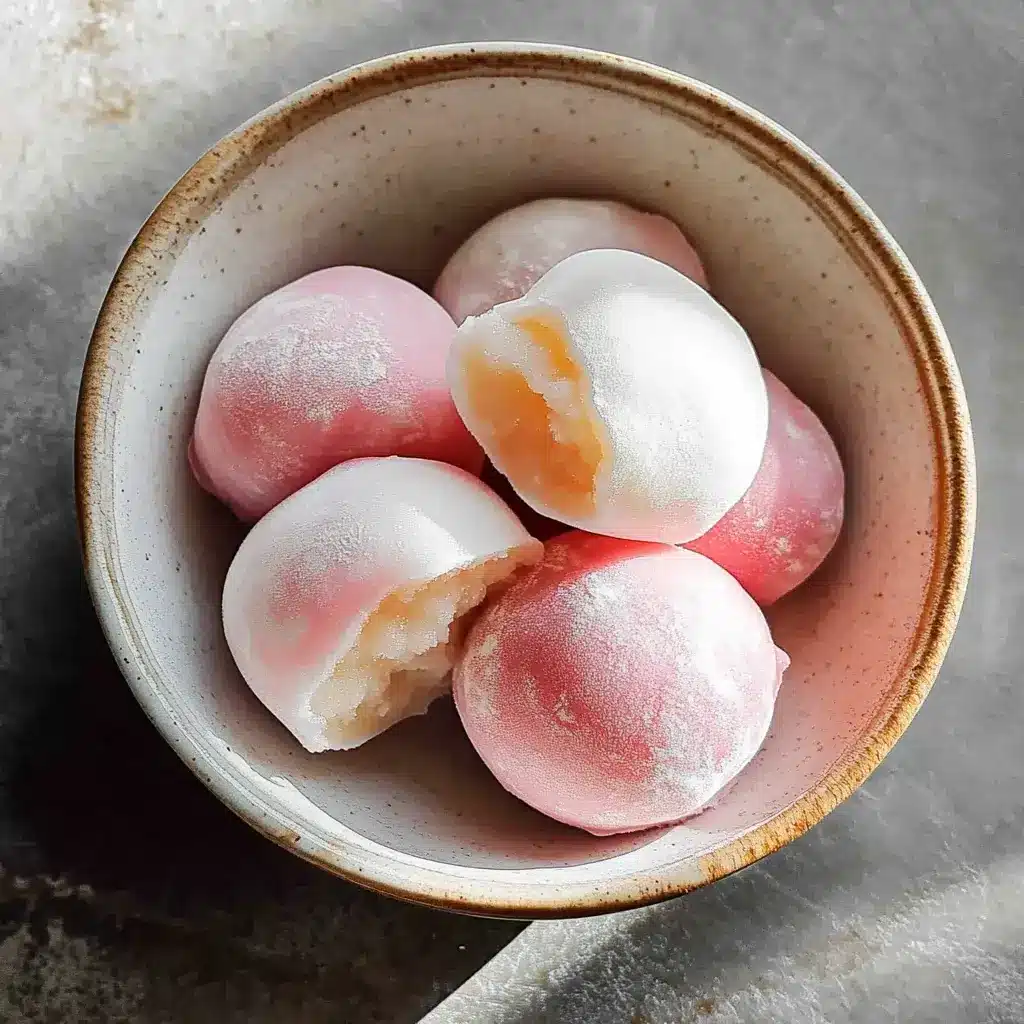

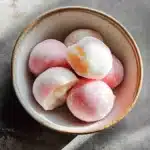
My first encounter with Mochi Ice Cream was pure fascination. Those colorful, perfectly round little spheres looked like something out of a fantasy candy shop. Then came the first bite – that unique, delightful contrast! The soft, slightly chewy, subtly sweet mochi dough giving way to the cold, creamy ice cream inside… it was unlike anything I’d ever tasted. I was instantly hooked. Naturally, my next thought was, “Can I make this at home?” Let’s just say my initial attempts were… educational. Sticky dough clinging to everything, ice cream melting faster than I could wrap it, textures that weren’t quite right. But the lure of recreating that perfect bite kept me going. After much trial, error, and mountains of cornstarch, I finally landed on this recipe and technique. When I served these homemade mochi ice cream balls to my family, their eyes lit up just like mine had. Seeing them experience that same delightful texture and flavor contrast made all the sticky counters worth it. It’s a bit of a project, yes, but the payoff is incredibly rewarding, and mastering homemade mochi ice cream feels like unlocking a delicious secret.
Ingredients for Homemade Mochi Ice Cream
Making authentic mochi ice cream at home requires specific ingredients, especially for the mochi dough itself. Precision here is key to achieving that signature soft, chewy texture that doesn’t harden into a rock in the freezer.
For the Mochi Dough:
- Glutinous Rice Flour (Sweet Rice Flour): 1 cup (approx. 150-160g) – THIS IS THE MOST CRUCIAL INGREDIENT.
- Must Use: You absolutely must use flour labeled “glutinous rice flour” or “sweet rice flour.” Mochiko (Koda Farms brand) is a widely available and reliable choice.
- Do NOT Substitute: Do not use regular rice flour or any other type of flour (like all-purpose, almond, coconut). They lack the specific starch structure needed to create the sticky, chewy texture of mochi. Using the wrong flour will result in failure.
- Source: Found in the international aisle of most well-stocked supermarkets or readily available in Asian grocery stores and online.
- Granulated Sugar: ¾ cup (approx. 150g)
- Purpose: Provides sweetness and also helps keep the mochi soft and pliable, even when frozen. Adjust slightly based on preference, but reducing too much can affect texture.
- Water: 1 cup (240ml)
- Temperature: Room temperature or cool water is fine.
- Cornstarch (or Potato Starch): ½ cup to 1 cup (approx. 60-120g), for dusting
- Essential for Handling: Mochi dough is incredibly sticky. You will need a generous amount of starch for dusting your work surface, hands, rolling pin, and the dough itself to prevent it from sticking to everything. Potato starch works equally well and is sometimes preferred in Japanese cooking for its fine texture. Don’t skimp here!
- Optional Flavoring/Coloring:
- Food Coloring: A few drops of gel or liquid food coloring can be added to the wet ingredients for vibrant mochi. Match the color to your ice cream flavor (e.g., pink for strawberry, green for matcha).
- Extracts: ½ teaspoon of vanilla extract, matcha powder (sifted, 1-2 tsp mixed into dry ingredients), cocoa powder (sifted, 1 tbsp mixed into dry ingredients), or strawberry extract can be added for flavored mochi dough.
For the Filling:
- Ice Cream: Approximately 1 pint (about 2 cups or 475ml) of your favorite ice cream.
- Quality Matters: Use a good quality, dense ice cream. Ice creams with lower overrun (less air whipped in) freeze harder and melt slightly slower, making the wrapping process easier.
- Flavor Choice: Any flavor works! Classic choices include strawberry, vanilla, chocolate, green tea (matcha), mango, and red bean. Choose flavors that complement the subtle sweetness of the mochi.
Equipment Needed:
- Microwave-safe bowl (if using microwave method)
- Saucepan (if using stovetop method)
- Whisk
- Rubber spatula or wooden spoon
- Plastic wrap
- Baking sheet lined with parchment paper or wax paper
- Muffin tin (standard size, 12 cups) – highly recommended for shaping ice cream balls
- Small ice cream scoop (approx. 1.5-inch diameter) or melon baller
- Rolling pin
- Round cookie cutter (approx. 3.5 – 4 inches diameter) or a drinking glass rim
- Pastry brush (optional, for dusting off excess starch)
- Gloves (optional, but helpful for handling sticky dough)
Step-by-Step Instructions for Making Mochi Ice Cream
Making mochi ice cream is a multi-stage process that requires patience and preparation, especially regarding temperature control. Read through all the steps before starting.
Phase 1: Prepare the Ice Cream Balls (Do This First!)
This step is critical and should be done several hours or ideally the day before assembling.
- Line Muffin Tin: Line a standard 12-cup muffin tin with plastic wrap or individual small squares of parchment/wax paper. This prevents the ice cream scoops from sticking.
- Scoop Ice Cream: Working quickly, scoop out 12 firmly packed, small balls of ice cream using a small ice cream scoop (about 1.5 inches in diameter). Place one scoop into each prepared muffin cup. Level the tops slightly if needed.
- Deep Freeze: Cover the muffin tin tightly with plastic wrap. Place the tin in the coldest part of your freezer (usually the back). Freeze for at least 2-4 hours, but preferably overnight, until the ice cream balls are frozen solid. They need to be rock hard to withstand the wrapping process without melting instantly.
Phase 2: Make the Mochi Dough
You can make the mochi dough using either a microwave or stovetop method. The microwave method is generally faster.
Method A: Microwave (Faster)
- Combine Dry Ingredients: In a medium-sized microwave-safe bowl, whisk together the glutinous rice flour and granulated sugar until well combined and free of lumps.
- Add Wet Ingredients: Gradually whisk in the water until you have a smooth, lump-free, milky batter. If using food coloring or liquid extracts, whisk them in now.
- Microwave – First Cook: Cover the bowl loosely with plastic wrap (leaving a small vent for steam) or use a microwave-safe lid. Microwave on High power (assuming ~1000-1200W) for 1 minute.
- Stir: Carefully remove the bowl (it will be hot!). The mixture will be partially cooked and sticky. Using a wet rubber spatula or wooden spoon, stir the mixture vigorously, trying to incorporate the cooked parts with the uncooked liquid parts.
- Microwave – Second Cook: Re-cover the bowl loosely and microwave on High for another 1 minute.
- Stir Again: Remove carefully and stir vigorously again. The mixture will be thicker and stickier.
- Microwave – Final Cook: Re-cover and microwave for another 30 seconds to 1 minute. The mochi dough is done when it becomes translucent, very sticky, and pulls away cleanly from the sides of the bowl as you stir. If it still looks opaque white in spots, microwave in additional 30-second bursts, stirring in between, until fully cooked. Total microwave time is typically 2.5 – 3.5 minutes but varies by microwave wattage.
- Proceed to Phase 3.
Method B: Stovetop (More Control)
- Combine Dry Ingredients: In a medium saucepan, whisk together the glutinous rice flour and granulated sugar until well combined.
- Add Wet Ingredients: Gradually whisk in the water until smooth and lump-free. Add optional food coloring/extracts now.
- Cook on Stovetop: Place the saucepan over medium-low heat. Cook, stirring constantly with a rubber spatula or wooden spoon. This is crucial to prevent scorching and ensure even cooking.
- Continue Stirring: The mixture will start thin, then gradually thicken. Keep stirring vigorously, scraping the bottom and sides of the pan. It will become increasingly thick, sticky, and translucent.
- Check for Doneness: Cook for approximately 5-10 minutes, stirring constantly, until the dough is thick, glossy, very sticky, pulls away from the sides of the pan, and loses its opaque white color, becoming more translucent.
- Proceed to Phase 3.
Phase 3: Roll and Cut the Mochi Dough
Work quickly while the mochi dough is still warm and pliable. Have your cornstarch ready!
- Prepare Work Surface: Generously dust a large, clean work surface (like a cutting board, countertop, or silicone mat) with cornstarch. Use more than you think you need! Also, dust your hands and a rolling pin generously.
- Transfer Dough: Carefully scrape the hot mochi dough out onto the heavily dusted surface.
- Dust Dough: Dust the top of the mochi dough generously with more cornstarch.
- Knead Briefly (Optional): Some find briefly kneading the hot dough (using well-dusted hands or gloves) helps improve texture, but be careful as it’s hot. Fold it over itself a few times.
- Roll Out: Using the dusted rolling pin, roll the mochi dough out into a thin sheet, approximately ⅛ inch (3-4 mm) thick. Dust with more cornstarch as needed if it starts sticking. Try to roll it evenly.
- Chill Briefly (Optional but Recommended): Carefully transfer the rolled-out mochi sheet (still on parchment or mat if possible) to a baking sheet and place it in the refrigerator or freezer for 15-20 minutes. Chilling makes it slightly less sticky and easier to cut and handle.
- Cut Circles: Remove the chilled dough sheet. Using a well-dusted round cookie cutter (about 3.5-4 inches wide) or the rim of a dusted drinking glass, cut out as many circles as possible (aim for 12). Re-roll scraps carefully if needed, though re-rolled dough can be slightly tougher.
Phase 4: Assemble the Mochi Ice Cream
This is the trickiest part where speed is essential. Work with only ONE ice cream ball and ONE mochi circle at a time, keeping the rest frozen/chilled.
- Prepare Assembly Station: Have your cut mochi circles ready on a lightly dusted surface. Keep the frozen ice cream balls in the freezer until the absolute moment you need each one. Have small squares of plastic wrap ready.
- Dust Mochi Circle: Take one mochi circle. Use a pastry brush (optional) to gently brush off excess cornstarch from the side that will touch the ice cream (usually the top side as it lay flat). Leave the other side dusted.
- Wrap Ice Cream: Place the mochi circle (dusted side down) onto a small square of plastic wrap or directly into your dusted hand. Retrieve ONE frozen ice cream ball from the freezer and place it in the center of the mochi circle.
- Enclose Quickly: Working quickly before the ice cream melts, bring the edges of the mochi circle up and over the ice cream ball. Pinch the seams together tightly at the top to seal completely. If the dough is too dry to seal, lightly dab the edges with a tiny bit of water. The warmth of your hands will help meld the seams.
- Wrap Tightly: Immediately wrap the assembled mochi ice cream ball tightly in the square of plastic wrap, twisting the excess wrap at the seam to hold the round shape and reinforce the seal.
- Freeze Immediately: Place the wrapped mochi ice cream ball seam-side down back into the muffin tin or onto a parchment-lined baking sheet in the freezer.
- Repeat: Repeat the process quickly with the remaining mochi circles and ice cream balls, working one at a time.
Phase 5: Final Freeze and Storing
- Firm Up: Freeze the assembled and wrapped mochi ice cream balls for at least 1-2 hours to allow the mochi to firm up around the ice cream and ensure everything is frozen solid again.
- Store: Once fully frozen, transfer the individually wrapped mochi ice cream balls to a freezer-safe airtight container or freezer bag for longer storage.
- Enjoy: See “How to Serve” for tips on eating!
Nutrition Facts (Approximate)
Nutritional information for homemade mochi ice cream can vary significantly based on the type and fat content of the ice cream used, the precise thickness of the mochi dough, and the exact size of the balls. These are rough estimates per mochi ice cream ball.
- Servings: This recipe makes approximately 12 mochi ice cream balls.
- Serving Size: 1 mochi ice cream ball
- Approximate Calories per Serving: 100 – 200 calories
Breakdown Considerations:
- Carbohydrates: Relatively high, primarily from the glutinous rice flour and sugar in the mochi dough, plus sugars in the ice cream. Typically 15-30g per ball.
- Fat: Varies greatly depending on the ice cream chosen (low-fat vs. premium full-fat). Can range from 2-10g+ per ball.
- Protein: Generally low, contributed mainly by the ice cream (dairy). Around 1-3g per ball.
- Sugar: Significant amount from both the mochi dough and the ice cream.
Dietary Notes: Naturally gluten-free (ensure certified GF flour if needed). Contains dairy unless vegan ice cream and water (instead of dairy) are used. Contains sugar.
Disclaimer: This is a dessert treat. For precise nutritional values, use an online calculator and input your specific brand of ice cream and exact ingredient measurements.
Preparation and Cooking Time
Mochi ice cream is a project that requires significant freezing time, so plan accordingly.
- Preparation Time (Active):
- Scooping Ice Cream: 10 minutes
- Making Mochi Dough: 10-15 minutes
- Rolling & Cutting Dough: 15-20 minutes
- Assembling Mochi Balls: 15-25 minutes (depending on speed)
- Total Active Prep Time: Approximately 50 – 70 minutes
- Passive Time (Freezing/Chilling):
- Initial Ice Cream Freezing: 2-4 hours minimum, overnight preferred
- Dough Chilling (Optional): 15-20 minutes
- Final Freezing After Assembly: 1-2 hours minimum
- Total Minimum Passive Time: ~3.5 – 6.5 hours (significantly more if freezing overnight)
- Total Time (Including Minimum Freezing): Approximately 4.5 hours to 1 full day, depending heavily on freezing times.
Planning: It’s best to scoop the ice cream the day before you plan to make the mochi and assemble.
How to Serve Your Homemade Mochi Ice Cream
Serving homemade mochi ice cream properly enhances the unique textural experience.
- Temper Before Serving (Crucial!): This is the most important step! Straight from the deep freeze, the mochi dough will be quite hard. Let the mochi ice cream sit at room temperature for 3-5 minutes (or slightly longer if your freezer is extra cold) before eating. This allows the mochi dough to soften slightly, returning it to its signature pliable, chewy texture that contrasts perfectly with the cold ice cream. Don’t let it sit out too long, or the ice cream will melt excessively.
- Serving Suggestions:
- Plain and Simple: Enjoy them as they are, unwrapped from the plastic wrap.
- Lightly Dusted: You can lightly dust them with a bit more cornstarch or potato starch before serving for aesthetics, especially if they feel slightly sticky after tempering.
- With Tea: Pair with a cup of Japanese green tea (like sencha or matcha) for an authentic experience.
- Dessert Platter: Arrange different flavors on a platter for a colorful and fun dessert offering.
- Cut in Half: For presentation or sharing, you can carefully slice a mochi ball in half with a sharp knife after tempering to show the ice cream interior.
Eat them relatively quickly after tempering for the best texture contrast.
5 Essential Tips for Mochi Ice Cream Success
Making mochi ice cream can be tricky. These tips address the most common challenges:
- Use the RIGHT Flour (No Exceptions!): This cannot be stressed enough. You must use glutinous rice flour (sweet rice flour), such as the Mochiko brand. Regular rice flour or other flours will not work and will result in a dough that doesn’t stretch or have the characteristic chewy texture. Double-check the packaging!
- Freeze Ice Cream SOLID: Your pre-scooped ice cream balls need to be frozen rock solid, preferably overnight in the coldest part of your freezer. Working with partially frozen ice cream is a recipe for a melted mess during the wrapping stage. The muffin tin helps maintain their shape during this deep freeze.
- Embrace the Cornstarch: Mochi dough is notoriously sticky. Be generous with the cornstarch (or potato starch) on your work surface, hands, rolling pin, and the dough itself. You can always brush excess off the final product, but not having enough will lead to frustration and sticking. It’s your best friend during the rolling and handling process.
- Work Quickly and Keep Things Cold: The biggest challenge is the temperature difference between the warm/room temperature mochi dough and the frozen ice cream. Assemble one mochi ball at a time, keeping the remaining ice cream scoops frozen and the mochi circles cool (chilling the rolled sheet helps). Wrap quickly, seal tightly, and return the finished ball to the freezer immediately.
- Temper Before Eating for Texture: Don’t eat them straight from the freezer! Letting the finished mochi ice cream sit at room temperature for 3-5 minutes before serving is crucial. This allows the mochi layer to soften from rock hard to perfectly soft and chewy, creating that signature delightful contrast with the cold ice cream.
Bonus Tip: If you find the dough very hard to handle even with chilling, try working with slightly smaller batches or recruiting a helper – one person can handle the dough while the other handles the ice cream.
Frequently Asked Questions (FAQ)
Here are answers to common questions about homemade mochi ice cream:
- Q: Can I use regular rice flour instead of glutinous rice flour?
- A: No. Absolutely not. Regular rice flour lacks the high amylopectin starch content that gives glutinous rice flour its unique sticky, chewy, and stretchable properties when cooked. Using regular rice flour will result in a crumbly, non-elastic dough that cannot be used to make mochi. You must use flour specifically labeled “glutinous rice flour” or “sweet rice flour” (like Mochiko).
- Q: My mochi dough is impossibly sticky! What can I do?
- A: Mochi dough is inherently very sticky! The key is using lots of cornstarch (or potato starch) for dusting your hands, surface, and rolling pin. Chilling the rolled-out dough for 15-20 minutes before cutting and wrapping also helps significantly by making it firmer and less tacky. Ensure the dough was cooked properly – undercooked dough can be extra sticky. Some people find wearing food-safe gloves (also dusted) helpful.
- Q: Why did my mochi get hard in the freezer? How can I prevent it?
- A: Mochi naturally hardens when frozen due to starch retrogradation. Several factors help minimize this:
- Sugar Content: The sugar in the recipe helps keep the mochi softer at freezing temperatures. Don’t reduce it too much.
- Proper Cooking: Ensure the mochi dough is fully cooked until translucent and elastic.
- Wrapping Tightly: Wrapping each mochi ball tightly in plastic wrap immediately after assembly minimizes moisture loss and exposure to air, which contributes to hardening.
- Tempering: Always let the mochi sit at room temperature for 3-5 minutes before eating. This allows it to soften back to a chewy texture. Even perfectly made mochi will be hard straight from the freezer.
- A: Mochi naturally hardens when frozen due to starch retrogradation. Several factors help minimize this:
- Q: Can I make vegan or dairy-free mochi ice cream?
- A: Yes! The mochi dough itself (using water, glutinous rice flour, and sugar) is naturally vegan and dairy-free. Simply substitute your favorite vegan/dairy-free ice cream for the filling. Ensure the non-dairy ice cream you choose freezes very solid, as some varieties can be softer than traditional dairy ice cream. Follow all the same steps for pre-scooping, freezing, and assembly.
- Q: How long does homemade mochi ice cream last in the freezer?
- A: When wrapped tightly in individual plastic wrap and stored in an airtight container or freezer bag, homemade mochi ice cream is best enjoyed within 1 to 2 weeks. While it might technically be safe to eat for longer, the texture of the mochi can degrade over time, potentially becoming harder or developing ice crystals, even with proper storage. For the optimal chewy texture, fresher is better.
Mochi Ice Cream recipe
Ingredients
- Glutinous Rice Flour (Sweet Rice Flour): 1 cup (approx. 150-160g) – THIS IS THE MOST CRUCIAL INGREDIENT.
- Must Use: You absolutely must use flour labeled “glutinous rice flour” or “sweet rice flour.” Mochiko (Koda Farms brand) is a widely available and reliable choice.
- Do NOT Substitute: Do not use regular rice flour or any other type of flour (like all-purpose, almond, coconut). They lack the specific starch structure needed to create the sticky, chewy texture of mochi. Using the wrong flour will result in failure.
- Source: Found in the international aisle of most well-stocked supermarkets or readily available in Asian grocery stores and online.
- Granulated Sugar: ¾ cup (approx. 150g)
- Purpose: Provides sweetness and also helps keep the mochi soft and pliable, even when frozen. Adjust slightly based on preference, but reducing too much can affect texture.
- Water: 1 cup (240ml)
- Temperature: Room temperature or cool water is fine.
- Cornstarch (or Potato Starch): ½ cup to 1 cup (approx. 60-120g), for dusting
- Essential for Handling: Mochi dough is incredibly sticky. You will need a generous amount of starch for dusting your work surface, hands, rolling pin, and the dough itself to prevent it from sticking to everything. Potato starch works equally well and is sometimes preferred in Japanese cooking for its fine texture. Don’t skimp here!
- Optional Flavoring/Coloring:
- Food Coloring: A few drops of gel or liquid food coloring can be added to the wet ingredients for vibrant mochi. Match the color to your ice cream flavor (e.g., pink for strawberry, green for matcha).
- Extracts: ½ teaspoon of vanilla extract, matcha powder (sifted, 1-2 tsp mixed into dry ingredients), cocoa powder (sifted, 1 tbsp mixed into dry ingredients), or strawberry extract can be added for flavored mochi dough.
For the Filling:
- Ice Cream: Approximately 1 pint (about 2 cups or 475ml) of your favorite ice cream.
- Quality Matters: Use a good quality, dense ice cream. Ice creams with lower overrun (less air whipped in) freeze harder and melt slightly slower, making the wrapping process easier.
- Flavor Choice: Any flavor works! Classic choices include strawberry, vanilla, chocolate, green tea (matcha), mango, and red bean. Choose flavors that complement the subtle sweetness of the mochi.
Equipment Needed:
- Microwave-safe bowl (if using microwave method)
- Saucepan (if using stovetop method)
- Whisk
- Rubber spatula or wooden spoon
- Plastic wrap
- Baking sheet lined with parchment paper or wax paper
- Muffin tin (standard size, 12 cups) – highly recommended for shaping ice cream balls
- Small ice cream scoop (approx. 1.5-inch diameter) or melon baller
- Rolling pin
- Round cookie cutter (approx. 3.5 – 4 inches diameter) or a drinking glass rim
- Pastry brush (optional, for dusting off excess starch)
- Gloves (optional, but helpful for handling sticky dough)
Instructions
- Line Muffin Tin: Line a standard 12-cup muffin tin with plastic wrap or individual small squares of parchment/wax paper. This prevents the ice cream scoops from sticking.
- Scoop Ice Cream: Working quickly, scoop out 12 firmly packed, small balls of ice cream using a small ice cream scoop (about 1.5 inches in diameter). Place one scoop into each prepared muffin cup. Level the tops slightly if needed.
- Deep Freeze: Cover the muffin tin tightly with plastic wrap. Place the tin in the coldest part of your freezer (usually the back). Freeze for at least 2-4 hours, but preferably overnight, until the ice cream balls are frozen solid. They need to be rock hard to withstand the wrapping process without melting instantly.
Phase 2: Make the Mochi Dough
You can make the mochi dough using either a microwave or stovetop method. The microwave method is generally faster.
Method A: Microwave (Faster)
- Combine Dry Ingredients: In a medium-sized microwave-safe bowl, whisk together the glutinous rice flour and granulated sugar until well combined and free of lumps.
- Add Wet Ingredients: Gradually whisk in the water until you have a smooth, lump-free, milky batter. If using food coloring or liquid extracts, whisk them in now.
- Microwave – First Cook: Cover the bowl loosely with plastic wrap (leaving a small vent for steam) or use a microwave-safe lid. Microwave on High power (assuming ~1000-1200W) for 1 minute.
- Stir: Carefully remove the bowl (it will be hot!). The mixture will be partially cooked and sticky. Using a wet rubber spatula or wooden spoon, stir the mixture vigorously, trying to incorporate the cooked parts with the uncooked liquid parts.
- Microwave – Second Cook: Re-cover the bowl loosely and microwave on High for another 1 minute.
- Stir Again: Remove carefully and stir vigorously again. The mixture will be thicker and stickier.
- Microwave – Final Cook: Re-cover and microwave for another 30 seconds to 1 minute. The mochi dough is done when it becomes translucent, very sticky, and pulls away cleanly from the sides of the bowl as you stir. If it still looks opaque white in spots, microwave in additional 30-second bursts, stirring in between, until fully cooked. Total microwave time is typically 2.5 – 3.5 minutes but varies by microwave wattage.
- Proceed to Phase 3.
Method B: Stovetop (More Control)
- Combine Dry Ingredients: In a medium saucepan, whisk together the glutinous rice flour and granulated sugar until well combined.
- Add Wet Ingredients: Gradually whisk in the water until smooth and lump-free. Add optional food coloring/extracts now.
- Cook on Stovetop: Place the saucepan over medium-low heat. Cook, stirring constantly with a rubber spatula or wooden spoon. This is crucial to prevent scorching and ensure even cooking.
- Continue Stirring: The mixture will start thin, then gradually thicken. Keep stirring vigorously, scraping the bottom and sides of the pan. It will become increasingly thick, sticky, and translucent.
- Check for Doneness: Cook for approximately 5-10 minutes, stirring constantly, until the dough is thick, glossy, very sticky, pulls away from the sides of the pan, and loses its opaque white color, becoming more translucent.
- Proceed to Phase 3.
Phase 3: Roll and Cut the Mochi Dough
Work quickly while the mochi dough is still warm and pliable. Have your cornstarch ready!
- Prepare Work Surface: Generously dust a large, clean work surface (like a cutting board, countertop, or silicone mat) with cornstarch. Use more than you think you need! Also, dust your hands and a rolling pin generously.
- Transfer Dough: Carefully scrape the hot mochi dough out onto the heavily dusted surface.
- Dust Dough: Dust the top of the mochi dough generously with more cornstarch.
- Knead Briefly (Optional): Some find briefly kneading the hot dough (using well-dusted hands or gloves) helps improve texture, but be careful as it’s hot. Fold it over itself a few times.
- Roll Out: Using the dusted rolling pin, roll the mochi dough out into a thin sheet, approximately ⅛ inch (3-4 mm) thick. Dust with more cornstarch as needed if it starts sticking. Try to roll it evenly.
- Chill Briefly (Optional but Recommended): Carefully transfer the rolled-out mochi sheet (still on parchment or mat if possible) to a baking sheet and place it in the refrigerator or freezer for 15-20 minutes. Chilling makes it slightly less sticky and easier to cut and handle.
- Cut Circles: Remove the chilled dough sheet. Using a well-dusted round cookie cutter (about 3.5-4 inches wide) or the rim of a dusted drinking glass, cut out as many circles as possible (aim for 12). Re-roll scraps carefully if needed, though re-rolled dough can be slightly tougher.
Phase 4: Assemble the Mochi Ice Cream
This is the trickiest part where speed is essential. Work with only ONE ice cream ball and ONE mochi circle at a time, keeping the rest frozen/chilled.
- Prepare Assembly Station: Have your cut mochi circles ready on a lightly dusted surface. Keep the frozen ice cream balls in the freezer until the absolute moment you need each one. Have small squares of plastic wrap ready.
- Dust Mochi Circle: Take one mochi circle. Use a pastry brush (optional) to gently brush off excess cornstarch from the side that will touch the ice cream (usually the top side as it lay flat). Leave the other side dusted.
- Wrap Ice Cream: Place the mochi circle (dusted side down) onto a small square of plastic wrap or directly into your dusted hand. Retrieve ONE frozen ice cream ball from the freezer and place it in the center of the mochi circle.
- Enclose Quickly: Working quickly before the ice cream melts, bring the edges of the mochi circle up and over the ice cream ball. Pinch the seams together tightly at the top to seal completely. If the dough is too dry to seal, lightly dab the edges with a tiny bit of water. The warmth of your hands will help meld the seams.
- Wrap Tightly: Immediately wrap the assembled mochi ice cream ball tightly in the square of plastic wrap, twisting the excess wrap at the seam to hold the round shape and reinforce the seal.
- Freeze Immediately: Place the wrapped mochi ice cream ball seam-side down back into the muffin tin or onto a parchment-lined baking sheet in the freezer.
- Repeat: Repeat the process quickly with the remaining mochi circles and ice cream balls, working one at a time.
Phase 5: Final Freeze and Storing
- Firm Up: Freeze the assembled and wrapped mochi ice cream balls for at least 1-2 hours to allow the mochi to firm up around the ice cream and ensure everything is frozen solid again.
- Store: Once fully frozen, transfer the individually wrapped mochi ice cream balls to a freezer-safe airtight container or freezer bag for longer storage.
- Enjoy: See “How to Serve” for tips on eating!
Nutrition
- Serving Size: one normal portion
- Calories: 100 – 200


