

There are certain dishes that are more than just food; they are a feeling, a memory, a warm hug in a 9×13-inch pan. For anyone who grew up in Minnesota, Tater Tot Hotdish is the undisputed king of that category. I can still smell the aroma filling our small kitchen on a Tuesday night after hockey practice, the sound of the oven door opening signaling that dinner was almost ready. It was the dish my mom brought to every potluck, the meal that showed up on a neighbor’s doorstep after a new baby was born, and the ultimate comfort food on a dark, frigid January evening. It’s unpretentious, unassuming, and unapologetically delicious. My friends from other states would call it a “casserole,” and we’d good-naturedly correct them—no, this is hotdish. It represents a kind of practical, Midwestern love: hearty, dependable, and guaranteed to make you feel better. Making it for my own family now feels like passing down a cherished heirloom, a taste of home that warms you from the inside out.
The Authentic Minnesota Tater Tot Hotdish: A Step-by-Step Guide to Comfort
Tater Tot Hotdish is a culinary cornerstone of the Upper Midwest. It’s a layered masterpiece that combines a savory ground beef and vegetable base with a creamy, rich sauce, all topped with a golden, crispy blanket of Tater Tots. While countless variations exist, this recipe holds true to the classic, no-fuss version that has graced Minnesota dinner tables for generations. It’s simple, satisfying, and the very definition of comfort food.
Yields: 8-10 servings
Prep time: 15 minutes
Cook time: 50-60 minutes
Ingredients: The Anatomy of a Classic Hotdish
The beauty of Tater Tot Hotdish lies in its accessible, pantry-friendly ingredients. This is not the time for fancy, artisanal products; it’s a celebration of dependable, workhorse staples.
- Ground Beef: 1.5 lbs lean ground beef (85/15 is a good choice).
- Onion: 1 medium yellow onion, finely chopped.
- Cream of Mushroom Soup: 2 (10.5-ounce) cans of condensed cream of mushroom soup. This is the traditional, non-negotiable binder.
- Milk: ½ cup of whole milk or evaporated milk for a richer sauce.
- Worcestershire Sauce: 1 tablespoon. This is the secret ingredient that adds a deep, savory, umami flavor.
- Soy Sauce: 1 teaspoon. Another umami-booster that complements the beef and Worcestershire sauce.
- Frozen Vegetables: 1 (16-ounce) bag of frozen mixed vegetables (typically a corn, green bean, pea, and carrot mix). No need to thaw. Canned green beans are also a very traditional choice.
- Frozen Tater Tots: 1 (28 to 32-ounce) bag of frozen Tater Tots.
- Shredded Cheese: 2 cups of shredded sharp cheddar or Colby Jack cheese.
- Seasoning: 1 teaspoon fine sea salt and ½ teaspoon black pepper, or to taste.
Ingredient Notes & Authentic Variations:
- The Soup: While cream of mushroom is the gold standard, some families swear by cream of chicken, cream of celery, or even a can of condensed cheddar cheese soup. For a “from-scratch” feel, you can make your own cream sauce (see tips section).
- The Vegetables: The classic recipe often uses canned green beans (drained well) instead of a frozen mix. A bag of frozen corn or frozen green beans also works perfectly. The key is convenience and simplicity.
- The Beef: You can substitute ground turkey or even ground venison for a different flavor profile. Just make sure to drain any excess fat well.
Instructions: Building Your Hotdish Layer by Layer
The construction of a hotdish is a time-honored process. Each layer has its purpose, culminating in the perfect, harmonious bite.
Step 1: Preheat and Prepare
- Preheat your oven to 375°F (190°C).
- Lightly grease a 9×13-inch baking dish or a 3-quart casserole dish.
Step 2: Brown the Beef and Onions
- In a large skillet or Dutch oven, cook the chopped yellow onion over medium heat for 3-4 minutes until it begins to soften and become translucent.
- Add the ground beef to the skillet with the onions. Use a spatula to break the meat apart. Cook until the beef is thoroughly browned and no pink remains, about 8-10 minutes.
- Drain the beef and onion mixture very well to remove any excess grease. This is a crucial step to prevent a greasy hotdish. Return the drained meat to the skillet.
Step 3: Create the Creamy Base
- To the skillet with the browned beef, add the two cans of condensed cream of mushroom soup, milk, Worcestershire sauce, soy sauce, salt, and pepper.
- Stir everything together over low heat until the soup is smooth and all the ingredients are well combined. Let it gently heat through for about 2 minutes. This creates the savory, creamy “gravy” that binds the hotdish together.
Step 4: Assemble the Hotdish Layers
This is where the magic happens. The order of the layers is part of the tradition.
- Meat Layer: Pour the creamy ground beef mixture into the bottom of your prepared 9×13-inch baking dish and spread it into an even layer.
- Vegetable Layer: Pour the bag of frozen mixed vegetables (or your vegetable of choice) directly over the meat layer. Gently spread them out to cover the entire surface. There is no need to thaw the vegetables first; they will cook perfectly in the oven.
- Cheese Layer: Sprinkle 1.5 cups of the shredded cheese evenly over the vegetable layer, reserving the last ½ cup for the very end.
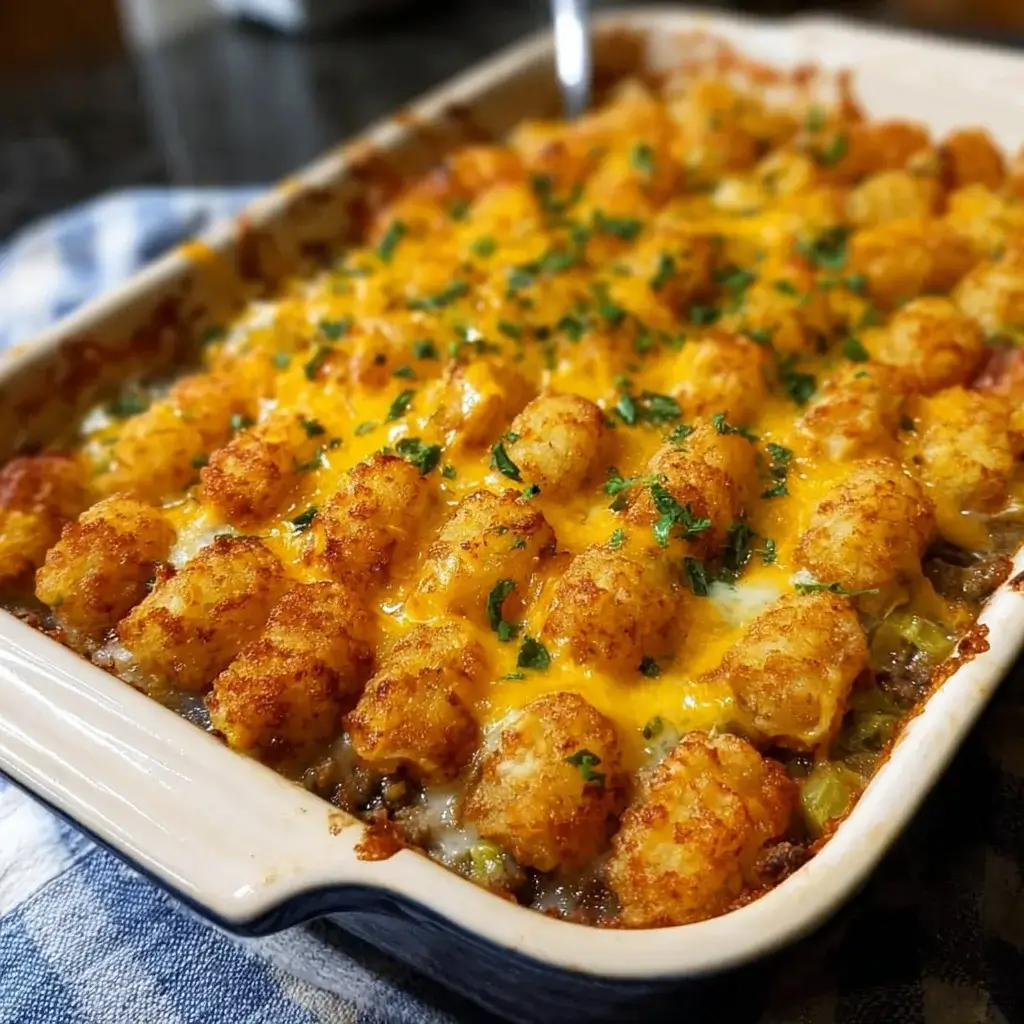
- Tater Tot Topping: This is the crowning glory. Carefully arrange the frozen Tater Tots on top of the cheese layer. For the most authentic and visually pleasing hotdish, arrange them in neat, straight rows. This ensures maximum crispiness and a beautiful presentation. If you’re in a hurry, you can simply dump and spread them, but the rows are a hallmark of a carefully made hotdish.
Step 5: Bake to Golden Perfection
- Place the assembled hotdish in the preheated oven.
- Bake, uncovered, for 40-50 minutes. The hotdish is done when the sauce is bubbling up around the edges and the Tater Tots are a deep golden brown and crispy.
- During the last 5 minutes of baking, sprinkle the remaining ½ cup of shredded cheese over the top of the Tater Tots. Return to the oven just long enough for the cheese to melt and become bubbly.
Step 6: Rest and Serve
- Remove the hotdish from the oven and let it rest on a wire rack for at least 10 minutes before serving. This allows the creamy sauce to set up slightly, making it easier to serve.
- Serve hot, scooping generous portions onto each plate.
Nutrition Facts
- Servings: 8-10 generous servings
- Calories per serving: Approximately 550-700 kcal (This is an estimate and will vary based on the leanness of the beef, type of cheese, and other specific ingredients used.)
Preparation Time
- Total Time: Approximately 1 hour 15 minutes
- Active Preparation: 15 minutes
- Baking & Resting Time: 60 minutes
How to Serve Minnesota Tater Tot Hotdish
Serving Tater Tot Hotdish is as much a part of the tradition as making it. It’s all about simple, comforting accompaniments.
- Straight from the Pan: The hotdish is its own serving vessel. Place the hot 9×13-inch pan on a trivet right in the center of the dinner table and let everyone serve themselves.
- Classic Midwestern Side Dishes:
- A Simple Salad: An iceberg lettuce salad with sliced cucumbers, tomatoes, and a bottle of French or Ranch dressing is the perfect crisp, cool contrast.
- Bread and Butter: Slices of plain white or wheat bread with butter are essential for sopping up any extra creamy sauce on the plate.
- Pickles: A dish of dill or sweet bread-and-butter pickles on the side adds a wonderful tangy crunch.
- Applesauce: A scoop of cold applesauce is another classic pairing that provides a sweet and tangy counterpoint to the savory hotdish.
- Jell-O Salad: For the ultimate potluck experience, serve it alongside a classic Midwestern Jell-O salad (the kind with fruit cocktail and a creamy topping).
- At a Potluck or Gathering:
- Tater Tot Hotdish is the star of any potluck line.
- It travels well. Just cover it with foil after baking to keep it warm on the way.
- Leave a large serving spoon in the dish and let guests scoop their own portions. It’s meant to be a communal, shared experience.
Additional Tips for the Perfect Hotdish
- Achieve Peak Tater Tot Crispiness: The key to a truly great hotdish is the contrast between the creamy interior and the crispy topping. Arranging the tots in neat rows maximizes the surface area exposed to the oven’s heat. For an extra-crispy finish, you can switch the oven to the broil setting for the last 1-2 minutes of cooking. Watch it like a hawk to prevent burning!
- The “From Scratch” Cream Sauce Upgrade: If you’re not a fan of canned soup, you can easily make your own cream sauce. Melt 4 tablespoons of butter in a saucepan, whisk in ¼ cup of all-purpose flour, and cook for one minute to make a roux. Slowly whisk in 2 cups of milk and 1 cup of beef or mushroom broth. Add sautéed mushrooms and season with salt, pepper, and onion powder. Simmer until thickened, and use this in place of the condensed soup and milk.
- The Make-Ahead and Freezer-Friendly Guide: Tater Tot Hotdish is a perfect make-ahead meal.
- To Refrigerate: Assemble the entire hotdish without the Tater Tots. Cover tightly and refrigerate for up to 2 days. When ready to bake, add the frozen Tater Tots on top and increase the baking time by 10-15 minutes.
- To Freeze: Assemble the entire hotdish, including the Tater Tots, in a freezer-safe dish. Wrap it tightly in two layers of plastic wrap and a layer of aluminum foil. It can be frozen for up to 3 months. To bake, do not thaw. Remove the plastic wrap, cover with foil, and bake at 375°F for 60 minutes. Then, remove the foil and bake for another 20-30 minutes, or until the tots are golden and the center is hot and bubbly.
- Don’t Be Afraid to Season: The canned soup and frozen vegetables can be bland on their own. Be sure to season the ground beef layer generously. The Worcestershire and soy sauce are critical for adding depth, but don’t shy away from tasting and adjusting the salt and pepper in the cream sauce before you assemble the layers.
- Give it a Rest: This might be the hardest step, but it’s important. Letting the hotdish rest for 10-15 minutes after it comes out of the oven is crucial. It allows the molten-hot filling to cool slightly and set up, preventing it from turning into a soupy mess on the plate. It will still be plenty hot and much easier to serve in neat squares.
Frequently Asked Questions (FAQ)
1. What is the real difference between a “hotdish” and a “casserole”?
This is the great debate of the Midwest! While technically all hotdishes are casseroles, not all casseroles are hotdishes. In Minnesota, a “hotdish” generally follows a formula: a protein (like ground beef), a vegetable, a creamy binder (usually a canned “cream of” soup), and a starchy topping (like Tater Tots, chow mein noodles, or rice). Casserole is a more general term. Calling it a hotdish is a nod to its specific Midwestern identity and heritage.
2. Why did my Tater Tot Hotdish turn out watery or greasy?
This is a common issue with two main causes. Grease: It is absolutely essential to drain the ground beef very thoroughly after browning. Any fat left in the pan will pool at the bottom of your dish. Water: The culprit is usually the vegetables. If you use canned vegetables, they must be drained very well. If you use frozen vegetables, do not thaw them first. Thawing them releases water, which will make your sauce soupy. Pour them straight from the bag onto the meat layer.
3. Can I make a vegetarian Tater Tot Hotdish?
Yes, you can easily adapt this recipe. For a vegetarian version, substitute the ground beef with 1.5 lbs of sautéed mushrooms and lentils, or use a plant-based ground “meat” crumble. Ensure you use a vegetarian-friendly “cream of” soup or make a from-scratch cream sauce using vegetable broth instead of beef broth. The rest of the recipe remains the same and is equally delicious.
4. What’s the best way to reheat leftovers?
The best way to reheat Tater Tot Hotdish and retain the crispy top is in the oven or an air fryer. Place a portion in an oven-safe dish and heat at 350°F for 15-20 minutes, or until heated through. The microwave works in a pinch, but be warned: it will make the Tater Tots soft, not crispy.
5. Can I leave the cheese out?
You can, but it’s a key component for many families! The cheese adds flavor, richness, and helps create a barrier that keeps the tots from getting too soggy from the steam below. The final sprinkle of cheese on top creates that classic, gooey “cheese pull.” If you need a dairy-free version, you can omit it or use a dairy-free cheese substitute.

Minnesota Tater Tot Hotdish recipe
Ingredients
-
Ground Beef: 1.5 lbs lean ground beef (85/15 is a good choice).
-
Onion: 1 medium yellow onion, finely chopped.
-
Cream of Mushroom Soup: 2 (10.5-ounce) cans of condensed cream of mushroom soup. This is the traditional, non-negotiable binder.
-
Milk: ½ cup of whole milk or evaporated milk for a richer sauce.
-
Worcestershire Sauce: 1 tablespoon. This is the secret ingredient that adds a deep, savory, umami flavor.
-
Soy Sauce: 1 teaspoon. Another umami-booster that complements the beef and Worcestershire sauce.
-
Frozen Vegetables: 1 (16-ounce) bag of frozen mixed vegetables (typically a corn, green bean, pea, and carrot mix). No need to thaw. Canned green beans are also a very traditional choice.
-
Frozen Tater Tots: 1 (28 to 32-ounce) bag of frozen Tater Tots.
-
Shredded Cheese: 2 cups of shredded sharp cheddar or Colby Jack cheese.
-
Seasoning: 1 teaspoon fine sea salt and ½ teaspoon black pepper, or to taste.
Instructions
Step 1: Preheat and Prepare
-
Preheat your oven to 375°F (190°C).
-
Lightly grease a 9×13-inch baking dish or a 3-quart casserole dish.
Step 2: Brown the Beef and Onions
-
In a large skillet or Dutch oven, cook the chopped yellow onion over medium heat for 3-4 minutes until it begins to soften and become translucent.
-
Add the ground beef to the skillet with the onions. Use a spatula to break the meat apart. Cook until the beef is thoroughly browned and no pink remains, about 8-10 minutes.
-
Drain the beef and onion mixture very well to remove any excess grease. This is a crucial step to prevent a greasy hotdish. Return the drained meat to the skillet.
Step 3: Create the Creamy Base
-
To the skillet with the browned beef, add the two cans of condensed cream of mushroom soup, milk, Worcestershire sauce, soy sauce, salt, and pepper.
-
Stir everything together over low heat until the soup is smooth and all the ingredients are well combined. Let it gently heat through for about 2 minutes. This creates the savory, creamy “gravy” that binds the hotdish together.
Step 4: Assemble the Hotdish Layers
This is where the magic happens. The order of the layers is part of the tradition.
-
Meat Layer: Pour the creamy ground beef mixture into the bottom of your prepared 9×13-inch baking dish and spread it into an even layer.
-
Vegetable Layer: Pour the bag of frozen mixed vegetables (or your vegetable of choice) directly over the meat layer. Gently spread them out to cover the entire surface. There is no need to thaw the vegetables first; they will cook perfectly in the oven.
-
Cheese Layer: Sprinkle 1.5 cups of the shredded cheese evenly over the vegetable layer, reserving the last ½ cup for the very end.
-
Tater Tot Topping: This is the crowning glory. Carefully arrange the frozen Tater Tots on top of the cheese layer. For the most authentic and visually pleasing hotdish, arrange them in neat, straight rows. This ensures maximum crispiness and a beautiful presentation. If you’re in a hurry, you can simply dump and spread them, but the rows are a hallmark of a carefully made hotdish.
Step 5: Bake to Golden Perfection
-
Place the assembled hotdish in the preheated oven.
-
Bake, uncovered, for 40-50 minutes. The hotdish is done when the sauce is bubbling up around the edges and the Tater Tots are a deep golden brown and crispy.
-
During the last 5 minutes of baking, sprinkle the remaining ½ cup of shredded cheese over the top of the Tater Tots. Return to the oven just long enough for the cheese to melt and become bubbly.
Step 6: Rest and Serve
-
Remove the hotdish from the oven and let it rest on a wire rack for at least 10 minutes before serving. This allows the creamy sauce to set up slightly, making it easier to serve.
-
Serve hot, scooping generous portions onto each plate.
Nutrition
- Serving Size: one normal portion
- Calories: 550-700 kcal


