

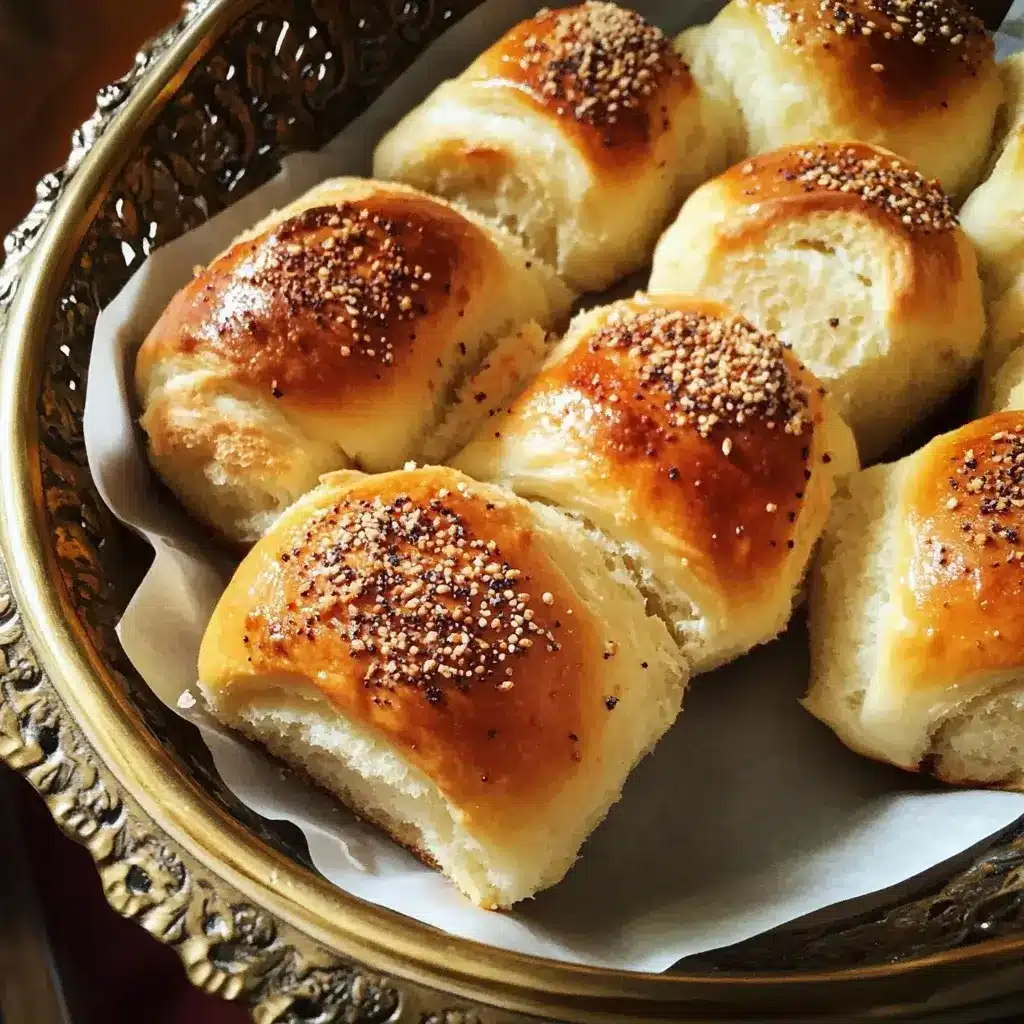

There’s nothing quite like the aroma of freshly baked bread wafting through the house, especially when it’s the soft, pillowy goodness of homemade yeast rolls. For years, the thought of making yeast rolls from scratch felt daunting – a project reserved for seasoned bakers. But all that changed when I discovered the magic of make-ahead yeast rolls. Suddenly, the dream of serving warm, homemade rolls with dinner became a delightful reality, not a stressful undertaking. What I adore most about this recipe is the sheer convenience. The dough can be prepared well in advance, even days ahead, and then baked off whenever you need them. This is a game-changer, especially during busy holidays or for dinner parties when time is precious. My family absolutely adores these rolls. They are incredibly soft, slightly sweet, and have that perfect melt-in-your-mouth texture that only homemade yeast rolls can deliver. From Thanksgiving feasts to simple weeknight dinners, these make-ahead rolls have become a staple in our kitchen. They eliminate the last-minute rush and allow me to enjoy the process of baking without the pressure. If you’ve ever been hesitant to try baking yeast rolls, this recipe is your answer. Get ready to experience the joy of effortlessly serving warm, fresh-from-the-oven rolls, anytime you desire!
Ingredients for the Perfect Make-Ahead Yeast Rolls
Crafting the perfect make-ahead yeast rolls relies on a balance of simple, quality ingredients and precise measurements. These ingredients work together to create rolls that are incredibly soft, flavorful, and have that classic yeast roll texture. Here’s what you’ll need to bake a batch of these delightful make-ahead yeast rolls:
- Active Dry Yeast: 2 ¼ teaspoons (1 packet). Yeast is the leavening agent that makes these rolls light and airy. Active dry yeast is readily available and reliable. Ensure your yeast is fresh; expired yeast may not activate properly, resulting in dense rolls. You can also use instant yeast (also called rapid-rise yeast) in the same quantity, but the proofing method might slightly differ (instant yeast often doesn’t require proofing, but proofing is still recommended for this recipe to ensure activation).
- Warm Water: ½ cup (105-115°F). Warm water is essential for activating the active dry yeast. The temperature is crucial; too cold and the yeast won’t activate, too hot and it will kill the yeast. Use a thermometer to ensure the water is within the optimal temperature range. If you don’t have a thermometer, the water should feel comfortably warm to the touch, like bathwater.
- Warm Milk: 1 cup (whole milk or 2% milk, warmed to 105-115°F). Warm milk adds richness, flavor, and tenderness to the rolls. Whole milk will result in richer rolls, but 2% milk works well too. Warming the milk to the same temperature as the water helps maintain the optimal temperature for yeast activation when combined. You can warm milk in a saucepan on low heat or in the microwave in short intervals, stirring occasionally, until it reaches the desired temperature.
- Granulated Sugar: ¼ cup. Sugar provides food for the yeast to activate and contributes to the sweetness and browning of the rolls. Granulated sugar dissolves easily and provides a clean sweetness. You can adjust the amount of sugar slightly depending on your preference for sweetness.
- Salt: 1 ½ teaspoons. Salt is crucial for controlling yeast activity and enhancing the flavor of the rolls. Salt prevents the yeast from rising too quickly and gives the rolls a balanced, savory-sweet flavor. Use table salt or fine sea salt.
- Unsalted Butter, Melted and Cooled: ¼ cup (4 tablespoons). Melted butter adds richness, flavor, and tenderness to the rolls. Using unsalted butter allows you to control the overall saltiness of the recipe. Melt the butter and let it cool slightly before adding it to the dough. Hot butter can kill the yeast.
- Large Egg: 1. An egg adds richness, structure, and color to the rolls. Use a large egg at room temperature for best incorporation into the dough. The egg contributes to the soft and slightly chewy texture of the rolls.
- All-Purpose Flour: 4 ½ – 5 cups (plus more for dusting). All-purpose flour is the base of the rolls, providing structure and gluten development. The amount of flour can vary slightly depending on humidity and the exact type of flour used. Start with 4 ½ cups and add more gradually, as needed, until the dough reaches the desired consistency (slightly sticky but manageable). Using too much flour will result in dry, dense rolls. Measure flour correctly by spooning it into measuring cups and leveling off the top, rather than scooping directly from the bag.
- Melted Butter for Brushing (Optional): 2 tablespoons. Melted butter brushed over the rolls before baking and after baking adds extra flavor, richness, and a beautiful golden-brown sheen. This step is optional but highly recommended for enhancing the overall flavor and appearance of the rolls.
Optional Ingredients for Flavor Variations:
- Honey or Maple Syrup: Substitute some of the granulated sugar with honey or maple syrup for a slightly different sweetness and flavor profile. Use about 2-3 tablespoons of honey or maple syrup.
- Herbs: Add 1-2 tablespoons of finely chopped fresh herbs like rosemary, thyme, or parsley to the dough for savory herb rolls.
- Garlic Powder or Onion Powder: Add 1-2 teaspoons of garlic powder or onion powder to the dough for savory garlic or onion rolls.
- Cheese: Add ½ cup of shredded cheese (cheddar, Parmesan, etc.) to the dough for cheesy rolls.
- Cinnamon and Sugar: For sweet rolls, add 1 teaspoon of cinnamon and increase sugar to ½ cup. You can also add a swirl of cinnamon-sugar filling before shaping the rolls.
Step-by-Step Instructions for Make-Ahead Yeast Rolls
Making make-ahead yeast rolls is a rewarding process, and while it involves several steps, each step is straightforward. Follow these detailed instructions to bake a batch of soft, delicious rolls:
Step 1: Proof the Yeast
- In a large bowl or the bowl of a stand mixer, combine the warm water and active dry yeast.
- Let it stand for 5-10 minutes, or until the yeast is foamy and bubbly. This step, called “proofing,” ensures that the yeast is active and will leaven the dough properly. If the yeast doesn’t foam, it may be old or inactive, and you should start with fresh yeast.
Step 2: Combine Wet Ingredients
- To the yeast mixture, add the warm milk, granulated sugar, salt, melted and cooled butter, and egg.
- Whisk or stir well to combine all the wet ingredients.
Step 3: Gradually Add Flour and Knead Dough
- Gradually add the all-purpose flour, starting with 4 ½ cups. Add the flour in ½ cup increments, mixing after each addition.
- If using a stand mixer, use the dough hook and mix on low speed until the dough comes together.
- If mixing by hand, use a wooden spoon or your hands to mix until the dough comes together.
- Once the dough comes together, increase the speed of the stand mixer to medium-low and knead for 6-8 minutes, or knead by hand on a lightly floured surface for 8-10 minutes. The dough should be smooth, elastic, and slightly sticky to the touch. If the dough is too sticky, add a little more flour, 1 tablespoon at a time, until it is manageable. Avoid adding too much flour, as this will make the rolls dry.
Step 4: First Rise (Bulk Fermentation)
- Place the dough in a large, lightly greased bowl. Turn the dough to coat it lightly with grease.
- Cover the bowl with plastic wrap or a clean kitchen towel.
- Let the dough rise in a warm place for 1-1 ½ hours, or until doubled in size. The rising time can vary depending on the temperature of your kitchen. A warm place (75-80°F) is ideal for yeast activity. You can place the bowl in a slightly warmed oven (turned off), a warm spot in your kitchen, or use the “proof” setting on some ovens.
Step 5: Punch Down Dough and Shape Rolls
- Once the dough has doubled in size, gently punch it down to release the air.
- Turn the dough out onto a lightly floured surface.
- Divide the dough into 12-15 equal pieces. You can use a kitchen scale for accuracy if desired.
- Shape each piece of dough into a smooth round roll by gently tucking the edges underneath and rolling it between your palms. You can also shape them into knots or other desired shapes.
Step 6: Second Rise (Proofing)
- Grease a 9×13 inch baking pan or a similar-sized baking dish.
- Arrange the shaped rolls in the prepared baking pan, leaving a little space between each roll for expansion.
- Cover the pan loosely with plastic wrap or a clean kitchen towel.
- Let the rolls rise in a warm place for 30-45 minutes, or until they are puffy and almost doubled in size. They should be noticeably softer and lighter than before the second rise.
Step 7: Bake the Rolls
- Preheat oven to 375°F (190°C).
- If desired, brush the tops of the rolls with melted butter before baking. This will give them a golden-brown color and richer flavor.
- Bake for 18-22 minutes, or until the rolls are golden brown on top and sound hollow when tapped lightly on the bottom. Baking time can vary slightly depending on your oven. Keep an eye on them to prevent over-browning.
Step 8: Cool and Serve
- Remove the rolls from the oven and let them cool in the pan for a few minutes.
- If desired, brush the tops of the hot rolls with more melted butter for extra richness and shine.
- Transfer the rolls to a wire rack to cool slightly before serving.
- Serve warm and enjoy!
Make-Ahead Instructions (Refrigeration or Freezing):
- Refrigerate Dough for Baking Later: After Step 5 (shaping the rolls), instead of proceeding with Step 6 (second rise), you can cover the pan of shaped rolls tightly with plastic wrap and refrigerate for up to 24-48 hours. When ready to bake, remove the pan from the refrigerator and let the rolls rise at room temperature for about 1-1 ½ hours, or until puffy and almost doubled in size. Then proceed with Step 7 (baking).
- Freeze Unbaked Rolls: After Step 5 (shaping the rolls), place the pan of shaped rolls in the freezer until frozen solid, about 2-3 hours. Once frozen, transfer the rolls to a freezer-safe bag or container. Freeze for up to 2-3 months. To bake from frozen, place the frozen rolls in a greased baking pan, cover loosely, and let them thaw and rise at room temperature for 3-5 hours, or overnight in the refrigerator. They should be puffy and almost doubled in size. Then proceed with Step 7 (baking).
- Freeze Baked Rolls: Bake the rolls completely as directed. Let them cool completely. Wrap them tightly in plastic wrap and then in foil or place them in a freezer-safe bag or container. Freeze for up to 2-3 months. To reheat, thaw at room temperature or in the refrigerator. Reheat in a 350°F (175°C) oven for 10-15 minutes, or until warmed through. You can also reheat in the microwave in short intervals.
Nutrition Facts for Make-Ahead Yeast Rolls
Make-Ahead Yeast Rolls are a delicious treat, but like most breads, they are primarily carbohydrate-based. Here’s an estimated nutritional breakdown per roll. Please note that these values are approximate and can vary depending on the specific ingredients used, roll size, and variations in the recipe.
Serving Size: 1 roll (recipe makes 12-15 rolls)
Approximate Nutrition Facts Per Roll (based on 12 rolls per batch):
- Calories: 180-220 calories
- Total Fat: 6-8 grams
- Saturated Fat: 3-4 grams (primarily from butter and milk)
- Trans Fat: 0 grams
- Monounsaturated Fat: Varies
- Polyunsaturated Fat: Varies
- Cholesterol: 20-30 mg
- Sodium: 150-200 mg
- Total Carbohydrates: 25-30 grams
- Dietary Fiber: 1-2 grams
- Sugars: 4-6 grams (naturally occurring and added sugar)
- Protein: 4-5 grams
- Vitamins and Minerals: Small amounts of iron, calcium, and B vitamins.
Important Notes:
- Carbohydrate Content: The primary macronutrient in these rolls is carbohydrates, mainly from flour and sugar. Be mindful of carbohydrate intake if you are watching your carbohydrate consumption.
- Fat Content: The rolls contain a moderate amount of fat from butter and milk, contributing to their tenderness and flavor.
- Calorie Content: The calorie count per roll is moderate. Be mindful of portion sizes, especially when serving with butter or other toppings.
- Nutrient Density: While not a significant source of vitamins and minerals, these rolls do provide some fiber, protein, and trace amounts of micronutrients.
- Homemade vs. Store-Bought: Homemade yeast rolls generally have fewer preservatives and additives compared to store-bought rolls.
Disclaimer: These nutrition facts are estimates and should be considered as general guidelines. For precise nutritional information, you can use online nutrition calculators, but remember that homemade recipes can vary.
Preparation Time for Make-Ahead Yeast Rolls
Making Make-Ahead Yeast Rolls involves several steps, but the make-ahead aspect allows you to break up the preparation over time. Here’s a breakdown of the approximate preparation time:
- Prep Time: 30-40 minutes. This includes:
- Proofing yeast (5-10 minutes)
- Combining wet ingredients (5 minutes)
- Mixing and kneading dough (15-20 minutes)
- Shaping rolls (5-10 minutes)
- First Rise (Bulk Fermentation): 1- 1 ½ hours. Inactive rising time.
- Second Rise (Proofing): 30-45 minutes. Inactive rising time.
- Bake Time: 18-22 minutes.
- Cooling Time: 10-15 minutes.
Total Active Time: Approximately 50-65 minutes.
Total Inactive Time (Rising): Approximately 1 hour 30 minutes – 2 hours 15 minutes.
Total Time (including rising and baking): Approximately 2 hours 20 minutes – 3 hours 22 minutes.
Make-Ahead Advantage: The beauty of make-ahead yeast rolls is that you can prepare the dough and shape the rolls ahead of time. You can refrigerate the shaped rolls for up to 48 hours or freeze them for up to 3 months. This significantly reduces the active time on the day you want to bake and serve the rolls. For example, you can prepare the dough and shape the rolls one day, refrigerate them overnight, and then bake them fresh the next day.
How to Serve Make-Ahead Yeast Rolls
Make-Ahead Yeast Rolls are incredibly versatile and can be served in numerous ways, making them perfect for any meal or occasion. Here are some delicious serving suggestions:
- Classic Dinner Rolls:
- Serve warm with butter, jam, or honey alongside any dinner.
- Perfect accompaniment to soups, stews, salads, roasted meats, and pasta dishes.
- Elevate weeknight meals or special occasion dinners with these homemade rolls.
- Holiday Rolls:
- A must-have for holiday feasts like Thanksgiving, Christmas, and Easter.
- Impress your guests with freshly baked, soft rolls that complement holiday meals perfectly.
- Make-ahead nature is especially helpful during busy holiday cooking.
- Sandwich Rolls or Sliders:
- Use slightly larger rolls to make delicious sandwiches or sliders.
- Fill with deli meats, cheeses, pulled pork, BBQ chicken, or burger patties.
- Perfect for lunch, light dinners, or party appetizers.
- Breakfast or Brunch Rolls:
- Serve warm for breakfast or brunch with butter, cream cheese, or fruit preserves.
- Pair with eggs, bacon, sausage, or yogurt for a complete breakfast.
- Enjoy with coffee, tea, or juice.
- Garlic Knots or Herb Rolls:
- Brush warm rolls with garlic butter or herb butter (melted butter mixed with minced garlic or fresh herbs like parsley, rosemary, thyme).
- Serve as flavorful appetizers or side dishes.
- Enhance the savory profile of the rolls.
- Sweet Rolls (with Variations):
- Adapt the dough for sweet rolls by increasing sugar and adding cinnamon.
- Fill with cinnamon-sugar mixture, cream cheese filling, or fruit fillings before shaping.
- Top with glaze or frosting after baking for a sweet treat.
- Serving Presentation Ideas:
- Bread Basket: Arrange warm rolls in a pretty bread basket lined with a cloth napkin for an inviting presentation.
- Stacked on a Plate: Stack rolls attractively on a serving plate for a rustic look.
- Individual Plates: Place a warm roll on each plate as a thoughtful touch for individual servings.
- Serve with Flavored Butters: Offer a variety of flavored butters (herb butter, garlic butter, honey butter, cinnamon butter) alongside the rolls for guests to choose from.
- Keep Warm in a Warmer: Use a bread warmer or a low oven to keep rolls warm if serving over an extended period.
Additional Tips for the Best Make-Ahead Yeast Rolls
To ensure your Make-Ahead Yeast Rolls are consistently soft, fluffy, and delicious, here are five essential tips:
- Use Fresh and Active Yeast: Yeast is a living organism, and its freshness and activity are crucial for successful yeast rolls. Always check the expiration date on your yeast package. If you are unsure about the yeast’s activity, proof it in warm water with a pinch of sugar as instructed in Step 1 of the recipe. If it doesn’t become foamy and bubbly within 5-10 minutes, it’s best to use fresh yeast. Storing yeast properly in an airtight container in a cool, dry place will help maintain its freshness and activity for longer.
- Don’t Overheat Liquids (Water and Milk): While warm liquids are necessary to activate yeast and create a favorable environment for dough development, overheating the water or milk can kill the yeast. Always use a thermometer to ensure the water and milk are within the optimal temperature range of 105-115°F (40-46°C). If you don’t have a thermometer, the liquids should feel comfortably warm to the touch, like bathwater, but not hot. Overheated liquids will destroy the yeast and prevent your rolls from rising properly.
- Measure Flour Correctly and Don’t Over-Flour: Accurate flour measurement is important in baking, especially for yeast breads. Too much flour will result in dry, dense rolls, while too little flour can make the dough too sticky and difficult to handle. Measure flour correctly by spooning it lightly into measuring cups and leveling off the top with a straight edge, rather than scooping directly from the bag. Scooping can compact the flour and result in using more flour than intended. Start with the lower end of the flour range (4 ½ cups) in the recipe and add more gradually, only if needed, until the dough reaches the desired consistency – slightly sticky but manageable.
- Allow Sufficient Rising Time in a Warm Place: Yeast rolls need adequate time to rise, both for the first rise (bulk fermentation) and the second rise (proofing). Rising time can vary depending on the temperature of your kitchen. A warm place (75-80°F or 24-27°C) is ideal for yeast activity. In a cooler kitchen, rising may take longer. Ensure you let the dough rise until it has doubled in size for the first rise and until the shaped rolls are puffy and almost doubled for the second rise. Under-proofing will result in dense rolls, while over-proofing can lead to collapsed rolls. A warm, draft-free environment is key for successful rising.
- Don’t Overbake the Rolls: Overbaking yeast rolls can make them dry and tough. Bake the rolls until they are golden brown on top and sound hollow when tapped lightly on the bottom. Baking time in the recipe is a guideline, and oven temperatures can vary. Start checking for doneness around 18 minutes and adjust baking time as needed. Remove the rolls from the oven as soon as they are done to prevent overbaking. Brushing the tops with melted butter before baking helps them brown beautifully and adds flavor, but also keep an eye on them to prevent over-browning.
Frequently Asked Questions (FAQ) About Make-Ahead Yeast Rolls
Here are some common questions people ask about making and enjoying Make-Ahead Yeast Rolls:
Q1: Can I use instant yeast instead of active dry yeast?
A: Yes, you can use instant yeast (also called rapid-rise yeast) instead of active dry yeast in this recipe. The amount remains the same: 2 ¼ teaspoons (1 packet). With instant yeast, you can typically skip the proofing step (Step 1) and add the instant yeast directly to the dry ingredients or with the wet ingredients. However, for this recipe, proofing the instant yeast is still recommended to ensure it’s active and to give you visual confirmation that it’s working. The rising times for the dough and shaped rolls should remain similar when using instant yeast.
Q2: Can I make these rolls gluten-free?
A: Adapting this recipe to be gluten-free would require significant modifications and likely a different blend of gluten-free flours and binders. All-purpose flour is essential for the structure of traditional yeast rolls due to gluten development. While it’s challenging to achieve the exact same texture and rise with gluten-free ingredients, there are many gluten-free yeast roll recipes available online that are specifically formulated for gluten-free baking. Searching for “gluten-free yeast rolls recipe” will provide you with recipes tailored for gluten-free baking.
Q3: Can I make these rolls dairy-free or vegan?
A: Yes, you can make these rolls dairy-free or vegan with some substitutions.
- Dairy-Free: Substitute the milk with a plant-based milk alternative like almond milk, soy milk, oat milk, or coconut milk (canned coconut milk might add a slight coconut flavor). Ensure the plant-based milk is warmed to the same temperature as cow’s milk. Substitute the butter with a plant-based butter alternative (vegan butter sticks) or melted coconut oil.
- Vegan: In addition to the dairy-free substitutions, replace the egg with a flax egg or commercially available egg replacer. To make a flax egg, mix 1 tablespoon of ground flaxseed meal with 3 tablespoons of warm water and let it sit for 5 minutes to thicken.
These substitutions can alter the texture and flavor slightly, but you can still achieve delicious dairy-free or vegan yeast rolls.
Q4: My dough didn’t rise. What went wrong?
A: There are several reasons why yeast dough might not rise properly:
- Yeast was inactive: Expired yeast or yeast that wasn’t stored properly may not be active. Always check the expiration date and proof the yeast to ensure it’s bubbly before using.
- Liquids were too hot or too cold: Overheated liquids can kill yeast, while liquids that are too cold may not activate it. Use a thermometer to ensure liquids are in the 105-115°F range.
- Kitchen was too cold: Yeast rises best in a warm environment (75-80°F). If your kitchen is too cold, find a warmer place for rising, such as a slightly warmed oven (turned off) or a warm spot in your house.
- Too much salt: Excessive salt can inhibit yeast activity. Ensure you are measuring salt accurately.
- Not enough kneading: Kneading develops gluten, which provides structure for the dough to rise. Ensure you knead the dough for the recommended time.
Troubleshooting these factors can help ensure successful dough rising in the future.
Q5: How do I reheat leftover yeast rolls and keep them soft?
A: To reheat leftover yeast rolls and keep them soft, follow these methods:
- Oven Reheating: Wrap the rolls loosely in foil and reheat in a preheated oven at 350°F (175°C) for 10-15 minutes, or until warmed through. The foil helps retain moisture and prevent them from drying out.
- Microwave Reheating (Quick but Can Be Less Soft): Microwave individual rolls in short intervals (10-20 seconds) until warmed through. Microwaving can sometimes make them slightly less soft compared to oven reheating. Wrap them in a damp paper towel while microwaving to help retain moisture.
- Steaming Method: Place rolls in a steamer basket over simmering water for a few minutes until warmed through. This method helps to re-moisturize the rolls and keep them soft.
Avoid over-reheating, as this can make the rolls dry or tough. Reheated rolls are best enjoyed soon after reheating.
Enjoy the delightful process of baking and sharing your homemade Make-Ahead Yeast Rolls! They are sure to become a cherished addition to your meals and gatherings.
Print
Make-Ahead Yeast Rolls recipe
Ingredients
-
- Active Dry Yeast: 2 ¼ teaspoons (1 packet). Yeast is the leavening agent that makes these rolls light and airy. Active dry yeast is readily available and reliable. Ensure your yeast is fresh; expired yeast may not activate properly, resulting in dense rolls. You can also use instant yeast (also called rapid-rise yeast) in the same quantity, but the proofing method might slightly differ (instant yeast often doesn’t require proofing, but proofing is still recommended for this recipe to ensure activation).
-
- Warm Water: ½ cup (105-115°F). Warm water is essential for activating the active dry yeast. The temperature is crucial; too cold and the yeast won’t activate, too hot and it will kill the yeast. Use a thermometer to ensure the water is within the optimal temperature range. If you don’t have a thermometer, the water should feel comfortably warm to the touch, like bathwater.
-
- Warm Milk: 1 cup (whole milk or 2% milk, warmed to 105-115°F). Warm milk adds richness, flavor, and tenderness to the rolls. Whole milk will result in richer rolls, but 2% milk works well too. Warming the milk to the same temperature as the water helps maintain the optimal temperature for yeast activation when combined. You can warm milk in a saucepan on low heat or in the microwave in short intervals, stirring occasionally, until it reaches the desired temperature.
-
- Granulated Sugar: ¼ cup. Sugar provides food for the yeast to activate and contributes to the sweetness and browning of the rolls. Granulated sugar dissolves easily and provides a clean sweetness. You can adjust the amount of sugar slightly depending on your preference for sweetness.
-
- Salt: 1 ½ teaspoons. Salt is crucial for controlling yeast activity and enhancing the flavor of the rolls. Salt prevents the yeast from rising too quickly and gives the rolls a balanced, savory-sweet flavor. Use table salt or fine sea salt.
-
- Unsalted Butter, Melted and Cooled: ¼ cup (4 tablespoons). Melted butter adds richness, flavor, and tenderness to the rolls. Using unsalted butter allows you to control the overall saltiness of the recipe. Melt the butter and let it cool slightly before adding it to the dough. Hot butter can kill the yeast.
-
- Large Egg: 1. An egg adds richness, structure, and color to the rolls. Use a large egg at room temperature for best incorporation into the dough. The egg contributes to the soft and slightly chewy texture of the rolls.
-
- All-Purpose Flour: 4 ½ – 5 cups (plus more for dusting). All-purpose flour is the base of the rolls, providing structure and gluten development. The amount of flour can vary slightly depending on humidity and the exact type of flour used. Start with 4 ½ cups and add more gradually, as needed, until the dough reaches the desired consistency (slightly sticky but manageable). Using too much flour will result in dry, dense rolls. Measure flour correctly by spooning it into measuring cups and leveling off the top, rather than scooping directly from the bag.
-
- Melted Butter for Brushing (Optional): 2 tablespoons. Melted butter brushed over the rolls before baking and after baking adds extra flavor, richness, and a beautiful golden-brown sheen. This step is optional but highly recommended for enhancing the overall flavor and appearance of the rolls.
Instructions
Step 1: Proof the Yeast
-
- In a large bowl or the bowl of a stand mixer, combine the warm water and active dry yeast.
-
- Let it stand for 5-10 minutes, or until the yeast is foamy and bubbly. This step, called “proofing,” ensures that the yeast is active and will leaven the dough properly. If the yeast doesn’t foam, it may be old or inactive, and you should start with fresh yeast.
Step 2: Combine Wet Ingredients
-
- To the yeast mixture, add the warm milk, granulated sugar, salt, melted and cooled butter, and egg.
-
- Whisk or stir well to combine all the wet ingredients.
Step 3: Gradually Add Flour and Knead Dough
-
- Gradually add the all-purpose flour, starting with 4 ½ cups. Add the flour in ½ cup increments, mixing after each addition.
-
- If using a stand mixer, use the dough hook and mix on low speed until the dough comes together.
-
- If mixing by hand, use a wooden spoon or your hands to mix until the dough comes together.
-
- Once the dough comes together, increase the speed of the stand mixer to medium-low and knead for 6-8 minutes, or knead by hand on a lightly floured surface for 8-10 minutes. The dough should be smooth, elastic, and slightly sticky to the touch. If the dough is too sticky, add a little more flour, 1 tablespoon at a time, until it is manageable. Avoid adding too much flour, as this will make the rolls dry.
Step 4: First Rise (Bulk Fermentation)
-
- Place the dough in a large, lightly greased bowl. Turn the dough to coat it lightly with grease.
-
- Cover the bowl with plastic wrap or a clean kitchen towel.
-
- Let the dough rise in a warm place for 1-1 ½ hours, or until doubled in size. The rising time can vary depending on the temperature of your kitchen. A warm place (75-80°F) is ideal for yeast activity. You can place the bowl in a slightly warmed oven (turned off), a warm spot in your kitchen, or use the “proof” setting on some ovens.
Step 5: Punch Down Dough and Shape Rolls
-
- Once the dough has doubled in size, gently punch it down to release the air.
-
- Turn the dough out onto a lightly floured surface.
-
- Divide the dough into 12-15 equal pieces. You can use a kitchen scale for accuracy if desired.
-
- Shape each piece of dough into a smooth round roll by gently tucking the edges underneath and rolling it between your palms. You can also shape them into knots or other desired shapes.
Step 6: Second Rise (Proofing)
-
- Grease a 9×13 inch baking pan or a similar-sized baking dish.
-
- Arrange the shaped rolls in the prepared baking pan, leaving a little space between each roll for expansion.
-
- Cover the pan loosely with plastic wrap or a clean kitchen towel.
-
- Let the rolls rise in a warm place for 30-45 minutes, or until they are puffy and almost doubled in size. They should be noticeably softer and lighter than before the second rise.
Step 7: Bake the Rolls
-
- Preheat oven to 375°F (190°C).
-
- If desired, brush the tops of the rolls with melted butter before baking. This will give them a golden-brown color and richer flavor.
-
- Bake for 18-22 minutes, or until the rolls are golden brown on top and sound hollow when tapped lightly on the bottom. Baking time can vary slightly depending on your oven. Keep an eye on them to prevent over-browning.
Step 8: Cool and Serve
-
- Remove the rolls from the oven and let them cool in the pan for a few minutes.
-
- If desired, brush the tops of the hot rolls with more melted butter for extra richness and shine.
-
- Transfer the rolls to a wire rack to cool slightly before serving.
-
- Serve warm and enjoy!
Nutrition
- Serving Size: one normal portion
- Calories: 180-220
- Sugar: 4-6 grams
- Sodium: 150-200 mg
- Fat: 6-8 grams
- Saturated Fat: 3-4 grams
- Carbohydrates: 25-30 grams
- Fiber: 1-2 grams
- Protein: 4-5 grams
- Cholesterol: 20-30 mg


