

Embarking on a low-carb lifestyle was one of the best decisions I ever made for my health, but if there was one thing I genuinely, deeply missed, it was bread. Not just any bread, but the comforting ritual of a morning toast, the satisfying structure of a sandwich, or simply a slice to mop up a delicious sauce. For a long time, I thought I’d have to say goodbye to those simple pleasures forever. I tried countless store-bought low-carb breads, and while some were okay, many had a strange aftertaste, an unpleasantly spongy texture, or an astronomical price tag. Then, I stumbled upon the building blocks for this recipe, and after much tweaking and many (sometimes comical) baking experiments in my own kitchen, this particular Low-Carb Bread was born. The first time I pulled a perfectly golden, fragrant loaf from my oven, I was ecstatic. When I sliced into it after it cooled (the hardest part!) and found a wonderfully soft, yet sturdy crumb, I knew I had a winner. My family, even those not strictly following a low-carb diet, were instantly impressed. My husband loves it for his avocado toast, and even my kids enjoy a slice with a bit of sugar-free jam. It’s become such a staple that I bake a loaf almost weekly. It’s not just a bread substitute; it’s genuinely delicious bread in its own right, making my low-carb journey sustainable and incredibly enjoyable.
The Ultimate Low-Carb Bread: Your Guilt-Free Loaf of Happiness
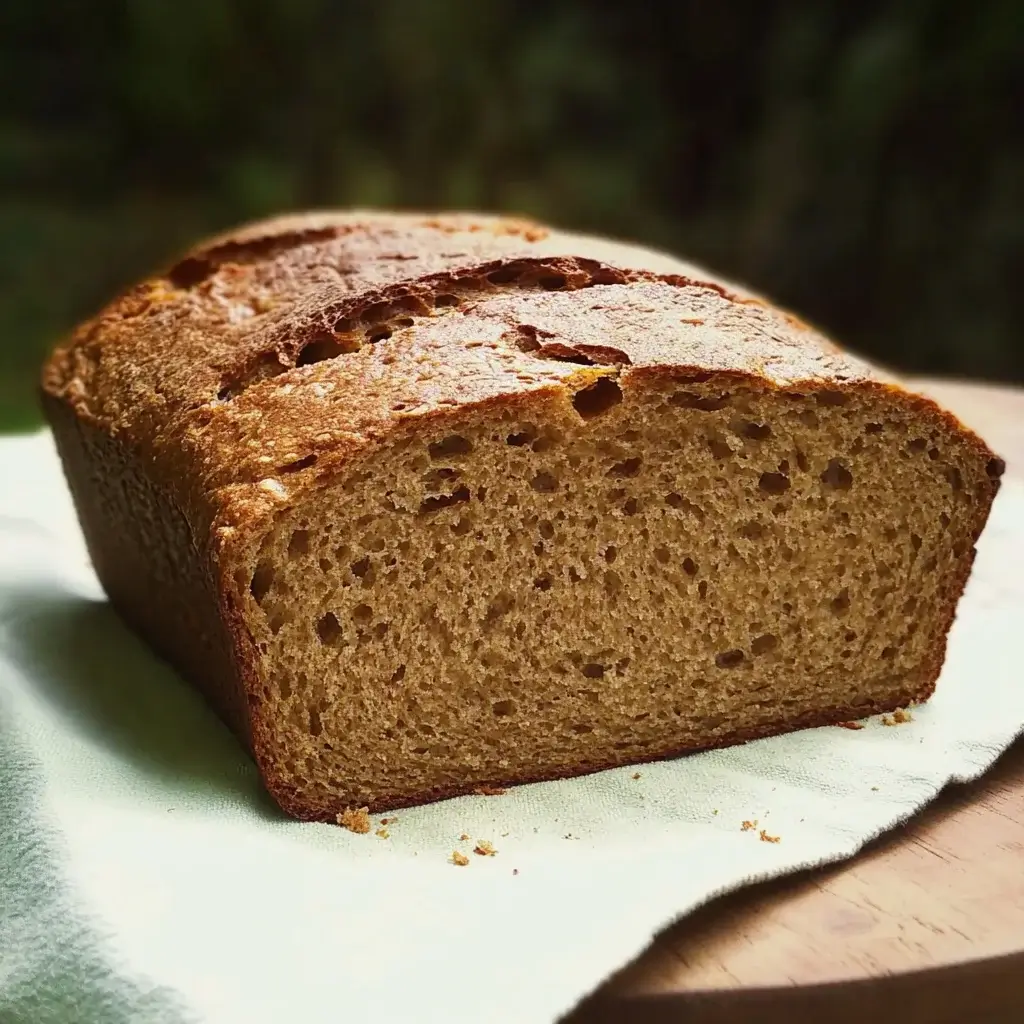
This Low-Carb Bread recipe is a game-changer for anyone following a ketogenic, low-carb, or gluten-free diet who misses the taste and texture of traditional bread. Made primarily with almond flour and psyllium husk, it delivers a satisfying crumb, excellent toasting capabilities, and a neutral flavor profile that makes it incredibly versatile. Say goodbye to carb-laden loaves and hello to delicious, homemade bread that fits your lifestyle!
Complete Ingredients List
To bake this amazing Low-Carb Bread, you’ll need the following high-quality ingredients. Precision is key in low-carb baking, so measuring accurately will yield the best results.
- Dry Ingredients:
- 1 ½ cups (168g) blanched super-fine almond flour (ensure it’s not almond meal, which is coarser)
- ½ cup (40g) psyllium husk powder (not whole husks – if you only have whole husks, grind them into a fine powder first. Note: psyllium husk powder can vary; some brands are darker and may result in a purplish loaf. This doesn’t affect taste.)
- ¼ cup (30g) unflavored whey protein isolate powder (optional, but improves structure and protein content. Can substitute with more almond flour or egg white protein powder)
- 2 teaspoons baking powder (ensure it’s fresh and gluten-free if needed)
- ½ teaspoon fine sea salt
- Wet Ingredients:
- 5 large eggs, at room temperature
- ¼ cup (60ml) melted unsalted butter or coconut oil (or light olive oil for a more savory note)
- 1 cup (240ml) warm water (around 105-115°F or 40-46°C – not hot, just pleasantly warm)
- 1 tablespoon apple cider vinegar (reacts with baking powder for better leavening and can neutralize any slight psyllium taste)
- Optional additions for flavor/texture:
- 1-2 tablespoons erythritol or your preferred low-carb sweetener (if you like a slightly sweeter bread, similar to some store-bought white breads)
- 1 teaspoon xanthan gum (for improved elasticity, though psyllium often provides enough)
- Seeds for topping: sesame seeds, poppy seeds, flax seeds, or an “everything bagel” seasoning blend.
Step-by-Step Instructions
Follow these detailed instructions carefully to bake a perfect loaf of Low-Carb Bread every time. Low-carb baking can be a bit different from traditional baking, so attention to detail is important.
- Preheat Oven and Prepare Loaf Pan: Preheat your oven to 350°F (175°C). Grease a standard 8.5 x 4.5 inch or 9 x 5 inch loaf pan thoroughly with butter, coconut oil, or cooking spray. Line the pan with parchment paper, leaving an overhang on the two longer sides. This will make it much easier to lift the bread out after baking. Grease the parchment paper as well.
- Combine Dry Ingredients: In a large mixing bowl, whisk together the almond flour, psyllium husk powder, optional whey protein isolate, baking powder, and salt (and optional xanthan gum/sweetener if using). Whisking thoroughly ensures that the leavening agent and psyllium are evenly distributed, which is crucial for the bread’s texture and rise. Break up any clumps in the almond flour.
- Combine Wet Ingredients: In a separate medium bowl, whisk the room temperature eggs until they are lightly frothy. Add the melted butter (or oil), warm water, and apple cider vinegar. Whisk again until all wet ingredients are well combined. Using room temperature eggs helps them incorporate better with the other ingredients and can lead to a better rise.
- Mix Wet and Dry Ingredients: Pour the wet ingredient mixture into the bowl with the dry ingredients. Using a sturdy spatula or a hand mixer on low speed (or stand mixer with paddle attachment), mix until just combined. The batter will thicken very quickly as the psyllium husk absorbs the liquid and starts to gel. Do not overmix. Scrape down the sides of the bowl to ensure everything is incorporated. The dough will be thick and somewhat sticky, more like a very thick batter or a soft dough.
- Rest the Dough (Crucial Step): Let the dough sit in the bowl for 5-10 minutes. This allows the psyllium husk and almond flour to fully absorb the liquids and for the gelling action of the psyllium to take full effect. This step is vital for the bread’s structure. The dough will become even thicker and more manageable during this time.
- Transfer Dough to Pan: After resting, the dough should be quite thick and easier to handle (though still a bit sticky). Scoop the dough into the prepared loaf pan. Using a wet spatula or slightly wet hands, spread and smooth the top of the dough evenly. Wetting your tools prevents the dough from sticking excessively. If you want a domed top, you can shape it slightly.
- Optional Topping: If desired, sprinkle the top of the dough evenly with sesame seeds, poppy seeds, flax seeds, or an “everything bagel” seasoning blend. Gently press them into the dough so they adhere.
- Bake the Bread: Place the loaf pan in the center rack of the preheated oven. Bake for 50-60 minutes. Baking times can vary depending on your oven and the specific loaf pan used.
- The bread is done when it is golden brown on top, sounds hollow when tapped, and a skewer or toothpick inserted into the center comes out clean (or with just a few dry crumbs, no wet batter).
- An internal temperature check with a food thermometer is the most accurate way: it should read 200-210°F (93-99°C).
- If the top of the bread starts to brown too quickly before it’s cooked through, you can loosely tent it with a piece of aluminum foil for the last 10-15 minutes of baking.
- Cool Completely (Extremely Important!): Once baked, carefully remove the loaf pan from the oven. Using the parchment paper overhangs, lift the bread out of the pan and place it on a wire cooling rack.
- THIS IS THE MOST CRITICAL STEP FOR LOW-CARB BREADS: Allow the bread to cool COMPLETELY on the wire rack before slicing. This can take at least 2-3 hours, or even longer. Slicing it while warm will result in a gummy, dense texture as the internal structure is still setting. Patience here is key to a good crumb.
- Slice and Store: Once completely cool, use a sharp serrated bread knife to slice the loaf. Store the bread in an airtight container in the refrigerator for up to a week, or freeze slices for longer storage.
Nutrition Facts
- Servings: 1 loaf (approximately 12-16 slices, depending on thickness)
- Calories per serving (approximate, for 1 slice out of 14): 120-150 calories
- Net Carbs per serving (approximate): 2-3g (Total Carbs minus Fiber)
Disclaimer: Nutritional information is an estimate and can vary significantly based on specific brands of ingredients used, precise slice thickness, and whether optional ingredients like whey protein or sweeteners are included. For precise tracking, it’s recommended to calculate based on your specific ingredients using a nutrition calculator.
This bread is an excellent source of healthy fats and fiber, and relatively high in protein, especially if whey protein isolate is used.
Preparation Time
Understanding the time commitment will help you plan your baking session:
- Prep Time: 15-20 minutes (includes measuring, mixing, and preparing the pan)
- Dough Resting Time: 5-10 minutes
- Cook Time: 50-60 minutes
- Cooling Time (Crucial): 2-3 hours (minimum, longer is better)
- Total Time (excluding extended cooling): Approximately 1 hour 10 minutes to 1 hour 30 minutes active/baking time. Total time until ready to eat is closer to 4-5 hours.
This makes it a great weekend baking project, or something you can prepare in the evening to enjoy the next day.
How to Serve Low-Carb Bread
This versatile Low-Carb Bread can be enjoyed in many ways, just like traditional bread. Here are some delicious ideas:
- Toast:
- Classic Toast: Simply toast slices until golden and crispy. Spread with butter, sugar-free jam or marmalade, cream cheese, or nut butter (almond, peanut, etc.).
- Avocado Toast: Top toasted slices with mashed avocado, a sprinkle of everything bagel seasoning, salt, pepper, and perhaps a squeeze of lemon juice. Add a fried or poached egg for extra protein.
- Cinnamon Toast: Toast a slice, spread with butter, and sprinkle with a mix of cinnamon and a low-carb sweetener like erythritol or monk fruit.
- Sandwiches:
- Lunch Sandwiches: Perfect for deli meats, cheese, lettuce, tomato, and your favorite low-carb condiments like mayonnaise or mustard. The bread holds up well.
- Grilled Cheese: Use two slices with your favorite cheese (cheddar, provolone, mozzarella) and grill in butter until golden and melty.
- Breakfast Sandwiches: Create a hearty breakfast sandwich with eggs, bacon or sausage, and cheese.
- Sides & Accompaniments:
- With Soups and Stews: Use a slice to dip into hearty low-carb soups or stews.
- As Croutons: Cube stale slices, toss with olive oil and herbs, and bake or air fry until crispy for delicious low-carb croutons for salads.
- Breadcrumbs: Process dried slices in a food processor to make low-carb breadcrumbs for coating chicken or fish, or as a binder in meatballs.
- Sweet Treats:
- French Toast: Dip slices in an egg mixture (egg, unsweetened almond milk, cinnamon, low-carb sweetener) and pan-fry in butter until golden. Serve with sugar-free syrup and berries.
- Bread Pudding (Low-Carb Version): Cube the bread and use it as a base for a sugar-free bread pudding recipe.
- General Enjoyment:
- Simply enjoy a slice plain or with a light spread to satisfy that bread craving.
- It’s great with a cheese board, alongside olives and charcuterie.
The neutral flavor makes it a perfect canvas for both savory and slightly sweet applications. Experiment and find your favorite ways to enjoy it!
Additional Tips for Perfect Low-Carb Bread
Achieving the perfect loaf of low-carb bread can sometimes be tricky. Here are five additional tips to help you succeed:
- Psyllium Husk Powder is Key (and a bit finicky): Do not substitute psyllium husk powder with whole psyllium husks directly unless you grind them into a fine powder first (a coffee grinder works well). The powder is much more absorbent. Also, some brands of psyllium husk powder (especially those that aren’t “blonde” psyllium) can turn baked goods a purplish hue. This is purely cosmetic and doesn’t affect the taste or texture, but if it bothers you, seek out a lighter-colored psyllium brand. Always measure psyllium accurately; too much can make the bread overly gummy.
- Don’t Fear the “Wet” Dough: The dough for this bread will be much wetter and stickier than traditional wheat bread dough before resting. This is normal. The psyllium husk needs that moisture to activate and create the gel-like structure that mimics gluten. Resist the urge to add too much extra almond flour to make it less sticky, as this can result in a dry, crumbly bread. Trust the resting process to thicken it.
- Internal Temperature is Your Best Friend: Ovens vary, and visual cues can sometimes be misleading with low-carb baked goods. The most reliable way to ensure your bread is perfectly cooked through (not gummy in the center) is to use an instant-read food thermometer. Aim for an internal temperature of 200-210°F (93-99°C). This guarantees it’s cooked without being overbaked and dry.
- Room Temperature Ingredients Matter: Especially for the eggs. Using room temperature eggs allows them to incorporate more easily and fully into the batter, leading to a lighter texture and better volume. If you forget to take your eggs out, you can place them in a bowl of warm (not hot) water for 5-10 minutes. Melted butter/oil should be warm, not hot, so it doesn’t cook the eggs.
- Storage is Different from Regular Bread: Because this bread lacks the preservatives found in commercial breads and has a higher moisture content from ingredients like almond flour, it’s best stored in an airtight container in the refrigerator, where it will last for up to a week. For longer storage, slice the completely cooled loaf and freeze the slices in a freezer-safe bag or container, separated by parchment paper if desired, for up to 3 months. Toast slices directly from frozen.
Frequently Asked Questions (FAQ)
Here are answers to some common questions you might have about this Low-Carb Bread recipe:
- Q: Can I use coconut flour instead of almond flour?
- A: No, coconut flour and almond flour are not interchangeable on a 1:1 basis in most recipes, especially bread. Coconut flour is far more absorbent than almond flour and requires a much higher liquid-to-flour ratio. Substituting directly would result in a very dry, crumbly bread. You would need to find a recipe specifically formulated for coconut flour or significantly adjust liquid and egg content.
- Q: My bread turned out gummy or dense in the middle. What went wrong?
- A: This is a common issue with low-carb breads and can be due to several factors:
- Underbaking: The most common culprit. Ensure the internal temperature reaches 200-210°F (93-99°C).
- Slicing too soon: The bread must cool completely (several hours) to allow the structure to set. Slicing it warm will almost always result in a gummy texture.
- Too much psyllium or liquid: Incorrect measurement of psyllium husk powder or too much liquid can lead to gumminess.
- Psyllium type: Using whole husks instead of powder, or not allowing the powder to fully hydrate during the resting period.
- A: This is a common issue with low-carb breads and can be due to several factors:
- Q: Can I add nuts, seeds, or other flavorings to the dough?
- A: Absolutely! This recipe is a great base for customization.
- Seeds/Nuts: You can mix in ¼ to ½ cup of seeds like flax, chia, sunflower, or pumpkin seeds, or chopped nuts like walnuts or pecans directly into the dough for added texture and nutrition.
- Herbs/Spices: For a savory bread, consider adding 1-2 teaspoons of dried herbs like rosemary, thyme, oregano, or garlic powder and onion powder to the dry ingredients.
- Cheese: Stir in ½ cup of shredded cheddar or Parmesan cheese for a cheesy loaf.
- A: Absolutely! This recipe is a great base for customization.
- Q: Why did my bread turn a purplish color?
- A: This is usually due to the brand or type of psyllium husk powder used. Some psyllium husk, particularly if it’s not “blonde” psyllium, can react with baking powder or other ingredients and produce a purple or grayish hue. This is purely a cosmetic issue and does not affect the taste, texture, or safety of the bread. If it bothers you, try a different brand of psyllium husk powder, often labeled as “blonde psyllium.”
- Q: Can I make this bread dairy-free?
- A: Yes, this recipe can easily be made dairy-free.
- Butter: Replace the melted butter with an equal amount of melted coconut oil, light olive oil, or another dairy-free fat.
- Whey Protein Isolate: If using, replace the whey protein isolate with a dairy-free protein powder like egg white protein powder, or simply omit it and replace it with an equal amount (by weight or volume) of additional almond flour. Ensure your baking powder is also dairy-free if that’s a concern.
- A: Yes, this recipe can easily be made dairy-free.
This Low-Carb Bread will hopefully become a beloved staple in your kitchen, making your healthy lifestyle even more delicious and sustainable! Enjoy the satisfaction of baking your own wholesome bread.
Print
Low-Carb Bread recipe
Ingredients
-
- Dry Ingredients:
-
- 1 ½ cups (168g) blanched super-fine almond flour (ensure it’s not almond meal, which is coarser)
-
- ½ cup (40g) psyllium husk powder (not whole husks – if you only have whole husks, grind them into a fine powder first. Note: psyllium husk powder can vary; some brands are darker and may result in a purplish loaf. This doesn’t affect taste.)
-
- ¼ cup (30g) unflavored whey protein isolate powder (optional, but improves structure and protein content. Can substitute with more almond flour or egg white protein powder)
-
- 2 teaspoons baking powder (ensure it’s fresh and gluten-free if needed)
-
- ½ teaspoon fine sea salt
-
- Dry Ingredients:
-
- Wet Ingredients:
-
- 5 large eggs, at room temperature
-
- ¼ cup (60ml) melted unsalted butter or coconut oil (or light olive oil for a more savory note)
-
- 1 cup (240ml) warm water (around 105-115°F or 40-46°C – not hot, just pleasantly warm)
-
- 1 tablespoon apple cider vinegar (reacts with baking powder for better leavening and can neutralize any slight psyllium taste)
-
- Wet Ingredients:
-
- Optional additions for flavor/texture:
-
- 1–2 tablespoons erythritol or your preferred low-carb sweetener (if you like a slightly sweeter bread, similar to some store-bought white breads)
-
- 1 teaspoon xanthan gum (for improved elasticity, though psyllium often provides enough)
-
- Seeds for topping: sesame seeds, poppy seeds, flax seeds, or an “everything bagel” seasoning blend.
-
- Optional additions for flavor/texture:
Instructions
-
- Preheat Oven and Prepare Loaf Pan: Preheat your oven to 350°F (175°C). Grease a standard 8.5 x 4.5 inch or 9 x 5 inch loaf pan thoroughly with butter, coconut oil, or cooking spray. Line the pan with parchment paper, leaving an overhang on the two longer sides. This will make it much easier to lift the bread out after baking. Grease the parchment paper as well.
-
- Combine Dry Ingredients: In a large mixing bowl, whisk together the almond flour, psyllium husk powder, optional whey protein isolate, baking powder, and salt (and optional xanthan gum/sweetener if using). Whisking thoroughly ensures that the leavening agent and psyllium are evenly distributed, which is crucial for the bread’s texture and rise. Break up any clumps in the almond flour.
-
- Combine Wet Ingredients: In a separate medium bowl, whisk the room temperature eggs until they are lightly frothy. Add the melted butter (or oil), warm water, and apple cider vinegar. Whisk again until all wet ingredients are well combined. Using room temperature eggs helps them incorporate better with the other ingredients and can lead to a better rise.
-
- Mix Wet and Dry Ingredients: Pour the wet ingredient mixture into the bowl with the dry ingredients. Using a sturdy spatula or a hand mixer on low speed (or stand mixer with paddle attachment), mix until just combined. The batter will thicken very quickly as the psyllium husk absorbs the liquid and starts to gel. Do not overmix. Scrape down the sides of the bowl to ensure everything is incorporated. The dough will be thick and somewhat sticky, more like a very thick batter or a soft dough.
-
- Rest the Dough (Crucial Step): Let the dough sit in the bowl for 5-10 minutes. This allows the psyllium husk and almond flour to fully absorb the liquids and for the gelling action of the psyllium to take full effect. This step is vital for the bread’s structure. The dough will become even thicker and more manageable during this time.
-
- Transfer Dough to Pan: After resting, the dough should be quite thick and easier to handle (though still a bit sticky). Scoop the dough into the prepared loaf pan. Using a wet spatula or slightly wet hands, spread and smooth the top of the dough evenly. Wetting your tools prevents the dough from sticking excessively. If you want a domed top, you can shape it slightly.
-
- Optional Topping: If desired, sprinkle the top of the dough evenly with sesame seeds, poppy seeds, flax seeds, or an “everything bagel” seasoning blend. Gently press them into the dough so they adhere.
-
- Bake the Bread: Place the loaf pan in the center rack of the preheated oven. Bake for 50-60 minutes. Baking times can vary depending on your oven and the specific loaf pan used.
-
- The bread is done when it is golden brown on top, sounds hollow when tapped, and a skewer or toothpick inserted into the center comes out clean (or with just a few dry crumbs, no wet batter).
-
- An internal temperature check with a food thermometer is the most accurate way: it should read 200-210°F (93-99°C).
-
- If the top of the bread starts to brown too quickly before it’s cooked through, you can loosely tent it with a piece of aluminum foil for the last 10-15 minutes of baking.
-
- Bake the Bread: Place the loaf pan in the center rack of the preheated oven. Bake for 50-60 minutes. Baking times can vary depending on your oven and the specific loaf pan used.
-
- Cool Completely (Extremely Important!): Once baked, carefully remove the loaf pan from the oven. Using the parchment paper overhangs, lift the bread out of the pan and place it on a wire cooling rack.
-
- THIS IS THE MOST CRITICAL STEP FOR LOW-CARB BREADS: Allow the bread to cool COMPLETELY on the wire rack before slicing. This can take at least 2-3 hours, or even longer. Slicing it while warm will result in a gummy, dense texture as the internal structure is still setting. Patience here is key to a good crumb.
-
- Cool Completely (Extremely Important!): Once baked, carefully remove the loaf pan from the oven. Using the parchment paper overhangs, lift the bread out of the pan and place it on a wire cooling rack.
-
- Slice and Store: Once completely cool, use a sharp serrated bread knife to slice the loaf. Store the bread in an airtight container in the refrigerator for up to a week, or freeze slices for longer storage.
Nutrition
- Serving Size: one normal portion
- Calories: 120-150


