


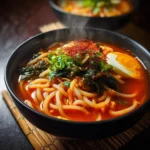
There are certain dishes that transcend mere sustenance and become a form of therapy, and for me, that dish is a steaming, bubbling bowl of Cheesy Kimchi Udon. I discovered it on a cold, rainy evening, craving something with a spicy kick that felt like a hug in a bowl. I had a jar of well-fermented kimchi in the fridge, a pack of frozen udon noodles in the freezer, and a block of cheese. What started as a simple pantry experiment turned into a lifelong obsession. The magic began the moment the chopped kimchi hit the hot pan with a sizzle, releasing its pungent, tangy, and spicy aroma. As I built the sauce, the kitchen filled with a scent that was at once deeply savory and exhilaratingly vibrant. But the true alchemy happened when the thick, chewy udon noodles were tossed in the fiery red sauce, absorbing all that incredible flavor, and then blanketed with a generous layer of mozzarella cheese. Watching that cheese melt into a gooey, stretchy blanket over the noodles was a moment of pure culinary joy. The first bite was a revelation—the satisfying chew of the noodles, the complex funk and spice of the caramelized kimchi, the rich, savory sauce, and the creamy, cooling pull of the melted cheese. It was a symphony of textures and flavors that was utterly addictive. Now, it’s my go-to comfort meal, the dish I make when I need a quick weeknight dinner that feels like a decadent treat, and the recipe I share with anyone who wants to experience the ultimate in Korean comfort food.
The Ultimate Cheesy Kimchi Udon: A Complete Recipe
This recipe is designed for maximum flavor and that signature “cheese pull” that makes this dish so iconic. We will cover the essentials for creating a perfectly balanced sauce and bringing all the components together for a restaurant-quality meal at home.
For the Udon and Sauce Base:
- Frozen Udon Noodles: 2 individual blocks (approximately 16-18 oz total). Frozen udon provides the best chewy texture.
- Aged Kimchi: 1 ½ cups, packed, chopped into bite-sized pieces. Use well-fermented, sour kimchi for the best flavor.
- Kimchi Juice: ¼ cup, from the jar of kimchi (this is liquid gold!).
- Bacon or Pork Belly: 4-6 slices, chopped into small pieces (optional, but highly recommended for flavor). For a vegetarian option, use 2 tablespoons of neutral oil and 4 oz of shiitake mushrooms.
- Yellow Onion: ½ medium, thinly sliced.
- Garlic: 3-4 cloves, minced.
- Gochujang (Korean Chili Paste): 1-2 tablespoons, depending on your spice preference.
- Gochugaru (Korean Chili Flakes): 1-2 teaspoons (use coarse gochugaru for better flavor).
- Soy Sauce: 1 tablespoon, low-sodium.
- Sugar or Honey: 1 teaspoon (this balances the sourness of the kimchi).
- Sesame Oil: 1 teaspoon.
- Water or Dashi Broth: ½ cup.
For the Cheesy Topping and Garnish:
- Low-Moisture Mozzarella Cheese: 1 cup, shredded.
- Green Onions: 2, thinly sliced (separate the white and green parts).
- Toasted Sesame Seeds: For garnish.
- Roasted Seaweed (Gim): Crumbled or cut into thin strips for garnish (optional).
Step-by-Step Instructions for Perfect Kimchi Udon
Follow these detailed steps to build layers of flavor, resulting in a perfectly saucy, chewy, and cheesy final dish.
Step 1: Prepare Your Ingredients (Mise en Place)
Like any good stir-fry, this dish comes together very quickly. Having all your ingredients prepped and ready to go is the key to a smooth and successful cooking process.
- Chop and Separate: Chop your kimchi, bacon/pork belly, and thinly slice the onion. Mince the garlic. Thinly slice the green onions, keeping the white bottoms and green tops separate.
- Prepare Udon: Bring a pot of water to a boil. Add the frozen udon blocks and cook for 1-2 minutes, or just until they separate and are heated through. Drain them immediately and set them aside. Do not overcook them at this stage; they will finish cooking in the sauce.
Step 2: Build the Flavor Foundation
This is where the deep, savory base of the dish is created.
- Render the Fat: Place a large skillet or pan over medium heat. Add the chopped bacon or pork belly. Cook, stirring occasionally, for 5-7 minutes, or until the fat has rendered out and the pieces are golden and crispy.
- Vegetarian Alternative: If not using bacon, heat 2 tablespoons of neutral oil in the skillet. Add the sliced shiitake mushrooms and cook until they are browned and their moisture has evaporated.
- Sauté the Aromatics: To the pan with the rendered fat (or oil), add the sliced yellow onion and the white parts of the green onions. Sauté for 3-4 minutes until the onions have softened and become translucent. Add the minced garlic and cook for another minute until fragrant, being careful not to burn it.
Step 3: Caramelize the Kimchi and Create the Sauce
This is the most critical step for developing the rich, complex flavor of the dish.
- Fry the Kimchi: Add the chopped kimchi to the skillet. Turn the heat up to medium-high and stir-fry the kimchi for 3-5 minutes. You want to “caramelize” it slightly, cooking off some of the raw, sharp flavor and deepening its savory taste. The edges should start to look slightly browned.
- Bloom the Spices: Add the gochujang and gochugaru to the pan. Stir constantly for about 60 seconds, allowing the chili paste and flakes to cook in the hot oil. This “blooming” process awakens their flavors and gives the final dish a beautiful, vibrant red color.
- Deglaze and Simmer: Pour in the kimchi juice, soy sauce, and water (or dashi broth). Add the teaspoon of sugar or honey. Stir everything together, scraping up any flavorful browned bits from the bottom of the pan. Bring the sauce to a vigorous simmer and let it cook for 2-3 minutes to allow the flavors to meld together.
Step 4: Combine, Finish, and Melt
Now we bring all the components together for the grand finale.
- Add the Noodles: Add the drained, cooked udon noodles to the skillet with the sauce. Using tongs, gently toss the noodles until they are thoroughly coated in the fiery red sauce. Let them simmer in the sauce for 1-2 minutes, allowing them to absorb all the delicious flavors.
- Stir in Sesame Oil: Turn off the heat and stir in the teaspoon of toasted sesame oil. This adds a final layer of nutty, aromatic flavor.
- The Cheese Blanket: Sprinkle the shredded mozzarella cheese evenly over the top of the udon noodles.
- Melt to Perfection: Cover the skillet with a lid and let it sit for 2-3 minutes. The residual heat will melt the cheese into a gooey, perfect blanket over the noodles.
- Garnish and Serve: Uncover the skillet. Garnish generously with the green parts of the sliced green onions, a sprinkle of toasted sesame seeds, and the optional crumbled roasted seaweed. Serve immediately, straight from the pan.
Nutrition Facts
- Servings: 2
- Calories per serving: Approximately 750-950 kcal
Disclaimer: The nutritional information provided is an estimate. The final calorie count will vary significantly based on whether you use bacon or pork belly, the specific brands of your ingredients, and the amount of cheese used. This is a hearty and indulgent comfort food.
Preparation Time
- Prep Time: 15 minutes (includes chopping ingredients and pre-boiling udon)
- Cook Time: 15 minutes
- Total Time: 30 minutes
How to Serve Your Cheesy Kimchi Udon
This dish is a full meal in a bowl (or pan!), but its presentation can enhance the experience.
- Straight from the Skillet (The Best Way):
- The most satisfying way to serve Kimchi Udon is communally, right from the skillet it was cooked in.
- Place the hot skillet on a heat-proof trivet in the center of the table.
- Provide chopsticks or forks and let everyone dig in, enjoying the dramatic cheese pull with every serving.
- Individual Bowls:
- If you prefer individual servings, divide the hot udon between two large, shallow bowls.
- Ensure each bowl gets an equal amount of the gooey, cheesy topping.
- Top each individual bowl with fresh garnishes.
- Elevate Your Toppings:
While the classic garnishes are fantastic, you can add even more layers of texture and flavor with these additions:- A Jammy Soft-Boiled Egg: A perfectly cooked egg with a runny yolk adds incredible richness that cuts through the spice.
- Crispy Fried Onions or Garlic: Sprinkle on top for an extra savory crunch.
- Katsuobushi (Bonito Flakes): These paper-thin smoked fish flakes will “dance” on top of the hot noodles and add a deep umami flavor.
- A Drizzle of Japanese Mayo: The creamy, tangy mayonnaise provides a delicious contrast to the spicy sauce.
- Side Dishes to Complement the Meal:
Because the main dish is so rich and flavorful, simple, refreshing side dishes work best.- Danmuji (Yellow Pickled Radish): The sweet, tangy crunch is the perfect palate cleanser between bites.
- Simple Cucumber Salad: Thinly sliced cucumbers with a touch of rice vinegar and salt provide a cool, crisp contrast.
- Steamed Edamame: A simple, healthy side that won’t compete with the main flavors.
5 Additional Tips for Udon Perfection
- Use Aged, Sour Kimchi: This is the single most important tip for achieving authentic, restaurant-quality flavor. Freshly made kimchi is delicious as a side dish, but for cooking, you need well-fermented (or “sour”) kimchi. The aging process develops a deeper, more complex, tangy flavor that is essential for the sauce. A good sign is if the kimchi jar fizzes slightly when you open it. And never, ever throw out the kimchi juice—it’s a critical, flavor-packed ingredient.
- Don’t Overcook the Udon Initially: Frozen udon noodles are already cooked. The initial boiling step is just to defrost them and separate the strands. If you boil them for too long, they will become mushy and waterlogged. Boil them for the minimum time stated on the package (usually 1-2 minutes), drain them, and let them finish “cooking” in the sauce, where they will absorb flavor and maintain their signature chewy bite.
- Balance the Flavors: The Role of Sugar: It might seem counterintuitive to add sugar to a savory, spicy dish, but it is a crucial step in Korean cooking. The small amount of sugar or honey does not make the dish sweet; instead, it balances the intense sourness of the aged kimchi and the saltiness of the soy sauce and gochujang, creating a more harmonious and well-rounded flavor profile. Always taste your sauce before adding the noodles and adjust if needed.
- Low-Moisture Mozzarella is Key for the “Cheese Pull”: For that epic, stretchy, satisfying cheese pull, you must use low-moisture mozzarella (the kind that often comes in a block or pre-shredded bag). Fresh mozzarella has a very high water content and will release liquid when melted, making your sauce watery. Low-moisture mozzarella melts beautifully into a gooey, stringy blanket.
- Don’t Crowd the Pan: Use a large skillet or wok that gives your ingredients plenty of room. This is especially important when you are caramelizing the kimchi. If the pan is too crowded, the kimchi will steam instead of fry, and you won’t develop that deep, concentrated flavor. A wider surface area allows for better heat distribution and superior texture.
Frequently Asked Questions (FAQ)
1. Can I make this recipe vegetarian or vegan?
Absolutely! This dish is very easy to adapt. To make it vegetarian, simply omit the bacon/pork belly and use a neutral oil (like canola or vegetable oil) to sauté your onions. Adding sautéed shiitake mushrooms is a great way to add a “meaty” texture and umami flavor. To make it vegan, follow the vegetarian instructions and also ensure your kimchi does not contain any fish sauce or shrimp paste (many traditional kimchis do, but vegan versions are widely available). Finally, substitute the mozzarella cheese with your favorite brand of vegan melting cheese.
2. This recipe seems too spicy for me. How can I adjust the heat level?
You have complete control over the spice level. The heat comes primarily from the gochujang and gochugaru. To make it milder, reduce the amount of gochujang to 1 tablespoon (or even less) and omit the gochugaru entirely. You can also look for a “mild” version of gochujang at your local Asian market. The cheese also helps to mellow out the spice significantly.
3. What if I can’t find frozen udon noodles?
While frozen udon noodles provide the best chewy texture, you can certainly use other types. Shelf-stable vacuum-packed udon noodles are a good alternative. Dried udon noodles will also work, but they tend to have a slightly less chewy, more pasta-like texture. Simply cook them according to the package directions before adding them to the sauce. In a pinch, you could even use thick spaghetti or bucatini for a fusion twist.
4. What’s the difference between Gochujang and Gochugaru? Do I need both?
Yes, for the best flavor, it’s recommended to use both. Gochujang is a fermented chili paste that is thick, sweet, savory, and spicy. It forms the main body of the sauce. Gochugaru are Korean chili flakes. They add a cleaner, more direct, and often smokier layer of heat and give the dish its vibrant red color without adding as much sweetness as gochujang. Using both creates a more complex and balanced spice profile.
5. Can I make this dish ahead of time for meal prep?
Kimchi Udon is a dish that is truly at its best when served immediately after cooking. The noodles can become soft and absorb too much liquid upon reheating, and the melted cheese loses its perfect gooey texture. However, you can absolutely do the prep ahead of time. You can chop all your vegetables, kimchi, and bacon and store them in an airtight container in the fridge. With the prep done, the final dish will come together in just 15 minutes, making it a perfect quick weeknight meal.
Kimchi Udon Recipe
Ingredients
For the Udon and Sauce Base:
-
Frozen Udon Noodles: 2 individual blocks (approximately 16-18 oz total). Frozen udon provides the best chewy texture.
-
Aged Kimchi: 1 ½ cups, packed, chopped into bite-sized pieces. Use well-fermented, sour kimchi for the best flavor.
-
Kimchi Juice: ¼ cup, from the jar of kimchi (this is liquid gold!).
-
Bacon or Pork Belly: 4-6 slices, chopped into small pieces (optional, but highly recommended for flavor). For a vegetarian option, use 2 tablespoons of neutral oil and 4 oz of shiitake mushrooms.
-
Yellow Onion: ½ medium, thinly sliced.
-
Garlic: 3-4 cloves, minced.
-
Gochujang (Korean Chili Paste): 1-2 tablespoons, depending on your spice preference.
-
Gochugaru (Korean Chili Flakes): 1-2 teaspoons (use coarse gochugaru for better flavor).
-
Soy Sauce: 1 tablespoon, low-sodium.
-
Sugar or Honey: 1 teaspoon (this balances the sourness of the kimchi).
-
Sesame Oil: 1 teaspoon.
-
Water or Dashi Broth: ½ cup.
For the Cheesy Topping and Garnish:
-
Low-Moisture Mozzarella Cheese: 1 cup, shredded.
-
Green Onions: 2, thinly sliced (separate the white and green parts).
-
Toasted Sesame Seeds: For garnish.
-
Roasted Seaweed (Gim): Crumbled or cut into thin strips for garnish (optional).
Instructions
Step 1: Prepare Your Ingredients (Mise en Place)
Like any good stir-fry, this dish comes together very quickly. Having all your ingredients prepped and ready to go is the key to a smooth and successful cooking process.
-
Chop and Separate: Chop your kimchi, bacon/pork belly, and thinly slice the onion. Mince the garlic. Thinly slice the green onions, keeping the white bottoms and green tops separate.
-
Prepare Udon: Bring a pot of water to a boil. Add the frozen udon blocks and cook for 1-2 minutes, or just until they separate and are heated through. Drain them immediately and set them aside. Do not overcook them at this stage; they will finish cooking in the sauce.
Step 2: Build the Flavor Foundation
This is where the deep, savory base of the dish is created.
-
Render the Fat: Place a large skillet or pan over medium heat. Add the chopped bacon or pork belly. Cook, stirring occasionally, for 5-7 minutes, or until the fat has rendered out and the pieces are golden and crispy.
-
Vegetarian Alternative: If not using bacon, heat 2 tablespoons of neutral oil in the skillet. Add the sliced shiitake mushrooms and cook until they are browned and their moisture has evaporated.
-
Sauté the Aromatics: To the pan with the rendered fat (or oil), add the sliced yellow onion and the white parts of the green onions. Sauté for 3-4 minutes until the onions have softened and become translucent. Add the minced garlic and cook for another minute until fragrant, being careful not to burn it.
Step 3: Caramelize the Kimchi and Create the Sauce
This is the most critical step for developing the rich, complex flavor of the dish.
-
Fry the Kimchi: Add the chopped kimchi to the skillet. Turn the heat up to medium-high and stir-fry the kimchi for 3-5 minutes. You want to “caramelize” it slightly, cooking off some of the raw, sharp flavor and deepening its savory taste. The edges should start to look slightly browned.
-
Bloom the Spices: Add the gochujang and gochugaru to the pan. Stir constantly for about 60 seconds, allowing the chili paste and flakes to cook in the hot oil. This “blooming” process awakens their flavors and gives the final dish a beautiful, vibrant red color.
-
Deglaze and Simmer: Pour in the kimchi juice, soy sauce, and water (or dashi broth). Add the teaspoon of sugar or honey. Stir everything together, scraping up any flavorful browned bits from the bottom of the pan. Bring the sauce to a vigorous simmer and let it cook for 2-3 minutes to allow the flavors to meld together.
Step 4: Combine, Finish, and Melt
Now we bring all the components together for the grand finale.
-
Add the Noodles: Add the drained, cooked udon noodles to the skillet with the sauce. Using tongs, gently toss the noodles until they are thoroughly coated in the fiery red sauce. Let them simmer in the sauce for 1-2 minutes, allowing them to absorb all the delicious flavors.
-
Stir in Sesame Oil: Turn off the heat and stir in the teaspoon of toasted sesame oil. This adds a final layer of nutty, aromatic flavor.
-
The Cheese Blanket: Sprinkle the shredded mozzarella cheese evenly over the top of the udon noodles.
-
Melt to Perfection: Cover the skillet with a lid and let it sit for 2-3 minutes. The residual heat will melt the cheese into a gooey, perfect blanket over the noodles.
-
Garnish and Serve: Uncover the skillet. Garnish generously with the green parts of the sliced green onions, a sprinkle of toasted sesame seeds, and the optional crumbled roasted seaweed. Serve immediately, straight from the pan.
Nutrition
- Serving Size: one normal portion
- Calories: 750-950 kcal


