
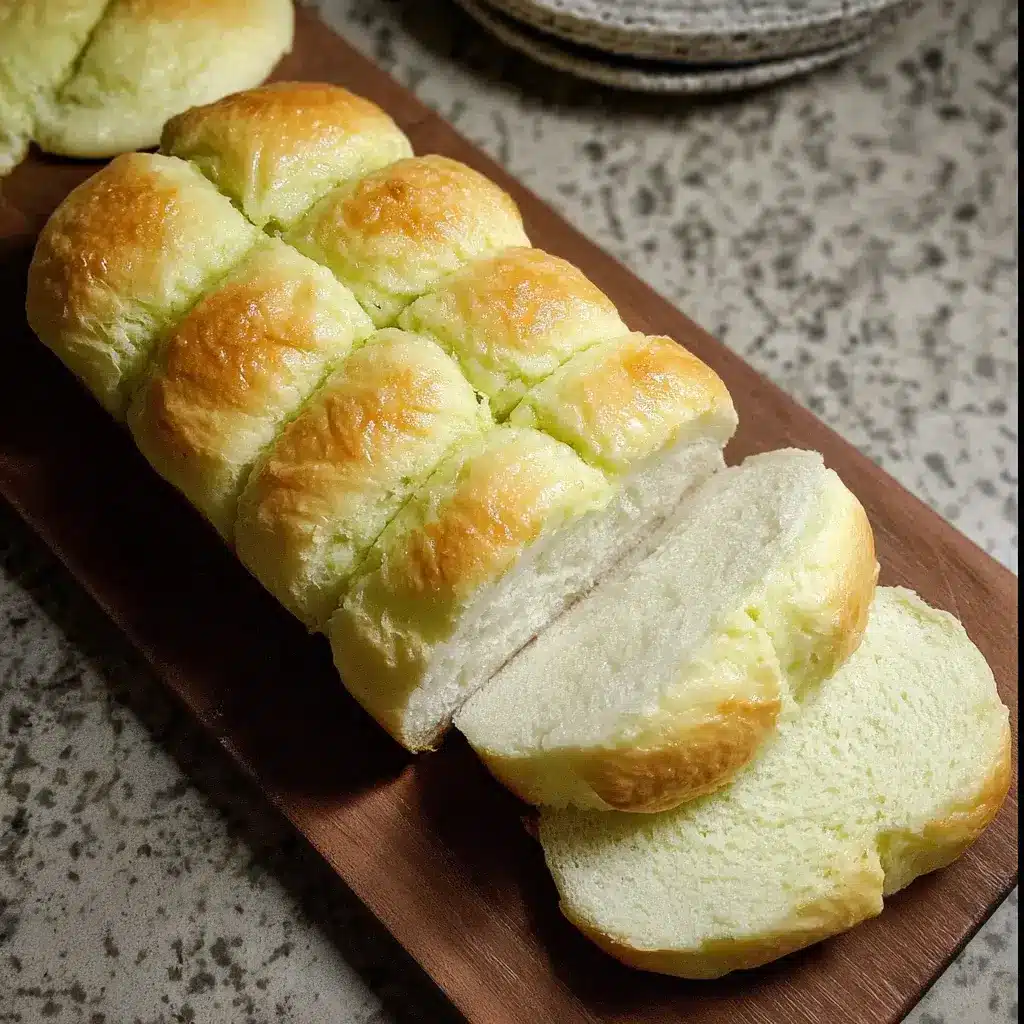

The first time I encountered Japanese Honeydew Bread, it was in a small, brightly lit bakery tucked away in a bustling city center. The air was thick with the scent of sugar and yeast, but one aroma stood out—a sweet, fragrant, almost nostalgic scent that I couldn’t quite place. My eyes landed on a tray of perfectly uniform, pale green buns, each with a beautifully crosshatched, sugary crust that glittered under the lights. It looked like a miniature melon. I bought one out of pure curiosity. That first bite was a revelation. It was a study in contrasts: the top was a thin, crisp, sugary cookie, which gave way to the softest, most ethereal, cloud-like bread I had ever tasted. The flavor was unmistakably honeydew, a sweet and delicate taste that transported me straight back to summer days. I was completely enchanted. Recreating that experience at home became my personal baking quest. It was a journey of learning about special Asian bread-making techniques, of balancing textures, and of capturing that elusive flavor. This recipe is the culmination of that journey. It’s a labor of love that fills my kitchen with that same magical aroma and produces buns so perfect, so texturally delightful, that my family now requests them for every special occasion. It is, without a doubt, one of the most rewarding baking projects I have ever mastered.
Why This Japanese Honeydew Bread Recipe is a Masterpiece
Before we embark on this delightful baking adventure, let’s break down what makes this specific recipe so exceptional. This isn’t just a sweet bread; it’s a technical marvel of the baking world, and this recipe demystifies the process for you.
- The Magic of Tangzhong for Ultimate Softness: The secret to the impossibly soft, fluffy, and moist interior of this bread lies in an Asian baking technique called Tangzhong (or Yudane). By cooking a small portion of the flour and liquid into a thick paste before adding it to the main dough, we pre-gelatinize the starches. This allows the flour to absorb more moisture, resulting in a bread that is incredibly soft and has a longer shelf life than typical homemade bread.
- The Perfect Crispy Cookie Crust: The hallmark of a great Melon Pan (the traditional name for this style of bread) is the cookie crust. This recipe has been meticulously balanced to create a crust that is thin, crisp, and sweet, but not so hard that it shatters. It provides the perfect textural contrast to the pillowy bread beneath.
- Authentic Honeydew Flavor: We use honeydew melon extract to achieve that distinct, sweet, and fragrant flavor that is so characteristic of this treat in Japanese and other Asian bakeries. It’s a unique flavor profile that is both comforting and excitingly different.
- Visually Stunning and Impressive: From the pale green hue of the cookie crust to the classic crosshatch pattern scored on top, these buns are a work of art. They look like they came straight from a professional bakery, making them a show-stopping addition to any brunch, bake sale, or afternoon tea.
- A Rewarding and Fun Baking Project: While there are a few steps involved, this recipe is broken down into manageable stages. The process of working with the soft dough, wrapping it in the cookie crust, and scoring the tops is incredibly satisfying. It’s a wonderful project for a weekend when you want to create something truly special from scratch.
The Ultimate Japanese Honeydew Bread (Melon Pan) Recipe
This recipe is divided into three key components: the Tangzhong starter, the enriched milk bread dough, and the crispy honeydew cookie crust. Don’t be intimidated by the steps; each one is simple on its own.
Ingredients You’ll Need
For the best results, I highly recommend using a kitchen scale for accuracy, as baking is a science!
For the Tangzhong (Flour Paste Starter):
- Bread Flour: ⅓ cup (43g)
- Whole Milk: ⅔ cup (160ml)
- Water: ⅔ cup (160ml)
- (You will only use a portion of this for the dough; the rest can be stored)
For the Soft Milk Bread Dough:
- Tangzhong: 120g (about ½ cup) from the batch made above
- Whole Milk: ½ cup (120ml), lukewarm (around 110°F / 43°C)
- Active Dry Yeast: 2 ¼ teaspoons (1 standard packet, 7g)
- Granulated Sugar: ⅓ cup (67g)
- Large Egg: 1, plus 1 egg yolk (save the white for the cookie crust), at room temperature
- Bread Flour: 3 ⅓ cups (430g)
- Fine Sea Salt: 1 ¼ teaspoons
- Unsalted Butter: 4 tablespoons (57g), softened to room temperature
For the Crispy Honeydew Cookie Crust:
- Unsalted Butter: 6 tablespoons (85g), softened to room temperature
- Granulated Sugar: ¾ cup (150g), plus extra for coating
- Egg White: 1, from the egg used in the dough, at room temperature
- Honeydew Melon Extract: 1 teaspoon (or more to taste)
- Green Gel Food Coloring: A few drops, to achieve a pale honeydew green
- All-Purpose Flour: 1 ½ cups (180g)
- Baking Powder: 1 teaspoon
Step-by-Step Instructions
Follow these instructions carefully, and you’ll be rewarded with perfect honeydew bread.
Part 1: Making the Tangzhong Starter
- Whisk Ingredients: In a small saucepan, whisk together the bread flour, milk, and water until no lumps remain.
- Cook the Paste: Place the saucepan over medium-low heat. Cook, whisking constantly, for 3-5 minutes. The mixture will thicken into a smooth, thick paste, like a pudding. You’ll see lines on the bottom of the pan as you whisk.
- Cool Completely: Remove from the heat and transfer the Tangzhong to a small bowl. Press a piece of plastic wrap directly onto the surface to prevent a skin from forming. Let it cool completely to room temperature. You can make this a day ahead and store it in the refrigerator.
Part 2: Making the Soft Milk Bread Dough
- Activate Yeast: In the bowl of a stand mixer, combine the lukewarm milk, a pinch of the granulated sugar, and the yeast. Let it sit for 5-10 minutes until foamy.
- Combine Ingredients: To the yeast mixture, add the remaining granulated sugar, the egg and egg yolk, and 120g of the cooled Tangzhong. Mix briefly with the dough hook attachment to combine.
- Add Dry Ingredients: In a separate bowl, whisk together the bread flour and salt. Add this to the wet ingredients in the mixer bowl.
- Knead the Dough: Mix on low speed until a shaggy dough forms. Add the softened butter. Increase the speed to medium and knead for 15-20 minutes. The dough will be very sticky at first, but resist adding too much extra flour. Be patient! A properly kneaded dough will be incredibly smooth, elastic, and will pass the “windowpane test” (a small piece can be stretched thin enough to see through without tearing).
- First Rise: Form the dough into a ball and place it in a lightly greased bowl. Cover with plastic wrap and let it rise in a warm place for 1-1.5 hours, or until doubled in size.
Part 3: Making the Honeydew Cookie Crust
- Cream Butter and Sugar: While the bread dough is rising, make the cookie dough. In a medium bowl, use an electric mixer to beat the softened butter and granulated sugar until light and fluffy, about 2-3 minutes.
- Add Wet Ingredients: Beat in the egg white until combined. Then, mix in the honeydew extract and a few drops of green food coloring until you reach your desired shade.
- Add Dry Ingredients: In a separate bowl, whisk together the all-purpose flour and baking powder. Add the dry ingredients to the wet ingredients and mix on low speed until just combined into a soft dough. Do not overmix.
- Chill the Dough: Turn the dough out onto a piece of plastic wrap, form it into a flat disk, and wrap it tightly. Refrigerate for at least 30 minutes. This is crucial for making it easy to handle.
Part 4: Assembling, Scoring, and Baking
- Divide Doughs: Once the bread dough has risen, punch it down and turn it out onto a lightly floured surface. Divide it into 12 equal pieces (a kitchen scale is very helpful here). Roll each piece into a smooth ball. Remove the cookie dough from the fridge and divide it into 12 equal pieces as well.
- Shape the Cookie Topping: Take one piece of cookie dough and roll it into a ball between your palms, then flatten it into a circle about 4 inches in diameter between two pieces of parchment paper.
- Wrap the Buns: Take one bread dough ball and place the flattened cookie dough circle on top. Gently cup the bun in your hand, pressing and smoothing the cookie dough down and around the sides of the bread dough until it covers the top half, like a cap.
- Coat and Score: Pour some extra granulated sugar onto a small plate. Dip the cookie-topped part of the bun into the sugar to coat it evenly. Place the bun on a parchment-lined baking sheet. Using a bench scraper or the back of a knife, gently score a crosshatch (diamond) pattern into the cookie dough. Be careful not to cut through to the bread dough underneath. Repeat with the remaining buns, placing them about 2-3 inches apart.
- Second Rise: Cover the baking sheets loosely with plastic wrap and let the buns rise in a warm place for 30-45 minutes, or until puffy. They won’t quite double in size. While they are rising, preheat your oven to 350°F (175°C).
- Bake: Bake the buns for 15-18 minutes, or until the bread part is a light golden brown at the bottom and the cookie topping is set and lightly colored. Do not overbake, or you will lose the signature softness.
- Cool: Let the buns cool on the baking sheet for a few minutes before transferring them to a wire rack to cool completely.
Nutritional Information
This information is an estimate and will vary based on the exact ingredients used.
- Servings: 12 buns
- Calories per serving: Approximately 380-420 calories
Preparation & Cooking Time
- Preparation Time: 45 minutes
- Rising & Chilling Time: 2 – 2.5 hours
- Baking Time: 15-18 minutes
- Total Time: Approximately 3.5 hours
How to Serve and Enjoy Your Honeydew Bread
These delightful buns are best enjoyed in their pure, unadorned perfection.
- Fresh and Warm: The ultimate experience is eating one while it’s still slightly warm from the oven. The cookie crust is at its crispiest, and the bread is at its softest.
- With a Hot Beverage: Pair a bun with your morning coffee, a cup of green tea, or a glass of milk for the perfect breakfast or afternoon snack.
- As a Special Treat: Pack them in lunchboxes for a wonderful surprise that will be the envy of the cafeteria.
- For Brunch or Parties: Arrange them on a platter for a unique and impressive addition to a brunch spread or dessert table.
- As a Light Dessert: While sweet enough on its own, for an indulgent twist, you can split a bun and serve it with a scoop of vanilla or coconut ice cream.
Additional Tips for Bakery-Perfect Results
This is a recipe with a few technical elements. These five tips will help you navigate them like a pro.
- Don’t Skip the Tangzhong: I can’t emphasize this enough. It may seem like an extra step, but the Tangzhong is the non-negotiable secret to achieving the signature cloud-like, moist texture of authentic Asian milk bread.
- Keep the Cookie Dough Cold: The cookie dough is soft and high in butter. If it gets too warm, it will become sticky, greasy, and nearly impossible to wrap around the bread buns. If you find it’s getting too soft while you work, pop it back in the refrigerator for 10-15 minutes to firm up.
- Weigh Your Ingredients for Consistency: Baking, especially bread making, is a science of ratios. Using a digital kitchen scale to measure your ingredients, particularly the flour and Tangzhong, will ensure you get the right dough consistency every time and guarantee repeatable, perfect results.
- Score Gently, Not Deeply: The purpose of scoring the crosshatch pattern is purely aesthetic. Use a light touch. If you press too hard and cut through the cookie dough into the bread dough beneath, the bread may bulge out awkwardly during the second rise and bake, distorting the classic melon pattern.
- Master the Second Proof (The Poke Test): Over-proofed buns can collapse in the oven, and under-proofed buns will be dense. To check if your buns are ready for the oven after the second rise, lightly press a fingertip into the side of one of the bread portions (not the cookie top). If the indentation springs back immediately, it needs more time. If it springs back slowly and leaves a small indent, it’s ready. If the indentation stays completely, it’s over-proofed.
Frequently Asked Questions (FAQ)
Here are answers to some questions you might have about this unique and delicious bread.
1. Why is it called “Melon Pan” if it doesn’t traditionally taste like melon?
This is a fantastic question! The name “Melon Pan” (メロンパン) comes from its appearance, not its flavor. The scoring on the cookie crust makes the bun resemble a rock melon or cantaloupe. The classic, original Melon Pan is typically vanilla or citrus-flavored. This “Honeydew Bread” is a popular, modern flavor variation that takes the name more literally by adding honeydew flavor and color.
2. Can I make this recipe without honeydew extract?
Absolutely! To make a classic Melon Pan, simply substitute the honeydew extract with 1 ½ teaspoons of pure vanilla extract. You can omit the food coloring for a traditional golden-brown cookie crust. You could also experiment with other extracts like lemon, almond, or strawberry for different flavor variations.
3. My cookie crust cracked a lot or spread too much during baking. What happened?
This can happen for a few reasons. The most common is that the buns were over-proofed during the second rise, causing the bread to expand too rapidly in the oven and crack the crust. It could also be that the cookie dough was rolled too thinly or scored too deeply. Ensure you follow the proofing and scoring guidance for the best results.
4. How should I store Japanese Honeydew Bread?
To maintain their incredible softness, these buns should be stored in an airtight container or a zip-top bag at room temperature. They are best enjoyed within 1-2 days. After the first day, the cookie crust will soften, but the bread will remain delicious. You can briefly refresh a bun in the microwave for 10-15 seconds to soften it up again.
5. Can I prepare the dough ahead of time?
Yes. You can perform the first rise in the refrigerator overnight. After kneading the bread dough, place it in a greased bowl, cover it tightly, and refrigerate for 8-12 hours. The next day, let it sit on the counter for about an hour to warm up slightly before punching it down and proceeding with the shaping and assembly steps. You can also make the cookie dough up to 2 days in advance and keep it wrapped in the refrigerator.
Japanese Honeydew Bread recipe
Ingredients
For the Tangzhong (Flour Paste Starter):
-
Bread Flour: ⅓ cup (43g)
-
Whole Milk: ⅔ cup (160ml)
-
Water: ⅔ cup (160ml)
-
(You will only use a portion of this for the dough; the rest can be stored)
For the Soft Milk Bread Dough:
-
Tangzhong: 120g (about ½ cup) from the batch made above
-
Whole Milk: ½ cup (120ml), lukewarm (around 110°F / 43°C)
-
Active Dry Yeast: 2 ¼ teaspoons (1 standard packet, 7g)
-
Granulated Sugar: ⅓ cup (67g)
-
Large Egg: 1, plus 1 egg yolk (save the white for the cookie crust), at room temperature
-
Bread Flour: 3 ⅓ cups (430g)
-
Fine Sea Salt: 1 ¼ teaspoons
-
Unsalted Butter: 4 tablespoons (57g), softened to room temperature
For the Crispy Honeydew Cookie Crust:
-
Unsalted Butter: 6 tablespoons (85g), softened to room temperature
-
Granulated Sugar: ¾ cup (150g), plus extra for coating
-
Egg White: 1, from the egg used in the dough, at room temperature
-
Honeydew Melon Extract: 1 teaspoon (or more to taste)
-
Green Gel Food Coloring: A few drops, to achieve a pale honeydew green
-
All-Purpose Flour: 1 ½ cups (180g)
-
Baking Powder: 1 teaspoon
Instructions
Part 1: Making the Tangzhong Starter
-
Whisk Ingredients: In a small saucepan, whisk together the bread flour, milk, and water until no lumps remain.
-
Cook the Paste: Place the saucepan over medium-low heat. Cook, whisking constantly, for 3-5 minutes. The mixture will thicken into a smooth, thick paste, like a pudding. You’ll see lines on the bottom of the pan as you whisk.
-
Cool Completely: Remove from the heat and transfer the Tangzhong to a small bowl. Press a piece of plastic wrap directly onto the surface to prevent a skin from forming. Let it cool completely to room temperature. You can make this a day ahead and store it in the refrigerator.
Part 2: Making the Soft Milk Bread Dough
-
Activate Yeast: In the bowl of a stand mixer, combine the lukewarm milk, a pinch of the granulated sugar, and the yeast. Let it sit for 5-10 minutes until foamy.
-
Combine Ingredients: To the yeast mixture, add the remaining granulated sugar, the egg and egg yolk, and 120g of the cooled Tangzhong. Mix briefly with the dough hook attachment to combine.
-
Add Dry Ingredients: In a separate bowl, whisk together the bread flour and salt. Add this to the wet ingredients in the mixer bowl.
-
Knead the Dough: Mix on low speed until a shaggy dough forms. Add the softened butter. Increase the speed to medium and knead for 15-20 minutes. The dough will be very sticky at first, but resist adding too much extra flour. Be patient! A properly kneaded dough will be incredibly smooth, elastic, and will pass the “windowpane test” (a small piece can be stretched thin enough to see through without tearing).
-
First Rise: Form the dough into a ball and place it in a lightly greased bowl. Cover with plastic wrap and let it rise in a warm place for 1-1.5 hours, or until doubled in size.
Part 3: Making the Honeydew Cookie Crust
-
Cream Butter and Sugar: While the bread dough is rising, make the cookie dough. In a medium bowl, use an electric mixer to beat the softened butter and granulated sugar until light and fluffy, about 2-3 minutes.
-
Add Wet Ingredients: Beat in the egg white until combined. Then, mix in the honeydew extract and a few drops of green food coloring until you reach your desired shade.
-
Add Dry Ingredients: In a separate bowl, whisk together the all-purpose flour and baking powder. Add the dry ingredients to the wet ingredients and mix on low speed until just combined into a soft dough. Do not overmix.
-
Chill the Dough: Turn the dough out onto a piece of plastic wrap, form it into a flat disk, and wrap it tightly. Refrigerate for at least 30 minutes. This is crucial for making it easy to handle.
Part 4: Assembling, Scoring, and Baking
-
Divide Doughs: Once the bread dough has risen, punch it down and turn it out onto a lightly floured surface. Divide it into 12 equal pieces (a kitchen scale is very helpful here). Roll each piece into a smooth ball. Remove the cookie dough from the fridge and divide it into 12 equal pieces as well.
-
Shape the Cookie Topping: Take one piece of cookie dough and roll it into a ball between your palms, then flatten it into a circle about 4 inches in diameter between two pieces of parchment paper.
-
Wrap the Buns: Take one bread dough ball and place the flattened cookie dough circle on top. Gently cup the bun in your hand, pressing and smoothing the cookie dough down and around the sides of the bread dough until it covers the top half, like a cap.
-
Coat and Score: Pour some extra granulated sugar onto a small plate. Dip the cookie-topped part of the bun into the sugar to coat it evenly. Place the bun on a parchment-lined baking sheet. Using a bench scraper or the back of a knife, gently score a crosshatch (diamond) pattern into the cookie dough. Be careful not to cut through to the bread dough underneath. Repeat with the remaining buns, placing them about 2-3 inches apart.
-
Second Rise: Cover the baking sheets loosely with plastic wrap and let the buns rise in a warm place for 30-45 minutes, or until puffy. They won’t quite double in size. While they are rising, preheat your oven to 350°F (175°C).
-
Bake: Bake the buns for 15-18 minutes, or until the bread part is a light golden brown at the bottom and the cookie topping is set and lightly colored. Do not overbake, or you will lose the signature softness.
-
Cool: Let the buns cool on the baking sheet for a few minutes before transferring them to a wire rack to cool completely.
Nutrition
- Serving Size: one normal portion
- Calories: 380-420


