

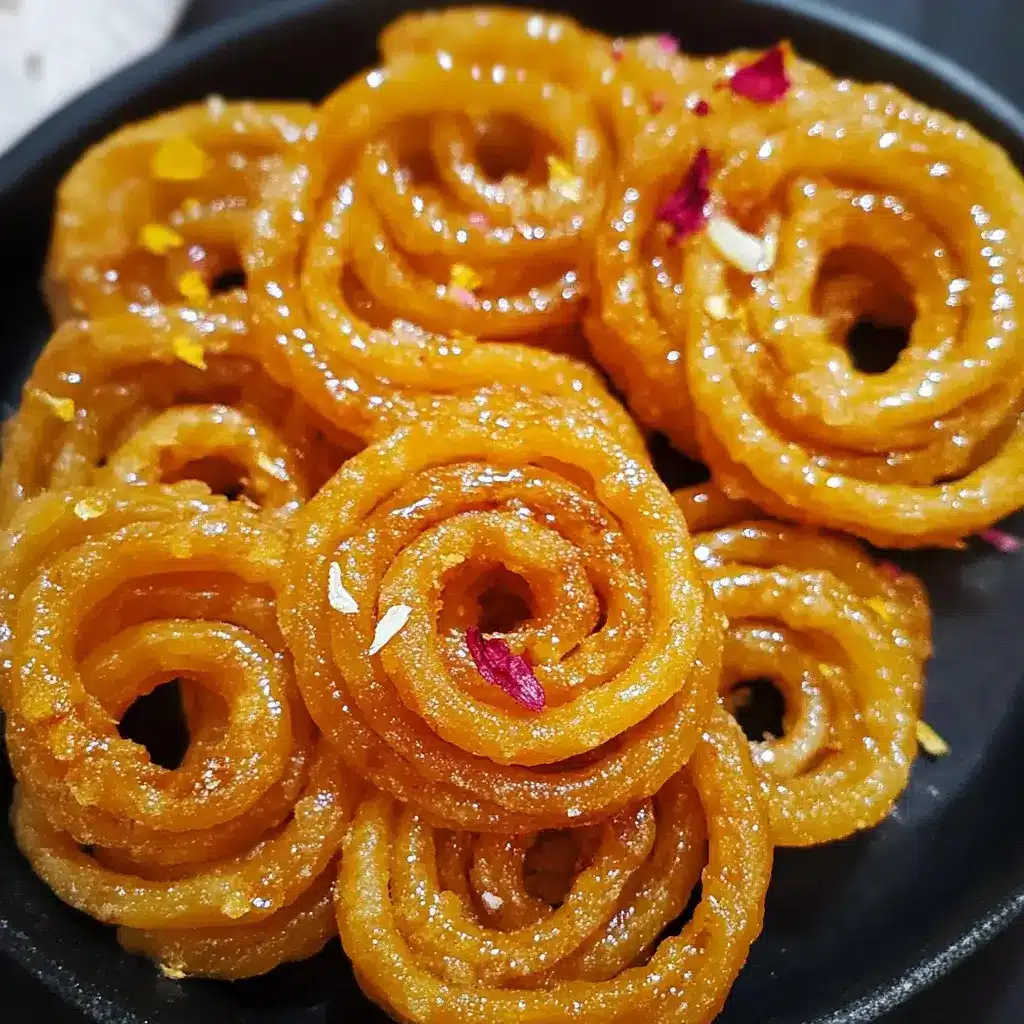

The aroma of freshly fried Jalebis, those intricate spirals of sweet, crispy goodness soaking in fragrant sugar syrup, is something that transports me straight back to bustling Indian street markets and festive family gatherings. For years, the thought of making Jalebi at home felt like an unattainable culinary dream – a secret held only by seasoned halwais (sweet makers). But let me tell you, the first time I successfully piped those golden swirls into hot oil and watched them puff up, then dunked them into warm, saffron-infused syrup, the sense of accomplishment was immense! My family, initially skeptical of my ambitious project, were absolutely floored. The Jalebis were perfectly crispy on the outside, chewy and syrupy on the inside, with that signature tangy hint from the fermentation. They disappeared in minutes, accompanied by happy sighs and requests for “just one more.” This recipe demystifies the process, breaking it down into manageable steps so you too can experience the joy of creating this iconic Indian sweet in your own kitchen. It’s more than just a dessert; it’s an experience, a celebration of flavor and texture that’s bound to impress.
Unveiling the Magic: What Exactly is Jalebi?
Jalebi is a beloved sweet snack popular across South Asia, the Middle East, and parts of Africa. It’s instantly recognizable by its bright orange or yellow, somewhat chaotic, pretzel-like spiral shapes. At its heart, Jalebi is made by deep-frying a fermented batter, typically made from all-purpose flour (maida), and then soaking these fried spirals in a warm sugar syrup (chashni).
The magic of Jalebi lies in its contrasting textures and flavors:
- Crispy Exterior: The immediate bite offers a satisfying crunch.
- Chewy & Syrupy Interior: As you bite further, the Jalebi yields to a slightly chewy texture, having absorbed the sweet, often cardamom and saffron-flavored, sugar syrup.
- Slight Tang: Traditionally, the batter is fermented for several hours, or even overnight, which imparts a subtle, pleasant tanginess that beautifully balances the sweetness of the syrup.
Jalebis are not just a dessert; they are an emotion, a celebratory food often enjoyed during festivals like Diwali, Holi, Eid, weddings, and other special occasions. They are also a popular street food, enjoyed hot and fresh, sometimes with a side of creamy rabri (sweetened condensed milk) or a glass of warm milk.
Why You’ll Adore Crafting Homemade Jalebi
While readily available in sweet shops, there’s a unique satisfaction and several advantages to making Jalebi at home:
- Unbeatable Freshness: Nothing compares to the taste of Jalebis straight from the frying pan, warm, crispy, and dripping with syrup.
- Quality Control: You control the quality of ingredients – from the flour and sugar to the oil and flavorings. No artificial colors or preservatives unless you choose to add them (though natural options like turmeric or saffron are preferred).
- Customizable Sweetness & Flavor: You can adjust the sweetness of the syrup and the intensity of flavors like cardamom, saffron, or rose water to your preference.
- The “Wow” Factor: Presenting a plate of homemade Jalebis to guests is guaranteed to impress. It shows effort, skill, and a love for authentic flavors.
- It’s Fun! Once you get the hang of piping the batter, it’s a surprisingly fun and creative process.
- Hygienic: Making them at home ensures they are prepared in a clean and hygienic environment.
Gathering Your Sweet Arsenal: Jalebi Ingredients
Precision is important for achieving the perfect Jalebi. Here’s what you’ll need:
For the Jalebi Batter (Traditional Fermented Method):
- 1 cup (125g) All-Purpose Flour (Maida)
- 1 tablespoon (15g) Gram Flour (Besan) or Fine Semolina (Sooji/Rava) – for crispiness
- 1/4 teaspoon Active Dry Yeast (or 1/8 teaspoon Instant Yeast)
- 1/2 cup (120ml) Lukewarm Water (approx., adjust for consistency)
- 1 tablespoon Plain Yogurt (Dahi) – optional, for tang and to aid fermentation
- Pinch of Saffron strands (Kesar) – soaked in 1 tbsp warm water (optional, for color and flavor in batter)
- A tiny pinch of Turmeric powder (Haldi) – for natural yellow color (optional) OR a drop of food-grade orange or yellow food coloring (optional)
For the Sugar Syrup (Chashni):
- 1.5 cups (300g) Granulated Sugar
- 3/4 cup (180ml) Water
- 1/2 teaspoon Cardamom Powder (Elaichi)
- 1/4 teaspoon Saffron Strands (Kesar)
- 1 teaspoon Lemon Juice (to prevent crystallization of syrup)
- 1 teaspoon Rose Water (Gulab Jal) – optional, for fragrance
For Frying:
- 2-3 cups Ghee or Vegetable Oil (or a mix) for deep frying
Essential Tools for the Jalebi Artisan
Having the right equipment will make the Jalebi-making process smoother and more successful:
- Mixing Bowls: At least two – one for the batter and one for the sugar syrup.
- Whisk: For mixing the batter thoroughly.
- Measuring Cups and Spoons: For accurate ingredient measurements.
- Squeeze Bottle or Piping Bag: A plastic squeeze bottle with a small nozzle (about 2-3mm opening) is traditional and easiest for beginners. Alternatively, a sturdy piping bag with a small round tip, or even a Ziploc bag with a tiny corner snipped off, can be used. A traditional Jalebi cloth (a square piece of thick cloth with a hole in the center) is used by professionals but requires practice.
- Heavy-Bottomed Pan or Kadai: A wide, relatively shallow, heavy-bottomed pan is ideal for frying Jalebis. This allows them to float freely and cook evenly.
- Slotted Spoon or Spider Strainer: For carefully removing Jalebis from the hot oil and transferring them to the syrup.
- Saucepan: For making the sugar syrup.
- Kitchen Thermometer (Optional but helpful): For checking the temperature of the oil and syrup. Syrup needs to be warm, not hot or cold. Oil should be at medium heat.
- Wire Rack: For placing Jalebis briefly after soaking if you want to drain excess syrup, though many prefer them very syrupy.
The Sweet Symphony: Step-by-Step Jalebi Instructions
Making Jalebi involves three main stages: preparing the batter, making the sugar syrup, and then frying and soaking the Jalebis.
Part 1: Crafting the Perfect Jalebi Batter (Fermentation is Key!)
This traditional method relies on yeast and time for fermentation.
- Activate Yeast (If using Active Dry Yeast): In a small bowl, dissolve the active dry yeast in 2 tablespoons of the lukewarm water. Let it sit for 5-10 minutes until foamy. If using instant yeast, you can add it directly to the dry ingredients.
- Combine Dry Ingredients: In a medium mixing bowl, whisk together the all-purpose flour (maida) and gram flour (besan) or semolina (sooji).
- Add Wet Ingredients: Add the activated yeast mixture (or instant yeast), plain yogurt (if using), soaked saffron (with its water, if using), and turmeric/food coloring (if using) to the dry ingredients.
- Form the Batter: Gradually add the remaining lukewarm water, whisking continuously to form a smooth, thick, yet pourable batter. The consistency should be similar to pancake batter or dosa batter – thick enough to hold its shape when piped but thin enough to flow easily. Aim for a lump-free batter. You might need slightly more or less water, so add it slowly.
- Beat Well: Whisk the batter vigorously for 4-5 minutes. This incorporates air and helps develop gluten, which is important for the Jalebi’s texture.
- Ferment the Batter: Cover the bowl with a lid or plastic wrap and place it in a warm spot to ferment for 8-12 hours, or even up to 18-24 hours for a more pronounced tang, depending on your room temperature. In warmer climates, fermentation will be faster. The batter should increase in volume slightly and have tiny bubbles on the surface. It will also smell slightly sour, which is perfectly normal and desired.
- Quick Fermentation Tip: If you’re short on time, you can reduce fermentation to 1-2 hours in a very warm place (like an oven with just the light on, or a sunny spot). The tang won’t be as developed, but it will still work. Some “instant” recipes skip long fermentation and use baking powder, but the flavor profile is different.
- Check Batter Consistency: After fermentation, gently stir the batter. If it has become too thick, add a teaspoon or two of water. If too thin, add a teaspoon of all-purpose flour. It should be a smooth, flowing consistency.
Part 2: Brewing the Aromatic Sugar Syrup (Chashni)
The syrup should be made while the Jalebis are frying or just before, as it needs to be warm when the hot Jalebis are added.
- Combine Sugar and Water: In a saucepan, combine the sugar and water.
- Dissolve Sugar: Place the saucepan over medium heat. Stir continuously until the sugar is completely dissolved.
- Boil and Thicken: Bring the syrup to a boil. Once boiling, stop stirring. Let it boil for 4-5 minutes, or until it reaches a “one-string consistency.”
- Testing for One-String Consistency: Dip a spoon into the syrup, let it cool slightly for a few seconds, then touch the syrup between your thumb and forefinger and gently pull them apart. A single thread (string) should form and not break immediately. If it’s too thin, boil for a bit longer. If it goes beyond one string, it will be too thick and might crystallize on the Jalebis.
- Add Flavorings and Lemon Juice: Once the desired consistency is reached, turn off the heat. Stir in the cardamom powder, saffron strands, lemon juice (this prevents the syrup from crystallizing later), and rose water (if using).
- Keep Warm: Cover the syrup and keep it warm while you fry the Jalebis. The syrup should not be boiling hot, but pleasantly warm to the touch. If it cools down too much, gently reheat it.
Part 3: The Art of Frying and Soaking Jalebis
This is where the magic happens!
- Prepare for Frying: Fill your squeeze bottle or piping bag with the fermented Jalebi batter.
- Heat Oil/Ghee: Heat the ghee or oil in your wide, heavy-bottomed pan over medium heat. The oil depth should be about 1 to 1.5 inches. The oil should not be smoking hot. To test if it’s ready, drop a tiny bit of batter into the oil. It should sizzle and float to the surface steadily, not sink or brown too quickly. Ideal temperature is around 325-350°F (160-175°C). If it’s too hot, Jalebis will brown too fast and be raw inside. If too cool, they will absorb too much oil and be greasy.
- Pipe the Jalebis: Holding the squeeze bottle or piping bag over the hot oil, squeeze the batter in continuous, overlapping circular motions to form spiral shapes. Start from the center and work outwards, or make random crisscross patterns. Don’t make them too large, especially when starting. Pipe only a few Jalebis at a time to avoid overcrowding the pan, which lowers the oil temperature.
- Fry Until Light Golden and Crisp: Fry the Jalebis on low to medium heat. They will initially sink and then float to the surface. Fry for about 1-2 minutes on one side until they are light golden and slightly crisp.
- Flip and Fry: Gently flip the Jalebis using a slotted spoon or tongs and fry the other side for another 1-2 minutes until they are evenly light golden brown and crisp on both sides. They should feel firm to the touch.
- Drain Briefly: Remove the fried Jalebis from the oil using a slotted spoon, allowing excess oil to drip back into the pan for a few seconds.
- Soak in Warm Syrup: Immediately transfer the hot, fried Jalebis into the warm sugar syrup. Ensure they are fully submerged.
- Soak and Flip: Let the Jalebis soak in the syrup for about 30 seconds to 1 minute on each side, depending on how syrupy you like them. If you prefer them crispier, soak for a shorter time. If you like them softer and juicier, soak a bit longer. They will absorb the syrup and become heavier.
- Remove and Serve: Using the slotted spoon, carefully remove the soaked Jalebis from the syrup, allowing any excess syrup to drip off. They are best served warm.
- Repeat: Continue piping, frying, and soaking the remaining batter in batches. Maintain the oil temperature and ensure the syrup stays warm.
Nutritional Snapshot (Estimated)
Please note these are approximate values and can vary greatly based on the size of the Jalebis, amount of oil absorbed, and syrup concentration.
- Servings: This recipe makes approximately 20-25 medium-sized Jalebis.
- Serving Size: Let’s consider 2 Jalebis as one serving.
- Calories per serving (2 Jalebis): Approximately 250-350 calories.
- Breakdown Consideration: The primary calorie contributors are the flour, sugar in the syrup, and the oil absorbed during frying.
For a more accurate count, using a nutritional calculator with your specific ingredient quantities is recommended.
Time Investment: Preparation and Cooking
Understanding the time commitment helps in planning:
- Batter Preparation Time: 15-20 minutes (mixing and initial whisking)
- Batter Fermentation Time: 8-24 hours (largely unattended)
- Syrup Preparation Time: 10-15 minutes
- Frying and Soaking Time: 3-5 minutes per batch. For 5-6 batches, this would be 15-30 minutes.
- Total Active Time: Approximately 45 minutes to 1 hour (excluding fermentation)
- Total Time (including average fermentation): Approximately 9 hours to 25 hours.
Serving Your Golden Spirals: Jalebi Presentation Ideas
Jalebis are delightful on their own, but here are some ways to serve them for an enhanced experience:
- Plain and Warm: The classic way, allowing their pure flavor and texture to shine.
- With Rabri: A very popular and decadent pairing. Serve warm Jalebis with a dollop of chilled, creamy Rabri (a sweetened, thickened milk dessert). The contrast is divine.
- With Warm Milk: Many enjoy dipping crispy Jalebis into a glass of warm, unsweetened or lightly sweetened milk.
- With Yogurt or Curd: A dollop of plain, unsweetened yogurt can provide a cooling contrast to the sweet Jalebis.
- Garnishes (Optional):
- Sprinkle with finely chopped pistachios or almonds for added crunch and visual appeal.
- A few extra strands of saffron.
- Edible silver leaf (varak) for a festive touch.
- As Part of a Dessert Platter: Include Jalebis alongside other Indian sweets like Gulab Jamun, Barfi, or Ladoo for a grand dessert spread.
- Breakfast Treat: In some parts of India, Jalebis are enjoyed as a special breakfast item, especially with poha (flattened rice) or kachori.
Pro Tips for Jalebi Perfection (5 Tips)
- Master Batter Consistency: This is crucial. The batter should be smooth, lump-free, and of a pouring consistency similar to thick pancake batter. If it’s too thick, Jalebis will be dense. If too thin, they won’t hold their shape. Test a small amount first.
- Perfect Oil Temperature: Fry Jalebis on low to medium heat. If the oil is too hot, they’ll brown quickly on the outside but remain raw inside and won’t be crispy. If too cool, they’ll absorb excess oil and become greasy. Aim for a steady sizzle.
- Warm Syrup is Key: The sugar syrup should be warm (not boiling hot or cold) when you add the hot Jalebis. This allows for optimal absorption without making them soggy too quickly or preventing absorption.
- Don’t Overcrowd the Pan: Fry Jalebis in small batches. Overcrowding lowers the oil temperature, leading to oily and improperly cooked Jalebis. Give them space to float and cook evenly.
- Immediate Soaking: Transfer the Jalebis directly from the hot oil to the warm syrup. This temperature difference helps them absorb the syrup effectively. Don’t let them cool down completely before soaking.
Beyond the Basics: Jalebi Variations to Explore
While the traditional fermented maida Jalebi is classic, there are several interesting variations:
- Instant Jalebi (No Fermentation): For those short on time, an “instant” version can be made using baking powder or Eno (fruit salt) as a leavening agent instead of yeast, skipping the long fermentation. The taste will be slightly different, lacking the distinct tang, but still delicious.
- Urad Dal Jalebi (Jangiri/Imarti): A popular South Indian variation called Jangiri (or Imarti in North India) is made from a batter of ground urad dal (split black lentils). These are often thicker, more flower-like in shape, and have a distinct texture and flavor.
- Paneer Jalebi (Chenna Jalebi): Made with fresh chenna (Indian cottage cheese) mixed with flour, these Jalebis are softer and have a richer, milkier taste. They are popular in Bengal and Odisha.
- Mawa Jalebi (Khoya Jalebi): These are made with mawa (khoya/milk solids) and are very rich, dense, and often darker in color, resembling Gulab Jamun in texture.
- Whole Wheat Jalebi: For a slightly healthier twist, you can try making Jalebis with whole wheat flour (atta), though the texture and crispiness might differ from the maida version.
Troubleshooting Common Jalebi Challenges
- Jalebis are Flat, Not Puffy:
- Batter might be too thin. Add a little more flour.
- Fermentation might not have been sufficient, or yeast was not active.
- Oil not hot enough.
- Jalebis are Soggy, Not Crispy:
- Oil temperature too low, causing them to absorb too much oil.
- Soaked in syrup for too long.
- Syrup too thin or too cold.
- Batter too thin.
- Jalebis are Too Hard or Brittle:
- Batter too thick.
- Over-fried at high temperature.
- Syrup too thick (more than one-string consistency).
- Jalebis Not Absorbing Syrup:
- Jalebis were allowed to cool too much before being added to the syrup.
- Syrup is too cold or too thick.
- Syrup Crystallizing:
- Lemon juice was not added to the syrup.
- Syrup was overcooked to a two-string or higher consistency.
- Stirring the syrup after it comes to a boil can also cause crystallization.
Storing and Reheating Your Jalebi Treasures
- Storing: Jalebis are best enjoyed fresh on the day they are made for maximum crispiness. However, leftovers can be stored in an airtight container at room temperature for 1-2 days, or in the refrigerator for 3-4 days. Note that they will lose some of their crispiness over time, especially when refrigerated.
- Reheating:
- Oven/Air Fryer: The best way to bring back some crispiness is to reheat them in a preheated oven or air fryer at a low temperature (around 250-300°F or 120-150°C) for a few minutes until warmed through. Keep a close eye to prevent them from burning or drying out too much.
- Microwave (Use with Caution): Microwaving can make them soft and chewier rather than crispy. If you do use a microwave, heat for very short intervals (10-15 seconds).
- Briefly Re-dip in Warm Syrup: If they seem dry, you can quickly dip them in some leftover warm syrup after reheating.
The Cultural Tapestry: Jalebi in Celebrations and Daily Life
Jalebi is more than just a sweet; it’s deeply woven into the cultural fabric of India and neighboring regions.
- Festive Staple: No major festival in India, be it Diwali (the festival of lights), Holi (the festival of colors), Dussehra, or Eid, feels complete without the presence of Jalebis. They are offered to deities, shared with family and friends, and symbolize joy and auspiciousness.
- Celebratory Occasions: From weddings and birthdays to exam results and new beginnings, Jalebis are often the sweet of choice to mark happy events. The phrase “Jalebi ki tarah seedha” (as straight as a Jalebi) is a humorous idiom in Hindi, referring to someone who is deceptively complex, much like the sweet’s twisted form.
- Street Food Icon: Wander through any Indian market, and you’re likely to find a halwai expertly piping and frying fresh Jalebis, their sweet aroma filling the air. Enjoying hot Jalebis from a street vendor is a quintessential Indian experience.
- Regional Variations & Names: While “Jalebi” is the most common name, it’s known by slight variations like Jilapi, Jilipi, Zulbia (in Persian cuisine, from which it likely originated or was influenced), Jeri, etc., across different regions, each with subtle nuances in preparation or presentation.
Perfect Pairings: What to Enjoy with Jalebi
Jalebi’s unique sweet and tangy profile pairs wonderfully with several items:
- Rabri: This is the ultimate classic pairing. The cool, creamy, cardamom-infused thickened milk cuts through the sweetness and crispness of the Jalebi beautifully.
- Warm Milk: A simple glass of unsweetened or lightly sweetened warm milk is a comforting accompaniment.
- Plain Yogurt (Dahi/Curd): The tartness of plain yogurt balances the intense sweetness of Jalebi.
- Samosa or Kachori: In many parts of North India, a savory snack like a spicy samosa or kachori followed by a sweet Jalebi is a popular combination, offering a delightful contrast of flavors.
- Poha: In regions like Madhya Pradesh, Jalebi is often served with Indori Poha for breakfast.
- Vanilla Ice Cream: A modern twist, where warm Jalebi with cold vanilla ice cream creates a lovely hot-cold, crispy-creamy contrast.
Frequently Asked Questions (FAQ) About Jalebi
- Q: Why does Jalebi batter need to be fermented?
A: Fermentation (traditionally with yeast or a starter culture) is key to Jalebi’s unique character. It develops a slight tanginess that balances the sweetness of the sugar syrup. It also helps in creating a lighter texture and contributes to the Jalebi’s ability to absorb syrup. - Q: Can I make Jalebi without yeast or a long fermentation?
A: Yes, you can make “instant Jalebis” using leavening agents like baking powder or Eno (fruit salt). These recipes skip the long fermentation. While they will look like Jalebis and be sweet, they will lack the characteristic tangy flavor of traditionally fermented Jalebis. - Q: My Jalebis are not crispy. What did I do wrong?
A: Several factors can lead to non-crispy Jalebis:- Oil Temperature: If the oil is not hot enough, Jalebis will absorb oil and become soggy. If too hot, they’ll cook fast outside but stay soft inside.
- Batter Consistency: A batter that is too thin can result in softer Jalebis.
- Syrup Temperature/Consistency: Soaking in overly hot or very thin syrup for too long can make them lose crispness.
- Frying Time: Ensure they are fried until golden and firm.
- Q: What is “one-string consistency” for the sugar syrup?
A: One-string consistency (Ek Taar Chashni) is a specific stage in sugar syrup making. To test, take a tiny drop of cooled syrup between your thumb and forefinger. When you gently pull them apart, a single thread or “string” should form without breaking immediately. This consistency is crucial for Jalebis to absorb the syrup properly without becoming too soggy or getting a sugary crust. - Q: Can I use a Ziploc bag instead of a squeeze bottle for piping Jalebis?
A: Yes, you can. Use a sturdy freezer-grade Ziploc bag. Fill it with batter, seal it, and then snip off a very small corner (about 2-3mm). The control might be a bit less than with a dedicated squeeze bottle, but it’s a viable alternative if you don’t have one. Practice your piping on a plate first.
Conclusion: Embrace the Sweet Swirls of Homemade Jalebi!
Crafting Jalebi at home might seem daunting at first, but as you’ve seen, it’s a journey of simple steps leading to an incredibly rewarding outcome. The aroma of fermenting batter, the sizzle of Jalebis in hot oil, and the sight of those golden spirals soaking up fragrant syrup is a culinary experience unlike any other. This recipe empowers you to bring that authentic, festive Indian sweetness right into your kitchen. So, roll up your sleeves, embrace the process, and get ready to delight your senses and impress your loved ones with perfectly crispy, syrupy, homemade Jalebis. Happy cooking!
Print
Jalebi recipe
Ingredients
-
- 1 cup (125g) All-Purpose Flour (Maida)
-
- 1 tablespoon (15g) Gram Flour (Besan) or Fine Semolina (Sooji/Rava) – for crispiness
-
- 1/4 teaspoon Active Dry Yeast (or 1/8 teaspoon Instant Yeast)
-
- 1/2 cup (120ml) Lukewarm Water (approx., adjust for consistency)
-
- 1 tablespoon Plain Yogurt (Dahi) – optional, for tang and to aid fermentation
-
- Pinch of Saffron strands (Kesar) – soaked in 1 tbsp warm water (optional, for color and flavor in batter)
-
- A tiny pinch of Turmeric powder (Haldi) – for natural yellow color (optional) OR a drop of food-grade orange or yellow food coloring (optional)
For the Sugar Syrup (Chashni):
-
- 1.5 cups (300g) Granulated Sugar
-
- 3/4 cup (180ml) Water
-
- 1/2 teaspoon Cardamom Powder (Elaichi)
-
- 1/4 teaspoon Saffron Strands (Kesar)
-
- 1 teaspoon Lemon Juice (to prevent crystallization of syrup)
-
- 1 teaspoon Rose Water (Gulab Jal) – optional, for fragrance
Instructions
-
- Activate Yeast (If using Active Dry Yeast): In a small bowl, dissolve the active dry yeast in 2 tablespoons of the lukewarm water. Let it sit for 5-10 minutes until foamy. If using instant yeast, you can add it directly to the dry ingredients.
-
- Combine Dry Ingredients: In a medium mixing bowl, whisk together the all-purpose flour (maida) and gram flour (besan) or semolina (sooji).
-
- Add Wet Ingredients: Add the activated yeast mixture (or instant yeast), plain yogurt (if using), soaked saffron (with its water, if using), and turmeric/food coloring (if using) to the dry ingredients.
-
- Form the Batter: Gradually add the remaining lukewarm water, whisking continuously to form a smooth, thick, yet pourable batter. The consistency should be similar to pancake batter or dosa batter – thick enough to hold its shape when piped but thin enough to flow easily. Aim for a lump-free batter. You might need slightly more or less water, so add it slowly.
-
- Beat Well: Whisk the batter vigorously for 4-5 minutes. This incorporates air and helps develop gluten, which is important for the Jalebi’s texture.
-
- Ferment the Batter: Cover the bowl with a lid or plastic wrap and place it in a warm spot to ferment for 8-12 hours, or even up to 18-24 hours for a more pronounced tang, depending on your room temperature. In warmer climates, fermentation will be faster. The batter should increase in volume slightly and have tiny bubbles on the surface. It will also smell slightly sour, which is perfectly normal and desired.
-
- Quick Fermentation Tip: If you’re short on time, you can reduce fermentation to 1-2 hours in a very warm place (like an oven with just the light on, or a sunny spot). The tang won’t be as developed, but it will still work. Some “instant” recipes skip long fermentation and use baking powder, but the flavor profile is different.
-
- Ferment the Batter: Cover the bowl with a lid or plastic wrap and place it in a warm spot to ferment for 8-12 hours, or even up to 18-24 hours for a more pronounced tang, depending on your room temperature. In warmer climates, fermentation will be faster. The batter should increase in volume slightly and have tiny bubbles on the surface. It will also smell slightly sour, which is perfectly normal and desired.
-
- Check Batter Consistency: After fermentation, gently stir the batter. If it has become too thick, add a teaspoon or two of water. If too thin, add a teaspoon of all-purpose flour. It should be a smooth, flowing consistency.
Part 2: Brewing the Aromatic Sugar Syrup (Chashni)
The syrup should be made while the Jalebis are frying or just before, as it needs to be warm when the hot Jalebis are added.
-
- Combine Sugar and Water: In a saucepan, combine the sugar and water.
-
- Dissolve Sugar: Place the saucepan over medium heat. Stir continuously until the sugar is completely dissolved.
-
- Boil and Thicken: Bring the syrup to a boil. Once boiling, stop stirring. Let it boil for 4-5 minutes, or until it reaches a “one-string consistency.”
-
- Testing for One-String Consistency: Dip a spoon into the syrup, let it cool slightly for a few seconds, then touch the syrup between your thumb and forefinger and gently pull them apart. A single thread (string) should form and not break immediately. If it’s too thin, boil for a bit longer. If it goes beyond one string, it will be too thick and might crystallize on the Jalebis.
-
- Boil and Thicken: Bring the syrup to a boil. Once boiling, stop stirring. Let it boil for 4-5 minutes, or until it reaches a “one-string consistency.”
-
- Add Flavorings and Lemon Juice: Once the desired consistency is reached, turn off the heat. Stir in the cardamom powder, saffron strands, lemon juice (this prevents the syrup from crystallizing later), and rose water (if using).
-
- Keep Warm: Cover the syrup and keep it warm while you fry the Jalebis. The syrup should not be boiling hot, but pleasantly warm to the touch. If it cools down too much, gently reheat it.
Part 3: The Art of Frying and Soaking Jalebis
This is where the magic happens!
-
- Prepare for Frying: Fill your squeeze bottle or piping bag with the fermented Jalebi batter.
-
- Heat Oil/Ghee: Heat the ghee or oil in your wide, heavy-bottomed pan over medium heat. The oil depth should be about 1 to 1.5 inches. The oil should not be smoking hot. To test if it’s ready, drop a tiny bit of batter into the oil. It should sizzle and float to the surface steadily, not sink or brown too quickly. Ideal temperature is around 325-350°F (160-175°C). If it’s too hot, Jalebis will brown too fast and be raw inside. If too cool, they will absorb too much oil and be greasy.
-
- Pipe the Jalebis: Holding the squeeze bottle or piping bag over the hot oil, squeeze the batter in continuous, overlapping circular motions to form spiral shapes. Start from the center and work outwards, or make random crisscross patterns. Don’t make them too large, especially when starting. Pipe only a few Jalebis at a time to avoid overcrowding the pan, which lowers the oil temperature.
-
- Fry Until Light Golden and Crisp: Fry the Jalebis on low to medium heat. They will initially sink and then float to the surface. Fry for about 1-2 minutes on one side until they are light golden and slightly crisp.
-
- Flip and Fry: Gently flip the Jalebis using a slotted spoon or tongs and fry the other side for another 1-2 minutes until they are evenly light golden brown and crisp on both sides. They should feel firm to the touch.
-
- Drain Briefly: Remove the fried Jalebis from the oil using a slotted spoon, allowing excess oil to drip back into the pan for a few seconds.
-
- Soak in Warm Syrup: Immediately transfer the hot, fried Jalebis into the warm sugar syrup. Ensure they are fully submerged.
-
- Soak and Flip: Let the Jalebis soak in the syrup for about 30 seconds to 1 minute on each side, depending on how syrupy you like them. If you prefer them crispier, soak for a shorter time. If you like them softer and juicier, soak a bit longer. They will absorb the syrup and become heavier.
-
- Remove and Serve: Using the slotted spoon, carefully remove the soaked Jalebis from the syrup, allowing any excess syrup to drip off. They are best served warm.
-
- Repeat: Continue piping, frying, and soaking the remaining batter in batches. Maintain the oil temperature and ensure the syrup stays warm.
Nutrition
- Serving Size: one normal portion
- Calories: 250-350 calories.


