

I live for the moment at a Halloween party when someone does a double-take at the food table. It’s that split second of confusion, followed by a wide-eyed look of disgust, which then melts into a laugh of pure delight. That, my friends, is the magic of spooky food. For years, I tried elaborate, complicated recipes, spending hours creating intricate eyeball cupcakes or complex spiderweb dips. Then one year, running short on time before a school Halloween event, I threw together the simplest, silliest idea I could think of: Hotdog Fingers. I quickly boiled some hot dogs, made a few clumsy cuts for “knuckles,” stuck on a sliver of onion for a “nail,” and squirted a gruesome amount of ketchup at the base. I was almost embarrassed to put them on the table next to the more elaborate treats. But a funny thing happened. The Hotdog Fingers were the first thing to disappear. The kids went absolutely wild for them, proudly holding up their “severed fingers” before devouring them. It was a hilarious, macabre, and wildly successful experiment. Now, they are my go-to, my secret weapon for Halloween fun, proving that sometimes the most effective and memorable recipes are also the easiest.
Why These Hotdog Fingers are a Halloween Game-Changer
Before you dismiss this as just a hot dog in a bun, let’s break down why this simple recipe is pure Halloween genius and destined to become your new favorite tradition. This is more than food; it’s interactive, edible entertainment.
- Hilariously and Deliciously Creepy: The visual impact of these “fingers” is undeniable. They are just realistic enough to be unsettling but silly enough to be fun, not truly scary. Arranged on a platter, they create an instant centerpiece that gets everyone talking and laughing. It’s the perfect icebreaker for any Halloween party.
- The Ultimate Kid-Friendly Food: Let’s face it, Halloween is for the kids, and what do kids love more than hot dogs? This recipe takes a familiar, beloved food and gives it a spooky twist they can’t resist. It’s a guaranteed way to get even the pickiest eaters to participate in the festive meal.
- Incredibly Easy and Fast: In the chaos of Halloween costumes, decorations, and trick-or-treating schedules, you need a recipe that is virtually foolproof and lightning-fast. You can whip up a whole platter of these gruesome digits in under 20 minutes from start to finish. No special skills or fancy equipment required.
- Budget-Friendly for a Crowd: Hosting a party? Feeding the neighborhood kids before they head out? This recipe is incredibly economical. Hot dogs and buns are some of the most affordable party foods available, allowing you to create a high-impact dish without breaking the bank.
- Completely Customizable: While the classic recipe is a masterpiece of simplicity, it’s also a blank canvas. You can easily adapt it for different dietary needs using vegetarian or vegan hot dogs, or get creative with different “gore” and “garnish” to match your party’s theme.
The Anatomy of a Perfect Severed Finger: Ingredient Breakdown
The beauty of this recipe lies in its simplicity. You only need a few basic ingredients to create these masterpieces of mock horror.
The Fingers (The Hot Dogs)
The star of the show. The type of hot dog you choose can subtly change the final look.
- Best Choice: Standard-sized hot dogs (beef, pork, turkey, or a mix) are ideal. Their length and thickness are the most “finger-like.” Avoid jumbo or bun-length dogs, as their proportions can look less realistic.
- Dietary Options: This recipe works perfectly with vegetarian and vegan hot dogs! They cook and carve just as easily, making this a wonderfully inclusive party dish.
The Nail (The Onion)
This tiny detail is what sells the illusion.
- The Classic: A small piece of thinly sliced white or yellow onion creates a surprisingly effective and creepy-looking fingernail.
- Alternatives: If you have onion-averse kids (or adults!), a slivered almond makes a fantastic, and arguably more realistic, substitute. You can also use a small piece of bell pepper cut into a nail shape.
The Bun (The Serving Vessel)
The bun serves as the perfect holder for your creepy creation.
- Standard Buns: Regular, soft hot dog buns are perfect. Their pale color can even add to the “fleshy” aesthetic.
- Upgraded Buns: If you want to get a little fancier, a brioche or potato bun adds a touch of sweetness and richness.
The Gore (The Condiments)
This is where you bring the horror to life!
- Classic Blood: Ketchup is non-negotiable for that fresh, bloody look at the “severed” end of the finger.
- Other Gruesome Fluids: Don’t be afraid to add more! Yellow mustard can look like gruesome pus, while a green relish can give a ghoulish, gangrenous vibe.
Severed Hotdog Fingers: The Complete Recipe
Here is the simple blueprint for creating your own platter of delightfully disgusting digits.
Ingredients
- 1 package (8 count) standard hot dogs
- 1 package (8 count) hot dog buns
- 1 small white or yellow onion
- Ketchup, for garnish
- Optional: Yellow mustard, relish
Step-by-Step Instructions: Crafting Your Creepy Creations
Follow these simple steps to transform humble hot dogs into a spooky sensation.
Part 1: Preparing and Carving the “Fingers”
This is where the magic happens. A few simple cuts are all it takes.
- Cook the Hot Dogs: Cook the hot dogs using your preferred method. Boiling or pan-frying are excellent choices.
- To Boil: Bring a pot of water to a boil. Add the hot dogs and cook for 4-5 minutes, or until they are heated through and plump.
- To Pan-Fry: Heat a skillet over medium heat. You can add a tiny bit of oil or butter if you wish. Cook the hot dogs, turning occasionally, for 5-7 minutes until they are browned and heated through.
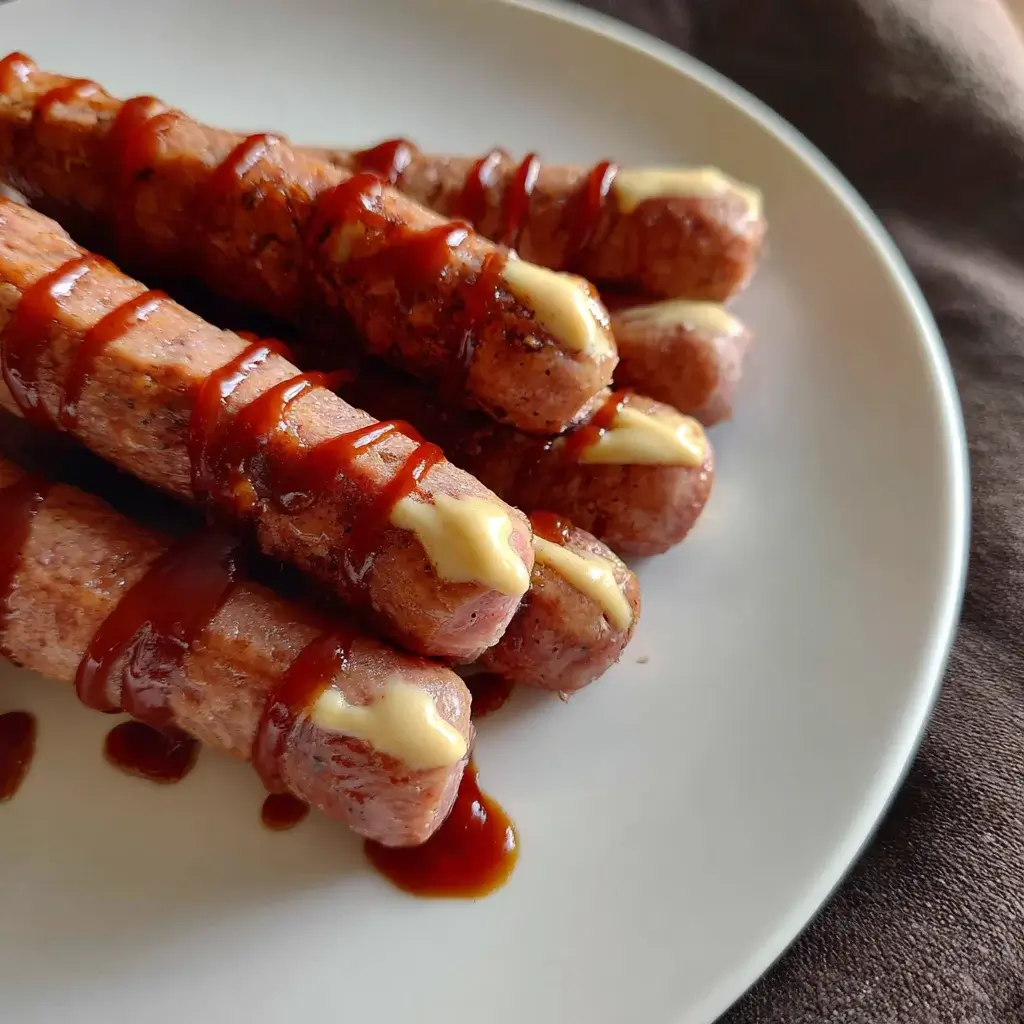
- Create the Knuckle Wrinkles: Once cooked, place a hot dog on a cutting board. Using a small paring knife, carefully make 3-4 shallow, horizontal cuts in the center of the hot dog. Don’t slice all the way through! These shallow cuts will pucker slightly as the hot dog cools, creating a surprisingly realistic knuckle effect. Make another 1-2 smaller cuts just below the tip.
- Carve the Nail Bed: At one end of the hot dog (the “fingertip”), use your knife to slice off a small, flat, shallow area. This will create a space for the “fingernail” to sit, making it look more embedded in the finger.
Part 2: Adding the Fingernail and Final Touches
- Prepare the Onion: Thinly slice your white or yellow onion. From one of the slices, cut out a small piece and shape it to resemble a fingernail.
- Attach the Nail: Gently press the onion “fingernail” onto the flat nail bed you carved at the tip of the hot dog. The warmth and moisture of the hot dog should be enough to make it stick. If it’s being stubborn, a tiny, invisible dab of ketchup or mustard underneath will act as edible glue.
Part 3: Assembling the Gory Scene
- Place in Bun: Gently open a hot dog bun and place one of your finished “fingers” inside. Position it so the “severed” end is sticking out of one side of the bun.
- Apply the “Blood”: This is the final, glorious step. Squeeze a generous amount of ketchup around the base of the hot dog where it meets the bun. Let it drip and pool to create a gruesome, bloody “severed” effect. For extra points, add drips of mustard or relish.
- Repeat: Continue the process with the remaining hot dogs and buns. Arrange them on a platter and serve immediately to your horrified and delighted guests.
Nutrition Facts
- Servings: 8 Hotdog Fingers
- Calories per serving: Approximately 280-350 kcal
Disclaimer: The nutritional information provided is an estimate and can vary greatly based on the specific brand and type of hot dog, bun, and condiments used. A beef hot dog will have a different profile than a turkey or vegan dog.
Preparation Time
- Prep Time: 10 minutes (includes carving)
- Cook Time: 5-7 minutes
- Total Time: Under 20 minutes
How to Serve Your Ghoulish Grub
Presentation is everything when it comes to spooky food. Here’s how to elevate your Hotdog Fingers from a simple snack to a show-stopping Halloween centerpiece.
Plating and Presentation Ideas
- The Butcher Shop: Arrange the Hotdog Fingers haphazardly on a rustic wooden cutting board. Leave the ketchup bottle nearby with its cap off and some drips on the board for a freshly-butchered effect.
- The Mad Scientist’s Lab: Serve them on a clean, metal baking sheet lined with white parchment paper. Arrange the fingers in neat rows, as if they are medical specimens. You can even create little labels for them using toothpicks and paper.
- A “Hand-y” Snack: On a large plate, arrange five Hotdog Fingers to look like a severed hand. Place the “hand” on a bed of french fries (“severed bones”) or potato chips.
- The Coffin Bed: Line a baking dish or platter with a bed of dark-colored food like black bean dip or dark rye breadcrumbs (“dirt”). Nestle the Hotdog Fingers in their buns into the “dirt” so they look like they’re emerging from their coffins.
A Buffet of Gore: Dips and Sauces
Set up a “Gore Station” with various condiments in squeeze bottles and let guests customize their own horror.
- Blood: Ketchup is a must.
- Bile/Toxic Slime: Use a vibrant green relish or even guacamole.
- Pus/Infection: A sharp yellow mustard or a nacho cheese sauce works wonders.
- Congealed Blood: A thick, dark BBQ sauce offers a different, grimier look.
Spooky Side Dish Pairings
Complete your terrifyingly tasty meal with these themed sides.
- A Bed of Maggots: Serve the Hotdog Fingers directly on a bed of cooked orzo pasta or rice. It’s simple, filling, and visually unsettling.
- Puking Pumpkin: Carve a face into a small pie pumpkin and hollow it out. Fill it with your favorite dip (guacamole, spinach dip, or French onion dip) so it looks like it’s spilling out of the pumpkin’s mouth. Serve with chips.
- Witch’s Brew Pasta Salad: Use unusually shaped pasta (like spirals or shells) and toss it with a pesto sauce and black olives for a “worms and bugs” effect.
- Ghostly Fries: Serve with a side of french fries or tater tots and use a squeeze bottle of sour cream to draw simple ghost faces on top.
Additional Tips for Maximum Creepiness
Take your Hotdog Fingers to the next level with these five professional tips.
- Timing the Knuckle Cuts is Key: For the most defined “knuckle” wrinkles, make the shallow cuts after the hot dogs have been boiled or fried. The skin will have tightened from cooking, and as it cools slightly, it will pucker more dramatically around your cuts, creating a more pronounced and realistic effect.
- Embrace the Almond Nail: While onion is the classic choice, a blanched, slivered almond is arguably the superior option for the “fingernail.” Its shape, color, and texture are incredibly realistic. You can press the pointed end firmly into the “nail bed” of the warm hot dog, and it will hold securely without any “glue.”
- Make it a DIY “Decorating” Station: Turn this recipe into a fun, interactive party activity. Cook and prepare the “fingers” with knuckles and nail beds, and place them on a platter. Set up a station with the buns and various “gore” condiments (ketchup, mustard, relish, cheese sauce) in squeeze bottles. Let kids and adults assemble and “bloody” their own fingers. It’s messy, creative fun.
- The “Toasted Bun” Debate: While a soft, pale bun has a certain “fleshy” quality, toasting the buns adds a fantastic layer of flavor and texture. For the best of both worlds, lightly butter the inside of the buns and toast them on a griddle until golden brown. This keeps the outside soft while providing a crisp interior that holds up well to the condiments.
- Don’t Fear the Vegan Dog: This recipe is one of the best for integrating vegetarian/vegan options seamlessly into a party menu. Plant-based hot dogs work perfectly. Just be sure to provide a vegan bun option and clearly label them. The creepy appearance is universal, so everyone can join in the fun.
Frequently Asked Halloween Food Questions (FAQ)
Here are the answers to some common questions that might come up as you prepare to unleash these horrors on your friends and family.
1. What are the absolute best hot dogs to use for Hotdog Fingers?
The best ones are standard-sized franks. Avoid oversized, bun-length, or jumbo hot dogs because their proportions are too large and they lose the delicate “finger” look. A classic, shorter hot dog has the most realistic dimensions. The brand and type (beef, pork, turkey) are purely up to your personal preference.
2. My onion “fingernail” keeps falling off. How can I make it stick?
This is a common frustration! The best trick is to press it onto the hot dog while it’s still warm and moist. If that doesn’t work, a tiny, hidden dab of a thick condiment like ketchup, mustard, or even cream cheese underneath the onion will act as an effective and edible glue. Alternatively, switch to a slivered almond, which can be wedged more securely into the hot dog.
3. Can I make these ahead of time for a party to save time?
Yes, you can do most of the prep ahead! You can cook the hot dogs, carve the knuckles and nail beds, and store the prepared “fingers” in an airtight container in the refrigerator for up to 24 hours. When it’s party time, simply reheat them gently (a quick dip in hot water or a few seconds in the microwave works) and then assemble them fresh with the buns and ketchup. Assembling them just before serving ensures the buns don’t get soggy and the “blood” looks fresh.
4. What are some other good alternatives to an onion for the fingernail?
The best alternative is a blanched slivered almond. It’s the most realistic in shape and color. Other creative options include a small piece of white American cheese cut into a nail shape, a piece of green or white bell pepper, or even a single, large sesame seed pressed into place.
5. How do I make the knuckle cuts look truly realistic?
The secret is subtlety and placement. Don’t saw at the hot dog; use the tip of a sharp paring knife to make quick, shallow slices. For the main knuckle, make two or three cuts very close together in the middle of the “finger.” To mimic the top joint, make one or two smaller, shallower cuts about half an inch below the “fingernail.” Varying the cuts slightly on each finger makes the whole platter look more organic and creepy.

Hotdog Fingers recipe
Ingredients
-
1 package (8 count) standard hot dogs
-
1 package (8 count) hot dog buns
-
1 small white or yellow onion
-
Ketchup, for garnish
-
Optional: Yellow mustard, relish
Instructions
Part 1: Preparing and Carving the “Fingers”
This is where the magic happens. A few simple cuts are all it takes.
-
Cook the Hot Dogs: Cook the hot dogs using your preferred method. Boiling or pan-frying are excellent choices.
-
To Boil: Bring a pot of water to a boil. Add the hot dogs and cook for 4-5 minutes, or until they are heated through and plump.
-
To Pan-Fry: Heat a skillet over medium heat. You can add a tiny bit of oil or butter if you wish. Cook the hot dogs, turning occasionally, for 5-7 minutes until they are browned and heated through.
-
-
Create the Knuckle Wrinkles: Once cooked, place a hot dog on a cutting board. Using a small paring knife, carefully make 3-4 shallow, horizontal cuts in the center of the hot dog. Don’t slice all the way through! These shallow cuts will pucker slightly as the hot dog cools, creating a surprisingly realistic knuckle effect. Make another 1-2 smaller cuts just below the tip.
-
Carve the Nail Bed: At one end of the hot dog (the “fingertip”), use your knife to slice off a small, flat, shallow area. This will create a space for the “fingernail” to sit, making it look more embedded in the finger.
Part 2: Adding the Fingernail and Final Touches
-
Prepare the Onion: Thinly slice your white or yellow onion. From one of the slices, cut out a small piece and shape it to resemble a fingernail.
-
Attach the Nail: Gently press the onion “fingernail” onto the flat nail bed you carved at the tip of the hot dog. The warmth and moisture of the hot dog should be enough to make it stick. If it’s being stubborn, a tiny, invisible dab of ketchup or mustard underneath will act as edible glue.
Part 3: Assembling the Gory Scene
-
Place in Bun: Gently open a hot dog bun and place one of your finished “fingers” inside. Position it so the “severed” end is sticking out of one side of the bun.
-
Apply the “Blood”: This is the final, glorious step. Squeeze a generous amount of ketchup around the base of the hot dog where it meets the bun. Let it drip and pool to create a gruesome, bloody “severed” effect. For extra points, add drips of mustard or relish.
-
Repeat: Continue the process with the remaining hot dogs and buns. Arrange them on a platter and serve immediately to your horrified and delighted guests.
Nutrition
- Serving Size: one normal portion
- Calories: 280-350 kcal


