


Ah, Hot Cross Buns. Just the name conjures up images of spring, Easter celebrations, and that irresistible aroma of warm spices filling the kitchen. For me, Hot Cross Buns are more than just a treat; they’re a tradition. Growing up, Easter Sunday wasn’t complete without a basket overflowing with these fragrant, slightly sweet buns, each adorned with that iconic white cross. While store-bought versions are readily available, nothing quite captures the magic like homemade Hot Cross Buns, fresh from the oven. I’ve been on a quest to perfect my own recipe for years, wanting to recreate that nostalgic flavor and soft, pillowy texture I remember so fondly. And after countless batches and tweaks, I can confidently say this recipe is it. The buns are beautifully spiced, not overly sweet, and have that perfect balance of chewiness and softness. The citrus zest brightens the flavor, and the dried fruit adds just the right amount of sweetness and texture. My family devours them within hours of them cooling, and the house smells absolutely divine while they bake. If you’re looking to bring a touch of homemade Easter magic into your kitchen, or simply crave a delicious, spiced bun any time of year, this Hot Cross Buns recipe is your answer. Prepare to be transported by the flavors and the sheer joy of baking these delightful treats from scratch!
Ingredients for Delicious Homemade Hot Cross Buns
Crafting the perfect batch of homemade Hot Cross Buns starts with selecting the right ingredients and understanding their roles in creating that signature flavor and texture. Each component, from the flour to the spices, plays a vital part in making these buns truly special. Let’s explore the ingredients you’ll need for this delightful recipe.
- Strong Bread Flour (500g or approximately 4 cups): The foundation of our Hot Cross Buns, strong bread flour is crucial for developing the gluten structure needed for a soft, chewy, and well-risen bun. Bread flour has a higher protein content than all-purpose flour, which is essential for creating a strong gluten network. This network traps the gases produced by the yeast during fermentation, resulting in a light and airy texture. Using strong bread flour ensures your buns have that desirable chewiness and rise beautifully. If you only have all-purpose flour, you can still use it, but your buns might be slightly less chewy. For the best results, always opt for bread flour when making yeast-based baked goods like Hot Cross Buns. Remember to measure your flour accurately by spooning it into your measuring cup and leveling it off with a straight edge. Avoid scooping directly from the bag as this can compact the flour and lead to using too much, resulting in denser buns.
- Instant Yeast (10g or approximately 2 teaspoons or 1 packet): The leavening agent that brings our Hot Cross Buns to life, instant yeast is a fast-acting dry yeast that can be added directly to the dry ingredients without needing to be proofed separately. Its convenience and reliability make it ideal for both experienced and novice bakers. Always ensure your yeast is fresh by checking the expiration date on the package. Fresh, potent yeast is vital for a good rise and a light texture. If you are unsure about the freshness of your yeast, you can test it by mixing a teaspoon of yeast with a quarter cup of warm water and a teaspoon of sugar. If it becomes foamy within 5-10 minutes, your yeast is active and ready to use. While this recipe calls for instant yeast, you can also use active dry yeast. If using active dry yeast, you will need to proof it first. To proof active dry yeast, dissolve it in the warm milk called for in the recipe along with a teaspoon of sugar and let it sit for 10-15 minutes until foamy before adding it to the dry ingredients.
- Caster Sugar (75g or approximately ⅓ cup): Sugar not only adds sweetness but also contributes to the tenderness and browning of the buns. Caster sugar, also known as superfine sugar, dissolves more easily into the dough compared to granulated sugar, ensuring a smoother texture. Sugar also provides food for the yeast, helping it to activate and produce carbon dioxide, which is essential for the dough to rise. While you can use granulated sugar if you don’t have caster sugar, caster sugar is preferred for its finer texture and quicker dissolving properties in this recipe. The amount of sugar in this recipe is carefully balanced to provide a subtle sweetness without being overly sugary, allowing the spices and dried fruit flavors to shine through.
- Mixed Spices (2 tsp ground cinnamon, 1 tsp ground mixed spice or nutmeg, ½ tsp ground cloves): The heart and soul of Hot Cross Buns, the blend of warm spices is what gives them their distinctive and comforting flavor. Cinnamon provides a sweet, warm, and slightly woody note. Mixed spice (or nutmeg) adds a complex warmth and depth. Ground cloves contribute a pungent, sweet, and aromatic quality. This combination creates that classic Hot Cross Bun spice profile that is both warming and inviting. Use good quality, fresh spices for the best flavor. Pre-ground spices lose their potency over time, so if your spices have been sitting in your pantry for a while, consider replacing them for a more vibrant flavor. You can also adjust the spice ratios to your preference; for example, if you prefer a stronger cinnamon flavor, you can increase the amount of cinnamon slightly.
- Salt (1 tsp): Salt is a crucial ingredient in bread making, often underestimated but essential for balancing flavors and controlling yeast activity. Salt enhances the flavor of the other ingredients, bringing out the sweetness and spice notes. It also strengthens the gluten structure, improving the dough’s elasticity and rise. Salt also controls the yeast activity, preventing it from rising too quickly and producing a bland, flavorless loaf. Use fine sea salt or table salt for this recipe. It is important to measure the salt accurately; too much salt can inhibit yeast activity and result in a dense loaf, while too little salt can lead to a bland, flavorless bread. Always add salt after the yeast has been incorporated into the flour, as direct contact with salt can dehydrate the yeast.
- Warm Milk (250ml or approximately 1 cup, lukewarm, about 105-115°F or 40-46°C): Warm milk provides the liquid necessary to hydrate the flour and activate the yeast. Milk adds richness and a softer texture to the buns compared to using water alone. The warmth of the milk is crucial for yeast activation; it should be lukewarm, feeling comfortably warm to the touch but not hot. Milk that is too hot can kill the yeast, while milk that is too cold will slow down its activity. Using a thermometer is the most accurate way to ensure the milk is at the correct temperature. If you don’t have a thermometer, test the milk by dripping a little on your wrist; it should feel comfortably warm, like bathwater. Whole milk is recommended for its richness, but you can also use semi-skimmed or even plant-based milk alternatives like almond milk or oat milk, although these may slightly alter the final texture and flavor.
- Unsalted Butter, melted (50g or approximately ¼ cup): Melted butter adds richness, tenderness, and flavor to our Hot Cross Buns. It also helps to create a softer crumb and a more moist texture. Unsalted butter is preferred in baking as it allows you to control the amount of salt in your recipe. Melt the butter until it is just liquid but not hot. You can melt it in the microwave or in a saucepan over low heat. If you don’t have unsalted butter, you can use salted butter, but reduce the amount of salt added to the dough by about ¼ teaspoon. For a dairy-free option, you can substitute the melted butter with a neutral-flavored oil like canola oil or vegetable oil, although butter will provide a richer flavor and softer texture.
- Egg (1 large): An egg adds richness, moisture, and structure to the dough. It also contributes to the golden color of the baked buns. Use a large egg at room temperature for best results. Room temperature eggs incorporate more easily into the dough. The egg yolk adds fat and richness, while the egg white provides protein that helps to strengthen the dough structure.
- Orange Zest (1 orange): Orange zest brings a bright, citrusy note that complements the warm spices and dried fruit beautifully. It adds a layer of complexity and freshness to the buns, preventing them from being overly heavy or cloying. Use a zester or microplane to zest the orange, being careful to only zest the orange part of the peel and avoid the white pith underneath, which can be bitter. Freshly zested orange is always best for the most vibrant flavor.
- Dried Mixed Fruit (150g or approximately 1 cup): Dried mixed fruit, typically a combination of raisins, sultanas, and currants, provides sweetness, chewiness, and texture to Hot Cross Buns. The dried fruit soaks up some of the moisture from the dough during baking, becoming plump and juicy. You can use a pre-mixed dried fruit blend or create your own combination using your favorite dried fruits. Soaking the dried fruit in warm water or rum for about 30 minutes before adding it to the dough can help to plump it up and prevent it from drawing moisture out of the dough, resulting in even softer buns. If you prefer, you can also substitute some of the mixed fruit with other dried fruits like cranberries, chopped apricots, or candied peel.
For the Crosses:
- Plain Flour (50g or approximately ½ cup): Plain flour (all-purpose flour) is used to make the paste for the crosses. It provides structure and helps the crosses hold their shape during baking.
- Water (approx. 5 tbsp): Water is mixed with the plain flour to create a smooth paste for the crosses. The amount of water may need to be adjusted slightly to achieve the desired consistency.
For the Glaze:
- Apricot Jam (2 tbsp): Apricot jam is used to create a glossy glaze for the finished Hot Cross Buns. It adds a touch of sweetness and a beautiful shine.
- Water (1 tbsp): Water is used to thin the apricot jam, making it easier to brush onto the buns.
Instructions: Baking Your Spiced Hot Cross Buns
Now that we have all our ingredients measured and ready, let’s get started on the delightful process of baking homemade Hot Cross Buns. Follow these step-by-step instructions to create fragrant, spiced buns that are perfect for Easter or any time you crave a comforting treat.
Step 1: Mixing Dry Ingredients
In a large mixing bowl, whisk together the strong bread flour, instant yeast, caster sugar, mixed spices (cinnamon, mixed spice/nutmeg, cloves), and salt. Whisking ensures that these dry ingredients are evenly distributed, especially the yeast and salt, preventing any pockets of concentrated ingredients that could affect the dough’s rise or flavor. This step is crucial for creating a consistent and well-balanced dough. Make sure to use a bowl that is large enough to accommodate the dough as it rises, ideally twice its initial volume.
Step 2: Adding Wet Ingredients and Forming the Dough
Make a well in the center of the dry ingredients. Pour in the warm milk, melted butter, and egg. Add the orange zest and dried mixed fruit. Using a wooden spoon or a spatula, stir the ingredients together until a shaggy dough forms. At this stage, the dough will be quite sticky and may not look perfectly smooth. Don’t worry, this is normal. The goal is just to bring all the ingredients together into a cohesive mass. Once a shaggy dough has formed, it’s time to move on to kneading.
Step 3: Kneading the Dough
Turn the dough out onto a lightly floured surface. Kneading is the process of working the dough to develop gluten, the protein in flour that gives bread its structure and elasticity. Knead the dough for 8-10 minutes, or until it becomes smooth, elastic, and slightly tacky but not sticky. To knead, use the heel of your hand to push the dough away from you, then fold it back over itself, and repeat. Turn the dough a quarter turn after each push and fold. If the dough sticks to your surface, add a tiny sprinkle of flour, but be careful not to add too much, as this can make the dough dry and tough. You’ll know the dough is kneaded enough when it passes the windowpane test: take a small piece of dough and gently stretch it between your fingers. If you can stretch it thin enough to see light through it without tearing, the gluten is well-developed, and the dough is ready. If it tears easily, continue kneading for a few more minutes. Alternatively, if you are using a stand mixer with a dough hook, knead the dough on medium-low speed for 6-8 minutes, or until it reaches the same smooth and elastic consistency.
Step 4: First Rise (Proofing)
Place the kneaded dough in a lightly oiled bowl, turning it to coat all sides with oil. This prevents the dough from drying out as it rises. Cover the bowl tightly with plastic wrap or a damp kitchen towel. Place the bowl in a warm, draft-free place to rise for 1-1.5 hours, or until the dough has doubled in size. A warm spot helps to speed up yeast activity. Good places for proofing include a slightly warmed oven (turned off!), a microwave (also turned off!), or a warm spot in your kitchen away from drafts. The rising time will depend on the temperature of your environment; warmer temperatures will result in faster rising. You’ll know the dough has doubled when it springs back slowly when gently poked with two fingers.
Step 5: Shaping the Buns
Once the dough has doubled, gently punch it down to release the air. Turn the dough out onto a lightly floured surface. Divide the dough into 12 equal portions (approximately 75-80g each). Shape each portion into a smooth, round bun by tucking the edges underneath and rolling it gently between your palms. Place the shaped buns on a baking tray lined with parchment paper, leaving some space between them for spreading during the second rise.
Step 6: Second Rise (Proofing in the Pan)
Cover the tray of buns loosely with plastic wrap or a damp kitchen towel. Let the buns rise again in a warm, draft-free place for 45-60 minutes, or until they have puffed up and are almost doubled in size and feel light and airy. This second rise is crucial for achieving light and fluffy Hot Cross Buns. Again, ensure the rising environment is warm and draft-free for optimal results.
Step 7: Making the Crosses
While the buns are proving for the second time, prepare the paste for the crosses. In a small bowl, mix the plain flour with water, adding water gradually until you get a smooth, thick paste that is pipeable but not too runny. You should aim for a consistency similar to toothpaste. Spoon the paste into a piping bag fitted with a small round nozzle, or use a zip-top bag and snip off a small corner. Once the buns have finished their second rise, pipe crosses onto the top of each bun. Pipe one line lengthwise and then another line crosswise to form a cross on each bun.
Step 8: Baking the Buns
Preheat your oven to 400°F (200°C). Once the crosses are piped, place the baking tray in the center rack of the preheated oven. Bake for 15-20 minutes, or until the buns are golden brown and sound hollow when tapped underneath. Keep an eye on them as oven temperatures can vary, and you want them to be nicely browned but not burnt.
Step 9: Making the Glaze
While the buns are baking, prepare the glaze. In a small saucepan, heat the apricot jam and water over low heat until the jam is melted and smooth. Simmer for a minute or two, stirring constantly, until it becomes a syrupy glaze. Strain the glaze through a fine-mesh sieve to remove any lumps or fruit pieces, resulting in a smooth, glossy glaze.
Step 10: Glazing and Cooling
As soon as the buns are out of the oven, brush them generously with the warm apricot glaze while they are still hot. This will give them a beautiful shine and a touch of extra sweetness. Let the glazed Hot Cross Buns cool on the baking tray for a few minutes before transferring them to a wire rack to cool completely. Allow them to cool slightly before serving as they are best enjoyed warm or at room temperature.
Nutrition Facts for Homemade Hot Cross Buns
Understanding the nutritional content of your homemade Hot Cross Buns can be helpful, especially if you are mindful of your dietary intake. Please note that these are approximate values and can vary slightly depending on the specific ingredients used, the size of your buns, and the amount of glaze applied.
Servings: 12 buns per batch
Serving Size: 1 bun (approximately 85-90g)
Approximate Nutrition Facts per Serving (1 bun):
- Calories: 250-300 kcal
- Total Fat: 6-8g
- Saturated Fat: 3-4g
- Trans Fat: 0g
- Cholesterol: 30-40mg
- Sodium: 200-250mg
- Total Carbohydrates: 45-55g
- Dietary Fiber: 2-3g
- Sugars: 15-20g
- Protein: 5-6g
Important Notes on Nutrition:
- Sugar Content: Hot Cross Buns are a sweet treat, and the sugar content is primarily from the caster sugar in the dough, the dried fruit, and the apricot glaze. If you are watching your sugar intake, you can slightly reduce the sugar in the dough, but this may affect the texture and sweetness.
- Fat Content: The fat content comes mainly from the butter and egg. You can reduce the fat slightly by using a lower-fat milk or a reduced amount of butter, but this may affect the richness and texture.
- Fiber Content: The fiber content is relatively modest, mainly from the whole wheat flour (if used in a variation) and the dried fruit.
- Calorie Count: The calorie count is approximate and can vary based on bun size and glaze quantity.
Variations for Healthier Buns (Nutritional Adjustments):
- Whole Wheat Flour: Substituting a portion of the bread flour with whole wheat flour will increase the fiber content and provide more complex carbohydrates. You can start by replacing up to half of the bread flour with whole wheat flour.
- Reduced Sugar: You can reduce the caster sugar in the dough by about 20-30g without significantly affecting the texture, but the buns will be less sweet.
- Less Glaze: Using a thinner glaze or applying it more sparingly will reduce the sugar and calorie content slightly.
- Fruit Additions: While dried fruit adds sugar, it also provides some fiber and nutrients. Be mindful of the quantity used.
This nutritional information is intended as a general guide. For precise nutritional values, especially if you have specific dietary needs or concerns, you can use online nutrition calculators or consult with a registered dietitian. Enjoy your homemade Hot Cross Buns in moderation as part of a balanced diet, especially during festive occasions!
Preparation Time for Homemade Hot Cross Buns
Baking homemade Hot Cross Buns is a labor of love, and understanding the time commitment involved helps in planning your baking session. Here’s a breakdown of the preparation time for this recipe:
- Active Time: This refers to the time you are actively working on the recipe.
- Mixing and Kneading Dough: 20-25 minutes
- Shaping Buns: 15-20 minutes
- Making Cross Paste and Piping: 10-15 minutes
- Making Glaze: 5-7 minutes
- Baking: 15-20 minutes
- Glazing: 5-7 minutes
- Total Active Time: Approximately 70-94 minutes (1 hour 10 minutes – 1 hour 34 minutes)
- Inactive Time: This is the time the dough spends rising, during which you are not actively working on the recipe.
- First Rise: 1-1.5 hours
- Second Rise: 45-60 minutes
- Cooling Time: 30-60 minutes (or until completely cooled)
- Total Inactive Time: Approximately 2 hours 15 minutes – 3 hours 30 minutes
- Total Time (Active + Inactive): Approximately 3 hours 25 minutes – 5 hours 4 minutes
Time Management Tips:
- Plan Ahead: Bread making, especially yeast-based doughs, requires time. Plan to start your Hot Cross Buns well in advance of when you want to serve them. Weekends or days off are ideal for baking projects like this.
- Multitasking: While the dough is rising, you can use the inactive time to prepare the cross paste, make the glaze, clean up, or do other kitchen tasks.
- Faster Rising: To speed up the rising process slightly, ensure your rising environment is warm. You can use a slightly warmed oven (turned off) or a proofing box if you have one. However, avoid excessively warm temperatures as this can negatively impact the flavor and texture.
- Make Dough Ahead: You can prepare the dough the day before and let it rise slowly in the refrigerator overnight. This slow fermentation can enhance the flavor. In this case, after kneading, place the dough in an oiled bowl, cover it, and refrigerate for 8-12 hours. The next day, let the dough come to near room temperature for about an hour before proceeding with shaping and the second rise.
- Cooling Time is Important: Resist the temptation to glaze and eat the buns immediately out of the oven. Allowing them to cool slightly before glazing and then cooling further before serving allows the texture to set and the flavors to meld.
While the total time from start to finish may seem lengthy, remember that much of it is inactive time while the dough is rising and cooling. The active time is manageable, and the reward of freshly baked, fragrant Hot Cross Buns is well worth the time investment, especially for special occasions like Easter.
How to Serve Homemade Hot Cross Buns
Homemade Hot Cross Buns are incredibly versatile and can be enjoyed in numerous ways, beyond just a simple snack. Here are some delightful serving suggestions to elevate your enjoyment of these spiced treats:
- Classic Warm with Butter:
- Simply Buttered: The most classic and arguably the best way to enjoy Hot Cross Buns is warm, split in half, and slathered with butter. The melting butter soaks into the soft crumb and complements the spices perfectly.
- Toasted with Butter: Lightly toasting the split buns before buttering adds a touch of crispness to the outside while keeping the inside soft and warm.
- Elevated Breakfast or Brunch:
- With Jam or Marmalade: Spread your favorite jam, marmalade, or fruit preserves on warm or toasted Hot Cross Buns for a delightful breakfast or brunch option. Citrus marmalade pairs particularly well with the spiced flavor.
- Cream Cheese and Fruit: Spread cream cheese on split buns and top with fresh berries, sliced bananas, or peaches for a richer and more substantial breakfast or brunch.
- Hot Cross Bun French Toast: Transform day-old Hot Cross Buns into decadent French toast. Slice the buns, soak them in a classic French toast batter (eggs, milk, vanilla, cinnamon), and pan-fry until golden brown. Serve with maple syrup, fresh fruit, and whipped cream.
- Afternoon Tea or Snack:
- Plain with Tea or Coffee: Enjoy a warm Hot Cross Bun on its own with a cup of tea, coffee, or hot chocolate for a comforting afternoon snack or as part of an afternoon tea spread.
- With Clotted Cream and Jam: For a more indulgent afternoon tea treat, serve split Hot Cross Buns with clotted cream and jam, similar to scones.
- Dessert Options:
- Warm with Custard or Ice Cream: Serve warm Hot Cross Buns with a scoop of vanilla ice cream, custard, or crème fraîche for a simple yet satisfying dessert.
- Hot Cross Bun Bread Pudding: Use slightly stale Hot Cross Buns to make a comforting and flavorful bread pudding. Cube the buns, soak them in a custard base, and bake until golden and set. Add extra dried fruit or chocolate chips for variations.
- Grilled Hot Cross Bun Sundae: Grill split Hot Cross Buns until lightly toasted. Top with a scoop of ice cream, caramel sauce, chocolate sauce, whipped cream, and chopped nuts for a fun and indulgent dessert sundae.
- Creative Serving Ideas:
- Savory Hot Cross Bun Sandwiches: While traditionally sweet, Hot Cross Buns can also be used for slightly sweet and savory sandwiches. Try them with ham and cheese, smoked salmon and cream cheese, or brie and apple.
- Hot Cross Bun Croutons: Cube day-old Hot Cross Buns, toss them with olive oil and spices, and bake until crisp to make sweet and spiced croutons for salads or soups (especially fruit soups).
Whether you prefer them simply buttered and warm, or transformed into a more elaborate dish, homemade Hot Cross Buns are a treat to be savored. Experiment with these serving suggestions and discover your favorite way to enjoy their spiced goodness!
Additional Tips for Baking Perfect Hot Cross Buns
Baking Hot Cross Buns can be a rewarding experience, and with a few extra tips, you can ensure your buns turn out perfectly spiced, soft, and beautifully risen every time. Here are five additional tips to help you achieve Hot Cross Bun baking success:
- Spice it Right: The spice blend is key to the distinctive flavor of Hot Cross Buns. Use fresh, good quality spices for the most vibrant flavor. If your spices have been sitting in your pantry for a while, consider replacing them. Don’t be afraid to adjust the spice ratios slightly to your personal preference. For example, if you love cinnamon, you can increase the cinnamon slightly and reduce the nutmeg or cloves. For a richer spice flavor, you can gently toast the whole spices (like cinnamon sticks, cloves, nutmeg) in a dry pan before grinding them yourself. Freshly ground spices will have a more intense aroma and flavor.
- Hydrate Your Dried Fruit: Dried fruit can sometimes draw moisture out of the dough, resulting in drier buns. To prevent this, plump up your dried fruit by soaking it in warm water, hot tea, or even rum for about 30 minutes before adding it to the dough. Drain the fruit well before incorporating it into the dough. This step will ensure the dried fruit remains juicy and plump during baking and contributes to the overall moistness of the buns.
- Master the Cross Paste: The crosses are not just decorative; they are an integral part of the Hot Cross Bun tradition. For clear, defined crosses that don’t disappear during baking, make sure your cross paste is the right consistency – thick enough to hold its shape but pipeable. Start with a smaller amount of water and add more gradually until you reach a toothpaste-like consistency. If the paste is too runny, it will spread and blur during baking. If it’s too thick, it will be difficult to pipe smoothly. Practice piping the crosses on a piece of parchment paper before piping them onto the buns to get a feel for the pressure and nozzle.
- Proper Baking Temperature and Time: Baking temperature and time are crucial for perfectly baked Hot Cross Buns. Preheat your oven accurately to 400°F (200°C). Baking at the correct temperature ensures the buns rise properly and develop a golden brown crust without drying out. Bake for the recommended time of 15-20 minutes, but keep an eye on them, especially in the last few minutes of baking. Ovens can vary, so start checking for doneness around 15 minutes. The buns are done when they are golden brown, spring back lightly when touched, and sound hollow when tapped underneath. Overbaking can make them dry, while underbaking can result in doughy centers.
- Glaze While Hot for Shine: For that beautiful, glossy finish on your Hot Cross Buns, glaze them immediately after they come out of the oven while they are still hot. The heat helps the glaze melt and spread evenly, creating a shiny, attractive surface. Use a good quality apricot jam for the glaze as it provides a lovely flavor and color. Make sure to strain the glaze for a smooth, lump-free finish. Generously brush the glaze over the warm buns, ensuring every part of the surface is covered for maximum shine and flavor.
By incorporating these additional tips into your Hot Cross Bun baking process, you’ll be well-equipped to bake truly exceptional buns that are sure to impress and delight everyone who tries them!
Frequently Asked Questions (FAQ) about Homemade Hot Cross Buns
Baking Hot Cross Buns can bring up some common questions, especially for those new to bread baking or this specific recipe. Here are answers to five frequently asked questions to help you bake with confidence:
Q1: Can I make Hot Cross Buns ahead of time?
A1: Yes, you can prepare Hot Cross Buns in stages to fit your schedule.
- Dough Preparation Ahead: You can make the dough the day before and let it rise slowly in the refrigerator overnight. This can enhance the flavor development. After the first rise in the fridge, bring the dough to near room temperature for about an hour before shaping and proceeding with the second rise and baking.
- Baked Buns Storage: Baked Hot Cross Buns are best enjoyed fresh but can be stored at room temperature for 1-2 days in an airtight container or frozen for longer storage.
- Freezing Baked Buns: To freeze, let the baked and glazed buns cool completely. Wrap them individually or in small batches in plastic wrap and then place them in a freezer-safe bag. They can be frozen for up to 2-3 months. Thaw at room temperature or gently reheat in a low oven or microwave before serving.
Q2: My crosses disappeared during baking. How can I prevent this?
A2: Disappearing crosses are a common issue, but easily preventable.
- Thick Enough Paste: Ensure your cross paste is thick enough – about the consistency of toothpaste. If it’s too runny, it will spread and blend into the bun during baking.
- Don’t Over-Proof After Piping: Avoid over-proofing the buns after piping the crosses. Over-proofing can cause the paste to sink into the dough. Pipe the crosses just before baking.
- Bake at the Right Temperature: Baking at the correct temperature (400°F/200°C) helps the crosses set quickly before they have a chance to spread too much.
- Flour and Water Ratio: Use the correct ratio of flour to water for the cross paste. Too much water will make it runny; too much flour will make it too stiff to pipe smoothly.
Q3: Can I use different dried fruits in Hot Cross Buns?
A3: Absolutely! You can customize the dried fruit mix to your liking.
- Substitutions: Feel free to substitute some or all of the mixed fruit with other dried fruits like cranberries, chopped dried apricots, chopped dates, or candied peel.
- Chocolate Chips: For a less traditional but still delicious twist, you can replace some of the dried fruit with chocolate chips or chunks.
- Quantity: Keep the total quantity of dried fruit roughly the same (around 150g) to maintain the right balance in the recipe.
- Soaking: Remember to soak any dried fruit that is very dry to plump it up before adding to the dough.
Q4: My Hot Cross Buns are dry. What did I do wrong?
A4: Dry Hot Cross Buns can be caused by a few factors.
- Over-Baking: Overbaking is the most common cause of dryness. Bake the buns for the recommended time and check for doneness – they should be golden brown and sound hollow when tapped underneath.
- Too Much Flour: Adding too much flour to the dough can make it dry. Measure flour accurately and avoid adding extra flour during kneading unless absolutely necessary.
- Not Enough Fat: Ensure you are using the correct amount of butter and egg in the recipe, as these ingredients contribute to moisture and richness.
- Rising Environment Too Dry: If the rising environment is too dry, the dough surface can dry out, leading to drier buns. Cover the dough and buns properly during rising to prevent them from drying out.
Q5: Can I make vegan Hot Cross Buns?
A5: Yes, with a few substitutions, you can easily make vegan Hot Cross Buns.
- Milk Substitution: Replace cow’s milk with plant-based milk like almond milk, soy milk, oat milk, or coconut milk.
- Butter Substitution: Use vegan butter or a neutral-flavored oil like canola oil or vegetable oil instead of dairy butter. Vegan butter often provides a texture and flavor closer to dairy butter.
- Egg Substitution: Replace the egg with a flax egg (1 tablespoon flaxseed meal mixed with 3 tablespoons water, let sit for 5 minutes until thickened) or a commercial egg replacer.
- Glaze: Ensure your apricot jam glaze is vegan-friendly. Most apricot jams are naturally vegan, but always check the label to be sure.
With these substitutions, you can enjoy delicious, spiced vegan Hot Cross Buns that are perfect for everyone to enjoy! Baking homemade Hot Cross Buns is a wonderful skill to acquire, and with practice and attention to these FAQs, you’ll be baking perfect batches in no time.
Print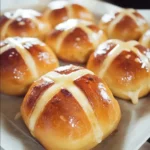
Hot Cross Buns recipe
Ingredients
-
- Strong Bread Flour (500g or approximately 4 cups): The foundation of our Hot Cross Buns, strong bread flour is crucial for developing the gluten structure needed for a soft, chewy, and well-risen bun. Bread flour has a higher protein content than all-purpose flour, which is essential for creating a strong gluten network. This network traps the gases produced by the yeast during fermentation, resulting in a light and airy texture. Using strong bread flour ensures your buns have that desirable chewiness and rise beautifully. If you only have all-purpose flour, you can still use it, but your buns might be slightly less chewy. For the best results, always opt for bread flour when making yeast-based baked goods like Hot Cross Buns. Remember to measure your flour accurately by spooning it into your measuring cup and leveling it off with a straight edge. Avoid scooping directly from the bag as this can compact the flour and lead to using too much, resulting in denser buns.
-
- Instant Yeast (10g or approximately 2 teaspoons or 1 packet): The leavening agent that brings our Hot Cross Buns to life, instant yeast is a fast-acting dry yeast that can be added directly to the dry ingredients without needing to be proofed separately. Its convenience and reliability make it ideal for both experienced and novice bakers. Always ensure your yeast is fresh by checking the expiration date on the package. Fresh, potent yeast is vital for a good rise and a light texture. If you are unsure about the freshness of your yeast, you can test it by mixing a teaspoon of yeast with a quarter cup of warm water and a teaspoon of sugar. If it becomes foamy within 5-10 minutes, your yeast is active and ready to use. While this recipe calls for instant yeast, you can also use active dry yeast. If using active dry yeast, you will need to proof it first. To proof active dry yeast, dissolve it in the warm milk called for in the recipe along with a teaspoon of sugar and let it sit for 10-15 minutes until foamy before adding it to the dry ingredients.
-
- Caster Sugar (75g or approximately ⅓ cup): Sugar not only adds sweetness but also contributes to the tenderness and browning of the buns. Caster sugar, also known as superfine sugar, dissolves more easily into the dough compared to granulated sugar, ensuring a smoother texture. Sugar also provides food for the yeast, helping it to activate and produce carbon dioxide, which is essential for the dough to rise. While you can use granulated sugar if you don’t have caster sugar, caster sugar is preferred for its finer texture and quicker dissolving properties in this recipe. The amount of sugar in this recipe is carefully balanced to provide a subtle sweetness without being overly sugary, allowing the spices and dried fruit flavors to shine through.
-
- Mixed Spices (2 tsp ground cinnamon, 1 tsp ground mixed spice or nutmeg, ½ tsp ground cloves): The heart and soul of Hot Cross Buns, the blend of warm spices is what gives them their distinctive and comforting flavor. Cinnamon provides a sweet, warm, and slightly woody note. Mixed spice (or nutmeg) adds a complex warmth and depth. Ground cloves contribute a pungent, sweet, and aromatic quality. This combination creates that classic Hot Cross Bun spice profile that is both warming and inviting. Use good quality, fresh spices for the best flavor. Pre-ground spices lose their potency over time, so if your spices have been sitting in your pantry for a while, consider replacing them for a more vibrant flavor. You can also adjust the spice ratios to your preference; for example, if you prefer a stronger cinnamon flavor, you can increase the amount of cinnamon slightly.
-
- Salt (1 tsp): Salt is a crucial ingredient in bread making, often underestimated but essential for balancing flavors and controlling yeast activity. Salt enhances the flavor of the other ingredients, bringing out the sweetness and spice notes. It also strengthens the gluten structure, improving the dough’s elasticity and rise. Salt also controls the yeast activity, preventing it from rising too quickly and producing a bland, flavorless loaf. Use fine sea salt or table salt for this recipe. It is important to measure the salt accurately; too much salt can inhibit yeast activity and result in a dense loaf, while too little salt can lead to a bland, flavorless bread. Always add salt after the yeast has been incorporated into the flour, as direct contact with salt can dehydrate the yeast.
-
- Warm Milk (250ml or approximately 1 cup, lukewarm, about 105-115°F or 40-46°C): Warm milk provides the liquid necessary to hydrate the flour and activate the yeast. Milk adds richness and a softer texture to the buns compared to using water alone. The warmth of the milk is crucial for yeast activation; it should be lukewarm, feeling comfortably warm to the touch but not hot. Milk that is too hot can kill the yeast, while milk that is too cold will slow down its activity. Using a thermometer is the most accurate way to ensure the milk is at the correct temperature. If you don’t have a thermometer, test the milk by dripping a little on your wrist; it should feel comfortably warm, like bathwater. Whole milk is recommended for its richness, but you can also use semi-skimmed or even plant-based milk alternatives like almond milk or oat milk, although these may slightly alter the final texture and flavor.
-
- Unsalted Butter, melted (50g or approximately ¼ cup): Melted butter adds richness, tenderness, and flavor to our Hot Cross Buns. It also helps to create a softer crumb and a more moist texture. Unsalted butter is preferred in baking as it allows you to control the amount of salt in your recipe. Melt the butter until it is just liquid but not hot. You can melt it in the microwave or in a saucepan over low heat. If you don’t have unsalted butter, you can use salted butter, but reduce the amount of salt added to the dough by about ¼ teaspoon. For a dairy-free option, you can substitute the melted butter with a neutral-flavored oil like canola oil or vegetable oil, although butter will provide a richer flavor and softer texture.
-
- Egg (1 large): An egg adds richness, moisture, and structure to the dough. It also contributes to the golden color of the baked buns. Use a large egg at room temperature for best results. Room temperature eggs incorporate more easily into the dough. The egg yolk adds fat and richness, while the egg white provides protein that helps to strengthen the dough structure.
-
- Orange Zest (1 orange): Orange zest brings a bright, citrusy note that complements the warm spices and dried fruit beautifully. It adds a layer of complexity and freshness to the buns, preventing them from being overly heavy or cloying. Use a zester or microplane to zest the orange, being careful to only zest the orange part of the peel and avoid the white pith underneath, which can be bitter. Freshly zested orange is always best for the most vibrant flavor.
-
- Dried Mixed Fruit (150g or approximately 1 cup): Dried mixed fruit, typically a combination of raisins, sultanas, and currants, provides sweetness, chewiness, and texture to Hot Cross Buns. The dried fruit soaks up some of the moisture from the dough during baking, becoming plump and juicy. You can use a pre-mixed dried fruit blend or create your own combination using your favorite dried fruits. Soaking the dried fruit in warm water or rum for about 30 minutes before adding it to the dough can help to plump it up and prevent it from drawing moisture out of the dough, resulting in even softer buns. If you prefer, you can also substitute some of the mixed fruit with other dried fruits like cranberries, chopped apricots, or candied peel.
Instructions
Step 1: Mixing Dry Ingredients
In a large mixing bowl, whisk together the strong bread flour, instant yeast, caster sugar, mixed spices (cinnamon, mixed spice/nutmeg, cloves), and salt. Whisking ensures that these dry ingredients are evenly distributed, especially the yeast and salt, preventing any pockets of concentrated ingredients that could affect the dough’s rise or flavor. This step is crucial for creating a consistent and well-balanced dough. Make sure to use a bowl that is large enough to accommodate the dough as it rises, ideally twice its initial volume.
Step 2: Adding Wet Ingredients and Forming the Dough
Make a well in the center of the dry ingredients. Pour in the warm milk, melted butter, and egg. Add the orange zest and dried mixed fruit. Using a wooden spoon or a spatula, stir the ingredients together until a shaggy dough forms. At this stage, the dough will be quite sticky and may not look perfectly smooth. Don’t worry, this is normal. The goal is just to bring all the ingredients together into a cohesive mass. Once a shaggy dough has formed, it’s time to move on to kneading.
Step 3: Kneading the Dough
Turn the dough out onto a lightly floured surface. Kneading is the process of working the dough to develop gluten, the protein in flour that gives bread its structure and elasticity. Knead the dough for 8-10 minutes, or until it becomes smooth, elastic, and slightly tacky but not sticky. To knead, use the heel of your hand to push the dough away from you, then fold it back over itself, and repeat. Turn the dough a quarter turn after each push and fold. If the dough sticks to your surface, add a tiny sprinkle of flour, but be careful not to add too much, as this can make the dough dry and tough. You’ll know the dough is kneaded enough when it passes the windowpane test: take a small piece of dough and gently stretch it between your fingers. If you can stretch it thin enough to see light through it without tearing, the gluten is well-developed, and the dough is ready. If it tears easily, continue kneading for a few more minutes. Alternatively, if you are using a stand mixer with a dough hook, knead the dough on medium-low speed for 6-8 minutes, or until it reaches the same smooth and elastic consistency.
Step 4: First Rise (Proofing)
Place the kneaded dough in a lightly oiled bowl, turning it to coat all sides with oil. This prevents the dough from drying out as it rises. Cover the bowl tightly with plastic wrap or a damp kitchen towel. Place the bowl in a warm, draft-free place to rise for 1-1.5 hours, or until the dough has doubled in size. A warm spot helps to speed up yeast activity. Good places for proofing include a slightly warmed oven (turned off!), a microwave (also turned off!), or a warm spot in your kitchen away from drafts. The rising time will depend on the temperature of your environment; warmer temperatures will result in faster rising. You’ll know the dough has doubled when it springs back slowly when gently poked with two fingers.
Step 5: Shaping the Buns
Once the dough has doubled, gently punch it down to release the air. Turn the dough out onto a lightly floured surface. Divide the dough into 12 equal portions (approximately 75-80g each). Shape each portion into a smooth, round bun by tucking the edges underneath and rolling it gently between your palms. Place the shaped buns on a baking tray lined with parchment paper, leaving some space between them for spreading during the second rise.
Step 6: Second Rise (Proofing in the Pan)
Cover the tray of buns loosely with plastic wrap or a damp kitchen towel. Let the buns rise again in a warm, draft-free place for 45-60 minutes, or until they have puffed up and are almost doubled in size and feel light and airy. This second rise is crucial for achieving light and fluffy Hot Cross Buns. Again, ensure the rising environment is warm and draft-free for optimal results.
Step 7: Making the Crosses
While the buns are proving for the second time, prepare the paste for the crosses. In a small bowl, mix the plain flour with water, adding water gradually until you get a smooth, thick paste that is pipeable but not too runny. You should aim for a consistency similar to toothpaste. Spoon the paste into a piping bag fitted with a small round nozzle, or use a zip-top bag and snip off a small corner. Once the buns have finished their second rise, pipe crosses onto the top of each bun. Pipe one line lengthwise and then another line crosswise to form a cross on each bun.
Step 8: Baking the Buns
Preheat your oven to 400°F (200°C). Once the crosses are piped, place the baking tray in the center rack of the preheated oven. Bake for 15-20 minutes, or until the buns are golden brown and sound hollow when tapped underneath. Keep an eye on them as oven temperatures can vary, and you want them to be nicely browned but not burnt.
Step 9: Making the Glaze
While the buns are baking, prepare the glaze. In a small saucepan, heat the apricot jam and water over low heat until the jam is melted and smooth. Simmer for a minute or two, stirring constantly, until it becomes a syrupy glaze. Strain the glaze through a fine-mesh sieve to remove any lumps or fruit pieces, resulting in a smooth, glossy glaze.
Step 10: Glazing and Cooling
As soon as the buns are out of the oven, brush them generously with the warm apricot glaze while they are still hot. This will give them a beautiful shine and a touch of extra sweetness. Let the glazed Hot Cross Buns cool on the baking tray for a few minutes before transferring them to a wire rack to cool completely. Allow them to cool slightly before serving as they are best enjoyed warm or at room temperature.
Nutrition
- Serving Size: one normal portion
- Calories: 250-300
- Sugar: 15-20g
- Sodium: 200-250mg
- Fat: 6-8g
- Saturated Fat: 3-4g
- Carbohydrates: 45-55g
- Fiber: 2-3g
- Protein: 5-6g
- Cholesterol: 30-40mg


