

There’s a universal truth that every parent eventually discovers: the magnetic, almost mythical pull of the chicken nugget. My own moment of reckoning came on a Tuesday afternoon when my seven-year-old, after a week of begging for a trip to the golden arches, declared my lovingly prepared roasted chicken “boring.” It was a humbling, if not entirely unexpected, blow. I understood the appeal—the perfect size, the reliable crunch, the dip-ability. But I couldn’t shake the “mystery meat” stereotype and the long list of unpronounceable ingredients on the fast-food version. That evening, I embarked on a mission: to create a homemade chicken nugget that wasn’t just a healthier alternative, but an unquestionably superior one. After several less-than-crispy attempts, I finally landed on this recipe. The first time I served them, piling the golden, crunchy nuggets on a platter, my kids fell silent. The only sound was the satisfying crunch, followed by a chorus of “Mom, these are the best nuggets ever!” It was a victory of epic proportions, and since that day, this recipe has become a treasured staple, proving that wholesome, real food can be the most delicious comfort food of all.
Why This Homemade Chicken Nugget Recipe is a Culinary Triumph
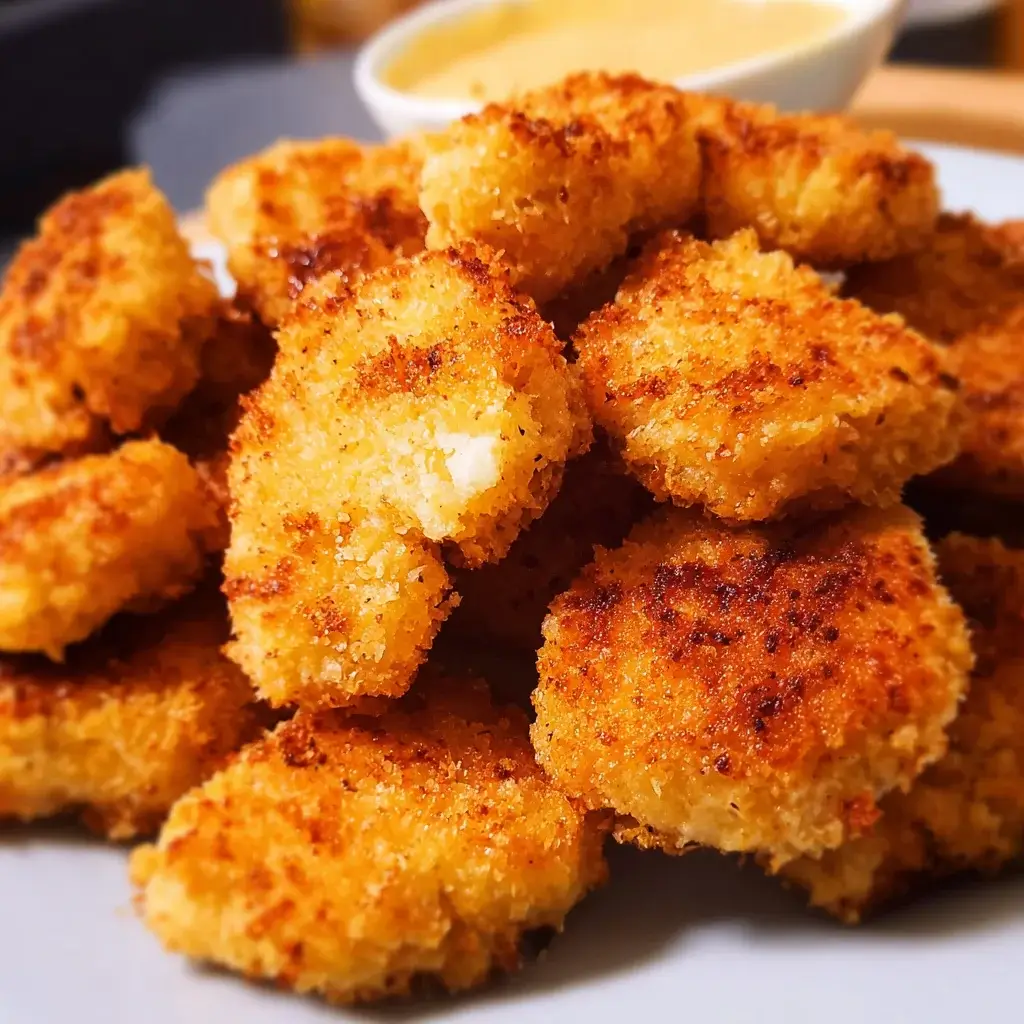
In a world saturated with nugget recipes, this one stands apart as the definitive guide to achieving crispy, juicy, and flavorful perfection at home. This isn’t just about breading and frying; it’s a carefully engineered approach that guarantees a result far superior to any frozen or fast-food offering.
First and foremost, the foundation of this recipe is real, high-quality chicken. We use 100% boneless, skinless chicken breast, which you cut yourself. This means you have complete control over the quality and know exactly what’s in every single bite. There are no fillers, no binders, no mysterious “restructured chicken product.” The result is a nugget with the pure, unadulterated taste and tender, meaty texture of real chicken—a difference you can see and taste immediately.
Second is the three-stage breading process, which is the secret to an ultra-crispy, flavorful crust that actually adheres to the chicken. We don’t just dunk the chicken in breadcrumbs. We start with a seasoned flour dredge, which gives the egg wash something to grip. The egg wash then acts as the perfect glue for our final coating: a masterful blend of Panko breadcrumbs and finely crushed cornflakes. Panko provides an airy, jagged texture that fries up incredibly light and crispy, while the cornflakes add an extra layer of shatteringly crunchy goodness and a beautiful golden color. The breading is also generously seasoned, ensuring that the crust is just as delicious as the juicy chicken it encases.
Finally, this recipe is built for versatility and the modern kitchen. While pan-frying delivers the classic golden-brown nugget of your childhood dreams, we provide equally detailed and effective instructions for both baking and air frying. This allows you to choose the method that best suits your lifestyle and health preferences without sacrificing the all-important crunch. The baked version offers a hands-off approach with less oil and easy cleanup, while the air fryer method yields a remarkably crispy nugget with minimal oil, making it a fantastic, healthier option for a weeknight meal. This recipe doesn’t just give you one path to success; it gives you three, ensuring you can make perfect nuggets anytime, any way you want.
The Anatomy of a Perfect Nugget: Understanding the Ingredients
Each component in this recipe plays a crucial role in building the final, perfect nugget. Understanding their function will turn you from a recipe-follower into a nugget-making expert.
The Star: The Chicken
- Boneless, Skinless Chicken Breasts: This is our preferred cut. It’s lean, tender, and easy to work with. It provides that classic, clean chicken flavor and a firm yet juicy texture that we associate with the perfect nugget. You can also use boneless, skinless chicken thighs for a richer, more flavorful, and even juicier nugget, though they can be slightly more challenging to trim and cut uniformly.
The Three-Stage Breading System:
- Stage 1: The Flour Dredge
- All-Purpose Flour: This is our base layer. Its purpose is to absorb any excess moisture on the surface of the chicken, creating a dry, starchy surface for the egg wash to cling to. It’s the primer that prevents the breading from sliding off.
- Spices (Salt, Black Pepper, Garlic Powder, Onion Powder, Paprika): We season every layer! This initial seasoning directly on the flour ensures the flavor penetrates right to the chicken itself. The paprika also adds a warm, golden hue.
- Stage 2: The Egg Wash
- Large Eggs & Water (or Milk): The eggs act as the essential binder—the “glue” that holds the breadcrumb coating to the chicken. Whisking in a small amount of water or milk thins the egg wash slightly, allowing it to coat the chicken more evenly without being too thick or clumpy.
- Stage 3: The Crispy Coating
- Panko Breadcrumbs: This is the non-negotiable secret to a truly crispy crust. Panko breadcrumbs are made from crustless bread and are ground into large, airy flakes. These flakes absorb less oil and provide a much lighter, crispier texture than standard, fine breadcrumbs.
- Cornflakes: Our secondary secret weapon for crunch. Crushing plain cornflakes and adding them to the panko creates an even more complex, craggy, and ultra-crunchy exterior.
- Grated Parmesan Cheese (Optional): For an extra layer of savory, umami flavor, a little grated Parmesan in the final coating is a game-changer. It gets nutty and golden as it cooks.
The Cooking Medium:
- For Pan-Frying: A neutral, high-smoke-point oil like canola, vegetable, or peanut oil is essential for achieving a golden-brown crust without burning.
- For Baking/Air Frying: A light spritz of cooking spray or a drizzle of oil helps the breading to brown and crisp up beautifully without deep frying.
Homemade Chicken Nuggets: The Complete Ingredient List
For the Chicken:
- 2 lbs (900g) Boneless, Skinless Chicken Breasts
For the Breading Station:
- Station 1 (Flour Dredge):
- 1 cup (120g) All-Purpose Flour
- 2 teaspoons Salt
- 1 teaspoon Black Pepper
- 1 teaspoon Garlic Powder
- 1 teaspoon Onion Powder
- 1 teaspoon Paprika
- Station 2 (Egg Wash):
- 2 large Eggs
- 2 tablespoons Water or Milk
- Station 3 (Crispy Coating):
- 2 cups (120g) Panko Breadcrumbs
- 1 cup (30g) Plain Cornflakes, finely crushed
- ½ cup (50g) Grated Parmesan Cheese (optional)
For Cooking:
- For Pan-Frying: 1 cup (240ml) Neutral Oil (like canola, vegetable, or peanut oil)
- For Baking or Air Frying: Olive oil cooking spray
Step-by-Step Instructions for Perfect, Crispy Nuggets
Follow these detailed steps, including the crucial “dry hand, wet hand” technique, for a clean and efficient breading process and flawless results.
Step 1: Prepare the Chicken
First, pat the chicken breasts completely dry with paper towels. This is a vital step for ensuring the breading adheres properly. Trim off any fat or tenders. Cut the chicken into uniform, bite-sized pieces, about 1.5 inches square. Uniformity is key to ensuring all the nuggets cook evenly.
Step 2: Set Up Your Breading Station
You will need three shallow dishes or pie plates.
- In the first dish: Whisk together all the ingredients for the Flour Dredge (flour, salt, pepper, garlic powder, onion powder, paprika).
- In the second dish: Whisk together the eggs and water until they are light and frothy.
- In the third dish: Combine the Panko breadcrumbs, crushed cornflakes, and optional Parmesan cheese. Mix well.
Arrange these three dishes in an assembly line next to your stovetop or a prepared baking sheet.
Step 3: The Breading Process (Dry Hand, Wet Hand)
This technique prevents your fingers from becoming caked in batter. Designate one hand as your “dry hand” (for handling the flour and breadcrumb mixtures) and the other as your “wet hand” (for handling the egg-coated chicken).
- Working with a few pieces of chicken at a time, use your dry hand to place them in the flour mixture. Toss to coat completely, then shake off the excess.
- Transfer the flour-dusted chicken pieces to the egg wash dish. Use your wet hand to turn them over, ensuring they are fully coated in the egg mixture. Let the excess egg drip off.
- Move the egg-coated pieces to the final Panko mixture. Use your dry hand to scoop the breading over the nuggets, pressing gently to ensure a thick, even coating on all sides.
- Place the fully breaded nuggets in a single layer on a clean plate or baking sheet. Repeat with the remaining chicken.
Step 4: Cook the Nuggets (Choose Your Method)
Method 1: Pan-Frying (The Classic)
- Pour about ½ inch of neutral oil into a large, heavy-bottomed skillet. Heat over medium-high heat until the oil reaches 350°F (175°C), or until a small drop of breading sizzles immediately.
- Carefully place the nuggets in the hot oil in a single layer. Do not overcrowd the pan. Work in batches of 8-10 nuggets.
- Fry for 3-4 minutes per side, until they are deep golden brown and cooked through.
- Remove with a slotted spoon and transfer to a wire rack set over a paper towel-lined baking sheet to drain. Sprinkle with a little extra salt while they are hot.
Method 2: Baking (The Easy, Healthier Option)
- Preheat your oven to 400°F (200°C). Place a wire rack inside a large rimmed baking sheet. Lightly spray the wire rack with cooking spray.
- Arrange the breaded nuggets in a single layer on the wire rack. Spray the tops of the nuggets generously with cooking spray.
- Bake for 15-20 minutes, flipping the nuggets halfway through, until they are golden brown, crispy, and cooked through.
Method 3: Air Frying (The Crispiest, Healthier Option)
- Preheat your air fryer to 400°F (200°C).
- Place the nuggets in the air fryer basket in a single, even layer. Do not overcrowd the basket. Work in batches if necessary.
- Spray the tops of the nuggets lightly with cooking spray.
- Air fry for 8-12 minutes, flipping them halfway through, until they are deeply golden, extra crispy, and cooked through.
Nutritional Information (An Estimation)
This is an approximation and will vary significantly based on the cooking method (pan-fried nuggets will absorb more oil and have a higher calorie count).
- Servings: 6
- Serving Size: Approximately 6-7 nuggets
- Calories per serving (Baked/Air-Fried): Approximately 350-400 kcal
- Calories per serving (Pan-Fried): Approximately 450-550 kcal
Time Commitment: Prep and Cook Time
- Preparation Time: 25 minutes
- Cook Time (per batch): 6-8 minutes (Pan-Frying), 8-12 minutes (Air Frying), 15-20 minutes (Baking)
- Total Time: Approximately 40-50 minutes
How to Serve Your Homemade Chicken Nuggets
The nugget is a blank canvas for a world of dipping sauces and delicious sides. Elevate your nugget night with these ideas:
- A Saucy Lineup (Beyond Ketchup):
- Classic Honey Mustard: Whisk together equal parts Dijon mustard and honey with a tablespoon of mayonnaise and a splash of apple cider vinegar.
- Creamy BBQ Ranch: Mix ½ cup of your favorite ranch dressing with 2 tablespoons of smoky BBQ sauce.
- Sweet and Sour Sauce: A classic pairing that is easy to find in a bottle or make at home.
- “Chick-fil-A” Style Sauce: Combine ½ cup mayonnaise, 2 tablespoons BBQ sauce, 1 tablespoon honey, and 1 tablespoon yellow mustard.
- Perfect Sidekicks:
- Classic: Serve with crispy French fries (store-bought or homemade) or tater tots.
- Comfort Food Combo: Pair with a scoop of creamy macaroni and cheese.
- Healthier Pairing: Serve with a side of steamed green beans, a fresh garden salad, or crisp apple slices.
- For the Kids: Offer a side of ants on a log (celery with peanut butter and raisins) or a simple fruit salad.
- Fun Presentation Ideas:
- Lunchbox Heroes: These nuggets are fantastic cold or at room temperature, making them perfect for school lunches.
- Party Platter: Arrange them on a large platter with a rainbow of dipping sauces in the center for a guaranteed party hit.
- Nugget “Salad”: Slice the cooked nuggets and serve them over a bed of crisp romaine lettuce with your favorite salad toppings for a fun and satisfying meal.
Mastering the Nugget: 5 Additional Tips for Perfection
- Don’t Overcrowd the Pan (or Basket!): This is the golden rule of frying and air frying. Overcrowding drops the temperature of the oil or the air, which leads to the nuggets steaming instead of crisping. This results in a soggy coating and greasy food. Always cook in batches, leaving space between each nugget.
- The Freezer Trick for an Unbeatable Crust: For an even more durable, extra-crispy crust, place the breaded nuggets on a parchment-lined baking sheet and freeze them for 15-30 minutes before cooking. This helps the breading adhere firmly to the chicken and ensures it won’t fall off during the cooking process.
- Make-Ahead and Freeze for Later: This recipe is perfect for batch cooking. Prepare the nuggets all the way through the breading process. Arrange them in a single layer on a parchment-lined baking sheet and “flash freeze” them until solid. Then, transfer the frozen, un-cooked nuggets to a freezer-safe bag or container. They can be cooked directly from frozen—just add 5-7 minutes to your chosen cooking time.
- Press the Breading On: When you are in the final Panko stage, don’t be shy. Use your dry hand to gently but firmly press the breadcrumb mixture onto the surface of the chicken. This ensures a thick, craggy coating that will become wonderfully crunchy.
- Double Breading for Extra-Thick Crust: If you are a true fiend for a thick, crunchy crust, you can perform a double breading. After the first pass through all three stations, simply repeat the process: dip the Panko-coated nugget back into the egg wash, then back into the Panko mixture a second time. This will create an incredibly thick, satisfyingly crunchy shell.
Frequently Asked Questions About Homemade Chicken Nuggets
1. Why is my breading falling off the chicken?
This is a common problem with a few likely causes. First, the chicken might have been too wet to begin with (always pat it dry!). Second, you may have skipped the initial flour dredge, which is essential for giving the egg something to stick to. Finally, using the freezer trick mentioned in the tips section can dramatically improve adhesion.
2. Can I make these gluten-free?
Absolutely! This recipe is easily adaptable. Simply substitute the all-purpose flour with a good quality gluten-free all-purpose blend. For the crispy coating, use gluten-free Panko breadcrumbs (widely available) and ensure your cornflakes are certified gluten-free. The results will be just as crispy and delicious.
3. Are these homemade nuggets actually healthier than fast-food nuggets?
Yes, significantly so. You are using 100% real chicken breast without fillers or additives. You control the amount of salt. When you bake or air-fry them, you are using a fraction of the oil used in commercial deep-frying. This means significantly less saturated fat, fewer calories, and no questionable preservatives.
4. How do I store and reheat leftovers?
Store any leftover nuggets in an airtight container in the refrigerator for up to 3 days. To reheat and restore their glorious crunch, the microwave is your enemy—it will make them soggy. The best way is to use an oven or air fryer. Reheat them at 400°F (200°C) for 5-7 minutes until they are hot and crispy again.
5. Can I use regular breadcrumbs instead of Panko?
You can, but the texture will be different. Standard breadcrumbs are finer and denser. They will create a crust that is more like a traditional breading—flatter and less craggy. It will still be tasty, but if you are chasing that signature light, airy, ultra-crispy texture, Panko breadcrumbs are essential.

Homemade Chicken Nuggets recipe
Ingredients
For the Chicken:
-
2 lbs (900g) Boneless, Skinless Chicken Breasts
For the Breading Station:
-
Station 1 (Flour Dredge):
-
1 cup (120g) All-Purpose Flour
-
2 teaspoons Salt
-
1 teaspoon Black Pepper
-
1 teaspoon Garlic Powder
-
1 teaspoon Onion Powder
-
1 teaspoon Paprika
-
-
Station 2 (Egg Wash):
-
2 large Eggs
-
2 tablespoons Water or Milk
-
-
Station 3 (Crispy Coating):
-
2 cups (120g) Panko Breadcrumbs
-
1 cup (30g) Plain Cornflakes, finely crushed
-
½ cup (50g) Grated Parmesan Cheese (optional)
-
For Cooking:
-
For Pan-Frying: 1 cup (240ml) Neutral Oil (like canola, vegetable, or peanut oil)
-
For Baking or Air Frying: Olive oil cooking spray
Instructions
Step 1: Prepare the Chicken
First, pat the chicken breasts completely dry with paper towels. This is a vital step for ensuring the breading adheres properly. Trim off any fat or tenders. Cut the chicken into uniform, bite-sized pieces, about 1.5 inches square. Uniformity is key to ensuring all the nuggets cook evenly.
Step 2: Set Up Your Breading Station
You will need three shallow dishes or pie plates.
-
In the first dish: Whisk together all the ingredients for the Flour Dredge (flour, salt, pepper, garlic powder, onion powder, paprika).
-
In the second dish: Whisk together the eggs and water until they are light and frothy.
-
In the third dish: Combine the Panko breadcrumbs, crushed cornflakes, and optional Parmesan cheese. Mix well.
Arrange these three dishes in an assembly line next to your stovetop or a prepared baking sheet.
Step 3: The Breading Process (Dry Hand, Wet Hand)
This technique prevents your fingers from becoming caked in batter. Designate one hand as your “dry hand” (for handling the flour and breadcrumb mixtures) and the other as your “wet hand” (for handling the egg-coated chicken).
-
Working with a few pieces of chicken at a time, use your dry hand to place them in the flour mixture. Toss to coat completely, then shake off the excess.
-
Transfer the flour-dusted chicken pieces to the egg wash dish. Use your wet hand to turn them over, ensuring they are fully coated in the egg mixture. Let the excess egg drip off.
-
Move the egg-coated pieces to the final Panko mixture. Use your dry hand to scoop the breading over the nuggets, pressing gently to ensure a thick, even coating on all sides.
-
Place the fully breaded nuggets in a single layer on a clean plate or baking sheet. Repeat with the remaining chicken.
Step 4: Cook the Nuggets (Choose Your Method)
Method 1: Pan-Frying (The Classic)
-
Pour about ½ inch of neutral oil into a large, heavy-bottomed skillet. Heat over medium-high heat until the oil reaches 350°F (175°C), or until a small drop of breading sizzles immediately.
-
Carefully place the nuggets in the hot oil in a single layer. Do not overcrowd the pan. Work in batches of 8-10 nuggets.
-
Fry for 3-4 minutes per side, until they are deep golden brown and cooked through.
-
Remove with a slotted spoon and transfer to a wire rack set over a paper towel-lined baking sheet to drain. Sprinkle with a little extra salt while they are hot.
Method 2: Baking (The Easy, Healthier Option)
-
Preheat your oven to 400°F (200°C). Place a wire rack inside a large rimmed baking sheet. Lightly spray the wire rack with cooking spray.
-
Arrange the breaded nuggets in a single layer on the wire rack. Spray the tops of the nuggets generously with cooking spray.
-
Bake for 15-20 minutes, flipping the nuggets halfway through, until they are golden brown, crispy, and cooked through.
Method 3: Air Frying (The Crispiest, Healthier Option)
-
Preheat your air fryer to 400°F (200°C).
-
Place the nuggets in the air fryer basket in a single, even layer. Do not overcrowd the basket. Work in batches if necessary.
-
Spray the tops of the nuggets lightly with cooking spray.
-
Air fry for 8-12 minutes, flipping them halfway through, until they are deeply golden, extra crispy, and cooked through.
Nutrition
- Serving Size: one normal portion
- Calories: 350-400 kcal


