
There’s a certain magic in transforming the mundane into the magnificent, and nowhere is this more apparent than in the ancient art of candying fruit. For years, my only experience with candied fruit was the sad, unnaturally colored specks in a store-bought fruitcake—a confection I dutifully avoided. I saw it as a relic, a cloying and unpleasant ingredient from a bygone era. That was until I decided to bake a traditional Italian panettone from scratch. The recipe called for high-quality candied orange and lemon peel, and I knew, with absolute certainty, that the stuff in the plastic tub at the grocery store would not do. So, I embarked on a journey. I spent a weekend carefully blanching citrus peels, simmering them slowly in a bubbling sugar syrup until they turned translucent and jewel-like, and then patiently letting them dry. The aroma that filled my kitchen was nothing short of intoxicating—pure, bright citrus, deepened by the warm scent of caramelizing sugar. When I finally tasted a piece of the finished candied orange peel, it was a revelation. It was soft yet chewy, bursting with intense, pure orange flavor, and perfectly sweet without being cloying. It was a gourmet confection, a world away from its mass-produced counterpart. That panettone was the best I’ve ever made, and I give full credit to the homemade candied fruit. Since then, I’ve never looked back. Making candied fruit has become a cherished holiday ritual, a way to preserve the brightness of citrus in the depths of winter and to elevate every bake into something truly special.
The Magic of Homemade Candied Fruit: A Lost Art Revived
Candied fruit, at its core, is a method of preservation that dates back to ancient civilizations. Before the advent of modern refrigeration, preserving the fleeting bounty of the harvest was a matter of survival. By slowly replacing the water content of a fruit with a high concentration of sugar, it could be kept for months, providing a source of sweetness and flavor long after the fresh fruit was gone. This process, known as candying or crystallizing, turns fruit into a stable, delicious confection.
Today, while we no longer need to candy fruit for survival, the practice offers something even more valuable: unparalleled flavor. Commercial candied fruit is often produced rapidly using chemical solutions and artificial colors, resulting in a product that is disappointingly bland and has a strange, waxy texture. Homemade candied fruit, in contrast, is a slow, gentle process. It respects the integrity of the fruit, concentrating its natural essence into a chewy, intensely flavorful, and visually stunning jewel. This guide will focus primarily on making candied citrus peel—the most versatile and rewarding place to start—but the principles can be applied to many other fruits as well. Prepare to transform your baking, your cocktails, and your opinion of candied fruit forever.
The Simple Science Behind Candying
Understanding the “why” behind the process makes the “how” much easier. The magic of candying relies on a basic scientific principle: osmosis.
Osmosis is the movement of water across a semi-permeable membrane (like the cell walls in fruit) from an area of low solute concentration to an area of high solute concentration. In this case, the “solute” is sugar.
When you place fruit peels in a high-sugar syrup, the water inside the fruit’s cells is naturally drawn out into the syrup. Simultaneously, the sugar molecules from the syrup slowly seep into the fruit’s cells, replacing the water. By doing this gradually over a low heat, you ensure the fruit’s structure remains intact. The result is a fruit peel where the water has been replaced by a super-saturated sugar solution, which acts as a powerful preservative and gives the fruit its characteristic chewy, dense texture. The initial blanching step is also crucial, as it serves to soften the peel and remove any harsh bitterness, especially from the white pith.
Complete Ingredients for Your Candied Citrus Peel
The beauty of this recipe lies in its simplicity. You are essentially using a waste product—the peel of an orange—and transforming it into a gourmet ingredient. For the best results, choose organic, thick-skinned citrus.
- Citrus Fruits: 3-4 large, thick-skinned oranges, 4-5 lemons, or 2 large grapefruit. A mix is wonderful!
- Water: For blanching and for the syrup (you will need several cups).
- Granulated Sugar: 3 cups (600g), plus an additional 1 cup (200g) for coating the finished peels.
- Optional Flavorings for the Syrup:
- 1 vanilla bean, split
- 2-3 whole star anise
- 1 cinnamon stick
- A splash of Grand Marnier or Cointreau (added at the end)
Step-by-Step Instructions for Perfect Candied Citrus Peel
Patience is the most important ingredient in this recipe. Rushing the process will not yield good results. Set aside an afternoon and enjoy the wonderfully aromatic journey.
Part 1: Preparing the Citrus Peels
- Wash the Fruit: Thoroughly wash and scrub the exterior of your citrus fruits to remove any wax or residue.
- Score and Peel: Using a sharp knife, score the peel of each fruit into four vertical segments, cutting just through the peel and pith, but not into the fruit’s flesh. Carefully peel these segments off the fruit. (Save the fruit for juicing or eating!)
- Cut into Strips: Lay the peel segments on a cutting board, pith-side up. Cut them into uniform strips, about ¼- to ½-inch wide. Uniformity is key for even cooking.
- Optional Pith Removal: The white pith can be bitter. For the most delicate, candy-like result, you can remove some of it. Lay a peel strip flat and carefully run a sharp paring knife along it to shave off a layer of the white pith. This step is optional; leaving the pith on results in a chewier, more substantial peel, which some prefer.
Part 2: The Crucial Blanching Process
- First Blanch: Place the prepared citrus peels in a medium saucepan and cover them with cold water. Bring the pot to a boil over high heat. Once it reaches a rolling boil, immediately drain the peels in a colander.
- Second and Third Blanch: Return the peels to the saucepan, cover again with fresh cold water, and bring to a boil. Drain. Repeat this process one more time for a total of three blanches. This repeated boiling and draining is the secret to removing the bitterness from the pith and softening the peels so they can properly absorb the sugar syrup. After the final drain, set the peels aside.
Part 3: The Candying Process (Slow Simmer)
- Make the Simple Syrup: In the same saucepan (wiped clean), combine 3 cups of granulated sugar with 3 cups of water. Heat over medium heat, stirring occasionally, until the sugar has completely dissolved.
- Add the Peels: Add the blanched peels to the sugar syrup. If you are using any whole spice flavorings (vanilla bean, star anise, cinnamon stick), add them now.
- The Slow Simmer: Bring the syrup to a gentle simmer. Once it begins to bubble, reduce the heat to the lowest possible setting that will maintain a very gentle, occasional “plop” of a bubble. Do not let it boil vigorously.
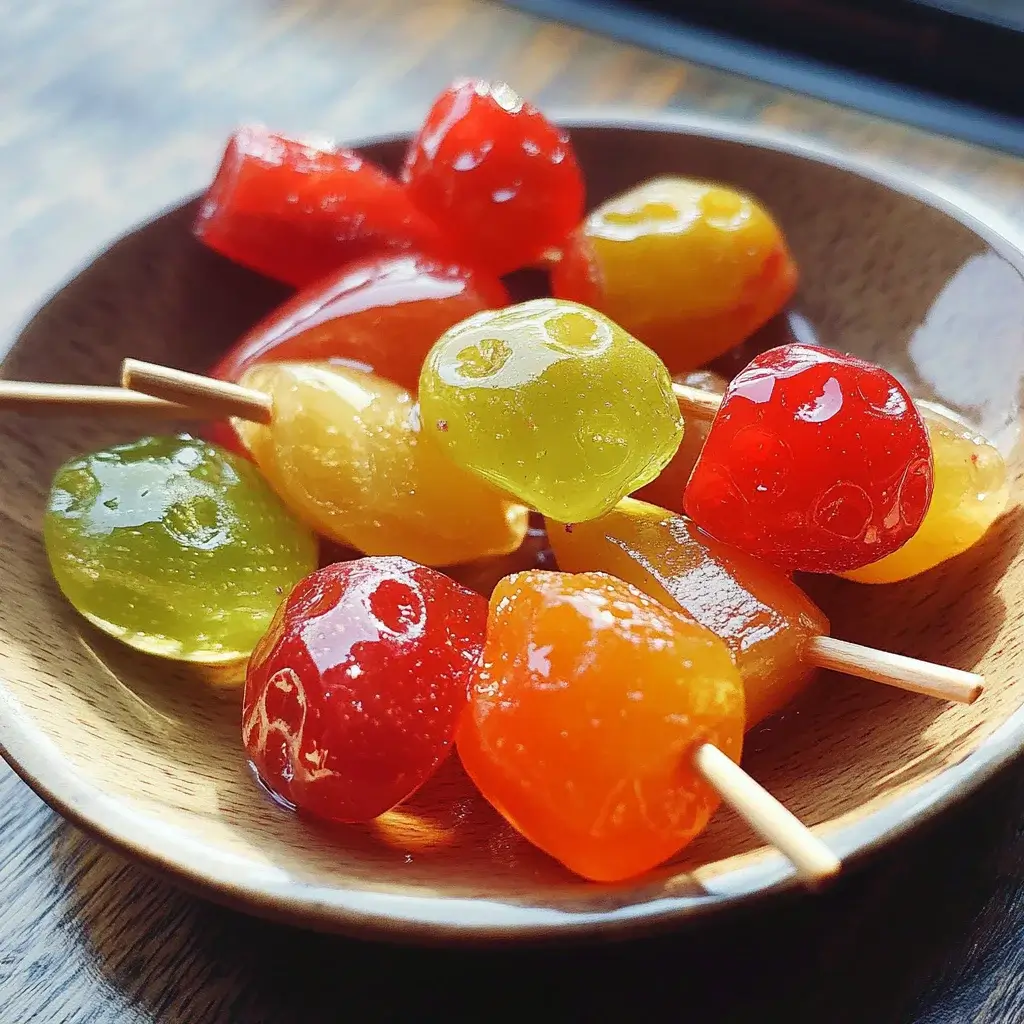
- Be Patient: Let the peels simmer very slowly in the syrup for 1 to 1.5 hours. Stir gently every 15-20 minutes. You will see a transformation. The peels will begin to look translucent and jewel-like as they absorb the sugar. The syrup will thicken considerably. The process is done when the peels are tender and almost entirely translucent.
- Optional Liqueur: If using liqueur for flavor, remove the pot from the heat and stir it in during the last few minutes.
Part 4: Drying and Finishing
- Drain the Peels: Set a wire cooling rack over a baking sheet (to catch drips). Using a slotted spoon or tongs, carefully remove the candied peels from the syrup and arrange them in a single layer on the wire rack. Do not discard the syrup! (See tips section).
- The Drying Stage: Let the peels air dry on the rack for at least 4-8 hours, or ideally, overnight at room temperature. They will become less sticky and develop a pleasant, chewy texture.
- The Sugar Coating: Once the peels are tacky but no longer wet, place the remaining 1 cup of granulated sugar in a shallow bowl. Toss the candied peels in the sugar, a few at a time, until they are evenly and generously coated.
- Final Dry: Place the sugar-coated peels back on the wire rack and let them dry for another hour or two to set the coating.
Nutrition Facts
- Servings: This recipe yields approximately 3-4 cups of candied peel. A serving is subjective.
- Calories per serving: This is primarily a sugar-based confection. A serving of 2-3 strips (about 30g) contains approximately 100-120 kcal, almost entirely from carbohydrates (sugar).
Preparation Time
- Active Prep Time: 30 minutes
- Blanching Time: 20-25 minutes
- Simmering (Candying) Time: 1 to 1.5 hours
- Drying Time: 5 hours to overnight
- Total Time: Approximately 8-12 hours (mostly hands-off drying time)
How to Use and Serve Your Homemade Candied Fruit
You’ve created a gourmet ingredient! Now it’s time to let it shine. The possibilities are endless and extend far beyond fruitcake.
- The Ultimate Holiday Baking Ingredient:
- Fruitcakes: The most obvious, but with homemade candied fruit, it becomes a delicacy.
- Stollen: Finely dice the peel and soak it in rum before adding to this classic German Christmas bread.
- Panettone: Essential for the authentic flavor and texture of this Italian sweet bread.
- Cookies: Chop it finely and add it to biscotti, shortbread, or Florentines for a chewy, citrusy bite.
- Scones and Muffins: Add a handful of chopped candied peel to your favorite scone or muffin batter for a burst of flavor.
- As a Gourmet Confection:
- Dipped in Chocolate: The most elegant treat. Dip the dried (but not sugar-coated) strips halfway into melted high-quality dark chocolate. Let them set on parchment paper. The combination of bitter chocolate and sweet citrus is divine.
- On a Cheeseboard: Serve strips of candied peel alongside sharp cheeses, nuts, and cured meats. It provides a wonderful sweet counterpoint.
- As a Standalone Treat: Simply enjoy them as they are with a cup of tea or coffee.
- As a Stunning Garnish:
- Cocktail Garnish: Use a strip to garnish cocktails like an Old Fashioned, a Negroni, or a hot toddy.
- Dessert Topping: Finely dice the peel and sprinkle it over ice cream, panna cotta, cheesecake, or yogurt.
- Cake Decoration: Use the beautiful, jewel-like strips to decorate the tops of cakes and tortes.
Additional Tips for Candying Perfection
- Save That Golden Syrup! The leftover syrup in the pot is liquid gold. It is now intensely flavored with citrus (and any spices you used). Let it cool, strain it into a clean glass jar, and store it in the refrigerator. Use it to sweeten iced tea, brush over cakes as a glaze, pour over pancakes, or mix into cocktails.
- Patience is a Virtue (and an Ingredient): The single biggest mistake is trying to rush the simmering process. Boiling the peels too quickly will cause them to toughen and the syrup to caramelize too fast. A very low, slow simmer is the key to tender, translucent peels.
- Pith Control is Key to Flavor: If you are sensitive to bitterness, take the extra time to trim away most of the white pith before you begin. If you enjoy a more robust, slightly bitter marmalade-like flavor, leave more of it on.
- Proper Storage for Longevity: Once fully dried and coated, your candied fruit is very shelf-stable. Store it in an airtight container, with parchment paper between the layers to prevent sticking. It will keep at room temperature for a month, or in the refrigerator for up to 6 months.
- Experiment with Spices and Flavors: Don’t be afraid to customize your candying syrup. A cinnamon stick and star anise will lend a warm, spiced flavor perfect for holiday baking. A split vanilla bean adds a beautiful floral sweetness. A splash of orange liqueur like Grand Marnier or Cointreau stirred in at the end adds a wonderful depth.
Frequently Asked Questions (FAQ)
1. Why is my candied fruit bitter?
Bitterness almost always comes from the pith. This can happen for two reasons: either you started with a very thick-pithed fruit and didn’t trim enough of it away, or, more likely, you didn’t blanch the peels enough times. The three-stage blanching process is designed specifically to draw out and discard these bitter compounds. Don’t skip it!
2. Can I use this method for other fruits?
Yes, the principle is the same, but the preparation varies.
- Candied Cherries: Pit the cherries, but leave them whole. You only need to blanch them once briefly before adding them to the syrup.
- Candied Pineapple: Use fresh pineapple. Peel, core, and cut it into rings or chunks. Simmer the pineapple pieces in plain water for about 10 minutes to soften them before proceeding with the sugar syrup stage.
- Candied Ginger: Peel fresh ginger and slice it into thin coins. The blanching process is essential to mellow its intense heat. Simmer it in the syrup until translucent.
3. My sugar syrup crystallized while simmering. What did I do wrong?
Crystallization can happen if sugar crystals are introduced to the pot’s sides or if the mixture is agitated too much. To prevent this, make sure all the sugar is fully dissolved before you add the peels. You can also add a tablespoon of corn syrup or lemon juice to the syrup at the beginning, as these “invert sugars” help inhibit crystallization. If it does crystallize, you may have to start the syrup over.
4. How long does homemade candied fruit last?
Thanks to the high sugar content, it’s an excellent natural preservative. When properly dried and stored in an airtight container, it will easily last for a month at a cool room temperature, and for 6 months or even longer in the refrigerator. If you see any signs of mold, discard it.
5. What can I do with the leftover citrus-infused syrup?
So many things! This byproduct is almost as valuable as the candied fruit itself.
- Sweeten Drinks: Add it to hot or iced tea, lemonade, or sparkling water.
- Cocktail Mixer: Use it in place of simple syrup in cocktails for an instant flavor upgrade.
- Cake Soak: Brush it over warm cake layers to add moisture and flavor.
- Glaze: Use it to glaze roasted carrots, sweet potatoes, or even a holiday ham.
- Over Yogurt or Ice Cream: Drizzle it over plain yogurt, oatmeal, or vanilla ice cream.

Homemade Candied Fruit recipe
Ingredients
- Citrus Fruits: 3-4 large, thick-skinned oranges, 4-5 lemons, or 2 large grapefruit. A mix is wonderful!
- Water: For blanching and for the syrup (you will need several cups).
- Granulated Sugar: 3 cups (600g), plus an additional 1 cup (200g) for coating the finished peels.
- Optional Flavorings for the Syrup:
- 1 vanilla bean, split
- 2–3 whole star anise
- 1 cinnamon stick
- A splash of Grand Marnier or Cointreau (added at the end)
Instructions
Part 1: Preparing the Citrus Peels
- Wash the Fruit: Thoroughly wash and scrub the exterior of your citrus fruits to remove any wax or residue.
- Score and Peel: Using a sharp knife, score the peel of each fruit into four vertical segments, cutting just through the peel and pith, but not into the fruit’s flesh. Carefully peel these segments off the fruit. (Save the fruit for juicing or eating!)
- Cut into Strips: Lay the peel segments on a cutting board, pith-side up. Cut them into uniform strips, about ¼- to ½-inch wide. Uniformity is key for even cooking.
- Optional Pith Removal: The white pith can be bitter. For the most delicate, candy-like result, you can remove some of it. Lay a peel strip flat and carefully run a sharp paring knife along it to shave off a layer of the white pith. This step is optional; leaving the pith on results in a chewier, more substantial peel, which some prefer.
Part 2: The Crucial Blanching Process
- First Blanch: Place the prepared citrus peels in a medium saucepan and cover them with cold water. Bring the pot to a boil over high heat. Once it reaches a rolling boil, immediately drain the peels in a colander.
- Second and Third Blanch: Return the peels to the saucepan, cover again with fresh cold water, and bring to a boil. Drain. Repeat this process one more time for a total of three blanches. This repeated boiling and draining is the secret to removing the bitterness from the pith and softening the peels so they can properly absorb the sugar syrup. After the final drain, set the peels aside.
Part 3: The Candying Process (Slow Simmer)
- Make the Simple Syrup: In the same saucepan (wiped clean), combine 3 cups of granulated sugar with 3 cups of water. Heat over medium heat, stirring occasionally, until the sugar has completely dissolved.
- Add the Peels: Add the blanched peels to the sugar syrup. If you are using any whole spice flavorings (vanilla bean, star anise, cinnamon stick), add them now.
- The Slow Simmer: Bring the syrup to a gentle simmer. Once it begins to bubble, reduce the heat to the lowest possible setting that will maintain a very gentle, occasional “plop” of a bubble. Do not let it boil vigorously.
- Be Patient: Let the peels simmer very slowly in the syrup for 1 to 1.5 hours. Stir gently every 15-20 minutes. You will see a transformation. The peels will begin to look translucent and jewel-like as they absorb the sugar. The syrup will thicken considerably. The process is done when the peels are tender and almost entirely translucent.
- Optional Liqueur: If using liqueur for flavor, remove the pot from the heat and stir it in during the last few minutes.
Part 4: Drying and Finishing
- Drain the Peels: Set a wire cooling rack over a baking sheet (to catch drips). Using a slotted spoon or tongs, carefully remove the candied peels from the syrup and arrange them in a single layer on the wire rack. Do not discard the syrup! (See tips section).
- The Drying Stage: Let the peels air dry on the rack for at least 4-8 hours, or ideally, overnight at room temperature. They will become less sticky and develop a pleasant, chewy texture.
- The Sugar Coating: Once the peels are tacky but no longer wet, place the remaining 1 cup of granulated sugar in a shallow bowl. Toss the candied peels in the sugar, a few at a time, until they are evenly and generously coated.
- Final Dry: Place the sugar-coated peels back on the wire rack and let them dry for another hour or two to set the coating.
Nutrition
- Serving Size: one normal portion
- Calories: 100-120 kcal