

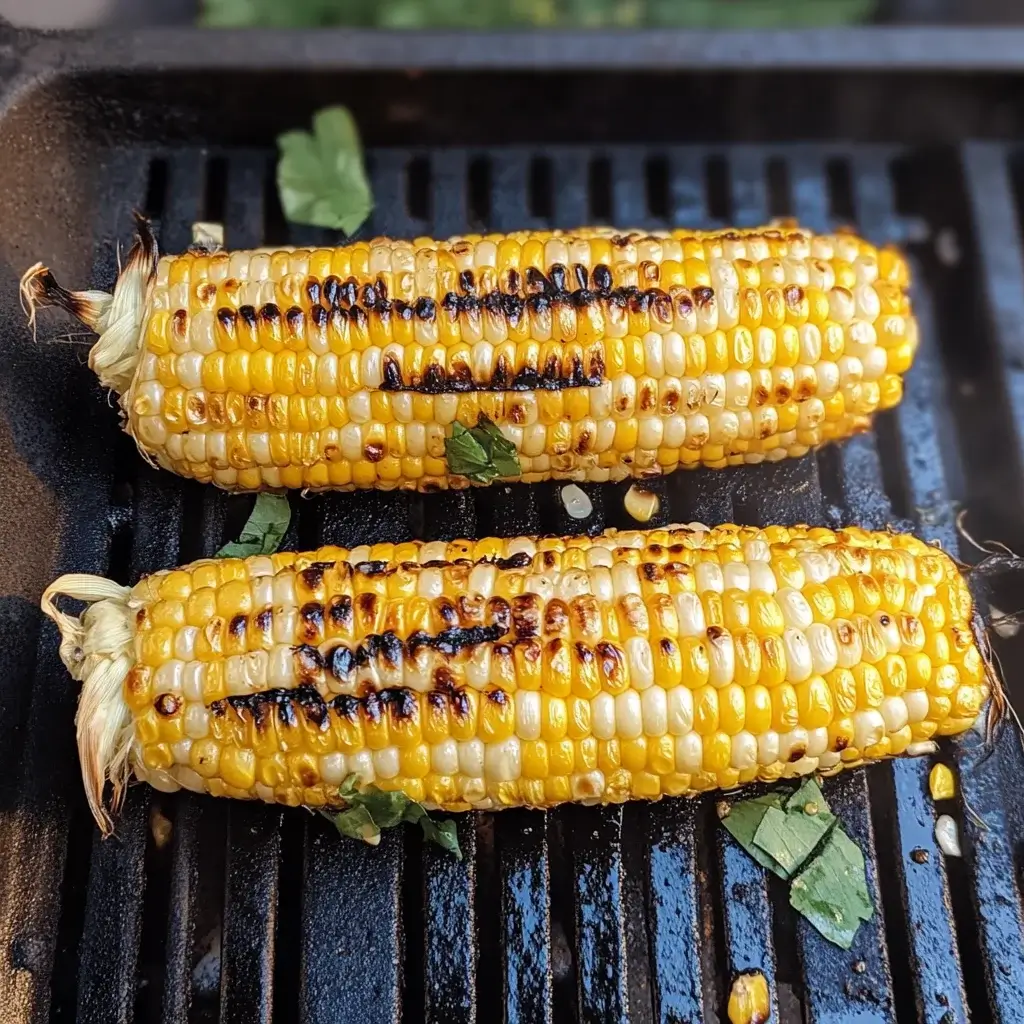

Summer, for me, is intrinsically linked to the simple pleasure of biting into a perfectly grilled ear of corn. It’s a taste that instantly transports me back to carefree childhood barbecues, the smoky sweetness mingling with the sunshine and laughter. And while there are many ways to cook corn on the cob, grilling it in the husk remains my absolute favorite. There’s a unique magic that happens when you grill corn this way. The husks act as a natural steamer, trapping moisture and infusing the kernels with a subtle smoky sweetness. The result is corn that’s incredibly juicy, tender, and bursting with flavor – far superior, in my opinion, to boiling or even grilling corn directly on the grates. My family agrees wholeheartedly. From the moment the aroma of grilling corn starts wafting from the backyard, everyone gathers around, eager for their share. It’s become a summer staple, gracing our table at every barbecue, picnic, and weeknight dinner. This Grilled Corn In Husk recipe is incredibly easy, almost foolproof, and delivers consistently delicious results every time. If you’re looking for the quintessential summer side dish that’s both simple to make and utterly satisfying, you’ve come to the right place. Get ready to unlock the secret to grilling corn in husk and experience the sweetest taste of summer, grilled to absolute perfection.
Ingredients
The beauty of Grilled Corn In Husk lies in its simplicity. You need just a few basic ingredients to create a dish that’s bursting with flavor and captures the essence of summer. High-quality corn is, of course, the star of the show, but a few other elements will elevate this dish from simple to spectacular. Let’s explore each ingredient:
- Fresh Corn on the Cob (6-8 ears, in husks): The quality of your corn is paramount for this recipe. Seek out the freshest, sweetest corn you can find. Look for ears that have bright green, tightly wrapped husks that are slightly damp to the touch. Avoid corn with dry, browning husks or husks that are starting to pull away from the cob. Feel the ears gently through the husks – they should feel plump and full, with kernels that are well-developed. If possible, purchase your corn the same day you plan to grill it for the best flavor and sweetness. Different varieties of corn will have slightly different levels of sweetness and texture. Sweet corn varieties are ideal for grilling and will deliver that classic summer corn flavor. You can usually find white, yellow, or bi-color (a mix of white and yellow kernels) sweet corn. All will work beautifully for this recipe. The number of ears you need will depend on how many people you are serving. Plan for at least one ear per person, and perhaps a few extras, as grilled corn is always a crowd-pleaser.
- Water (for soaking husks): Soaking the corn husks in water is a critical step in grilling corn in husk. The water-soaked husks act as a protective barrier, preventing the corn kernels from drying out or burning on the grill. As the corn grills, the water trapped in the husks steams the corn from the inside, resulting in perfectly cooked, juicy, and tender kernels. Plain tap water is perfectly fine for soaking the husks. You’ll need enough water to fully submerge the ears of corn.
- Butter (optional, for serving): While grilled corn in husk is delicious on its own, a pat of butter adds richness and enhances the natural sweetness of the corn. Use unsalted or salted butter, depending on your preference. Salted butter will add a touch of savory flavor, while unsalted butter will allow the pure corn flavor to shine through. Consider using high-quality butter for the best flavor. You can also experiment with flavored butters, such as herb butter (with chopped parsley, chives, or thyme), garlic butter (with minced garlic and parsley), or chili-lime butter (with lime zest, lime juice, and chili powder) to add extra layers of flavor to your grilled corn.
- Salt and Pepper (optional, for serving): A sprinkle of salt and freshly ground black pepper is a classic and simple way to season grilled corn. Salt enhances the sweetness of the corn and balances the flavors. Freshly ground black pepper adds a subtle warmth and depth. Use sea salt, kosher salt, or regular table salt. Freshly cracked black pepper is always preferred for its brighter flavor, but pre-ground black pepper will also work. Season to taste, and remember that you can always add more seasoning after grilling.
- Optional Toppings (for serving, variety of choices): The beauty of grilled corn in husk is its versatility. While butter, salt, and pepper are classic toppings, you can get creative and add a variety of other flavors to customize your grilled corn. Consider these delicious options:
- Lime wedges: A squeeze of fresh lime juice adds a bright, citrusy tang that complements the sweetness of the corn.
- Chili powder or paprika: A sprinkle of chili powder or smoked paprika adds a smoky, slightly spicy kick.
- Cotija cheese or crumbled feta: Salty, crumbly cheeses like Cotija or feta add a savory and salty dimension.
- Fresh herbs (cilantro, parsley, chives): Chopped fresh herbs add freshness and aroma. Cilantro is a classic pairing with corn, but parsley or chives also work well.
- Mayonnaise and chili-lime seasoning (Mexican Street Corn style): For a richer, creamier, and spicier corn, try brushing grilled corn with mayonnaise, then sprinkling with chili powder, lime juice, and Cotija cheese, inspired by Mexican Street Corn (Elote).
- Parmesan cheese: Grated Parmesan cheese adds a salty, nutty, and savory flavor.
- Hot sauce: A dash of your favorite hot sauce adds heat and complexity.
- Garlic butter: Brush grilled corn with garlic butter for extra richness and garlicky flavor.
Instructions
Grilling corn in husk is incredibly easy, even for novice grillers. With just a few simple steps, you can achieve perfectly cooked, juicy, and flavorful corn every time. Let’s walk through the instructions:
Step 1: Soak the Corn in Husks
This is the most crucial step for grilling corn in husk. Fill a large bowl or sink with cold water. Submerge the ears of corn, husks and all, in the water. Make sure the corn is fully submerged. You can weigh them down with a plate or a heavy bowl if needed to keep them under the water. Soak the corn for at least 30 minutes, and up to 2 hours. Soaking ensures that the husks become saturated with water, which will prevent them from burning on the grill and create steam to cook the corn from the inside. The longer you soak, the more moisture the husks will retain, resulting in even juicier corn.
Step 2: Prepare the Grill
Preheat your grill to medium heat. For a gas grill, this means setting the burners to medium. For a charcoal grill, wait until the coals are glowing and covered with a light layer of ash, indicating medium heat. Medium heat is ideal for grilling corn in husk because it cooks the corn through without burning the husks too quickly. If the grill is too hot, the husks may char on the outside before the corn is cooked through.
Step 3: Grill the Corn
Remove the soaked corn from the water, shaking off any excess water. You do not need to dry the husks completely. Place the ears of corn directly on the grill grates. Close the grill lid and grill for 20-25 minutes, turning the corn occasionally every 5-7 minutes to ensure even cooking on all sides. Grilling time may vary slightly depending on the heat of your grill and the size of the corn ears. You’ll know the corn is done when the husks are lightly charred and fragrant, and the kernels are tender when pierced with a fork through the husk.
Step 4: Check for Doneness (Optional)
If you want to check for doneness more precisely, you can carefully peel back a small section of the husk from one ear of corn. Use tongs to hold the corn and carefully peel back the husk, being mindful of the steam escaping. Pierce a kernel with a fork. If it is tender and milky, the corn is done. If it is still firm, close the husk back up and continue grilling for a few more minutes.
Step 5: Remove from Grill and Let Rest
Once the corn is grilled to your liking, remove it from the grill using tongs and place it on a platter or cutting board. Let the corn rest for a few minutes before handling. This resting period allows the steam to finish cooking the corn and makes it easier to handle.
Step 6: Peel Back Husks and Serve
Carefully peel back the husks from each ear of corn. Be mindful of the steam as you peel back the husks, as it can be hot. You can either remove the husks completely or peel them back and use them as a natural handle for eating the corn. Brush the hot corn with butter (if using), and season with salt and pepper to taste (if using). Serve immediately and enjoy! Offer a variety of optional toppings alongside for guests to customize their grilled corn.
Nutrition Facts (Approximate)
Please note that the following nutritional information is an estimate and can vary based on factors such as the size of the corn ear, variety of corn, and any toppings added. This is based on one medium-sized ear of grilled corn (approximately 7-8 inches long) without added butter or toppings.
- Servings: 1 ear of corn per serving
- Calories per serving (1 ear, plain): Approximately 100-130 calories
Approximate Macronutrients per Serving (1 ear, plain):
- Carbohydrates: 25-30g (including 3-4g of fiber and 6-8g of natural sugars)
- Protein: 3-4g
- Fat: 1-2g (naturally occurring in corn)
Important Note: These are approximate values. For precise nutritional information, you would need to use a nutrition calculator and input the exact details of your corn. Corn is a good source of carbohydrates, fiber, and some vitamins and minerals, including vitamin C, folate, and potassium. It is also a naturally low-fat food. Adding butter or other toppings will increase the calorie and fat content.
Preparation Time
Understanding the timeline for making Grilled Corn In Husk is helpful for planning your grilling session. The total preparation time includes both active time (time you spend actively working) and inactive time (soaking and grilling time).
- Soaking Time (inactive): 30 minutes to 2 hours (minimum 30 minutes recommended)
- Active Prep Time (preparing grill, minimal prep): Approximately 5-10 minutes
- Grilling Time (mostly inactive, occasional turning): 20-25 minutes
- Resting Time (inactive): 5 minutes
Total Time (from start to finish): Approximately 55 minutes to 2 hours 35 minutes (depending on soaking time)
The active time for this recipe is very minimal, making it a super easy and quick side dish to prepare, especially when you factor in the soaking time can be done ahead of time. The majority of the time is inactive, allowing you to focus on other grilling tasks or relax while the corn soaks and grills.
How to Serve Grilled Corn In Husk
Grilled Corn In Husk is incredibly versatile and can be served as a side dish for a wide variety of summer meals, barbecues, and picnics. Its sweet and smoky flavor pairs well with many cuisines and dishes. Here are some delicious ways to serve and enjoy your grilled corn:
- Classic BBQ Side Dish: Grilled corn is a quintessential side dish for any barbecue or cookout. Serve it alongside:
- Grilled Burgers and Hot Dogs: The sweetness of the corn perfectly complements savory burgers and hot dogs.
- BBQ Ribs or Pulled Pork: A classic pairing for smoky, flavorful BBQ meats.
- Grilled Chicken or Steak: A versatile side that works with a variety of grilled proteins.
- Grilled Salmon or Fish: Corn’s sweetness balances the richness of grilled fish.
- Picnic Perfect: Grilled corn in husk is easy to transport and enjoy at picnics or outdoor gatherings. Grill it ahead of time and keep it warm wrapped in foil, or grill it on-site if you have a portable grill.
- Summer Salad Ingredient: Cut the grilled corn kernels off the cob and add them to summer salads for extra sweetness, texture, and smoky flavor. Grilled corn is delicious in:
- Corn and Black Bean Salad: A classic summer salad with Southwestern flavors.
- Grilled Corn and Tomato Salad: A simple and refreshing salad showcasing summer produce.
- Pasta Salad with Grilled Corn and Vegetables: Adds sweetness and smoky depth to pasta salad.
- Mexican Fiesta Side: Grilled corn in husk pairs perfectly with Mexican-inspired meals. Serve it alongside:
- Tacos and Fajitas: A natural accompaniment to Mexican dishes.
- Grilled Chicken or Steak with Mexican Spices: Enhances the flavors of Mexican cuisine.
- Mexican Rice and Beans: Completes a flavorful Mexican-inspired plate.
- Soup or Chili Topping: Grilled corn kernels can be used as a flavorful topping for soups and chili, adding sweetness, texture, and a touch of smoky flavor.
- Corn Salsa or Relish: Create a vibrant corn salsa or relish using grilled corn kernels, diced tomatoes, onions, peppers, cilantro, lime juice, and seasonings. Serve it with grilled meats, fish, or tortilla chips.
- Simple Weeknight Side: Grilled corn in husk is quick and easy enough to prepare as a simple side dish for weeknight dinners. It elevates even simple meals.
- Vegetarian Main Course Component: For vegetarian meals, grilled corn can be a substantial and satisfying component. Pair it with grilled vegetables, beans, or grains for a complete vegetarian plate.
Additional Tips for Grilling Perfect Corn In Husk
While grilling corn in husk is straightforward, these extra tips will help you achieve consistently perfect results every time and elevate your grilled corn game:
- Choose Fresh Corn: Start with the freshest, highest quality corn you can find. Fresh corn is sweeter and juicier, resulting in a more flavorful grilled corn experience. Look for bright green husks and plump kernels.
- Soak Husks Thoroughly: Don’t skimp on the soaking time. Soaking the husks for at least 30 minutes, and ideally longer, is crucial for preventing burning and steaming the corn properly. Make sure the corn is fully submerged during soaking.
- Medium Heat is Key: Grill the corn over medium heat. If the heat is too high, the husks will char too quickly on the outside, while the corn inside may not be fully cooked. Medium heat allows the corn to cook through gently and evenly.
- Turn Regularly for Even Cooking: Turn the corn ears occasionally during grilling, about every 5-7 minutes. This ensures even cooking on all sides and prevents any one side from charring too much.
- Don’t Overcook: Grilled corn in husk is best when the kernels are tender and juicy, not mushy or dry. Overcooking can dry out the corn. Grill for the recommended time of 20-25 minutes, and check for doneness by piercing a kernel through the husk or peeling back a section to test for tenderness.
Frequently Asked Questions (FAQ)
Here are some common questions that people often ask when grilling corn in husk:
Q1: Do I need to remove the silk from the corn before grilling in husk?
A: No, you do not need to remove the silk from the corn before grilling in husk. Grilling the corn in the husk actually makes silk removal easier after grilling. The steam created inside the husks loosens the silk, making it much easier to pull away once the corn is cooked. You can remove the silk after grilling, just before serving.
Q2: Can I grill corn in husk without soaking it?
A: While technically you can grill corn in husk without soaking, it is highly recommended to soak the husks. Soaking the husks is crucial for preventing them from burning on the grill and for creating steam that cooks the corn from the inside, resulting in juicy and tender kernels. Grilling without soaking is more likely to result in dry, charred husks and potentially unevenly cooked corn.
Q3: How do I know when grilled corn in husk is done?
A: You can check for doneness in a few ways:
* Husk Appearance: The husks should be lightly charred and fragrant.
* Kernel Tenderness: Pierce a kernel through the husk with a fork. If it is tender and milky, the corn is likely done.
* Peel Back Husk (Optional Check): Carefully peel back a small section of the husk from one ear (using tongs to hold it) and test a kernel for tenderness. If it’s done, the rest are likely done as well.
Q4: Can I grill corn in husk ahead of time and reheat it?
A: Yes, you can grill corn in husk ahead of time and reheat it. Grill the corn as directed, then let it cool slightly. You can keep it warm wrapped in foil for a short period (30-60 minutes). For longer storage, remove the husks, wrap the corn in plastic wrap or place in an airtight container, and refrigerate for up to 2-3 days. To reheat, you can grill it briefly again, microwave it, or steam it until heated through. Reheating may slightly affect the texture, but it will still be enjoyable.
Q5: Can I add butter or seasonings before grilling corn in husk?
A: While you can add butter or seasonings after grilling, it’s generally not recommended to add them before grilling corn in husk. Adding butter or oil directly to the corn before grilling can make the husks more prone to burning. It’s best to brush the grilled corn with butter and season with salt and pepper (or other toppings) after it’s grilled and the husks are peeled back, just before serving. This allows the pure, sweet corn flavor to shine through during grilling and then you can customize with toppings afterwards.
Enjoy grilling up some perfectly delicious and easy Grilled Corn In Husk this summer! It’s a guaranteed crowd-pleaser and a taste of summer sunshine on a plate.
Print
Grilled Corn In Husk recipe
Ingredients
-
- Fresh Corn on the Cob (6-8 ears, in husks): The quality of your corn is paramount for this recipe. Seek out the freshest, sweetest corn you can find. Look for ears that have bright green, tightly wrapped husks that are slightly damp to the touch. Avoid corn with dry, browning husks or husks that are starting to pull away from the cob. Feel the ears gently through the husks – they should feel plump and full, with kernels that are well-developed. If possible, purchase your corn the same day you plan to grill it for the best flavor and sweetness. Different varieties of corn will have slightly different levels of sweetness and texture. Sweet corn varieties are ideal for grilling and will deliver that classic summer corn flavor. You can usually find white, yellow, or bi-color (a mix of white and yellow kernels) sweet corn. All will work beautifully for this recipe. The number of ears you need will depend on how many people you are serving. Plan for at least one ear per person, and perhaps a few extras, as grilled corn is always a crowd-pleaser.
-
- Water (for soaking husks): Soaking the corn husks in water is a critical step in grilling corn in husk. The water-soaked husks act as a protective barrier, preventing the corn kernels from drying out or burning on the grill. As the corn grills, the water trapped in the husks steams the corn from the inside, resulting in perfectly cooked, juicy, and tender kernels. Plain tap water is perfectly fine for soaking the husks. You’ll need enough water to fully submerge the ears of corn.
-
- Butter (optional, for serving): While grilled corn in husk is delicious on its own, a pat of butter adds richness and enhances the natural sweetness of the corn. Use unsalted or salted butter, depending on your preference. Salted butter will add a touch of savory flavor, while unsalted butter will allow the pure corn flavor to shine through. Consider using high-quality butter for the best flavor. You can also experiment with flavored butters, such as herb butter (with chopped parsley, chives, or thyme), garlic butter (with minced garlic and parsley), or chili-lime butter (with lime zest, lime juice, and chili powder) to add extra layers of flavor to your grilled corn.
-
- Salt and Pepper (optional, for serving): A sprinkle of salt and freshly ground black pepper is a classic and simple way to season grilled corn. Salt enhances the sweetness of the corn and balances the flavors. Freshly ground black pepper adds a subtle warmth and depth. Use sea salt, kosher salt, or regular table salt. Freshly cracked black pepper is always preferred for its brighter flavor, but pre-ground black pepper will also work. Season to taste, and remember that you can always add more seasoning after grilling.
-
- Optional Toppings (for serving, variety of choices): The beauty of grilled corn in husk is its versatility. While butter, salt, and pepper are classic toppings, you can get creative and add a variety of other flavors to customize your grilled corn. Consider these delicious options:
-
- Lime wedges: A squeeze of fresh lime juice adds a bright, citrusy tang that complements the sweetness of the corn.
-
- Chili powder or paprika: A sprinkle of chili powder or smoked paprika adds a smoky, slightly spicy kick.
-
- Cotija cheese or crumbled feta: Salty, crumbly cheeses like Cotija or feta add a savory and salty dimension.
-
- Fresh herbs (cilantro, parsley, chives): Chopped fresh herbs add freshness and aroma. Cilantro is a classic pairing with corn, but parsley or chives also work well.
-
- Mayonnaise and chili-lime seasoning (Mexican Street Corn style): For a richer, creamier, and spicier corn, try brushing grilled corn with mayonnaise, then sprinkling with chili powder, lime juice, and Cotija cheese, inspired by Mexican Street Corn (Elote).
-
- Parmesan cheese: Grated Parmesan cheese adds a salty, nutty, and savory flavor.
-
- Hot sauce: A dash of your favorite hot sauce adds heat and complexity.
-
- Garlic butter: Brush grilled corn with garlic butter for extra richness and garlicky flavor.
-
- Optional Toppings (for serving, variety of choices): The beauty of grilled corn in husk is its versatility. While butter, salt, and pepper are classic toppings, you can get creative and add a variety of other flavors to customize your grilled corn. Consider these delicious options:
Instructions
Step 1: Soak the Corn in Husks
This is the most crucial step for grilling corn in husk. Fill a large bowl or sink with cold water. Submerge the ears of corn, husks and all, in the water. Make sure the corn is fully submerged. You can weigh them down with a plate or a heavy bowl if needed to keep them under the water. Soak the corn for at least 30 minutes, and up to 2 hours. Soaking ensures that the husks become saturated with water, which will prevent them from burning on the grill and create steam to cook the corn from the inside. The longer you soak, the more moisture the husks will retain, resulting in even juicier corn.
Step 2: Prepare the Grill
Preheat your grill to medium heat. For a gas grill, this means setting the burners to medium. For a charcoal grill, wait until the coals are glowing and covered with a light layer of ash, indicating medium heat. Medium heat is ideal for grilling corn in husk because it cooks the corn through without burning the husks too quickly. If the grill is too hot, the husks may char on the outside before the corn is cooked through.
Step 3: Grill the Corn
Remove the soaked corn from the water, shaking off any excess water. You do not need to dry the husks completely. Place the ears of corn directly on the grill grates. Close the grill lid and grill for 20-25 minutes, turning the corn occasionally every 5-7 minutes to ensure even cooking on all sides. Grilling time may vary slightly depending on the heat of your grill and the size of the corn ears. You’ll know the corn is done when the husks are lightly charred and fragrant, and the kernels are tender when pierced with a fork through the husk.
Step 4: Check for Doneness (Optional)
If you want to check for doneness more precisely, you can carefully peel back a small section of the husk from one ear of corn. Use tongs to hold the corn and carefully peel back the husk, being mindful of the steam escaping. Pierce a kernel with a fork. If it is tender and milky, the corn is done. If it is still firm, close the husk back up and continue grilling for a few more minutes.
Step 5: Remove from Grill and Let Rest
Once the corn is grilled to your liking, remove it from the grill using tongs and place it on a platter or cutting board. Let the corn rest for a few minutes before handling. This resting period allows the steam to finish cooking the corn and makes it easier to handle.
Step 6: Peel Back Husks and Serve
Carefully peel back the husks from each ear of corn. Be mindful of the steam as you peel back the husks, as it can be hot. You can either remove the husks completely or peel them back and use them as a natural handle for eating the corn. Brush the hot corn with butter (if using), and season with salt and pepper to taste (if using). Serve immediately and enjoy! Offer a variety of optional toppings alongside for guests to customize their grilled corn.
Nutrition
- Serving Size: one normal portion
- Calories: 100-130
- Sugar: 6-8g
- Fat: 1-2g
- Carbohydrates: 25-30g
- Fiber: 3-4g
- Protein: 3-4g


