

The quest for the perfect Gluten-Free Wedding Cookie recipe began shortly after my celiac diagnosis. These delicate, buttery, powdered sugar-dusted morsels, also known as Mexican Wedding Cookies, Russian Tea Cakes, or Snowball Cookies, were a holiday staple in my family, and the thought of never enjoying them again was simply heartbreaking. My initial attempts at converting traditional recipes were… let’s just say, less than stellar. They were either too crumbly, too dense, or just didn’t have that signature melt-in-your-mouth texture. But I was determined! After much experimentation with different gluten-free flour blends, nut flours, and binding agents, this recipe finally emerged. The first time I pulled a batch from the oven and, after a generous dusting of powdered sugar, took a bite, I nearly cried with joy. They were perfect – tender, buttery, nutty, and with that iconic powdery sweetness. My family, including the gluten-eaters, couldn’t tell the difference. They’ve since become a beloved treat for holidays, special occasions, and “just because” moments, proving that gluten-free baking can be every bit as delicious and nostalgic.
The Ultimate Gluten-Free Wedding Cookies: Melt-in-Your-Mouth Perfection!
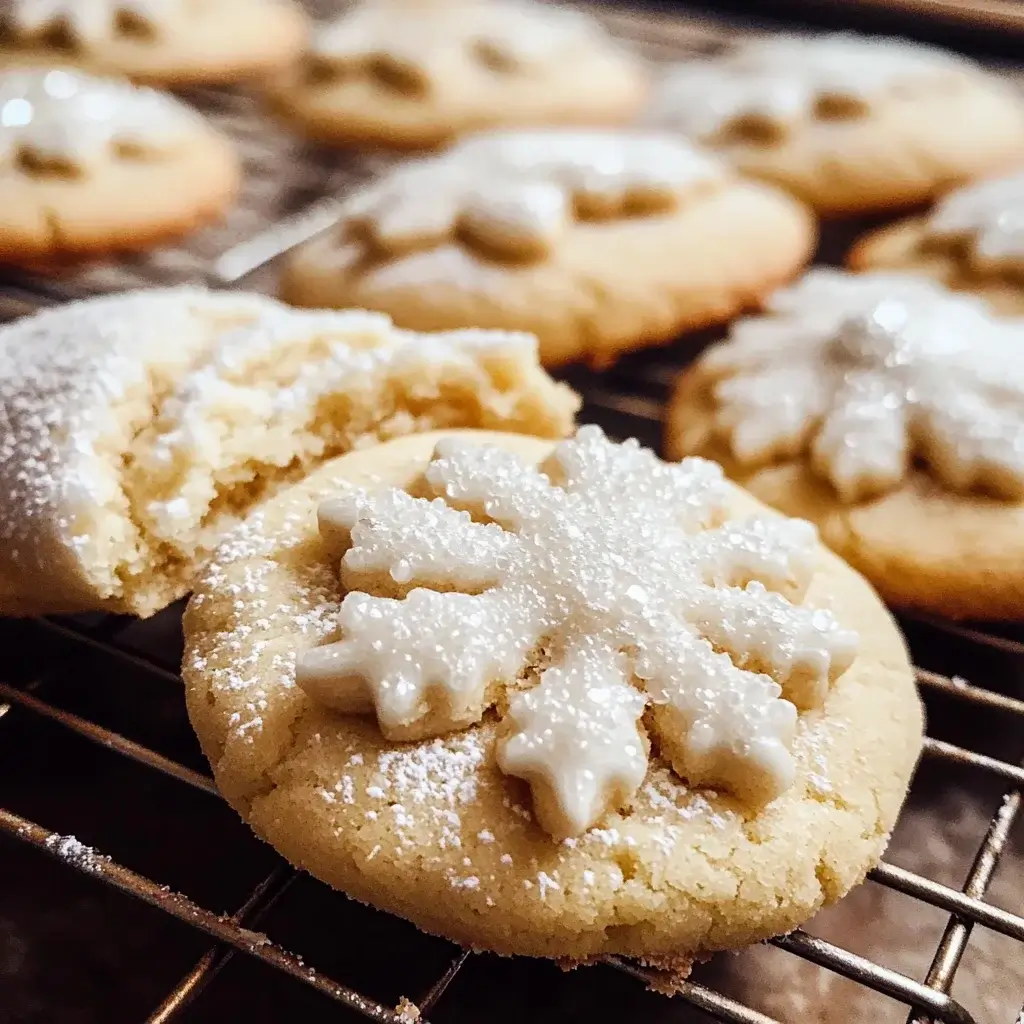
Gluten-Free Wedding Cookies, those delightful, buttery, nut-filled orbs generously blanketed in powdered sugar, are a classic treat beloved by many names – Mexican Wedding Cookies, Russian Tea Cakes, Snowball Cookies. Their delicate, melt-in-your-mouth texture and subtle sweetness make them an irresistible addition to any cookie platter, holiday celebration, or simply a cozy afternoon with a cup of tea. For those following a gluten-free diet, recreating this iconic cookie can seem daunting, but fear not! This comprehensive guide provides a meticulously tested recipe that captures all the traditional charm and flavor without a trace of gluten. We’ll delve into the best gluten-free flour combinations, tips for achieving that perfect tender crumb, and the secrets to that signature powdery coating, ensuring your Gluten-Free Wedding Cookies are nothing short of spectacular. Get ready to bake a batch of these heavenly treats that everyone, gluten-free or not, will adore.
Complete Ingredients Amount for Your Gluten-Free Delights
To create these exquisite Gluten-Free Wedding Cookies that rival their traditional counterparts, you’ll need a carefully selected blend of gluten-free ingredients. Quality is key for the best flavor and texture.
- Butter: 1 cup (2 sticks or 226g) unsalted butter, softened to room temperature (not melted).
- Powdered Sugar (Confectioners’ Sugar):
- For the dough: ½ cup (60g), sifted
- For rolling/dusting: Approximately 1 ½ – 2 cups (180-240g), sifted
- Vanilla Extract: 1 ½ teaspoons, pure
- Gluten-Free All-Purpose Flour Blend: 2 cups (approximately 280-300g, depending on the blend). Choose a high-quality blend that contains xanthan gum. If your blend does not contain xanthan gum, you’ll need to add it separately (see note below).
- Finely Ground Nuts: 1 cup. Options include:
- Pecans: Classic choice, toasted and finely ground or chopped very fine.
- Walnuts: Another traditional option, toasted and finely ground.
- Almonds: Blanched or skin-on, toasted and finely ground (almond meal can work, but freshly ground is often better for texture).
- Salt: ¼ teaspoon (enhances the flavors)
- Optional: Xanthan Gum: ¼ to ½ teaspoon, only if your gluten-free flour blend does not already contain it. Check your flour blend’s ingredient list.
Important Notes on Ingredients:
- Gluten-Free Flour Blend: The success of these cookies heavily relies on a good quality gluten-free all-purpose flour blend. Brands like King Arthur Gluten-Free Measure for Measure Flour, Bob’s Red Mill Gluten-Free 1-to-1 Baking Flour, or Cup4Cup Gluten-Free Flour often work well in cookie recipes. Ensure your blend is designed for cup-for-cup replacement.
- Softened Butter: Butter should be soft enough that your finger leaves an indent but not greasy or melted. This is crucial for the cookie’s texture.
- Toasting Nuts: Toasting the nuts before grinding them deepens their flavor significantly and is highly recommended. To toast, spread them on a baking sheet and bake at 350°F (175°C) for 5-8 minutes until fragrant, then let cool completely before grinding.
Step-by-Step Instructions for Perfect Gluten-Free Wedding Cookies
Follow these detailed instructions carefully to achieve the delicate, melt-in-your-mouth texture that makes Gluten-Free Wedding Cookies so special.
- Prepare Nuts (if not already ground): If using whole nuts, toast them as described in the ingredient notes. Once cooled, grind them finely in a food processor. Be careful not to over-process into nut butter; pulse until they resemble coarse sand or very fine crumbs. Set aside.
- Cream Butter and Sugar: In a large mixing bowl, using an electric hand mixer or a stand mixer fitted with the paddle attachment, beat the softened unsalted butter on medium speed until it’s smooth and creamy, about 1-2 minutes. Add the ½ cup of sifted powdered sugar (for the dough) and continue to beat on medium speed for another 2-3 minutes, or until the mixture is light and fluffy. Scrape down the sides of the bowl occasionally.
- Add Vanilla and Salt: Beat in the pure vanilla extract and the salt until well combined.
- Combine Dry Ingredients: In a separate medium bowl, whisk together the gluten-free all-purpose flour blend and the finely ground nuts. If your flour blend does not contain xanthan gum and you are adding it, whisk it in with the flour and nuts now.
- Gradually Add Dry to Wet Ingredients: With the mixer on low speed, gradually add the dry ingredient mixture to the wet butter mixture in two or three additions. Mix until just combined and a soft dough forms. Be careful not to overmix, as this can make gluten-free cookies tough. The dough will be soft and slightly crumbly but should hold together when pressed.
- Chill the Dough (Highly Recommended): Scrape the dough onto a piece of plastic wrap, form it into a disc, and wrap it tightly. Refrigerate the dough for at least 1 hour, or up to 24 hours. Chilling the dough helps the gluten-free flours absorb moisture, prevents the cookies from spreading too much during baking, and makes it easier to handle. This step is crucial for the best texture in your Gluten-Free Wedding Cookies.
- Preheat Oven and Prepare Baking Sheets: When ready to bake, preheat your oven to 350°F (175°C). Line two large baking sheets with parchment paper.
- Shape the Cookies: Remove the chilled dough from the refrigerator. If it’s very firm, let it sit at room temperature for 5-10 minutes to soften slightly. Scoop tablespoon-sized portions of dough (about 15-20g each) and roll them between your palms to form smooth, 1-inch balls. Place the balls about 1-2 inches apart on the prepared baking sheets. These cookies don’t spread much, but some space is good for even baking.
- Bake: Bake the cookies for 12-15 minutes. The exact time will depend on your oven and the size of your cookies. They are done when the bottoms are lightly golden brown, and the tops are set but still pale. They should not brown significantly on top.
- First Powdered Sugar Coating (Warm): Remove the baking sheets from the oven. Let the cookies cool on the baking sheets for about 5-10 minutes. They will be very delicate when hot. While the cookies are still warm (but not hot enough to melt all the sugar instantly), carefully roll them in a bowl filled with about 1 cup of sifted powdered sugar. The warmth helps the first layer of sugar adhere well. Place the sugar-coated cookies on a wire cooling rack.
- Second Powdered Sugar Coating (Cool): Let the cookies cool completely on the wire rack. Once completely cool, roll them a second time in the remaining sifted powdered sugar (or add more to your bowl if needed). This second coating gives them that signature snowy, generous layer of sweetness.
- Store or Serve: Your beautiful Gluten-Free Wedding Cookies are ready to be enjoyed!
Nutrition Facts (Servings and Calories Per Serving)
The nutritional information for this Gluten-Free Wedding Cookies recipe can vary based on the specific gluten-free flour blend, type of nuts used, and exact cookie size. The following is an approximate breakdown:
- Servings: This recipe yields approximately 36-48 cookies (3-4 dozen), depending on size.
- Calories per serving (approximate, per cookie, based on 40 cookies): 80-110 calories.
Approximate breakdown per cookie (based on 40 cookies, using pecans):
- Calories: ~95 kcal
- Protein: ~1g
- Fat: ~7g (primarily from butter and nuts)
- Saturated Fat: ~3g (from butter)
- Carbohydrates: ~8g
- Fiber: <1g
- Sugar: ~4g (from powdered sugar)
Note:
- These cookies are a treat and, like their traditional counterparts, are rich in butter and sugar.
- Using different nuts will slightly alter the nutritional profile (e.g., almonds might have slightly more protein and different fat profiles than pecans).
- While gluten-free, they are not necessarily low-calorie, but they offer a delicious way to enjoy a classic cookie without gluten.
Preparation Time for Your Gluten-Free Baking Masterpiece
Understanding the time commitment will help you plan your Gluten-Free Wedding Cookie baking adventure.
- Active Preparation Time (Mixing, Shaping): 30-40 minutes
- This includes toasting and grinding nuts (if needed), creaming butter and sugar, mixing dough, and rolling cookies.
- Chilling Time (Highly Recommended): Minimum 1 hour (up to 24 hours)
- This passive time is crucial for dough handling and cookie texture.
- Bake Time: 12-15 minutes per batch (you’ll likely bake in 2 batches)
- Cooling & Dusting Time: Approximately 30-45 minutes (for initial cooling, first dusting, complete cooling, and second dusting)
- Total Time (including minimum chilling): Approximately 2 hours 30 minutes to 3 hours.
This Gluten-Free Wedding Cookies recipe is a wonderful project for a weekend afternoon or for preparing ahead for a special occasion, as the dough can be made in advance.
How to Serve Your Delightful Gluten-Free Wedding Cookies
These Gluten-Free Wedding Cookies are perfect on their own, but here are some lovely ways to serve and enjoy them:
- On a Cookie Platter:
- They are a beautiful and classic addition to any holiday cookie assortment or dessert platter. Their snowy appearance stands out.
- With Coffee or Tea:
- The perfect accompaniment to a hot cup of coffee, tea (black, green, or herbal), or even a glass of milk (dairy or non-dairy).
- As Holiday Gifts:
- Package them in festive tins, cellophane bags tied with ribbon, or small boxes. They make a wonderful homemade gluten-free gift for friends, family, and neighbors.
- For Special Occasions:
- Serve them at weddings (of course!), bridal showers, baby showers, anniversaries, or any celebration that calls for a touch of elegance.
- After-Dinner Treat:
- A small, sweet bite to end a meal.
- Simply Because:
- Sometimes, you just need a delicious, buttery, gluten-free cookie!
Presentation Tips:
- Arrange them neatly on a serving plate or tiered stand.
- A light, final dusting of powdered sugar just before serving can refresh their snowy look.
- Consider placing them in mini cupcake liners for individual servings and easy handling, especially for parties.
No matter how you serve them, these Gluten-Free Wedding Cookies are sure to be a hit, delighting everyone with their delicate texture and sweet, nutty flavor.
Additional Tips for the Best Gluten-Free Wedding Cookies
To ensure your Gluten-Free Wedding Cookies are exceptionally delicious and have that perfect melt-in-your-mouth quality, consider these five essential tips:
- Don’t Skip Chilling the Dough: This step is even more critical for gluten-free baking. Chilling allows the gluten-free flours to fully hydrate, which improves the texture and prevents the cookies from spreading too much. It also makes the soft dough much easier to handle and roll into neat balls. Aim for at least 1 hour, but longer (even overnight) is fine.
- Measure Gluten-Free Flour Correctly: Use the “spoon and level” method for measuring your gluten-free flour blend. Lightly spoon the flour into your measuring cup and then sweep off the excess with a straight edge. Scooping directly from the bag can compact the flour, leading to too much flour in your recipe and resulting in dry, dense cookies.
- Finely Ground Nuts are Key for Texture: Ensure your nuts are ground very finely, almost like coarse sand, but stop before they turn into nut butter. Larger pieces of nuts can make the delicate cookies more prone to crumbling. Toasting the nuts before grinding also significantly enhances their flavor, adding depth to your Gluten-Free Wedding Cookies.
- Avoid Overbaking: These cookies should be pale on top and only lightly golden on the bottoms. Overbaking will make them dry and hard rather than tender and melt-in-your-mouth. Keep a close eye on them during the last few minutes of baking. They will continue to firm up slightly as they cool.
- The Double Dusting of Powdered Sugar is Essential: The first dusting while the cookies are still warm allows a base layer of sugar to melt slightly and adhere well. The second dusting once they are completely cool gives them that iconic, generous, snowy coating. Don’t skimp on this step for the authentic Wedding Cookie experience! Use sifted powdered sugar for a smooth, clump-free coating.
Frequently Asked Questions (FAQ) about Gluten-Free Wedding Cookies
Here are answers to some common questions you might have about making this Gluten-Free Wedding Cookies recipe:
- Q: Can I make these cookies nut-free?
- A: Traditional Wedding Cookies heavily rely on nuts for their characteristic flavor and texture. While you could try substituting the ground nuts with an equal amount of more gluten-free flour blend or perhaps toasted ground sunflower seeds or pumpkin seeds (for a different flavor profile), the result will be quite different from classic Wedding Cookies. If using seeds, ensure they are ground very finely. The texture might be denser.
- Q: My cookies are too crumbly. What did I do wrong?
- A: Crumbly gluten-free cookies can be due to a few factors:
- Incorrect Flour Measurement: Too much flour, especially if not measured correctly (see Tip #2).
- Not Enough Binder: Ensure your gluten-free flour blend contains xanthan gum, or that you added it if required.
- Overbaking: This dries them out.
- Dough Not Chilled Enough: Chilling helps hydrate flours.
- Not Enough Fat: Ensure butter was measured correctly and properly softened.
- A: Crumbly gluten-free cookies can be due to a few factors:
- Q: Can I use a different type of gluten-free flour, like just almond flour or coconut flour?
- A: This recipe is designed for a gluten-free all-purpose flour blend. Using only almond flour would make them very dense and oily. Using only coconut flour would make them extremely dry and crumbly, as coconut flour is highly absorbent. For best results, stick to a good quality all-purpose gluten-free blend that mimics the properties of wheat flour.
- Q: Can I make the dough ahead of time?
- A: Yes! The dough for these Gluten-Free Wedding Cookies can be made, wrapped tightly in plastic wrap, and refrigerated for up to 3-4 days. You can also freeze the unbaked dough. Form it into a disc, wrap well in plastic wrap and then in foil or a freezer bag, and freeze for up to 2-3 months. Thaw in the refrigerator overnight before scooping and baking. You can also freeze the rolled, unbaked cookie balls on a baking sheet until solid, then transfer them to a freezer bag. Bake from frozen, adding a few extra minutes to the baking time.
- Q: How should I store leftover Gluten-Free Wedding Cookies?
- A: Store the completely cooled and powdered cookies in an airtight container at room temperature. They will keep well for up to a week. Some people find their texture and flavor even improve slightly on the second day. Avoid refrigerating them, as this can dry them out and affect the powdered sugar coating. If they absorb too much moisture from the air and the sugar looks damp, you can give them a light fresh dusting of powdered sugar before serving.
Gluten-free Wedding Cookies recipe
Ingredients
- Butter: 1 cup (2 sticks or 226g) unsalted butter, softened to room temperature (not melted).
- Powdered Sugar (Confectioners’ Sugar):
- For the dough: ½ cup (60g), sifted
- For rolling/dusting: Approximately 1 ½ – 2 cups (180-240g), sifted
- Vanilla Extract: 1 ½ teaspoons, pure
- Gluten-Free All-Purpose Flour Blend: 2 cups (approximately 280-300g, depending on the blend). Choose a high-quality blend that contains xanthan gum. If your blend does not contain xanthan gum, you’ll need to add it separately (see note below).
- Finely Ground Nuts: 1 cup. Options include:
- Pecans: Classic choice, toasted and finely ground or chopped very fine.
- Walnuts: Another traditional option, toasted and finely ground.
- Almonds: Blanched or skin-on, toasted and finely ground (almond meal can work, but freshly ground is often better for texture).
- Salt: ¼ teaspoon (enhances the flavors)
- Optional: Xanthan Gum: ¼ to ½ teaspoon, only if your gluten-free flour blend does not already contain it. Check your flour blend’s ingredient list.
Instructions
- Prepare Nuts (if not already ground): If using whole nuts, toast them as described in the ingredient notes. Once cooled, grind them finely in a food processor. Be careful not to over-process into nut butter; pulse until they resemble coarse sand or very fine crumbs. Set aside.
- Cream Butter and Sugar: In a large mixing bowl, using an electric hand mixer or a stand mixer fitted with the paddle attachment, beat the softened unsalted butter on medium speed until it’s smooth and creamy, about 1-2 minutes. Add the ½ cup of sifted powdered sugar (for the dough) and continue to beat on medium speed for another 2-3 minutes, or until the mixture is light and fluffy. Scrape down the sides of the bowl occasionally.
- Add Vanilla and Salt: Beat in the pure vanilla extract and the salt until well combined.
- Combine Dry Ingredients: In a separate medium bowl, whisk together the gluten-free all-purpose flour blend and the finely ground nuts. If your flour blend does not contain xanthan gum and you are adding it, whisk it in with the flour and nuts now.
- Gradually Add Dry to Wet Ingredients: With the mixer on low speed, gradually add the dry ingredient mixture to the wet butter mixture in two or three additions. Mix until just combined and a soft dough forms. Be careful not to overmix, as this can make gluten-free cookies tough. The dough will be soft and slightly crumbly but should hold together when pressed.
- Chill the Dough (Highly Recommended): Scrape the dough onto a piece of plastic wrap, form it into a disc, and wrap it tightly. Refrigerate the dough for at least 1 hour, or up to 24 hours. Chilling the dough helps the gluten-free flours absorb moisture, prevents the cookies from spreading too much during baking, and makes it easier to handle. This step is crucial for the best texture in your Gluten-Free Wedding Cookies.
- Preheat Oven and Prepare Baking Sheets: When ready to bake, preheat your oven to 350°F (175°C). Line two large baking sheets with parchment paper.
- Shape the Cookies: Remove the chilled dough from the refrigerator. If it’s very firm, let it sit at room temperature for 5-10 minutes to soften slightly. Scoop tablespoon-sized portions of dough (about 15-20g each) and roll them between your palms to form smooth, 1-inch balls. Place the balls about 1-2 inches apart on the prepared baking sheets. These cookies don’t spread much, but some space is good for even baking.
- Bake: Bake the cookies for 12-15 minutes. The exact time will depend on your oven and the size of your cookies. They are done when the bottoms are lightly golden brown, and the tops are set but still pale. They should not brown significantly on top.
- First Powdered Sugar Coating (Warm): Remove the baking sheets from the oven. Let the cookies cool on the baking sheets for about 5-10 minutes. They will be very delicate when hot. While the cookies are still warm (but not hot enough to melt all the sugar instantly), carefully roll them in a bowl filled with about 1 cup of sifted powdered sugar. The warmth helps the first layer of sugar adhere well. Place the sugar-coated cookies on a wire cooling rack.
- Second Powdered Sugar Coating (Cool): Let the cookies cool completely on the wire rack. Once completely cool, roll them a second time in the remaining sifted powdered sugar (or add more to your bowl if needed). This second coating gives them that signature snowy, generous layer of sweetness.
- Store or Serve: Your beautiful Gluten-Free Wedding Cookies are ready to be enjoyed!
Nutrition
- Serving Size: one normal portion
- Calories: 95 kcal
- Sugar: 4g
- Fat: 7g
- Saturated Fat: 3g
- Carbohydrates: 8g
- Fiber: 1g
- Protein: 1g


