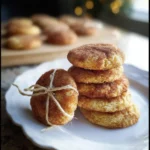
Of all the cookies in the vast, wonderful world of baking, the snickerdoodle holds a uniquely special place in my heart. It’s not flashy like a chocolate lava cake or complex like a French macaron. Its magic is quieter, more humble. It’s the cookie I associate with pure, unadulterated comfort. When I first had to switch to a gluten-free diet, the thought of losing that specific comfort was genuinely disheartening. My initial forays into gluten-free baking were a series of sad, crumbly, and gritty failures. The cookies would spread into thin, greasy crisps or remain as dense, sandy mounds. They lacked the soul of a true snickerdoodle—that perfect trifecta of a soft, pillowy center, chewy edges, and that signature tangy flavor from the cream of tartar. I almost gave up. But I was determined to recreate that nostalgic perfection. After countless batches, tweaking flour ratios and chilling times, I finally cracked the code. The day I pulled a tray of these Gluten-Free Snickerdoodles from the oven, I knew instantly. They had the beautiful, crackled tops, they smelled intoxicatingly of cinnamon and vanilla, and they felt soft to the touch. The real test was the first bite. It was perfect. Soft, chewy, tangy, sweet—it was all there. I gave one to my husband, a snickerdoodle purist, without telling him it was gluten-free. He took a bite, his eyes widened slightly, and he said, “This is one of the best snickerdoodles you’ve ever made.” That was the moment of victory. This recipe isn’t just a gluten-free alternative; it’s a cookie that stands proudly on its own, ready to fool even the most discerning gluten-eaters and bring that beloved, nostalgic comfort back to everyone’s kitchen.
The Best Gluten-Free Snickerdoodles: Soft, Chewy, and Perfectly Tangy
Welcome to your new go-to cookie recipe. These Gluten-Free Snickerdoodles are meticulously designed to deliver the classic texture and flavor you know and love, without a trace of gluten. We’re not settling for “good for gluten-free” here; we are aiming for “exceptionally good, period.” The secret lies in a carefully balanced gluten-free flour blend, the non-negotiable use of cream of tartar, and a few key techniques that ensure a soft, pillowy cookie that doesn’t spread into a sad, thin puddle. This comprehensive guide will walk you through every step, explaining the science behind the ingredients and methods, ensuring you can bake a perfect batch with confidence, whether you’re a seasoned gluten-free baker or just starting out.
Ingredients for a Perfect Batch
The success of any gluten-free recipe hinges on the right ingredients. Using a precise blend of flours and binders is what replicates the structure and texture that gluten normally provides. This recipe yields about 24 cookies.
For the Cookie Dough:
- Gluten-Free All-Purpose Flour Blend: 2 ¾ cups (330g) – See note below
- Xanthan Gum: 1 teaspoon (omit if your flour blend already contains it)
- Cream of Tartar: 2 teaspoons
- Baking Soda: 1 teaspoon
- Salt: ½ teaspoon
- Unsalted Butter: 1 cup (2 sticks or 226g), softened to room temperature
- Granulated Sugar: 1 ½ cups (300g)
- Large Eggs: 2, at room temperature
- Pure Vanilla Extract: 2 teaspoons
For the Cinnamon-Sugar Coating:
- Granulated Sugar: ¼ cup (50g)
- Ground Cinnamon: 2 teaspoons
A Deeper Look at the Key Ingredients
Understanding why we use these specific ingredients is the key to becoming a confident gluten-free baker.
The Gluten-Free Flour Blend: This is the most critical component. Gluten-free baking isn’t as simple as swapping wheat flour for a single gluten-free alternative. A blend of different flours is needed to mimic the properties of gluten.
- Our Recommended DIY Blend: For the best texture, we recommend a blend of: 1 ½ cups (210g) white or brown rice flour, ¾ cup (90g) potato starch (not flour), and ½ cup (60g) tapioca starch/flour. Whisk these together thoroughly before measuring for the recipe. This blend provides structure from the rice flour, tenderness from the potato starch, and a pleasant chew from the tapioca starch.
- Store-Bought Blends: If you prefer a store-bought blend, choose a high-quality “1-to-1” or “measure-for-measure” blend that is designed for baking. Brands like King Arthur Flour Measure for Measure or Bob’s Red Mill 1-to-1 Baking Flour are excellent choices. Always check if your blend contains xanthan gum.
Xanthan Gum: This is the binder and stabilizer that replaces gluten. It provides elasticity and structure, preventing your cookies from becoming a crumbly mess. It is absolutely essential for a chewy texture. If your store-bought flour blend already includes it, do not add more.
Cream of Tartar: This is the soul of a snickerdoodle. It is an acidic salt that serves two crucial purposes. First, it reacts with the alkaline baking soda to provide leavening, giving the cookies their signature puffiness and soft texture. Second, and most importantly, it imparts a subtle, tangy flavor that is the defining characteristic of a snickerdoodle. There is no substitute for cream of tartar in this recipe.
Room Temperature Ingredients: This is not a suggestion; it’s a rule for good baking. Softened butter and room temperature eggs emulsify together much more efficiently. When you cream softened butter and sugar, you are creating tiny air pockets. Room temperature eggs blend seamlessly into this mixture, preserving those air pockets. This process is fundamental to creating a light, tender cookie crumb. Cold ingredients will cause the butter to seize and result in dense, heavy cookies.
Step-by-Step Instructions for Flawless Snickerdoodles
Follow these detailed instructions carefully for a perfect batch of soft, chewy cookies.
Part 1: Making the Dough
- Whisk Dry Ingredients: In a medium bowl, whisk together the gluten-free flour blend, xanthan gum (if using), cream of tartar, baking soda, and salt. Whisking thoroughly ensures that the leavening agents are evenly distributed, which is key for a uniform rise. Set aside.
- Cream Butter and Sugar: In the bowl of a stand mixer fitted with the paddle attachment, or in a large bowl with a hand mixer, beat the softened unsalted butter and granulated sugar together on medium-high speed for 2-3 minutes. The mixture should become light, pale, and fluffy. This creaming process is essential for incorporating air into the dough.
- Add Eggs and Vanilla: Reduce the mixer speed to medium. Add the room temperature eggs one at a time, beating well after each addition until it is fully incorporated. Scrape down the sides and bottom of the bowl as needed. Add the vanilla extract and beat until combined.
- Combine Wet and Dry: Reduce the mixer speed to low. Gradually add the dry flour mixture to the wet ingredients in three additions, mixing until just combined after each addition. Be careful not to overmix. Overmixing can lead to tough cookies. The dough will be soft.
- Chill the Dough (CRITICAL STEP): Scrape the dough into a ball, cover the bowl tightly with plastic wrap, and refrigerate for at least 1 hour, and up to 2 days. Do not skip this step. Chilling the dough solidifies the fat (the butter), which prevents the cookies from spreading too much in the oven. It also allows the gluten-free flours to fully hydrate, which improves the texture and flavor of the final cookie.
Part 2: Baking the Cookies
- Preheat and Prepare: When you’re ready to bake, preheat your oven to 375°F (190°C). Line two large baking sheets with parchment paper.
- Make the Coating: In a small, shallow bowl, stir together the ¼ cup of granulated sugar and 2 teaspoons of ground cinnamon until well combined.
- Shape and Roll: Remove the chilled dough from the refrigerator. It will be firm. Scoop the dough using a medium cookie scoop (about 1.5 tablespoons) and roll it into a smooth ball between your hands.
- Coat in Cinnamon-Sugar: Drop the ball of dough into the cinnamon-sugar mixture and roll it around until it is generously and completely coated on all sides.
- Arrange on Baking Sheet: Place the coated dough balls on the prepared baking sheets, leaving about 2 inches of space between each one to allow for some spreading.
- Bake to Perfection: Bake for 9-11 minutes. The cookies are done when the edges are set and just beginning to turn a light golden brown, and the centers are puffed up and look slightly underdone. This “underbaking” is the key to a soft, chewy center. They will continue to bake from the residual heat on the pan.
- Cool Down: Let the cookies cool on the baking sheet for 5-10 minutes. During this time, the puffed centers will sink down slightly, creating the classic snickerdoodle cracks. After 10 minutes, transfer the cookies to a wire rack to cool completely.
Nutrition Facts
Please note that these values are an estimate and can vary based on the specific gluten-free flour blend and other ingredients used.
- Servings: About 24 cookies
- Calories per serving (1 cookie): 150-180 kcal
Preparation Time
While the active time is quick, remember to factor in the essential chilling time.
- Active Prep Time: 20 minutes
- Chilling Time: 1 hour (minimum)
- Baking Time: 9-11 minutes per batch
- Total Time: Approximately 1 hour and 40 minutes
How to Serve Your Gluten-Free Snickerdoodles
These cookies are a delight on their own, but they also serve as a wonderful component in other delicious creations.
- The Classic Way:
- Serve warm with a tall, cold glass of milk (or your favorite dairy-free alternative).
- Pair with a hot cup of coffee or a chai latte for a perfect afternoon treat.
- As a Dessert Component:
- Snickerdoodle Ice Cream Sandwiches: Place a scoop of vanilla bean (or cinnamon) ice cream between two completely cooled cookies. Wrap in plastic wrap and freeze for at least an hour.
- Snickerdoodle Crumble Topping: Crumble a few cookies over a bowl of yogurt, a fruit crisp, or a baked apple for a delicious, crunchy topping.
- Snickerdoodle “Tiramisu”: Use the cookies in place of ladyfingers in a creative, gluten-free tiramisu-style dessert.
- For Gifting and Holidays:
- These cookies are sturdy and travel well, making them perfect for care packages.
- They are a welcome and essential addition to any holiday cookie platter, especially since they cater to guests with gluten sensitivities.
5 Essential Tips for Perfect Gluten-Free Snickerdoodles
Internalize these five tips, and you’ll be baking perfect batches for years to come.
- Measure Your Flour Correctly: This is paramount in gluten-free baking. For the most accurate results, use a kitchen scale to weigh your flour. If you don’t have a scale, use the “spoon and level” method: use a spoon to fluff up the flour in its container, then spoon it into your measuring cup until it’s overflowing. Use the back of a knife to level off the top. Never scoop directly from the bag, as this compacts the flour and can result in up to 25% too much flour, leading to dry, dense cookies.
- Do Not, Under Any Circumstances, Skip Chilling the Dough: We mentioned it before, but it bears repeating. This is the single most important step for preventing your cookies from spreading into thin, sad wafers. Chilling allows the butter to solidify. When the cold dough hits the hot oven, the butter takes longer to melt, meaning the cookie’s structure has time to set before the fat melts completely. This results in a thicker, chewier cookie.
- Underbake for the Perfect Texture: The difference between a soft, chewy snickerdoodle and a hard, crunchy one is about two minutes in the oven. Pull the cookies out when the centers still look slightly soft and underdone. They will finish cooking on the hot baking sheet. This technique guarantees that desirable soft and pillowy center.
- Bang the Pan (Optional Pro-Tip): For more pronounced cracks and a chewier texture, you can try the pan-banging method. About 7-8 minutes into baking, open the oven and firmly lift and drop the baking sheet onto the oven rack a few times. This causes the puffed centers to collapse, creating ripples and a denser, chewier texture. Finish baking for another 2-3 minutes.
- Room Temperature is Your Friend: Ensure your butter is properly softened (it should give slightly when pressed, but not be greasy or melted) and your eggs are at room temperature. This allows for proper emulsification during the creaming process, which creates the light, tender structure of the cookie. To quickly bring eggs to room temperature, place them in a bowl of warm water for 5-10 minutes.
Frequently Asked Questions (FAQ)
Here are the answers to some of the most common questions about making gluten-free snickerdoodles.
1. Can I make this recipe dairy-free or vegan?
Yes, you can!
- For Dairy-Free: Substitute the unsalted butter with a high-quality vegan butter substitute that comes in stick form (brands like Miyoko’s Kitchen or Melt are great).
- For Vegan: In addition to using vegan butter, you will need to replace the eggs. The best substitute for this recipe would be a “flax egg.” For each egg, whisk together 1 tablespoon of ground flaxseed meal with 3 tablespoons of water. Let it sit for 5-10 minutes to form a gel-like consistency before adding it to the creamed butter and sugar mixture.
2. I don’t have cream of tartar. Can I substitute it?
Unfortunately, no. Cream of tartar is what makes a snickerdoodle a snickerdoodle. It provides both leavening and the signature tangy flavor. If you substitute it, you will essentially be making a cinnamon-sugar coated sugar cookie, which, while delicious, is not a snickerdoodle. It’s worth buying a small jar; it lasts forever in the pantry.
3. Why did my cookies spread so much and get flat?
This is the most common gluten-free cookie problem and is almost always due to one of three things: 1) You didn’t chill the dough long enough (or at all). 2) Your butter was too soft or melted, rather than just at room temperature. 3) Your oven was not fully preheated, giving the butter too much time to melt before the cookie’s structure could set.
4. Do I really need to use xanthan gum?
Yes. In gluten-free baking, xanthan gum is the binder that mimics the role of gluten. Without it, your cookies will be extremely crumbly and will not have the proper chewy structure. If you have a severe allergy or aversion to it, you can try substituting psyllium husk or ground chia seeds, but the texture will be different.
5. How should I store gluten-free snickerdoodles?
Store the completely cooled cookies in an airtight container at room temperature. They will stay soft and delicious for up to 4-5 days. Gluten-free baked goods can sometimes dry out faster than their gluten-filled counterparts. To keep them extra soft, you can place a slice of gluten-free bread in the container with them.
Gluten Free Snickerdoodles recipe
Ingredients
For the Cookie Dough:
-
Gluten-Free All-Purpose Flour Blend: 2 ¾ cups (330g) – See note below
-
Xanthan Gum: 1 teaspoon (omit if your flour blend already contains it)
-
Cream of Tartar: 2 teaspoons
-
Baking Soda: 1 teaspoon
-
Salt: ½ teaspoon
-
Unsalted Butter: 1 cup (2 sticks or 226g), softened to room temperature
-
Granulated Sugar: 1 ½ cups (300g)
-
Large Eggs: 2, at room temperature
-
Pure Vanilla Extract: 2 teaspoons
For the Cinnamon-Sugar Coating:
-
Granulated Sugar: ¼ cup (50g)
-
Ground Cinnamon: 2 teaspoons
Instructions
Part 1: Making the Dough
-
Whisk Dry Ingredients: In a medium bowl, whisk together the gluten-free flour blend, xanthan gum (if using), cream of tartar, baking soda, and salt. Whisking thoroughly ensures that the leavening agents are evenly distributed, which is key for a uniform rise. Set aside.
-
Cream Butter and Sugar: In the bowl of a stand mixer fitted with the paddle attachment, or in a large bowl with a hand mixer, beat the softened unsalted butter and granulated sugar together on medium-high speed for 2-3 minutes. The mixture should become light, pale, and fluffy. This creaming process is essential for incorporating air into the dough.
-
Add Eggs and Vanilla: Reduce the mixer speed to medium. Add the room temperature eggs one at a time, beating well after each addition until it is fully incorporated. Scrape down the sides and bottom of the bowl as needed. Add the vanilla extract and beat until combined.
-
Combine Wet and Dry: Reduce the mixer speed to low. Gradually add the dry flour mixture to the wet ingredients in three additions, mixing until just combined after each addition. Be careful not to overmix. Overmixing can lead to tough cookies. The dough will be soft.
-
Chill the Dough (CRITICAL STEP): Scrape the dough into a ball, cover the bowl tightly with plastic wrap, and refrigerate for at least 1 hour, and up to 2 days. Do not skip this step. Chilling the dough solidifies the fat (the butter), which prevents the cookies from spreading too much in the oven. It also allows the gluten-free flours to fully hydrate, which improves the texture and flavor of the final cookie.
Part 2: Baking the Cookies
-
Preheat and Prepare: When you’re ready to bake, preheat your oven to 375°F (190°C). Line two large baking sheets with parchment paper.
-
Make the Coating: In a small, shallow bowl, stir together the ¼ cup of granulated sugar and 2 teaspoons of ground cinnamon until well combined.
-
Shape and Roll: Remove the chilled dough from the refrigerator. It will be firm. Scoop the dough using a medium cookie scoop (about 1.5 tablespoons) and roll it into a smooth ball between your hands.
-
Coat in Cinnamon-Sugar: Drop the ball of dough into the cinnamon-sugar mixture and roll it around until it is generously and completely coated on all sides.
-
Arrange on Baking Sheet: Place the coated dough balls on the prepared baking sheets, leaving about 2 inches of space between each one to allow for some spreading.
-
Bake to Perfection: Bake for 9-11 minutes. The cookies are done when the edges are set and just beginning to turn a light golden brown, and the centers are puffed up and look slightly underdone. This “underbaking” is the key to a soft, chewy center. They will continue to bake from the residual heat on the pan.
-
Cool Down: Let the cookies cool on the baking sheet for 5-10 minutes. During this time, the puffed centers will sink down slightly, creating the classic snickerdoodle cracks. After 10 minutes, transfer the cookies to a wire rack to cool completely.
Nutrition
- Serving Size: one normal portion
- Calories: 150-180 kcal