

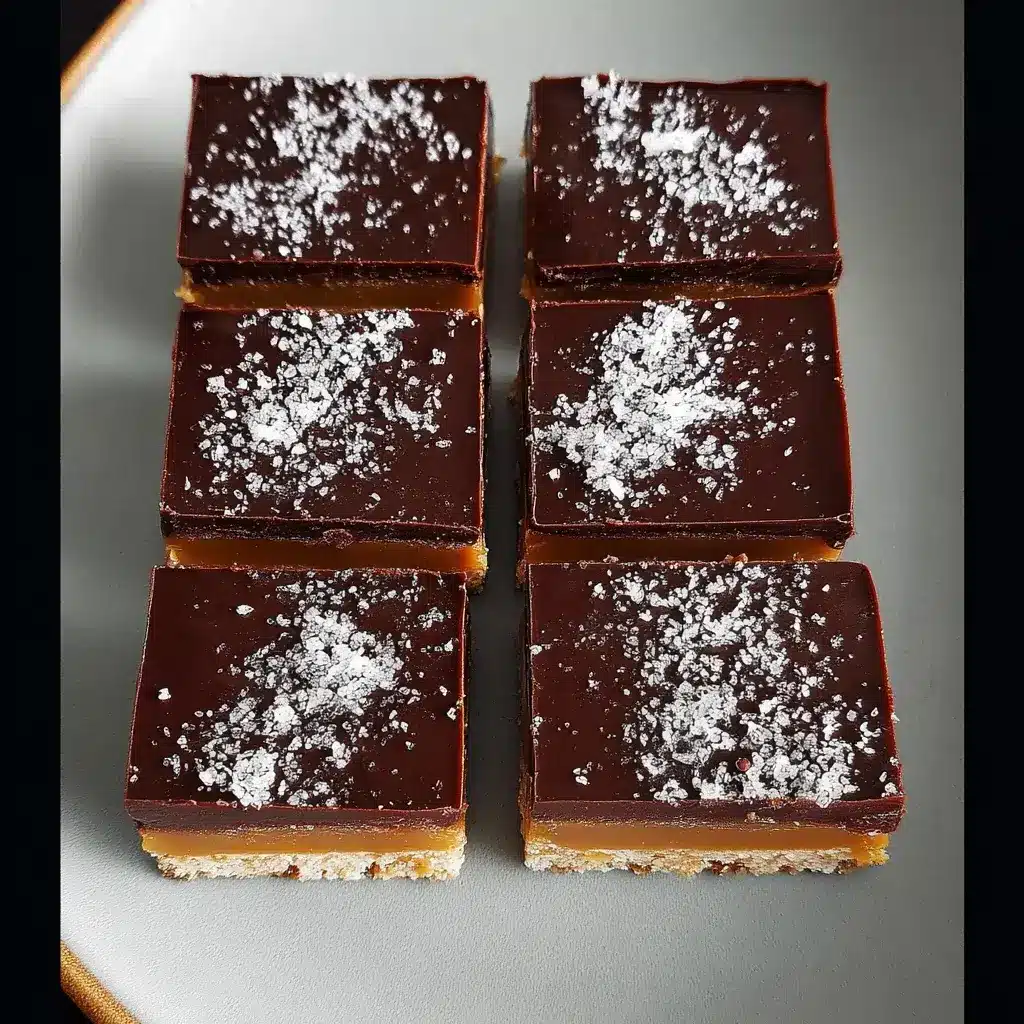

Of all the decadent traybakes, Millionaire’s Bars have always held a mythical status for me. That perfect trifecta of buttery shortbread, gooey caramel, and a crisp chocolate top is pure, unadulterated bliss. When I had to switch to a gluten-free diet, I mourned the loss of my favorite bakery version. My initial attempts to recreate them were… disappointing. The bases were either sandy or rock-hard. But I was determined. Then, during a deep dive into Middle Eastern flavors, a lightbulb went off: tahini. What if I swapped some of the butter in the caramel for rich, nutty, savory tahini? The result was nothing short of a revelation. The tahini didn’t just replace a fat; it transformed the entire bar. It tamed the sweetness of the caramel, adding an incredible, complex, earthy depth that was utterly addictive. The salt cut through the richness, and suddenly, this wasn’t just a copy of a classic—it was an upgrade. When I first shared a batch of these Gluten-Free Salted Tahini Caramel Millionaire Bars with my friends, the reaction was immediate. They weren’t just “good for gluten-free”; they were, hands down, the best Millionaire’s Bars anyone had ever tasted. They are now my signature bake, the one I bring to parties, the one I make as a gift, and the one I crave on a quiet afternoon with a cup of coffee.
The Ultimate Gluten-Free Salted Tahini Caramel Millionaire Bars
This recipe elevates the classic Millionaire’s Bar from a simple sweet treat to a sophisticated, gourmet dessert. The secret lies in the caramel layer, where traditional butter and sugar are joined by tahini, the rich paste made from ground sesame seeds. This addition provides a wonderful nutty, savory counterpoint to the sweetness, while a generous sprinkle of flaky sea salt makes every flavor pop. Built on a foundation of a crisp yet tender gluten-free shortbread and crowned with a layer of high-quality dark chocolate, these bars offer a symphony of textures and flavors in every single bite.
Why This Recipe is a Game-Changer
- Perfectly Textured Gluten-Free Base: We’ve perfected the ratio of gluten-free flour to butter and sugar to create a shortbread base that is buttery and crumbly but sturdy enough to hold its own against the rich toppings. No more sad, sandy bases!
- The Tahini Caramel Difference: This is not your average, cloyingly sweet caramel. The tahini adds an unparalleled depth of flavor—nutty, savory, and complex. It creates a soft, chewy caramel that is rich without being overwhelming.
- Balanced Sweetness: The combination of dark chocolate, savory tahini, and flaky sea salt creates a perfectly balanced treat. It satisfies the sweet tooth but appeals to a more grown-up, complex palate.
- Show-Stopping Appearance: With its three distinct, beautiful layers and a glistening, salt-flecked top, this is a dessert that looks as incredible as it tastes. It’s guaranteed to impress.
Complete Recipe Ingredients
This recipe is broken down into its three essential layers. Using high-quality ingredients, especially for the tahini and chocolate, will make a significant difference in the final product.
For the Gluten-Free Shortbread Base:
- Gluten-Free All-Purpose Flour Blend: 1 ½ cups (225g) – Ensure your blend contains xanthan gum.
- Unsalted Butter: 1/2 cup (113g), cold and cubed
- Granulated Sugar: 1/4 cup (50g)
- Salt: 1/4 teaspoon
For the Salted Tahini Caramel Filling:
- Sweetened Condensed Milk: 1 can (14 oz / 397g)
- Light Brown Sugar: 1/2 cup (100g), packed
- Unsalted Butter: 1/2 cup (113g)
- Golden Syrup or Light Corn Syrup: 3 tablespoons
- Good-Quality Tahini: 1/4 cup (65g), runny, not the dry dregs from the bottom of the jar
- Vanilla Extract: 1 teaspoon
- Fine Sea Salt: 1/2 teaspoon
For the Chocolate Topping:
- Dark Chocolate (60-70% cacao): 7 oz (200g), finely chopped
- Coconut Oil or Neutral Vegetable Oil: 1 teaspoon (this is optional but helps create a shinier top that’s easier to slice)
- Flaky Sea Salt (like Maldon): 1 teaspoon, for finishing
Equipment Needed:
- An 8×8 inch (20×20 cm) square baking pan
- Parchment paper
- A medium, heavy-bottomed saucepan
Step-by-Step Instructions
Patience is key with this recipe, as each layer needs to be properly set before you can proceed to the next. Follow these instructions closely for perfect results.
Part 1: Making the Gluten-Free Shortbread Base
- Preheat and Prepare Pan: Preheat your oven to 350°F (175°C). Line your 8×8 inch baking pan with parchment paper, leaving a 2-inch overhang on two opposite sides. This “sling” will make it easy to lift the bars out of the pan later.
- Combine Dry Ingredients: In a medium bowl, whisk together the gluten-free flour blend, granulated sugar, and salt.
- Cut in the Butter: Add the cold, cubed butter to the flour mixture. Using a pastry blender, your fingertips, or a food processor, cut the butter into the flour until the mixture resembles coarse, damp breadcrumbs.
- Press into Pan: Tip the crumbly mixture into your prepared pan. Use your fingers or the bottom of a flat measuring cup to press the dough down firmly and evenly across the bottom of the pan.
- Bake the Base: Bake for 18-22 minutes, or until the edges are lightly golden brown and the surface looks dry.
- Cool Completely: Remove the pan from the oven and place it on a wire rack to cool completely while you prepare the caramel. The base must be cool before you pour the hot caramel over it.
Part 2: Crafting the Salted Tahini Caramel
This is the most hands-on part of the recipe. Do not walk away from the stove while the caramel is cooking.
- Combine Caramel Ingredients: In a medium, heavy-bottomed saucepan, combine the sweetened condensed milk, light brown sugar, butter, and golden syrup (or corn syrup).
- Cook the Caramel: Place the saucepan over medium-low heat. Stir constantly with a heatproof spatula or wooden spoon, ensuring you scrape the bottom and corners of the pan to prevent scorching.
- Bring to a Boil: Continue to stir until the butter has melted and the sugar has dissolved. Bring the mixture to a gentle boil.
- Thicken the Caramel: Continue to cook, stirring constantly, for 5-8 minutes. The caramel will thicken considerably and turn a deeper golden-brown color. It should be thick enough that when you drag your spatula through it, it leaves a clear trail for a second before filling back in. If using a candy thermometer, it should reach the “soft-ball” stage, around 245°F (118°C).
- Add Flavorings: Immediately remove the pan from the heat. Stir in the tahini, vanilla extract, and fine sea salt until fully incorporated and the caramel is smooth.
- Pour Over Base: Working quickly, pour the hot caramel over the cooled shortbread base. Use an offset spatula to spread it into an even layer, reaching all the corners.
- Chill the Caramel Layer: Let the pan cool to room temperature on a wire rack, then transfer it to the refrigerator to chill for at least 2-3 hours, or until the caramel is completely firm to the touch. This step is crucial; if the caramel is not firm, the chocolate layer will mix with it.
Part 3: The Chocolate Topping and Final Touches
- Melt the Chocolate: Once the caramel is fully chilled and firm, melt the chopped dark chocolate. You can do this in a heatproof bowl set over a saucepan of simmering water (a double boiler), stirring until smooth. Alternatively, microwave it in 30-second intervals, stirring well between each, until melted.
- Add Oil: Stir the optional teaspoon of coconut oil or neutral oil into the melted chocolate. This gives the top a lovely gloss and prevents it from cracking too sharply when you slice it.
- Pour and Spread: Pour the melted chocolate over the firm caramel layer. Quickly and gently spread it into a smooth, even layer using an offset spatula.
- Final Sprinkle: Immediately, while the chocolate is still wet, sprinkle the flaky sea salt evenly over the top.
- Final Chill: Place the pan back in the refrigerator for at least 1 hour, or until the chocolate is completely set.
Nutrition Facts
These are decadent bars, meant as a treat. The nutritional information is an estimate and will vary based on your specific ingredients.
- Servings: This recipe yields 16 small square bars.
- Serving Size: 1 bar
- Calories Per Serving: Approximately 300-350 kcal
Preparation Time
This recipe requires significant inactive chilling time, so plan accordingly.
- Active Prep Time: 30 minutes
- Baking Time: 20 minutes
- Chilling Time: 4-5 hours (minimum)
- Total Time: Approximately 5-6 hours
How to Serve and Store
Serving these bars correctly ensures everyone gets a perfect, clean-cut slice.
Slicing for a Professional Finish
- Lift From Pan: Once the chocolate is fully set, use the parchment paper sling to lift the entire slab out of the pan and onto a cutting board.
- Use a Hot Knife: This is the secret to a clean cut! Fill a tall glass with hot water. Dip a large, sharp knife into the hot water, then wipe it dry with a towel.
- Slice Firmly: Make one firm, downward cut. Do not drag the knife.
- Repeat: Clean the knife, dip it back in the hot water, wipe it dry, and make the next cut. Repeat this process for every single cut. This method melts the chocolate just enough to slice through it cleanly without shattering it or smearing the layers.
- Serving Size: You can cut the slab into 16 small squares (a 4×4 grid) or 12 larger rectangles.
Serving Suggestions
- With a Hot Drink: These bars are the perfect companion to a strong cup of black coffee, an espresso, or a robust cup of black tea. The bitterness of the beverage beautifully balances the richness of the bar.
- On a Dessert Platter: Their neat, layered appearance makes them a fantastic addition to a dessert platter or cookie box, especially during the holidays.
- As a Gift: Stack them in a clear cellophane bag or a beautiful tin, tied with a ribbon, for a delicious and impressive homemade gift.
5 Additional Tips for Bar-Making Success
- Choose Your GF Flour Wisely: Use a high-quality “cup-for-cup” or “1-to-1” gluten-free all-purpose flour blend that already contains xanthan gum. This will provide the best structure and texture for the shortbread base without any extra measuring.
- Don’t Scrimp on Tahini Quality: Use a good quality, smooth, and runny tahini. The brands that are well-stirred and pourable work best. Avoid using the dry, hardened paste from the bottom of an old jar, as it won’t incorporate well and can have a bitter taste.
- Trust the Parchment Sling: Don’t skip the step of leaving an overhang of parchment paper. It is the single easiest way to remove the entire block from the pan for clean, perfect slicing. Trying to cut the bars inside the pan is a recipe for messy edges and frustration.
- Respect the Chill Times: The hardest part of this recipe is waiting. But chilling is not optional. A warm base will absorb the hot caramel. A warm caramel layer will melt and swirl with the chocolate, ruining the distinct layers. A fully chilled final product is essential for clean slicing. Plan ahead!
- Use a Candy Thermometer for Foolproof Caramel: While you can make the caramel by eye, using a candy thermometer takes out all the guesswork. Cooking the caramel to the “soft-ball stage” (240-248°F / 115-120°C) guarantees it will set up to be perfectly soft and chewy, not rock hard or runny.
Frequently Asked Questions (FAQ)
1. Can I make this with regular all-purpose flour if I don’t need it to be gluten-free?
Yes, absolutely. To make the shortbread base with regular wheat flour, simply substitute the 1 ½ cups (225g) of gluten-free flour blend with 1 ¾ cups (220g) of standard all-purpose flour. The rest of the recipe remains the same.
2. My caramel layer was too runny and oozed everywhere when I cut it. What did I do wrong?
This is a classic sign that the caramel was not cooked for long enough or to a high enough temperature. It needs to boil and thicken for the full 5-8 minutes to reach the proper setting point. If it doesn’t get hot enough, the sugar structure doesn’t form correctly, and it will remain a soft sauce instead of a firm, chewy caramel. Using a candy thermometer to ensure it reaches at least 240°F (115°C) can prevent this.
3. Can I use a different nut or seed butter instead of tahini?
Yes, this recipe is adaptable. You could substitute the tahini with an equal amount of smooth peanut butter, almond butter, or cashew butter for a different nutty flavor profile. For a nut-free version, sunflower seed butter would be an excellent alternative. Just ensure the butter you use is smooth and well-stirred.
4. How should I store these bars, and how long will they last?
These bars should be stored in an airtight container in the refrigerator. The cool temperature keeps the caramel firm and the chocolate crisp. They will last for up to one week in the fridge. They taste best when you let them sit at room temperature for about 10-15 minutes before serving to slightly soften the caramel.
5. Can I make this recipe vegan?
Making this recipe fully vegan would require several significant substitutions. You would need to use a high-quality block-style vegan butter (not a soft margarine) for the base and caramel, a can of full-fat coconut condensed milk for the caramel, and dairy-free dark chocolate. While theoretically possible, the setting properties of the caramel can be quite different with coconut condensed milk, so the results may vary. This specific recipe has been optimized for dairy ingredients.
Gluten free Salted Tahini Caramel Millionaire Bars recipe
Ingredients
For the Gluten-Free Shortbread Base:
-
Gluten-Free All-Purpose Flour Blend: 1 ½ cups (225g) – Ensure your blend contains xanthan gum.
-
Unsalted Butter: 1/2 cup (113g), cold and cubed
-
Granulated Sugar: 1/4 cup (50g)
-
Salt: 1/4 teaspoon
For the Salted Tahini Caramel Filling:
-
Sweetened Condensed Milk: 1 can (14 oz / 397g)
-
Light Brown Sugar: 1/2 cup (100g), packed
-
Unsalted Butter: 1/2 cup (113g)
-
Golden Syrup or Light Corn Syrup: 3 tablespoons
-
Good-Quality Tahini: 1/4 cup (65g), runny, not the dry dregs from the bottom of the jar
-
Vanilla Extract: 1 teaspoon
-
Fine Sea Salt: 1/2 teaspoon
For the Chocolate Topping:
-
Dark Chocolate (60-70% cacao): 7 oz (200g), finely chopped
-
Coconut Oil or Neutral Vegetable Oil: 1 teaspoon (this is optional but helps create a shinier top that’s easier to slice)
-
Flaky Sea Salt (like Maldon): 1 teaspoon, for finishing
Instructions
Part 1: Making the Gluten-Free Shortbread Base
-
Preheat and Prepare Pan: Preheat your oven to 350°F (175°C). Line your 8×8 inch baking pan with parchment paper, leaving a 2-inch overhang on two opposite sides. This “sling” will make it easy to lift the bars out of the pan later.
-
Combine Dry Ingredients: In a medium bowl, whisk together the gluten-free flour blend, granulated sugar, and salt.
-
Cut in the Butter: Add the cold, cubed butter to the flour mixture. Using a pastry blender, your fingertips, or a food processor, cut the butter into the flour until the mixture resembles coarse, damp breadcrumbs.
-
Press into Pan: Tip the crumbly mixture into your prepared pan. Use your fingers or the bottom of a flat measuring cup to press the dough down firmly and evenly across the bottom of the pan.
-
Bake the Base: Bake for 18-22 minutes, or until the edges are lightly golden brown and the surface looks dry.
-
Cool Completely: Remove the pan from the oven and place it on a wire rack to cool completely while you prepare the caramel. The base must be cool before you pour the hot caramel over it.
Part 2: Crafting the Salted Tahini Caramel
This is the most hands-on part of the recipe. Do not walk away from the stove while the caramel is cooking.
-
Combine Caramel Ingredients: In a medium, heavy-bottomed saucepan, combine the sweetened condensed milk, light brown sugar, butter, and golden syrup (or corn syrup).
-
Cook the Caramel: Place the saucepan over medium-low heat. Stir constantly with a heatproof spatula or wooden spoon, ensuring you scrape the bottom and corners of the pan to prevent scorching.
-
Bring to a Boil: Continue to stir until the butter has melted and the sugar has dissolved. Bring the mixture to a gentle boil.
-
Thicken the Caramel: Continue to cook, stirring constantly, for 5-8 minutes. The caramel will thicken considerably and turn a deeper golden-brown color. It should be thick enough that when you drag your spatula through it, it leaves a clear trail for a second before filling back in. If using a candy thermometer, it should reach the “soft-ball” stage, around 245°F (118°C).
-
Add Flavorings: Immediately remove the pan from the heat. Stir in the tahini, vanilla extract, and fine sea salt until fully incorporated and the caramel is smooth.
-
Pour Over Base: Working quickly, pour the hot caramel over the cooled shortbread base. Use an offset spatula to spread it into an even layer, reaching all the corners.
-
Chill the Caramel Layer: Let the pan cool to room temperature on a wire rack, then transfer it to the refrigerator to chill for at least 2-3 hours, or until the caramel is completely firm to the touch. This step is crucial; if the caramel is not firm, the chocolate layer will mix with it.
Part 3: The Chocolate Topping and Final Touches
-
Melt the Chocolate: Once the caramel is fully chilled and firm, melt the chopped dark chocolate. You can do this in a heatproof bowl set over a saucepan of simmering water (a double boiler), stirring until smooth. Alternatively, microwave it in 30-second intervals, stirring well between each, until melted.
-
Add Oil: Stir the optional teaspoon of coconut oil or neutral oil into the melted chocolate. This gives the top a lovely gloss and prevents it from cracking too sharply when you slice it.
-
Pour and Spread: Pour the melted chocolate over the firm caramel layer. Quickly and gently spread it into a smooth, even layer using an offset spatula.
-
Final Sprinkle: Immediately, while the chocolate is still wet, sprinkle the flaky sea salt evenly over the top.
-
Final Chill: Place the pan back in the refrigerator for at least 1 hour, or until the chocolate is completely set.
Nutrition
- Serving Size: one normal portion
- Calories: 00-350 kcal


