


There are certain desserts that feel like a warm hug, and for me, these Gluten-Free Raspberry Almond Bars are the epitome of edible comfort. I first developed this recipe when searching for a treat that could satisfy everyone at a family gathering—including those with gluten sensitivities—without compromising on flavor or texture. I was tired of gluten-free options that were dry, gritty, or overly complicated. I wanted something buttery, chewy, and bursting with bright, fruity flavor. After a few rounds of testing, these bars were born, and the reaction was immediate and unanimous. My nephew, a notoriously picky eater, devoured three of them before anyone could blink. My sister, who follows a strict gluten-free diet, declared them the best dessert she’d had in years, asking with wide eyes, “Are you sure these are gluten-free?” That’s the magic of this recipe. It’s a dessert that brings everyone to the table. The base is a rich, tender shortbread made from a perfect blend of almond and oat flours, which doubles as the crumbly, golden-brown topping. Sandwiched in between is a layer of sweet-tart raspberry jam that bubbles up beautifully in the oven. They are simple to make, stunning to look at, and have become my go-to, never-fail recipe for any occasion.
Complete with the Ingredients Amount
The beauty of these bars lies in their wholesome, accessible ingredients. The combination of almond and oat flours creates a wonderfully moist and flavorful base that is a far cry from many bland gluten-free baked goods. Each component is chosen specifically to build layers of texture and flavor, from the nutty crust to the bright, fruity center.
For the Gluten-Free Crust and Crumble Topping:
- Blanched Almond Flour: 1 ½ cups (This fine-textured flour provides moisture, a rich flavor, and a tender crumb.)
- Gluten-Free Oat Flour: 1 cup (You can buy this or make your own by blending certified gluten-free rolled oats. It adds structure and a lovely, subtle chewiness.)
- Coconut Sugar or Packed Brown Sugar: ½ cup (Coconut sugar offers a slight caramel note, while brown sugar provides classic, molasses-rich sweetness.)
- Baking Powder: ½ teaspoon
- Salt: ½ teaspoon (Essential for balancing the sweetness and enhancing the almond flavor.)
- Cold Unsalted Butter or Solid Coconut Oil: ½ cup (8 tablespoons), cut into ½-inch cubes (Using cold fat is crucial for creating a crumbly, shortbread-like texture.)
- Vanilla Extract: 1 teaspoon
- Almond Extract: ½ teaspoon (This is a key ingredient that amplifies the almond flavor throughout the bars.)
For the Raspberry Filling:
- High-Quality Raspberry Preserves or Jam: 1 cup (Choose a brand with a rich fruit flavor. Seedless or seeded is a matter of personal preference.)
- Fresh Lemon Juice: 1 tablespoon (This brightens the flavor of the raspberry and cuts through the sweetness.)
For the Topping Garnish:
- Sliced Almonds: ½ cup (These add a wonderful crunch and a beautiful, toasted finish.)
Ingredient Notes & Potential Substitutions
- Flours: The almond and oat flour combination is highly recommended for the best texture. If you do not have oat flour, you can use an additional cup of almond flour, but the bars will be slightly more dense. Alternatively, a high-quality gluten-free all-purpose baking blend (one that contains xanthan gum) could be substituted for the oat flour.
- Sweetener: Maple syrup can be used as a liquid sweetener alternative, but you may need to reduce it slightly (to about ⅓ cup) and add an extra tablespoon or two of flour to absorb the moisture.
- Vegan Option: This recipe is easily made vegan! Simply use solid, cold coconut oil in place of the butter. Ensure your sugar is vegan-certified if that is a concern. The rest of the ingredients are naturally plant-based.
- Jam Variations: Don’t feel limited to raspberry! These bars are spectacular with a variety of jams. Strawberry, apricot, fig, or even a tart cherry preserve would be delicious.
Instructions
Follow these detailed steps to create perfectly layered, delicious raspberry almond bars. The key to success is using cold ingredients for the crust and allowing the bars to cool completely before cutting them.
Step 1: Preparation
- Preheat and Prep the Pan: Preheat your oven to 350°F (175°C). Line an 8×8 inch square baking pan with parchment paper, leaving a few inches of overhang on two opposite sides. This “sling” will make it incredibly easy to lift the bars out of the pan for cutting later. Lightly grease the parchment paper and any exposed sides of the pan.
Step 2: Make the Crust and Crumble Mixture
- Combine Dry Ingredients: In a large mixing bowl, whisk together the blanched almond flour, gluten-free oat flour, coconut sugar (or brown sugar), baking powder, and salt. Whisking ensures that the leavening and salt are evenly distributed.
- Cut in the Cold Fat: Add the cubed, cold butter or coconut oil to the dry ingredients. Using a pastry blender or your fingertips, cut the fat into the flour mixture. Continue to work the mixture until it resembles coarse, damp crumbs with some pea-sized pieces of butter remaining. This process is what creates the tender, flaky layers in the crust.
- Add Flavorings: Drizzle the vanilla extract and almond extract over the mixture. Use a fork to toss everything together until just combined. Be careful not to overmix at this stage.
Step 3: Assemble the Bars
- Form the Base Crust: Set aside approximately 1 cup of the crumb mixture. This will be used for the topping. Pour the remaining mixture into your prepared baking pan. Use your fingers or the flat bottom of a measuring cup to press the crumbs down firmly and evenly to form a solid base layer.
- Prepare the Filling: In a small bowl, stir together the raspberry preserves and the fresh lemon juice until well combined.
- Spread the Filling: Dollop the raspberry mixture over the crust and use an offset spatula or the back of a spoon to spread it into an even layer, leaving about a ¼-inch border around the edges. This helps prevent the jam from burning where it touches the sides of the pan.
- Add the Topping: Take the 1 cup of reserved crumb mixture and crumble it evenly over the top of the raspberry layer. It’s okay if there are some gaps where the jam peeks through. Finally, sprinkle the sliced almonds evenly over the crumb topping.
Step 4: Bake and Cool
- Bake the Bars: Place the pan in the preheated oven and bake for 30-35 minutes. The bars are done when the topping is a light golden brown and the raspberry filling is bubbly around the edges.
- COOL COMPLETELY: This is the most important step! Remove the pan from the oven and place it on a wire rack to cool completely to room temperature. This will take at least 2 hours. If you try to cut the bars while they are still warm, they will be very soft and will fall apart. For the cleanest cuts, you can chill the cooled bars in the refrigerator for an additional 30 minutes before slicing.
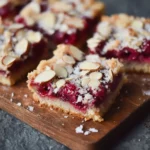
- Slice and Serve: Once fully cooled, use the parchment paper sling to lift the entire block out of the pan. Place it on a cutting board and use a sharp knife to cut into 16 squares.
Nutrition Facts
The nutritional information provided is an estimate based on the recipe being cut into 16 bars. Actual values may vary depending on the specific brands of ingredients used (e.g., sugar content in jam, type of sugar used).
- Servings: 16 bars
- Calories Per Serving: Approximately 220-250 kcal
A Quick Nutritional Breakdown
These bars are a wonderful example of a “better-for-you” dessert. The base of almond flour provides healthy monounsaturated fats, protein, and vitamin E. Oat flour contributes soluble fiber, which is great for digestion and heart health. By using natural sweeteners like coconut sugar and fruit preserves, you get a satisfying treat without a huge spike from refined white sugar. They are a wholesome, satisfying dessert that you can feel good about enjoying.
Preparation Time
Understanding the time commitment helps in planning. Note that the passive cooling time is the longest, but most crucial, part of the process.
- Prep Time: 15 minutes
- This includes gathering ingredients, lining the pan, and mixing the crust/crumble.
- Bake Time: 30-35 minutes
- Cooling Time: 2 hours (minimum)
- Total Time: Approximately 2 hours and 50 minutes (with most of that time being hands-off cooling)
How to Serve
These versatile bars can be enjoyed in many ways, from a simple afternoon snack to an elegant dessert. Here are some serving suggestions to elevate your gluten-free raspberry almond bars.
- Simply Classic: The bars are absolutely delicious on their own. Their rich flavor and varied textures need no accompaniment. They are perfect for packing in lunches or enjoying with a cup of coffee or tea.
- A Dusting of Sweetness: For a beautiful, professional-looking finish, lightly dust the cooled and cut bars with powdered sugar just before serving.
- A La Mode: For a truly decadent dessert experience, serve a slightly warmed bar with a scoop of high-quality vanilla bean ice cream or a dairy-free vanilla alternative. The contrast between the warm, gooey jam and the cold, creamy ice cream is heavenly.
- With a Drizzle: Melt some white chocolate and drizzle it artfully over the tops of the bars. The creamy sweetness of the white chocolate pairs wonderfully with the tart raspberry and nutty almond.
- Breakfast Parfait Style: Crumble one of the bars over a bowl of plain Greek yogurt or coconut yogurt. Top with a few fresh raspberries for a delightful breakfast treat or a healthy dessert.
- Dessert Platter: Cut the bars into smaller, bite-sized squares and arrange them on a dessert platter alongside fresh berries, other cookies, and chocolate truffles for a party or special occasion.
Additional Tips (5 Tips)
These pro tips will help ensure your bars turn out perfectly every single time and allow you to customize them with confidence.
- Don’t Skip the Parchment Sling: While it might seem like a small step, lining the pan with overhanging parchment paper is a game-changer. It guarantees that you can remove the entire block of bars cleanly without any risk of breaking them while trying to pry them out of the pan.
- Press the Crust Firmly: When forming the base layer, don’t be shy. Use the bottom of a glass or measuring cup to press the crumbs down very firmly. A tightly packed crust creates a stable foundation that won’t crumble when you cut into it.
- The Chill is Key for Clean Cuts: While letting the bars cool to room temperature is essential, an extra 30 minutes in the refrigerator will work wonders. This firms up the butter/coconut oil and the jam, allowing you to make sharp, clean slices with a large chef’s knife.
- Toast the Almonds for Deeper Flavor: For an extra layer of nutty goodness, you can toast the sliced almonds before sprinkling them on top. Simply spread them on a baking sheet and bake at 350°F (175°C) for 5-7 minutes, watching carefully until they are fragrant and lightly golden. Let them cool before using.
- Warm the Jam for Easy Spreading: If your jam or preserves are very thick and difficult to spread, place the measured amount in a small microwave-safe bowl and heat it for 15-20 seconds. This will loosen it up, making it much easier to spread evenly over the delicate crust without disturbing it.
FAQ section (5 Q/A)
Here are answers to some of the most common questions about making these gluten-free raspberry almond bars.
1. Can I use regular all-purpose flour if I don’t need them to be gluten-free?
Yes, you can. If you are not gluten-sensitive, you can substitute the 1 cup of oat flour with 1 cup of regular all-purpose flour. You would still use the 1 ½ cups of almond flour, as it is essential for the signature flavor and texture of these bars. The result will be just as delicious.
2. How do I properly store these bars, and how long do they last?
The bars can be stored in an airtight container at room temperature for up to 3 days. If you’d like them to last longer, you can store them in the refrigerator for up to a week. They are fantastic when chilled! For long-term storage, they also freeze beautifully. You can freeze the entire uncut block or individual slices. Wrap them tightly in plastic wrap and then place them in a freezer-safe bag or container for up to 3 months. Thaw at room temperature before enjoying.
3. My crust mixture seems too dry and isn’t holding together. What should I do?
This can sometimes happen if your flours are particularly dry or if measurements are slightly off. First, make sure you are pinching the dough together with your fingers to see if it holds its shape. Often, it’s less dry than it appears. If it’s still too sandy, add one teaspoon of ice-cold water and mix briefly. This is usually enough to bring the dough together without making it wet.
4. Can I make my own oat flour at home?
Absolutely! It’s very simple and cost-effective. Just place certified gluten-free rolled oats (not steel-cut or instant) into a high-speed blender. Blend on high for about 30-60 seconds, or until the oats have turned into a fine, uniform powder. Let the flour settle for a minute before opening the blender to avoid a cloud of dust. One cup of rolled oats will yield just under one cup of oat flour.
5. Can I reduce the amount of sugar in this recipe?
You can reduce the sugar in the crust/crumble mixture to ⅓ cup if you prefer a less sweet bar, and the texture should hold up well. The main source of sweetness comes from the jam. To reduce the overall sugar content, look for a brand of raspberry preserves that is labeled “low sugar” or “fruit-sweetened.” This will give you all the fruity flavor with less added sugar.
Gluten free Raspberry Almond Bars recipe
Ingredients
For the Gluten-Free Crust and Crumble Topping:
-
Blanched Almond Flour: 1 ½ cups (This fine-textured flour provides moisture, a rich flavor, and a tender crumb.)
-
Gluten-Free Oat Flour: 1 cup (You can buy this or make your own by blending certified gluten-free rolled oats. It adds structure and a lovely, subtle chewiness.)
-
Coconut Sugar or Packed Brown Sugar: ½ cup (Coconut sugar offers a slight caramel note, while brown sugar provides classic, molasses-rich sweetness.)
-
Baking Powder: ½ teaspoon
-
Salt: ½ teaspoon (Essential for balancing the sweetness and enhancing the almond flavor.)
-
Cold Unsalted Butter or Solid Coconut Oil: ½ cup (8 tablespoons), cut into ½-inch cubes (Using cold fat is crucial for creating a crumbly, shortbread-like texture.)
-
Vanilla Extract: 1 teaspoon
-
Almond Extract: ½ teaspoon (This is a key ingredient that amplifies the almond flavor throughout the bars.)
For the Raspberry Filling:
-
High-Quality Raspberry Preserves or Jam: 1 cup (Choose a brand with a rich fruit flavor. Seedless or seeded is a matter of personal preference.)
-
Fresh Lemon Juice: 1 tablespoon (This brightens the flavor of the raspberry and cuts through the sweetness.)
For the Topping Garnish:
-
Sliced Almonds: ½ cup (These add a wonderful crunch and a beautiful, toasted finish.)
Instructions
Step 1: Preparation
-
Preheat and Prep the Pan: Preheat your oven to 350°F (175°C). Line an 8×8 inch square baking pan with parchment paper, leaving a few inches of overhang on two opposite sides. This “sling” will make it incredibly easy to lift the bars out of the pan for cutting later. Lightly grease the parchment paper and any exposed sides of the pan.
Step 2: Make the Crust and Crumble Mixture
-
Combine Dry Ingredients: In a large mixing bowl, whisk together the blanched almond flour, gluten-free oat flour, coconut sugar (or brown sugar), baking powder, and salt. Whisking ensures that the leavening and salt are evenly distributed.
-
Cut in the Cold Fat: Add the cubed, cold butter or coconut oil to the dry ingredients. Using a pastry blender or your fingertips, cut the fat into the flour mixture. Continue to work the mixture until it resembles coarse, damp crumbs with some pea-sized pieces of butter remaining. This process is what creates the tender, flaky layers in the crust.
-
Add Flavorings: Drizzle the vanilla extract and almond extract over the mixture. Use a fork to toss everything together until just combined. Be careful not to overmix at this stage.
Step 3: Assemble the Bars
-
Form the Base Crust: Set aside approximately 1 cup of the crumb mixture. This will be used for the topping. Pour the remaining mixture into your prepared baking pan. Use your fingers or the flat bottom of a measuring cup to press the crumbs down firmly and evenly to form a solid base layer.
-
Prepare the Filling: In a small bowl, stir together the raspberry preserves and the fresh lemon juice until well combined.
-
Spread the Filling: Dollop the raspberry mixture over the crust and use an offset spatula or the back of a spoon to spread it into an even layer, leaving about a ¼-inch border around the edges. This helps prevent the jam from burning where it touches the sides of the pan.
-
Add the Topping: Take the 1 cup of reserved crumb mixture and crumble it evenly over the top of the raspberry layer. It’s okay if there are some gaps where the jam peeks through. Finally, sprinkle the sliced almonds evenly over the crumb topping.
Step 4: Bake and Cool
-
Bake the Bars: Place the pan in the preheated oven and bake for 30-35 minutes. The bars are done when the topping is a light golden brown and the raspberry filling is bubbly around the edges.
-
COOL COMPLETELY: This is the most important step! Remove the pan from the oven and place it on a wire rack to cool completely to room temperature. This will take at least 2 hours. If you try to cut the bars while they are still warm, they will be very soft and will fall apart. For the cleanest cuts, you can chill the cooled bars in the refrigerator for an additional 30 minutes before slicing.
-
Slice and Serve: Once fully cooled, use the parchment paper sling to lift the entire block out of the pan. Place it on a cutting board and use a sharp knife to cut into 16 squares.
Nutrition
- Serving Size: one normal portion
- Calories: 220-250 kcal


