

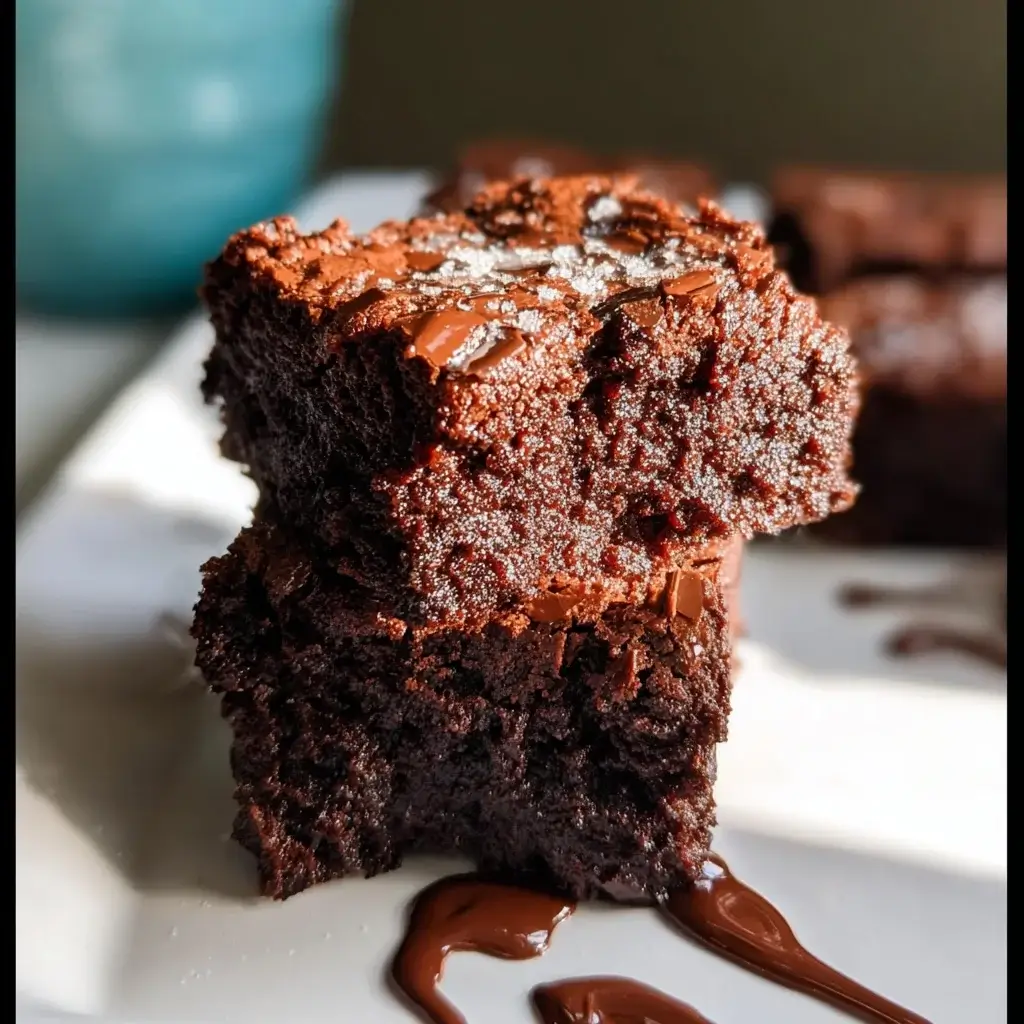

The quest for the perfect brownie is a serious endeavor. For me, it’s always been about achieving that elusive trifecta: a deep, dark chocolate flavor, a shatteringly thin, crackly top, and a center so fudgy and dense it borders on being a religious experience. When I went gluten-free, this quest became infinitely more complicated. The world of gluten-free baking can be fraught with peril—dry, crumbly textures, sandy aftertastes, and baked goods that taste vaguely of beans or cardboard. I was convinced that a truly great brownie, one that could stand up to its glutinous counterparts, was a unicorn. Then I discovered the quiet, unassuming power of almond flour. I stopped thinking of it as a “substitute” and started seeing it for what it truly is: a secret weapon. The first time I pulled a pan of these Gluten-Free Almond Flour Brownies from my oven, I knew something was different. The top was glossy and crackled. The aroma was of pure, unadulterated chocolate. After the agonizing but essential cooling period, I made the first cut. The knife slid through with the dense, smooth resistance of true fudge. That first bite was a moment of pure, unbridled joy. It was intensely chocolatey, impossibly moist, and had a richness that could only come from the healthy fats in the almond flour. I gave one to my most discerning, gluten-loving friend, who promptly declared it one of the best brownies he’d ever had, period. This isn’t just a gluten-free recipe; it’s a brownie recipe that happens to be gluten-free, and it is, without a doubt, the end of my quest.
The Ultimate Fudgy Gluten-Free Almond Flour Brownies
Welcome to what will become your one and only recipe for gluten-free brownies. This is not a cakey, dry brownie masquerading as the real thing. This is a truly fudgy, decadent, and intensely chocolatey brownie that owes its superior texture to the magic of almond flour. Unlike traditional flour, which can lead to a dry crumb, almond flour is packed with natural fats and protein that create an incredibly moist, dense, and tender brownie. This guide will provide you with a foolproof, step-by-step method to achieve that perfect crackly top and melt-in-your-mouth center. We will explore the science behind the ingredients and techniques, ensuring you can bake with confidence and produce a pan of brownies so good, no one will ever guess they’re gluten-free.
Ingredients for Brownie Perfection
The key to these spectacular brownies is using high-quality ingredients. There are no fancy techniques here, just simple, wholesome components that come together to create something truly special.
- High-Quality Dark Chocolate: 4 oz (113g), chopped (or high-quality chocolate chips)
- Unsalted Butter or Coconut Oil: ½ cup (113g)
- Coconut Sugar or Brown Sugar: 1 cup (200g), packed
- Large Eggs: 2, at room temperature
- Pure Vanilla Extract: 2 teaspoons
- Super-Fine Blanched Almond Flour: 1 cup (96g)
- Unsweetened Cocoa Powder: ⅓ cup (32g)
- Salt: ½ teaspoon
- Optional Chocolate Chips for folding in: ½ cup (90g)
A Deeper Look at the Key Ingredients: The “Why” Behind the Magic
Understanding the role of each ingredient is the key to mastering this recipe and customizing it to your liking.
Super-Fine Blanched Almond Flour: This is the undisputed star of the show.
- Why Almond Flour? Unlike all-purpose flour, which is high in starch, almond flour is high in protein and healthy fats. This composition is the secret to an ultra-moist and fudgy brownie. It doesn’t absorb moisture in the same way as wheat flour, which prevents the brownie from ever becoming dry or cakey.
- Blanched vs. Unblanched: We use blanched almond flour, which means the skins of the almonds have been removed. This results in a finer texture and a lighter color. Unblanched almond flour (or almond meal) will work, but it will create a slightly denser, heartier brownie with visible brown flecks.
- Super-Fine is Best: A super-fine grind ensures the smoothest possible texture, seamlessly integrating into the batter without any graininess.
The Chocolate Duo (Bar Chocolate & Cocoa Powder): Using both types of chocolate is crucial for a complex, deep flavor.
- Melted Dark Chocolate: This provides the fudgy texture and the base layer of rich chocolate flavor. Using a chopped chocolate bar (between 60-72% cacao) is highly recommended over chips for melting, as bars contain more cocoa butter and melt more smoothly.
- Unsweetened Cocoa Powder: This adds a deep, intense, and slightly bitter chocolate flavor that balances the sweetness and richness. For an even darker, richer brownie, you can use Dutch-processed cocoa powder.
The Fat (Butter or Coconut Oil): Melted fat is the key to a fudgy texture, as opposed to creamed butter which creates a cakey texture by incorporating air.
- Unsalted Butter: Provides a classic, rich, and nutty flavor.
- Coconut Oil: A fantastic dairy-free alternative. Use refined coconut oil if you don’t want any coconut flavor, or unrefined (virgin) coconut oil if you enjoy a subtle coconut note that pairs beautifully with the chocolate.
Room Temperature Eggs: This is a small detail with a big impact. Room temperature eggs emulsify more easily and efficiently with the melted butter and sugar, creating a smooth, homogenous batter. They also whip up with more volume, which is essential for achieving that coveted crackly top.
Step-by-Step Instructions for the Fudgiest Brownies
This recipe is wonderfully simple and can be made in one bowl. Follow these steps for a perfect result.
- Preheat and Prepare the Pan: Preheat your oven to 350°F (175°C). Line an 8×8-inch square baking pan with parchment paper, leaving an overhang on two sides to create a “sling.” This will make it incredibly easy to lift the brownies out of the pan after baking. Lightly grease the pan and parchment paper.
- Melt Chocolate and Fat: In a medium-sized, microwave-safe bowl, combine the 4 oz of chopped dark chocolate and the ½ cup of butter (or coconut oil). Microwave in 30-second increments, stirring well after each one, until the mixture is completely melted and smooth. Be careful not to scorch the chocolate. Alternatively, you can melt them together in a double boiler on the stovetop.
- Add Sugar and Vanilla: Whisk the 1 cup of coconut sugar or brown sugar into the warm chocolate mixture until it is fully combined. The mixture may look slightly grainy at this point. Whisk in the 2 teaspoons of vanilla extract.
- Whisk in the Eggs: Add the room temperature eggs to the bowl, one at a time. After adding the eggs, whisk the batter vigorously for a full minute. You will see the batter transform from dull and grainy to glossy, smooth, and slightly thickened. This vigorous whisking is a key step in developing the shiny, crackly crust.
- Fold in Dry Ingredients: Place a fine-mesh sieve over the bowl and sift in the 1 cup of almond flour, ⅓ cup of cocoa powder, and ½ teaspoon of salt. Sifting prevents lumps and ensures a smooth final texture. Using a spatula, gently fold the dry ingredients into the wet ingredients until just combined. Be careful not to overmix; stop as soon as you no longer see any dry streaks. Overmixing can lead to a tougher brownie.
- Add Optional Chocolate Chips: If using, gently fold in the ½ cup of extra chocolate chips.
- Bake to Perfection: Pour the batter into your prepared baking pan and use the spatula to spread it into an even layer. Bake for 25-30 minutes. The key is to not overbake. The brownies are done when the edges are set and a toothpick inserted into the center comes out with moist, fudgy crumbs attached, but not wet batter. If the toothpick comes out clean, they are overbaked.
- Cool Completely (THE MOST IMPORTANT STEP): Remove the pan from the oven and place it on a wire rack to cool completely. This step is non-negotiable for fudgy brownies. They are very delicate when warm and will finish setting up as they cool. Allowing them to cool in the pan for at least 2 hours (or even placing them in the fridge for an hour after they’ve cooled slightly) will result in a perfectly dense, fudgy texture and clean, neat slices.
- Slice and Serve: Once completely cooled, use the parchment paper sling to lift the entire block of brownies out of the pan. Place on a cutting board and slice into squares.
Nutrition Facts
Please note that these values are an estimate and can vary based on the specific ingredients used (e.g., butter vs. coconut oil, type of sugar).
- Servings: 16 small brownies
- Calories per serving (1 brownie): 180-220 kcal
Preparation Time
This recipe is as quick to mix up as any conventional brownie recipe. The only hard part is waiting for them to cool!
- Active Prep Time: 15 minutes
- Bake Time: 25-30 minutes
- Cooling Time: 2 hours (minimum)
- Total Time: Approximately 2 hours and 45 minutes
How to Serve Your Gluten-Free Almond Flour Brownies
While these brownies are spectacular on their own, they also serve as a perfect canvas for a variety of decadent presentations.
- The Purist: Serve at room temperature, cut into a perfect square. Simplicity at its finest.
- The Classic A La Mode: Gently warm a brownie in the microwave for 10-15 seconds and top with a generous scoop of high-quality vanilla bean ice cream. The contrast between the warm, fudgy brownie and the cold, creamy ice cream is pure heaven.
- The Chocolate-Lover’s Dream: Drizzle the brownies with a simple chocolate ganache or a warm salted caramel sauce.
- The Elegant Presentation: Dust the tops of the cooled brownies with a light layer of powdered sugar or extra cocoa powder before slicing. Serve alongside fresh raspberries or sliced strawberries, which provide a beautiful, tart contrast to the rich chocolate.
- The Brownie Sundae Bar: Cut the brownies into smaller, bite-sized pieces and set them out as the base for a build-your-own sundae bar with various ice creams, sauces (caramel, chocolate, strawberry), whipped cream, nuts, and sprinkles.
5 Essential Tips for Perfect Almond Flour Brownies
Keep these five tips in your back pocket to guarantee brownie success every single time.
- Do Not Overbake: This is the cardinal rule of brownie baking. The difference between a fudgy brownie and a dry, cakey one is just a few minutes in the oven. Err on the side of underbaking. A toothpick inserted into the center should come out with moist, sticky crumbs. The brownies will continue to set as they cool.
- Let Them Cool Completely Before Cutting: We cannot stress this enough. Warm brownies are gooey and will fall apart when you try to slice them. Cooling them completely allows the internal structure to set, resulting in that dense, fudgy texture and allowing for clean, beautiful squares. For extra-firm, ultra-fudgy brownies and super clean cuts, chill the cooled brownies in the fridge for an hour before slicing.
- Use Room Temperature Eggs: This simple step makes a big difference. Room temperature eggs mix more evenly into the batter and help dissolve the sugar, which is crucial for creating that shiny, paper-thin, crackly top that is the hallmark of a perfect brownie.
- Sift Your Dry Ingredients: Almond flour and cocoa powder can be prone to clumping. Running them through a fine-mesh sieve before folding them into the wet ingredients ensures a perfectly smooth, homogenous batter without any surprise lumps of cocoa powder in the finished product.
- Don’t Be Afraid to Experiment with Add-Ins: This recipe is a fantastic base. Feel free to fold in ½ cup of chopped toasted walnuts or pecans for a classic nutty crunch. A teaspoon of instant espresso powder added with the cocoa powder will deepen and enhance the chocolate flavor without making the brownies taste like coffee. A swirl of peanut butter or raspberry jam on top before baking can also be a delicious addition.
Frequently Asked Questions (FAQ)
Here are the answers to some of the most common questions about making these gluten-free brownies.
1. Can I make this recipe vegan?
Yes, you can! To make these brownies vegan, you will need to make two substitutions. First, use coconut oil instead of butter. Second, replace the two large eggs with two “flax eggs.” To make a flax egg, whisk 1 tablespoon of ground flaxseed meal with 3 tablespoons of water. Let this mixture sit for 5-10 minutes to form a gel-like consistency. You will need to make two of these. Note that the texture may be slightly denser and you may not get as pronounced a crackly top, but they will still be incredibly delicious and fudgy.
2. Can I use a different type of flour, like coconut flour or a gluten-free all-purpose blend?
No, you cannot substitute other flours 1-to-1 in this recipe. Almond flour and coconut flour are not interchangeable. Coconut flour is extremely absorbent and would require a complete reformulation of the recipe. A standard gluten-free all-purpose blend would result in a much cakier, drier brownie, as it lacks the fat and moisture content of almond flour. This recipe is specifically formulated to take advantage of the unique properties of almond flour.
3. Can I reduce the amount of sugar?
You can, but it will affect the final texture. Sugar does more than just add sweetness in a brownie recipe; it contributes to the moisture content, the fudgy texture, and is essential for creating the crackly top. Reducing the sugar will likely result in a less fudgy, more cake-like brownie with a duller top. If you want to reduce the sweetness, your best bet is to use a very dark chocolate (72% or higher).
4. How do I get that shiny, crackly top?
The secret to the “meringue-like” crackly top lies in the sugar and eggs. When you whisk the sugar and eggs together vigorously, the sugar crystals dissolve and help create a thin, glossy meringue layer on top of the batter as it bakes. Using room temperature eggs and whisking for a full minute after they are added are the key techniques to achieve this.
5. How should I store the brownies, and how long will they last?
Store the completely cooled brownies in an airtight container at room temperature. Because of the high moisture content from the almond flour, they stay incredibly fresh and fudgy for up to 4-5 days. You can also refrigerate them for a super-dense, truffle-like texture. For longer storage, they freeze beautifully. Slice them into individual squares, wrap them tightly in plastic wrap, and place them in a freezer-safe bag for up to 3 months. Thaw at room temperature before enjoying.
Gluten Free Almond Flour Brownies recipe
Ingredients
-
High-Quality Dark Chocolate: 4 oz (113g), chopped (or high-quality chocolate chips)
-
Unsalted Butter or Coconut Oil: ½ cup (113g)
-
Coconut Sugar or Brown Sugar: 1 cup (200g), packed
-
Large Eggs: 2, at room temperature
-
Pure Vanilla Extract: 2 teaspoons
-
Super-Fine Blanched Almond Flour: 1 cup (96g)
-
Unsweetened Cocoa Powder: ⅓ cup (32g)
-
Salt: ½ teaspoon
-
Optional Chocolate Chips for folding in: ½ cup (90g)
Instructions
-
Preheat and Prepare the Pan: Preheat your oven to 350°F (175°C). Line an 8×8-inch square baking pan with parchment paper, leaving an overhang on two sides to create a “sling.” This will make it incredibly easy to lift the brownies out of the pan after baking. Lightly grease the pan and parchment paper.
-
Melt Chocolate and Fat: In a medium-sized, microwave-safe bowl, combine the 4 oz of chopped dark chocolate and the ½ cup of butter (or coconut oil). Microwave in 30-second increments, stirring well after each one, until the mixture is completely melted and smooth. Be careful not to scorch the chocolate. Alternatively, you can melt them together in a double boiler on the stovetop.
-
Add Sugar and Vanilla: Whisk the 1 cup of coconut sugar or brown sugar into the warm chocolate mixture until it is fully combined. The mixture may look slightly grainy at this point. Whisk in the 2 teaspoons of vanilla extract.
-
Whisk in the Eggs: Add the room temperature eggs to the bowl, one at a time. After adding the eggs, whisk the batter vigorously for a full minute. You will see the batter transform from dull and grainy to glossy, smooth, and slightly thickened. This vigorous whisking is a key step in developing the shiny, crackly crust.
-
Fold in Dry Ingredients: Place a fine-mesh sieve over the bowl and sift in the 1 cup of almond flour, ⅓ cup of cocoa powder, and ½ teaspoon of salt. Sifting prevents lumps and ensures a smooth final texture. Using a spatula, gently fold the dry ingredients into the wet ingredients until just combined. Be careful not to overmix; stop as soon as you no longer see any dry streaks. Overmixing can lead to a tougher brownie.
-
Add Optional Chocolate Chips: If using, gently fold in the ½ cup of extra chocolate chips.
-
Bake to Perfection: Pour the batter into your prepared baking pan and use the spatula to spread it into an even layer. Bake for 25-30 minutes. The key is to not overbake. The brownies are done when the edges are set and a toothpick inserted into the center comes out with moist, fudgy crumbs attached, but not wet batter. If the toothpick comes out clean, they are overbaked.
-
Cool Completely (THE MOST IMPORTANT STEP): Remove the pan from the oven and place it on a wire rack to cool completely. This step is non-negotiable for fudgy brownies. They are very delicate when warm and will finish setting up as they cool. Allowing them to cool in the pan for at least 2 hours (or even placing them in the fridge for an hour after they’ve cooled slightly) will result in a perfectly dense, fudgy texture and clean, neat slices.
-
Slice and Serve: Once completely cooled, use the parchment paper sling to lift the entire block of brownies out of the pan. Place on a cutting board and slice into squares.
Nutrition
- Serving Size: one normal portion
- Calories: 180-220 kcal


