
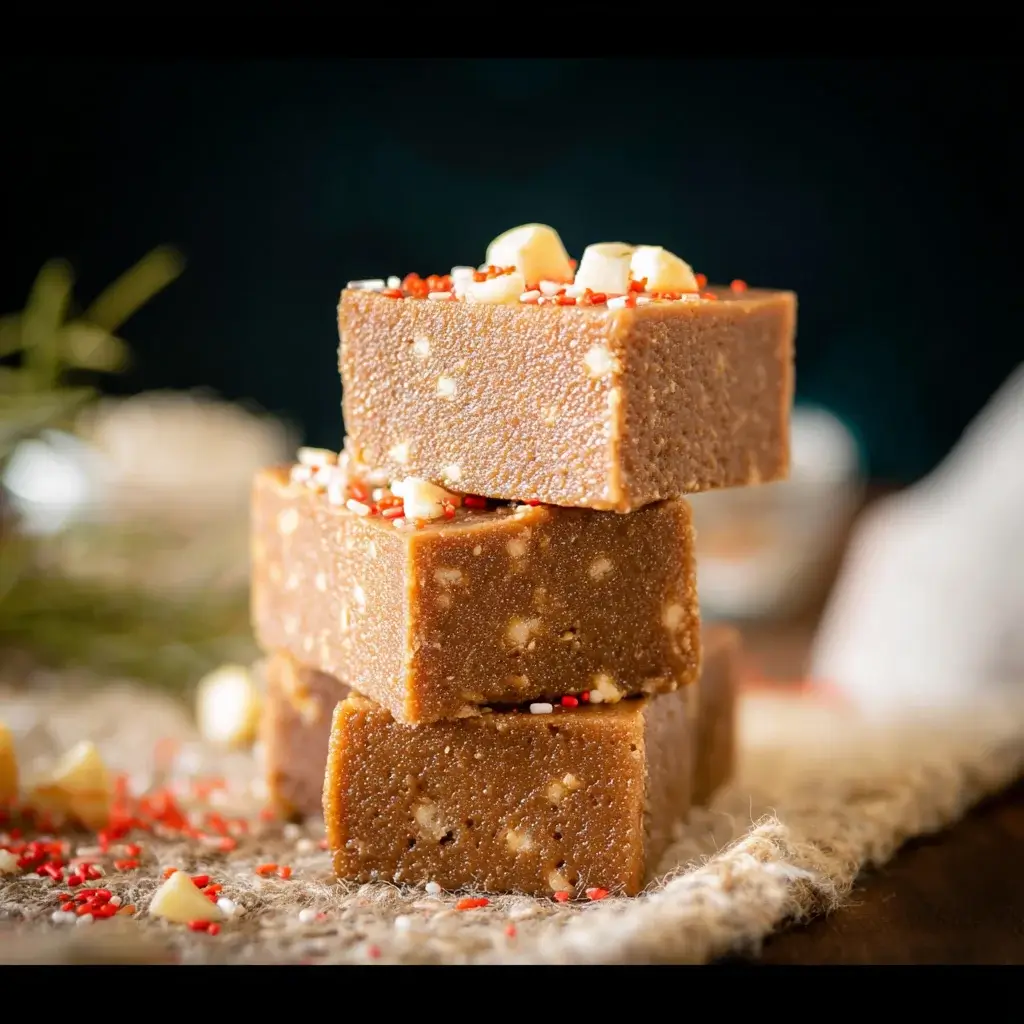

Of all the scents that define the holiday season, the warm, spicy aroma of gingerbread is arguably the most iconic. It’s the smell of nostalgia, of cozy kitchens, and of festive joy. I’ve baked my fair share of gingerbread men and constructed precarious gingerbread houses, but a few years ago, I craved that classic flavor in a new, simpler form. I wanted something rich and decadent, a treat that could be made without hours of rolling and decorating. That’s when I stumbled upon the idea of Gingerbread Fudge. The first batch was a revelation. It was everything I loved about gingerbread—the deep, molasses-rich sweetness, the fiery kick of ginger, the warm embrace of cinnamon and cloves—all captured in a melt-in-your-mouth, creamy square of fudge. It was an instant sensation with my family, disappearing from the Christmas dessert platter faster than any other treat. Now, it’s my go-to recipe for holiday parties and homemade gifts. It looks incredibly impressive, yet it’s one of the easiest no-bake treats you’ll ever make. This isn’t just fudge; it’s the very essence of Christmas, condensed into one perfect, bite-sized confection.
The Ultimate No-Bake Gingerbread Fudge Recipe
This recipe transforms the classic holiday flavor of gingerbread into a ridiculously easy, rich, and creamy fudge. Using white chocolate as a base allows the warm spices and molasses to shine through, creating a beautiful pale caramel color and an unmistakable gingerbread taste. It’s the perfect make-ahead treat for festive gatherings, cookie exchanges, and holiday gifting.
Yields: 64 small (1-inch) squares
Prep time: 15 minutes
Chill time: 4 hours
Total time: 4 hours 15 minutes
Complete Ingredients
For the best results, use high-quality ingredients, as their flavors are front and center in this simple recipe.
- 2 ½ cups (about 15 ounces) good-quality white chocolate chips: Using a reputable brand like Ghirardelli or Guittard will ensure the chocolate melts smoothly and doesn’t become grainy.
- 1 (14-ounce) can full-fat sweetened condensed milk: Do not substitute with evaporated milk; they are not the same and the fudge will not set.
- ¼ cup unsulphured molasses: This is the key to that authentic, deep gingerbread flavor. Do not use blackstrap molasses, which can be too bitter.
- 2 teaspoons ground ginger
- 1 ½ teaspoons ground cinnamon
- ¼ teaspoon ground nutmeg
- ¼ teaspoon ground cloves
- 1 teaspoon pure vanilla extract
- ⅛ teaspoon salt: Just a pinch to balance the sweetness.
- Optional for topping: Coarse sanding sugar, festive sprinkles, or a white chocolate drizzle.
Step-by-Step Instructions
This fudge comes together quickly on the stovetop or in the microwave. Follow these steps for a foolproof, creamy result.
Step 1: Prepare Your Pan
Line an 8×8 inch square baking pan with parchment paper, leaving a 2-inch overhang on two opposite sides. This “parchment sling” is the secret to easily lifting the entire block of fudge out of the pan for clean, perfect cuts later. Lightly grease the parchment paper and the uncovered sides of the pan.
Step 2: Combine and Melt the Base Ingredients
You can use either a stovetop or a microwave for this step.
- Stovetop Method (Recommended): In a medium, heavy-bottomed saucepan, combine the white chocolate chips and the sweetened condensed milk. Place the saucepan over low heat. Stir constantly with a heatproof rubber spatula, scraping the bottom and sides of the pan, until the chocolate is completely melted and the mixture is smooth. This low-and-slow method prevents the chocolate from scorching.
- Microwave Method: In a large, microwave-safe bowl, combine the white chocolate chips and sweetened condensed milk. Microwave on medium power (50%) in 30-second intervals, stirring well with a rubber spatula after each interval. Continue until the chocolate is fully melted and the mixture is smooth. Be careful not to overheat, as white chocolate can seize and become grainy.
Step 3: Add the Gingerbread Flavors
Remove the pan from the heat (or the bowl from the microwave). Immediately add the molasses, ground ginger, cinnamon, nutmeg, cloves, vanilla extract, and salt. Stir vigorously until all the spices and molasses are completely incorporated and the fudge is a uniform color and has a thick, glossy consistency. Work quickly, as the fudge will begin to set.
Step 4: Pour and Spread the Fudge
Pour the fudge mixture into your prepared 8×8 inch pan. Use your spatula to quickly spread it into an even layer, pushing it into the corners.
Step 5: Add Toppings (Optional)
If you are using sprinkles or sanding sugar, sprinkle them evenly over the top of the fudge now, while it is still soft. Gently press them into the surface with your hand so they adhere. If you plan to add a chocolate drizzle, you will do this after the fudge has chilled completely.
Step 6: Chill Until Firm
Place the pan in the refrigerator and chill, uncovered, for at least 4 hours, or until the fudge is completely firm. For best results, let it chill overnight.
Step 7: Cut and Serve
Once the fudge is firm, use the parchment paper overhangs to lift the entire block out of the pan and onto a cutting board. If you are adding a white chocolate drizzle, do so now and let it set. Using a long, sharp knife, cut the fudge into small, 1-inch squares. For the cleanest cuts, run the knife under hot water and wipe it dry between each slice.
The Anatomy of Perfect Gingerbread Fudge
Understanding the science behind these simple ingredients is the key to appreciating why this recipe works so beautifully.
- The Base: White Chocolate: Unlike dark or milk chocolate, white chocolate’s mild, creamy flavor profile doesn’t compete with the bold spices. It acts as a perfect canvas, allowing the ginger, cinnamon, and molasses to be the stars of the show. Its high cocoa butter content is what helps the fudge set up to a firm, yet sliceable, consistency.
- The Creaminess: Sweetened Condensed Milk: This is the magic ingredient in most no-bake fudge recipes. It’s milk that has had most of its water removed and a large amount of sugar added. This high sugar content is what prevents the formation of large sugar crystals, resulting in a fudge that is exceptionally smooth and creamy, rather than grainy. It provides the body and the signature soft texture.
- The Soul: Molasses: You cannot have a true gingerbread flavor without molasses. It provides a deep, slightly smoky, caramel-like sweetness and the characteristic dark color. Using unsulphured molasses is key, as its flavor is cleaner and sweeter than the more bitter blackstrap variety.
- The Spice Blend: The combination of ginger, cinnamon, nutmeg, and cloves is the heart of gingerbread. Ginger provides the fiery warmth, cinnamon adds a sweet and woody note, nutmeg contributes a nutty sweetness, and cloves bring a pungent, almost peppery depth. The balance of these four spices is what creates that complex, unmistakable holiday aroma and taste.
Nutrition Facts
- Servings: 64 small squares
- Calories Per Serving: Approximately 55 kcal
Disclaimer: The nutritional information provided is an estimate based on the ingredients listed. The final caloric content will vary depending on the specific brands of chocolate and condensed milk used, and the final size of your squares.
Preparation Time Breakdown
This recipe is mostly hands-off, making it perfect for busy holiday schedules.
- Active Preparation Time: 15 minutes
- Preparing the pan: 2 minutes
- Melting and mixing ingredients: 8 minutes
- Spreading and topping: 5 minutes
- Passive Chilling Time: 4+ hours
- Total Hands-On Time: Under 20 minutes
How to Serve and Gift Your Gingerbread Fudge
This fudge is as versatile as it is delicious. Here are some of the best ways to present it.
- On a Holiday Dessert Platter:
- Arrange the fudge squares on a platter alongside other holiday cookies like shortbread, Russian tea cakes, and thumbprint cookies. The fudge’s unique color and shape will provide a beautiful contrast.
- Create a “fudge flight” by making another variety (like chocolate peanut butter or peppermint) and arranging them in neat rows.
- As a Beautiful Homemade Gift:
- This fudge makes an incredible and thoughtful gift. Here’s how to package it:
- Festive Tins: Line a holiday tin with wax paper or festive tissue paper and fill it with fudge squares. Separate layers with a piece of wax paper to prevent sticking.
- Cellophane Bags: Fill small, clear cellophane bags with a handful of fudge squares and tie them shut with a festive red or green ribbon. Attach a small gift tag with the ingredients listed for those with allergies.
- Small Gift Boxes: Purchase small candy boxes from a craft store and carefully place a few pieces inside for an elegant, professional-looking gift for teachers, neighbors, or coworkers.
- With a Warm Beverage:
- Serve a square of gingerbread fudge alongside a cup of hot coffee, a creamy latte, or a steaming mug of hot chocolate. The warm drink will slightly melt the fudge, making it even more decadent.
Additional Tips for Fudge-Making Success
These five tips will help you navigate the simple process and ensure your fudge is perfect every single time.
- Low and Slow is the Way to Go: When melting the white chocolate and condensed milk, patience is your best friend. Whether on the stovetop or in the microwave, low heat is essential. High heat can scorch the milk and cause the white chocolate to “seize,” turning it into a lumpy, oily mess that cannot be saved.
- Don’t Substitute the Key Ingredients: This recipe’s chemistry relies on full-fat sweetened condensed milk and good-quality white chocolate. Using evaporated milk, low-fat condensed milk, or low-quality chocolate “melts” will likely result in fudge that is either greasy or fails to set up properly.
- Use a “Parchment Sling”: The trick of leaving parchment paper overhanging the sides of the pan cannot be overstated. It is the single best way to remove the fudge cleanly without having to dig it out with a knife, which can ruin the edges of your beautiful creation.
- Work Quickly After Removing from Heat: Once you remove the chocolate mixture from the heat, the setting process begins almost immediately. Have all your flavorings (molasses, spices, vanilla) measured and ready to go so you can stir them in quickly and get the fudge into the pan before it becomes too stiff to spread easily.
- The Secret to Perfect Squares: For ultra-clean cuts, use a large, non-serrated chef’s knife. Fill a tall glass with hot water. Dip the knife into the water, wipe it completely dry with a paper towel, and make one long, clean cut. Repeat this process for every single cut. It’s a bit tedious, but it’s the professional secret to fudge that looks like it came from a candy shop.
Frequently Asked Questions (FAQ)
1. My fudge is grainy. What did I do wrong?
Graininess in this type of fudge is almost always caused by overheating the white chocolate. If the chocolate gets too hot too quickly, the cocoa butter can separate from the solids, creating a grainy texture. This is why the low-and-slow melting method is so important.
2. Can I use a different kind of chocolate?
You can, but it will create a very different fudge. Using semi-sweet or milk chocolate will result in a traditional chocolate fudge with gingerbread spices. It will be delicious, but you will lose the distinct “creamy gingerbread” flavor and the beautiful light caramel color, as the chocolate flavor will dominate the more delicate spices.
3. How should I store Gingerbread Fudge?
Store the fudge in an airtight container. It can be kept at room temperature for up to one week or in the refrigerator for up to three weeks. If storing in the fridge, place layers of wax paper between the squares to prevent them from sticking together. Note that refrigerated fudge will be much harder, so you may want to let it sit at room temperature for 15-20 minutes before serving.
4. Can I freeze this fudge?
Yes, this fudge freezes beautifully, making it an excellent make-ahead holiday treat. Cut the fudge into squares first. Wrap the entire block or individual squares tightly in plastic wrap, and then place them in a freezer-safe zip-top bag or airtight container. It will keep well in the freezer for up to 3 months. Thaw it in the refrigerator or at room temperature before serving.
5. Can I double this recipe?
Absolutely. To double the recipe, simply double all the ingredients and pour the fudge into a 9×13 inch baking pan instead of an 8×8 inch pan. The preparation process is identical. Note that it may take slightly longer to chill and set up completely due to the larger volume.
Gingerbread Fudge Recipe
Ingredients
-
2 ½ cups (about 15 ounces) good-quality white chocolate chips: Using a reputable brand like Ghirardelli or Guittard will ensure the chocolate melts smoothly and doesn’t become grainy.
-
1 (14-ounce) can full-fat sweetened condensed milk: Do not substitute with evaporated milk; they are not the same and the fudge will not set.
-
¼ cup unsulphured molasses: This is the key to that authentic, deep gingerbread flavor. Do not use blackstrap molasses, which can be too bitter.
-
2 teaspoons ground ginger
-
1 ½ teaspoons ground cinnamon
-
¼ teaspoon ground nutmeg
-
¼ teaspoon ground cloves
-
1 teaspoon pure vanilla extract
-
⅛ teaspoon salt: Just a pinch to balance the sweetness.
-
Optional for topping: Coarse sanding sugar, festive sprinkles, or a white chocolate drizzle.
Instructions
Step 1: Prepare Your Pan
Line an 8×8 inch square baking pan with parchment paper, leaving a 2-inch overhang on two opposite sides. This “parchment sling” is the secret to easily lifting the entire block of fudge out of the pan for clean, perfect cuts later. Lightly grease the parchment paper and the uncovered sides of the pan.
Step 2: Combine and Melt the Base Ingredients
You can use either a stovetop or a microwave for this step.
-
Stovetop Method (Recommended): In a medium, heavy-bottomed saucepan, combine the white chocolate chips and the sweetened condensed milk. Place the saucepan over low heat. Stir constantly with a heatproof rubber spatula, scraping the bottom and sides of the pan, until the chocolate is completely melted and the mixture is smooth. This low-and-slow method prevents the chocolate from scorching.
-
Microwave Method: In a large, microwave-safe bowl, combine the white chocolate chips and sweetened condensed milk. Microwave on medium power (50%) in 30-second intervals, stirring well with a rubber spatula after each interval. Continue until the chocolate is fully melted and the mixture is smooth. Be careful not to overheat, as white chocolate can seize and become grainy.
Step 3: Add the Gingerbread Flavors
Remove the pan from the heat (or the bowl from the microwave). Immediately add the molasses, ground ginger, cinnamon, nutmeg, cloves, vanilla extract, and salt. Stir vigorously until all the spices and molasses are completely incorporated and the fudge is a uniform color and has a thick, glossy consistency. Work quickly, as the fudge will begin to set.
Step 4: Pour and Spread the Fudge
Pour the fudge mixture into your prepared 8×8 inch pan. Use your spatula to quickly spread it into an even layer, pushing it into the corners.
Step 5: Add Toppings (Optional)
If you are using sprinkles or sanding sugar, sprinkle them evenly over the top of the fudge now, while it is still soft. Gently press them into the surface with your hand so they adhere. If you plan to add a chocolate drizzle, you will do this after the fudge has chilled completely.
Step 6: Chill Until Firm
Place the pan in the refrigerator and chill, uncovered, for at least 4 hours, or until the fudge is completely firm. For best results, let it chill overnight.
Step 7: Cut and Serve
Once the fudge is firm, use the parchment paper overhangs to lift the entire block out of the pan and onto a cutting board. If you are adding a white chocolate drizzle, do so now and let it set. Using a long, sharp knife, cut the fudge into small, 1-inch squares. For the cleanest cuts, run the knife under hot water and wipe it dry between each slice.
Nutrition
- Serving Size: one normal portion
- Calories: 55 kcal


