
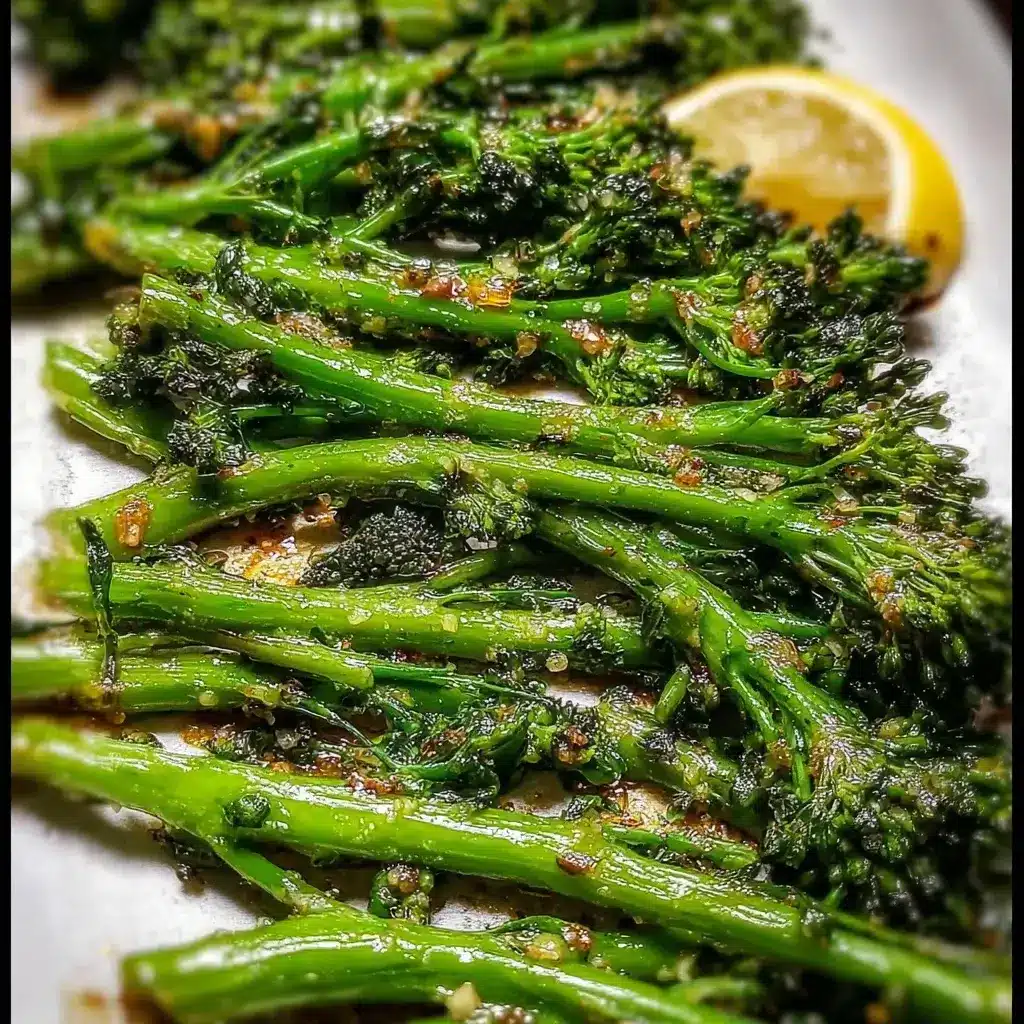

For years, I was stuck in a vegetable rut. My side dishes were a monotonous rotation of steamed broccoli, simple salads, and the occasional glazed carrot. They were fine, but they were never the star of the plate; they were an obligation, the healthy thing I had to eat before getting to the good stuff. Then, on a whim at the grocery store, I picked up a bunch of broccolini. It looked like a more elegant, delicate version of broccoli, and I figured I’d give it a try. I took it home, tossed it with a generous amount of olive oil, sliced garlic, and a pinch of chili flakes, and roasted it at high heat. The transformation that happened in the oven was nothing short of miraculous. The florets became crispy and deeply caramelized, the stems turned tender-crisp with a sweet, nutty flavor, and the garlic became fragrant and golden. That night, for the first time ever, my family fought over the last of the vegetables. This Garlic Roasted Broccolini wasn’t just a side dish; it was an event. It has since become the most requested, most versatile, and most foolproof recipe in my entire repertoire, effortlessly elevating a simple weeknight chicken dinner and standing proudly on our holiday table.
Why This Garlic Roasted Broccolini is a Culinary Game-Changer
In the vast world of side dishes, few recipes deliver such a high reward for such minimal effort. This Garlic Roasted Broccolini isn’t just another way to eat your greens; it’s a fundamental technique that transforms a humble vegetable into something truly special. If you’re looking for a recipe to add to your permanent collection, here’s why this is the one:
- Effortless Elegance: Broccolini’s long, slender stems and delicate florets give it a sophisticated appearance that instantly elevates any meal. It looks like something you’d be served at a high-end restaurant, yet it requires less work than making mashed potatoes. It’s the perfect side dish for impressing guests or simply making a Tuesday night dinner feel a little more special.
- The Magic of Roasting: This recipe showcases the transformative power of high-heat roasting. While boiling or steaming can often leave vegetables watery and bland, roasting concentrates their natural sugars, resulting in a deep, caramelized, nutty, and slightly sweet flavor profile. The textural contrast between the tender-crisp stems and the crunchy, charred florets is simply irresistible.
- Incredible Speed and Simplicity: With only five minutes of active prep time and about twenty minutes in the oven, this dish is a weeknight warrior. It requires just a handful of pantry staples and a single baking sheet, making both the cooking and the cleanup an absolute breeze. It’s the ideal solution for when you need a delicious and healthy side dish without any fuss.
- A Nutritional Powerhouse: Don’t let its delicious taste fool you; this dish is incredibly good for you. Broccolini is packed with essential nutrients, including vitamins C, K, and A, as well as folate and fiber. It’s a low-calorie, low-carb side dish that fits seamlessly into a wide range of healthy eating plans, from Mediterranean to Paleo.
- Supreme Versatility: This Garlic Roasted Broccolini is the chameleon of the culinary world. Its savory, slightly spicy flavor profile allows it to pair beautifully with an almost endless variety of main courses. It’s just as at home alongside a perfectly grilled steak as it is with a delicate piece of baked salmon, a hearty bowl of pasta, or a simple roasted chicken.
The Perfect Ingredients for Flawless Roasted Broccolini
The beauty of this recipe lies in its simplicity. It relies on a few high-quality ingredients to create a symphony of flavor. Each component plays a crucial role in the final dish.
Core Components:
- Broccolini: 2 large bunches (about 1 to 1.5 lbs / 450-680g). This is the star of the show. Look for bunches with vibrant green florets, firm stems, and no yellowing.
- Extra Virgin Olive Oil: 3 tablespoons. Don’t skimp here. A good quality olive oil will impart a fruity, peppery flavor that complements the vegetable beautifully. It’s also essential for achieving that perfect roast and crispiness.
- Garlic: 4 to 5 large cloves, thinly sliced. Slicing the garlic, rather than mincing it, is a critical technique. Thin slices will toast to a golden, nutty perfection without burning and turning bitter in the high heat of the oven.
- Kosher Salt: ¾ teaspoon. The larger crystals of Kosher salt adhere better to the broccolini and provide a cleaner flavor than table salt.
- Freshly Ground Black Pepper: ½ teaspoon. Freshly cracked pepper provides a pungent, woody spice that pre-ground pepper simply cannot match.
The Flavor Finishers:
- Red Pepper Flakes: ¼ to ½ teaspoon, depending on your heat preference. This adds a subtle, warm background heat that cuts through the richness of the olive oil and brightens the overall flavor profile without being overtly spicy.
- Fresh Lemon: 1, cut into wedges for serving. A final squeeze of fresh lemon juice is the secret weapon. Its bright acidity awakens all the other flavors and makes the entire dish taste more vibrant and fresh.
Optional Addition for Richness:
- Freshly Grated Parmesan Cheese: ¼ cup, for sprinkling after roasting. This adds a salty, nutty, umami-rich layer that takes the dish to a new level of indulgence.
Step-by-Step Instructions for Perfect Garlic Roasted Broccolini
Follow these simple, detailed steps to ensure your broccolini comes out perfectly tender-crisp, flavorful, and beautifully caramelized every single time.
Step 1: Preheat the Oven and the Pan
Position a rack in the center of your oven and preheat it to 425°F (220°C). Placing your baking sheet in the oven while it preheats is a pro-tip. A hot pan will give the broccolini a jump-start on caramelizing the second it makes contact, helping to create a better texture.
Step 2: Prepare the Broccolini
While the oven heats, prepare your broccolini. Rinse the bunches thoroughly under cool water. Next, and this is the most critical step for achieving a crispy result, dry the broccolini completely. Use a salad spinner or pat it thoroughly dry with clean kitchen towels or paper towels. Any excess water will create steam in the oven, preventing the broccolini from roasting and turning it soggy. Trim about an inch off the tough, woody bottom ends of the stems. If any of the stalks are particularly thick (thicker than your pinky finger), slice them in half lengthwise to ensure they cook at the same rate as the thinner stalks.
Step 3: Season Generously
Remove the hot baking sheet from the oven. Place the dry, trimmed broccolini directly onto the pan. Drizzle generously with the 3 tablespoons of extra virgin olive oil. Sprinkle the thinly sliced garlic, red pepper flakes, Kosher salt, and freshly ground black pepper evenly over the top.
Step 4: Toss to Coat
Using your hands or a pair of tongs, toss everything together right on the baking sheet. Be thorough and make sure every single stalk and floret is lightly coated in the oil and seasonings. This ensures even cooking and flavor in every bite.
Step 5: Roast to Perfection
Arrange the seasoned broccolini in a single, even layer on the baking sheet. It is crucial that you do not overcrowd the pan. The stalks need space for the hot air to circulate around them. If they are piled on top of each other, they will steam instead of roast. If necessary, use two baking sheets. Roast for 15 to 20 minutes, flipping the stalks halfway through the cooking time. The broccolini is done when the stems are tender-crisp (easily pierced with a fork) and the florets are deeply browned and crispy at the edges. A little bit of char is desirable—that’s where the flavor is!
Step 6: The Finishing Touch
Remove the baking sheet from the oven. Immediately squeeze the juice from half a lemon over the hot broccolini. You should hear a satisfying sizzle. Toss gently to coat. If you are using Parmesan cheese, now is the time to sprinkle it over the top. The residual heat will melt it slightly. Transfer the Garlic Roasted Broccolini to a serving platter and serve immediately while it’s hot and crispy.
Essential Recipe Information
Here’s a quick overview of the time and nutritional estimates for this simple side dish.
Preparation and Cook Time
- Preparation Time: 5 minutes
- Cook Time: 20 minutes
- Total Time: 25 minutes
Nutrition Facts
- Servings: 4
- Calories Per Serving: Approximately 150 kcal (This estimate does not include optional Parmesan cheese)
Disclaimer: Nutritional information is provided as a courtesy and is an estimate only. It can vary based on the specific ingredients and brands used.
How to Serve Your Garlic Roasted Broccolini
While this dish is spectacular enough to be eaten straight from the pan, its true strength lies in its versatility. Here are some fantastic ways to serve it:
- As the Perfect Sidekick to Any Protein:
- Serve alongside a simple roasted chicken for a classic and comforting meal.
- Pair it with a perfectly grilled steak or pork chop; the slight bitterness of the char on the broccolini cuts through the richness of the meat.
- Its bright, lemony flavor makes it an ideal companion for delicate fish like pan-seared salmon, cod, or halibut.
- As a Component in Main Dishes:
- Roughly chop the roasted broccolini and toss it with your favorite pasta, a little extra olive oil, and more Parmesan for a simple and elegant pasta dish.
- Use it as a base for a hearty grain bowl, adding quinoa, chickpeas, a soft-boiled egg, and a tahini dressing.
- Fold it into a frittata or omelet for a delicious, vegetable-packed breakfast or brunch.
- It makes a fantastic gourmet pizza topping, especially when paired with Italian sausage and ricotta cheese.
- With Added Toppings and Sauces:
- Drizzle with a high-quality balsamic glaze for a touch of sweet and tangy complexity.
- Top with a sprinkle of toasted pine nuts, slivered almonds, or crunchy breadcrumbs for added texture.
- Serve with a creamy dip on the side, such as a lemon-dill yogurt sauce, a garlic aioli, or a vibrant romesco sauce.
5 Pro-Tips for the Best Roasted Broccolini of Your Life
Master this simple dish by keeping these five key tips in mind. They make the difference between good broccolini and truly unforgettable broccolini.
- Dryness is Next to Godliness: This cannot be overstated. Water is the enemy of a crispy roast. After washing, take the extra two minutes to ensure your broccolini is bone dry. A wet vegetable will steam in the oven, resulting in a limp, drab, and soggy texture. A dry vegetable will roast, allowing its surface to make direct contact with the hot oil and air, creating that coveted crispy char.
- Give it Space (Don’t Crowd the Pan): Roasting is a dry-heat cooking method that relies on the circulation of hot air. When you pile vegetables on top of each other, you trap moisture and create steam. Spread your broccolini in a single, even layer with a little breathing room between the stalks. If your baking sheet looks crowded, it is. Grab a second one. It’s better to wash two pans than to eat one pan of mushy vegetables.
- Embrace the High Heat: Roasting vegetables is not a low-and-slow affair. A hot oven (425°F / 220°C) is essential. This high temperature cooks the broccolini quickly, allowing the exterior to caramelize and crisp up while the interior steams just enough to become tender-crisp. Too low a temperature will cause the vegetable to slowly lose moisture and become limp and dehydrated before it ever gets a chance to brown.
- Slice, Don’t Mince, Your Garlic: If you use minced or pressed garlic, its tiny pieces will have too much surface area exposed to the intense heat and will burn almost instantly, lending a bitter, acrid taste to the entire dish. By thinly slicing the garlic, you create larger, flatter pieces that can withstand the heat. They will toast to a beautiful golden brown, becoming sweet, nutty, and wonderfully aromatic.
- Finish with Acid and Fat: The final squeeze of fresh lemon juice is not just a garnish; it’s a critical flavor component. The bright acidity cuts through the richness of the olive oil and salt, awakening the palate and making all the flavors pop. Adding it at the very end, off the heat, preserves its fresh, vibrant taste. A final, high-quality finishing olive oil can also be drizzled on top for an extra layer of flavor.
Frequently Asked Questions (FAQ)
Here are the answers to some of the most common questions about cooking this delicious Garlic Roasted Broccolini.
1. What is the difference between broccoli and broccolini?
While they look similar, they are different vegetables. Broccoli has thick, tough stalks and large, tightly packed florets. Broccolini is a hybrid of broccoli and Chinese broccoli (Gai Lan). It has long, thin, tender stems and smaller, more delicate florets. Flavor-wise, broccolini is milder, sweeter, and less bitter than its more common cousin. The best part is that the entire stem is edible and delicious, so there is very little waste.
2. Can I use regular broccoli for this recipe instead?
Yes, you can absolutely use this method with regular broccoli. You will need to make a few adjustments. Cut the broccoli into medium-sized florets, keeping about an inch or two of the stem attached. The cooking time may be slightly shorter, so start checking for doneness around the 15-minute mark. The flavor will be more robust and distinctly “broccoli-like” compared to the milder broccolini.
3. How do I store and reheat leftovers for the best results?
Store any leftover roasted broccolini in an airtight container in the refrigerator for up to 3 days. While you can use a microwave, it will unfortunately make the broccolini soft and compromise its crispy texture. For the best results, reheat it in a hot oven or a toaster oven at 400°F (200°C) for 5-7 minutes, or in an air fryer for 3-4 minutes, until it’s heated through and has regained some of its crispness.
4. Why did my broccolini turn out mushy and soggy instead of crispy?
Soggy broccolini is almost always the result of one of three common mistakes. First, the broccolini was not dried thoroughly after washing. Second, the pan was overcrowded, which caused the vegetable to steam rather than roast. Third, the oven temperature was too low, cooking it too slowly and causing it to lose its structure before it could brown.
5. Can I prepare this dish ahead of time for a party or holiday?
While it’s best served fresh from the oven, you can certainly do the prep work in advance to save time. You can wash, thoroughly dry, and trim the broccolini and slice the garlic up to a day ahead. Store the prepared broccolini in a sealed bag with a paper towel to absorb any moisture, and keep the sliced garlic in a small airtight container in the refrigerator. When you’re ready to cook, simply toss everything together on the pan and roast as directed.

Garlic Roasted Broccolini recipe
Ingredients
Core Components:
-
Broccolini: 2 large bunches (about 1 to 1.5 lbs / 450-680g). This is the star of the show. Look for bunches with vibrant green florets, firm stems, and no yellowing.
-
Extra Virgin Olive Oil: 3 tablespoons. Don’t skimp here. A good quality olive oil will impart a fruity, peppery flavor that complements the vegetable beautifully. It’s also essential for achieving that perfect roast and crispiness.
-
Garlic: 4 to 5 large cloves, thinly sliced. Slicing the garlic, rather than mincing it, is a critical technique. Thin slices will toast to a golden, nutty perfection without burning and turning bitter in the high heat of the oven.
-
Kosher Salt: ¾ teaspoon. The larger crystals of Kosher salt adhere better to the broccolini and provide a cleaner flavor than table salt.
-
Freshly Ground Black Pepper: ½ teaspoon. Freshly cracked pepper provides a pungent, woody spice that pre-ground pepper simply cannot match.
The Flavor Finishers:
-
Red Pepper Flakes: ¼ to ½ teaspoon, depending on your heat preference. This adds a subtle, warm background heat that cuts through the richness of the olive oil and brightens the overall flavor profile without being overtly spicy.
-
Fresh Lemon: 1, cut into wedges for serving. A final squeeze of fresh lemon juice is the secret weapon. Its bright acidity awakens all the other flavors and makes the entire dish taste more vibrant and fresh.
Optional Addition for Richness:
-
Freshly Grated Parmesan Cheese: ¼ cup, for sprinkling after roasting. This adds a salty, nutty, umami-rich layer that takes the dish to a new level of indulgence.
Instructions
Step 1: Preheat the Oven and the Pan
Position a rack in the center of your oven and preheat it to 425°F (220°C). Placing your baking sheet in the oven while it preheats is a pro-tip. A hot pan will give the broccolini a jump-start on caramelizing the second it makes contact, helping to create a better texture.
Step 2: Prepare the Broccolini
While the oven heats, prepare your broccolini. Rinse the bunches thoroughly under cool water. Next, and this is the most critical step for achieving a crispy result, dry the broccolini completely. Use a salad spinner or pat it thoroughly dry with clean kitchen towels or paper towels. Any excess water will create steam in the oven, preventing the broccolini from roasting and turning it soggy. Trim about an inch off the tough, woody bottom ends of the stems. If any of the stalks are particularly thick (thicker than your pinky finger), slice them in half lengthwise to ensure they cook at the same rate as the thinner stalks.
Step 3: Season Generously
Remove the hot baking sheet from the oven. Place the dry, trimmed broccolini directly onto the pan. Drizzle generously with the 3 tablespoons of extra virgin olive oil. Sprinkle the thinly sliced garlic, red pepper flakes, Kosher salt, and freshly ground black pepper evenly over the top.
Step 4: Toss to Coat
Using your hands or a pair of tongs, toss everything together right on the baking sheet. Be thorough and make sure every single stalk and floret is lightly coated in the oil and seasonings. This ensures even cooking and flavor in every bite.
Step 5: Roast to Perfection
Arrange the seasoned broccolini in a single, even layer on the baking sheet. It is crucial that you do not overcrowd the pan. The stalks need space for the hot air to circulate around them. If they are piled on top of each other, they will steam instead of roast. If necessary, use two baking sheets. Roast for 15 to 20 minutes, flipping the stalks halfway through the cooking time. The broccolini is done when the stems are tender-crisp (easily pierced with a fork) and the florets are deeply browned and crispy at the edges. A little bit of char is desirable—that’s where the flavor is!
Step 6: The Finishing Touch
Remove the baking sheet from the oven. Immediately squeeze the juice from half a lemon over the hot broccolini. You should hear a satisfying sizzle. Toss gently to coat. If you are using Parmesan cheese, now is the time to sprinkle it over the top. The residual heat will melt it slightly. Transfer the Garlic Roasted Broccolini to a serving platter and serve immediately while it’s hot and crispy.
Nutrition
- Serving Size: one normal portion
- Calories: 150


