

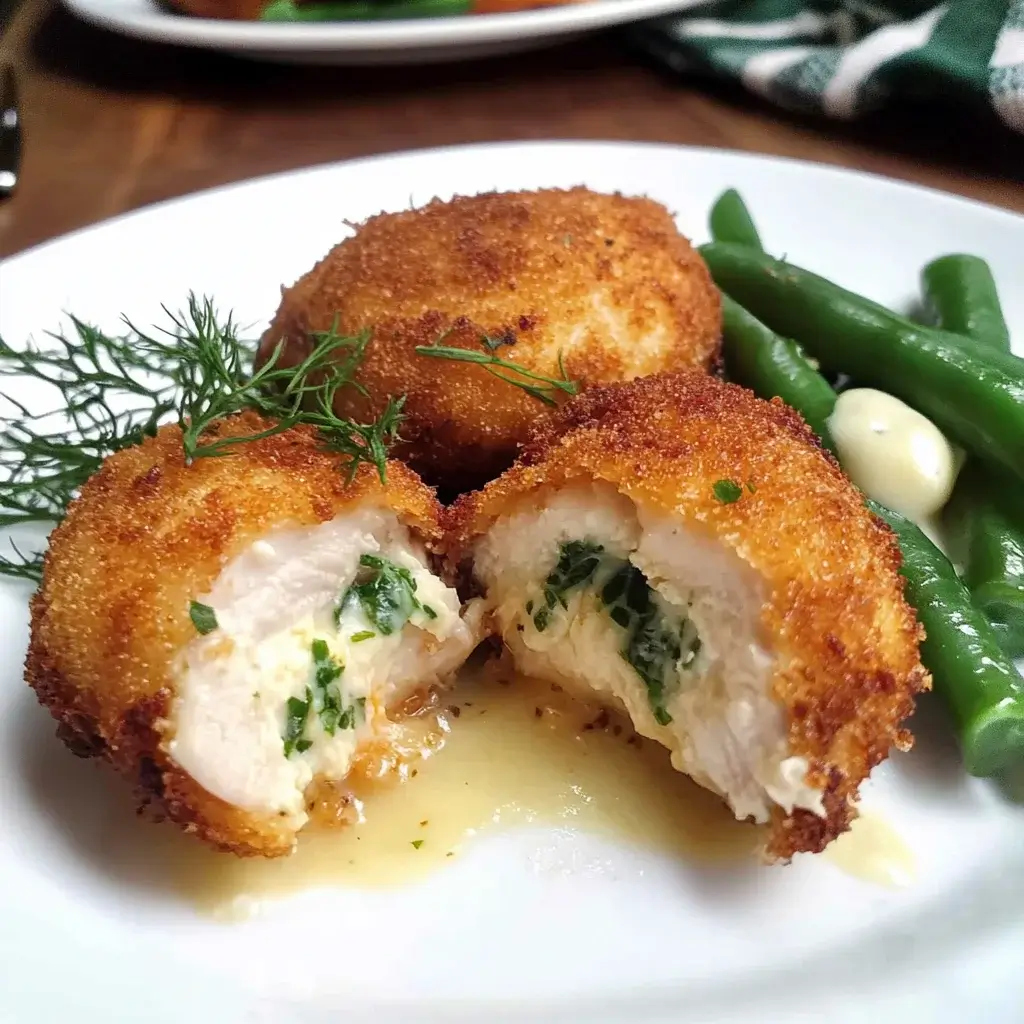

There are dishes that simply exude elegance, and for me, Chicken Kiev tops that list. It’s not just a meal; it’s an experience. I remember the first time I tasted a truly well-made Chicken Kiev – the anticipation as I cut into the golden-brown crust, the rush of fragrant herb butter cascading onto my plate, and the tender, juicy chicken underneath. It was a revelation! Recently, I decided to try my hand at making this classic at home, wanting to bring that touch of restaurant sophistication to our family dinner. While it might seem a bit involved, breaking down the steps made it surprisingly manageable and incredibly rewarding. The aroma that filled my kitchen as these beauties baked was intoxicating, and the moment of cutting into them at the table was met with gasps of delight. My family declared it a resounding success, elevating our weeknight dinner to a special occasion. This Elegant Chicken Kiev recipe is not just about cooking; it’s about creating a moment of culinary magic, and I’m thrilled to guide you through the process so you can bring this classic to your own table. Get ready to impress yourself and your loved ones!
Ingredients for Exquisite Chicken Kiev
Creating truly elegant Chicken Kiev hinges on the quality and freshness of your ingredients. While the list isn’t extensive, each component plays a vital role in achieving that classic flavor and texture. Here’s a detailed breakdown of what you’ll need to gather to embark on this culinary journey:
For the Chicken Kiev:
- 4 Boneless, Skinless Chicken Breasts (about 6-8 ounces each): Opt for high-quality, plump chicken breasts. Evenly sized breasts will cook more uniformly. Look for breasts that are not excessively thick, as this will make pounding and shaping easier.
- 1 cup (2 sticks) Unsalted Butter, very cold: Cold butter is absolutely crucial for Chicken Kiev. It’s what creates the flavorful, molten butter center. Use unsalted butter to control the overall saltiness of the dish. Make sure it’s thoroughly chilled and firm before starting.
- ¼ cup Fresh Parsley, finely chopped: Fresh parsley adds a bright, herbaceous note to the herb butter. Flat-leaf parsley (Italian parsley) is preferred for its robust flavor, but curly parsley can also be used. Ensure it is finely chopped to evenly distribute in the butter.
- 2 tablespoons Fresh Chives, finely chopped: Fresh chives contribute a delicate oniony flavor that complements the parsley and butter. Like parsley, finely chop the chives for even distribution.
- 1 clove Garlic, minced (optional): A small amount of minced garlic can add a subtle savory depth to the herb butter. If you prefer a more classic, herb-forward flavor, you can omit the garlic. Mince it finely if using to avoid overpowering the other flavors.
- ½ teaspoon Salt: Salt is essential for seasoning both the butter and the chicken. It enhances the flavors and balances the richness.
- ¼ teaspoon Black Pepper: Freshly ground black pepper adds a subtle spice and depth of flavor.
For the Breading:
- ½ cup All-Purpose Flour: Flour is the first layer of the breading, helping the egg wash adhere and creating a base for the breadcrumbs.
- 2 Large Eggs, lightly beaten: Eggs create a binding layer between the flour and breadcrumbs, ensuring the breading sticks properly and becomes golden and crispy. Lightly beat the eggs with a fork until yolks and whites are just combined.
- 1 ½ cups Panko Breadcrumbs: Panko breadcrumbs are Japanese-style breadcrumbs that are coarser and lighter than regular breadcrumbs. They create a wonderfully crispy and light coating. If panko is unavailable, you can use regular breadcrumbs, but panko is highly recommended for the best texture.
- ½ teaspoon Salt: Adding salt to the breadcrumbs seasons the breading and enhances the overall flavor.
- ¼ teaspoon Black Pepper: A touch of black pepper in the breadcrumbs adds another layer of flavor.
For Cooking:
- Vegetable Oil or Olive Oil (for grilling or baking sheet): A small amount of oil is needed to prevent sticking when grilling or baking. Vegetable oil or olive oil works well.
Step-by-Step Instructions for Classic Chicken Kiev
Making Elegant Chicken Kiev might seem like a culinary challenge, but by breaking it down into manageable steps and following these detailed instructions, you’ll find it’s a rewarding and achievable dish to create at home.
Step 1: Prepare the Herb Butter
- Soften Butter Slightly: If your butter is rock-hard from the refrigerator, let it sit at room temperature for just 5-10 minutes to soften slightly. It should still be very cold but pliable enough to work with. Do not let it get too soft or melted.
- Combine Ingredients: In a small bowl, combine the softened (but still cold) butter, finely chopped fresh parsley, finely chopped fresh chives, minced garlic (if using), salt, and black pepper.
- Mix Thoroughly: Use a fork or a small spatula to thoroughly mix all the ingredients together until they are evenly incorporated into the butter.
- Shape Butter Patties: Divide the herb butter into 4 equal portions. On a piece of parchment paper or plastic wrap, shape each portion into a small log or rectangle, about 2-3 inches long and ½ inch thick.
- Chill Herb Butter: Wrap each butter patty tightly in parchment paper or plastic wrap. Place them on a plate or small tray and freeze them for at least 30 minutes, or until they are very firm and solid. This freezing step is crucial to ensure the butter stays inside the chicken during cooking and melts beautifully when served.
Step 2: Prepare the Chicken Breasts
- Pound Chicken Breasts: Place one chicken breast at a time between two sheets of plastic wrap or parchment paper. Using a meat mallet or rolling pin, gently pound the chicken breast to an even thickness of about ¼-inch to ½-inch. Start from the thicker part of the breast and work outwards, being careful not to tear the chicken. The goal is to create a larger, thinner piece of chicken that can be easily rolled around the herb butter. Repeat with the remaining chicken breasts.
- Season Chicken: Lightly season both sides of each pounded chicken breast with salt and pepper.
Step 3: Assemble the Chicken Kiev
- Place Herb Butter: Remove the frozen herb butter patties from the freezer. Place one frozen herb butter patty in the center of each pounded chicken breast.
- Wrap and Secure: Carefully fold the sides of the chicken breast over the herb butter patty, tucking in the edges to completely enclose the butter. Roll the chicken breast up tightly, starting from one end and rolling towards the other, creating a neat, oblong shape. Ensure the butter is completely sealed inside the chicken to prevent leakage during cooking.
- Chill Assembled Kiev: Place the assembled Chicken Kiev seam-side down on a plate lined with parchment paper or plastic wrap. Cover loosely with plastic wrap and refrigerate for at least 30 minutes, or up to 1 hour. This chilling step is essential to help the chicken hold its shape and prevent the butter from melting out too quickly during breading and cooking.
Step 4: Breading the Chicken Kiev
- Set Up Breading Station: Prepare three shallow dishes or plates. In the first dish, place the all-purpose flour. In the second dish, place the lightly beaten eggs. In the third dish, combine the panko breadcrumbs, salt, and black pepper.
- First Flour Dredge: Remove the chilled Chicken Kiev from the refrigerator. Dredge each Kiev in the flour, ensuring it is evenly coated on all sides. Shake off any excess flour.
- Egg Wash Dip: Dip each flour-coated Kiev into the beaten eggs, making sure it is fully submerged and coated in egg wash. Let any excess egg drip off.
- Panko Breadcrumb Coating: Dredge each egg-washed Kiev in the panko breadcrumbs, pressing gently to ensure the breadcrumbs adhere well to all sides, creating a thick and even coating.
- Second Egg Wash and Breadcrumbs (Optional, for extra crispy coating): For an extra crispy and secure breading, you can repeat the egg wash and breadcrumb steps. Dip the panko-coated Kiev back into the egg wash and then back into the panko breadcrumbs for a double layer of breading. This is highly recommended, especially if grilling.
- Chill Breaded Kiev: Place the breaded Chicken Kiev back on the parchment-lined plate. Cover loosely and refrigerate for another 30 minutes to 1 hour. This second chilling step helps the breading set and adhere even more firmly, further reducing the risk of butter leakage and ensuring a crispy crust.
Step 5: Cooking the Chicken Kiev – Grilling or Baking Options
Grilling Method (for a smoky flavor and crispy crust):
- Preheat Grill: Preheat your grill to medium heat (about 350-400°F or 175-200°C). Lightly oil the grill grates.
- Grill Chicken Kiev: Place the breaded Chicken Kiev on the preheated grill grates.
- Grill and Rotate: Grill for about 6-8 minutes per side, rotating occasionally to ensure even cooking and browning. The goal is to achieve a golden brown and crispy crust and ensure the chicken is cooked through.
- Check for Doneness: Chicken Kiev is done when the internal temperature reaches 165°F (74°C) in the thickest part of the chicken (avoid piercing into the butter center when checking temperature). The breading should be golden brown and crispy.
- Rest Before Serving: Remove the grilled Chicken Kiev from the grill and let it rest for 5-10 minutes before serving. This allows the juices to redistribute and the butter center to become perfectly molten.
Baking Method (for a more controlled and even cooking):
- Preheat Oven: Preheat your oven to 400°F (200°C). Lightly oil a baking sheet or line it with parchment paper.
- Bake Chicken Kiev: Place the breaded Chicken Kiev on the prepared baking sheet.
- Bake: Bake for 25-30 minutes, or until the internal temperature reaches 165°F (74°C) in the thickest part of the chicken (avoid piercing into the butter center when checking temperature). The breading should be golden brown and crispy.
- Broil for Extra Crispness (Optional): For extra crispy breading, you can broil the Kiev for the last 1-2 minutes of baking, watching carefully to prevent burning.
- Rest Before Serving: Remove the baked Chicken Kiev from the oven and let it rest for 5-10 minutes before serving.
Step 6: Serve and Enjoy Immediately!
- Serve Hot: Chicken Kiev is best served immediately while it’s hot and the herb butter center is molten and flowing.
- Cut and Serve: To serve, carefully cut into the Chicken Kiev with a sharp knife. The herb butter should ooze out beautifully.
- Garnish (Optional): Garnish with fresh parsley sprigs or lemon wedges, if desired.
Nutrition Facts for Elegant Chicken Kiev
Understanding the nutritional content can help you enjoy Chicken Kiev as part of a balanced diet. Please note that these are approximate values and can vary based on ingredient brands, portion sizes, and cooking method.
- Servings: This recipe yields 4 servings (4 Chicken Kiev).
- Serving Size: 1 Chicken Kiev
Approximate Nutrition Information per Serving (1 Chicken Kiev, grilled or baked):
- Calories: 600-700 kcal
- Protein: 40-50g
- Fat: 40-50g
- Saturated Fat: 25-30g (primarily from butter)
- Carbohydrates: 20-25g
- Sugar: 2-3g (naturally occurring)
- Fiber: 1-2g
- Sodium: 500-700mg
Important Notes:
- These values are estimates. For precise nutritional information, use online nutrition calculators and input the specific brands and quantities of ingredients you use, and account for your cooking method (grilling or baking).
- Chicken Kiev is a relatively calorie-dense and fat-rich dish due to the butter and breading. Enjoy it in moderation as part of a balanced diet.
- You can slightly reduce the fat content by using less butter in the herb butter filling or by using a lighter breading (though this may affect the authentic texture and flavor).
Preparation Time Breakdown for Elegant Chicken Kiev
While Chicken Kiev requires some steps, the active preparation time is manageable. Here’s a breakdown of the time involved:
- Prep Time (Herb Butter, Pounding Chicken, Assembly): 30-40 minutes
- Chilling Time (Herb Butter): 30 minutes (minimum)
- Chilling Time (Assembled Kiev – First Chill): 30-60 minutes
- Breading Time: 15-20 minutes
- Chilling Time (Breaded Kiev – Second Chill): 30-60 minutes
- Cooking Time (Grilling or Baking): 25-30 minutes
- Resting Time: 5-10 minutes
Total Time (Approximate): 2 hours 45 minutes to 4 hours (including chilling times)
While the total time seems long, much of it is hands-off chilling time. You can break up the preparation by making the herb butter and assembling the Kiev earlier in the day, then breading and cooking closer to dinner time.
How to Serve Your Elegant Chicken Kiev: Serving Suggestions
Elegant Chicken Kiev is a show-stopping main course that deserves equally delightful accompaniments. Here are some serving suggestions to create a truly memorable meal:
- Classic Sides:
- Mashed Potatoes: Creamy, buttery mashed potatoes are a quintessential pairing with Chicken Kiev. They soak up the delicious herb butter beautifully.
- Roasted Asparagus: Tender-crisp roasted asparagus provides a fresh, green contrast and a touch of elegance.
- Green Beans Almondine: Sautéed green beans with toasted almonds offer a classic and flavorful side.
- Rice Pilaf: Fluffy rice pilaf is another excellent carbohydrate side that complements the richness of the Kiev.
- Sauces (Optional):
- Lemon Butter Sauce: A simple lemon butter sauce can enhance the citrus notes and add extra richness.
- Creamy Mushroom Sauce: A mushroom cream sauce provides a savory and earthy counterpoint to the herb butter.
- Dijon Mustard Sauce: A light Dijon mustard sauce can add a tangy and slightly spicy element.
- Salads:
- Simple Green Salad: A crisp green salad with a light vinaigrette provides a refreshing counterpoint to the richness of the Kiev.
- Caesar Salad: A classic Caesar salad is another elegant and flavorful salad option.
- Bread:
- Crusty Bread Rolls: Serve warm, crusty bread rolls or baguette slices to mop up any of the delicious herb butter sauce.
- Wine Pairing:
- Chardonnay: A buttery Chardonnay complements the richness of the Chicken Kiev and herb butter.
- Pinot Grigio: A crisp Pinot Grigio or other dry white wine can provide a refreshing contrast and balance the richness.
- Presentation:
- Garnish: Garnish plates with fresh parsley sprigs, lemon wedges, or a sprinkle of chopped chives for visual appeal.
- Butter Reveal: Encourage guests to cut into their Kiev at the table to experience the dramatic and delightful butter release.
Essential Tips for Perfect Chicken Kiev Every Time
Mastering Chicken Kiev is all about technique and attention to detail. These essential tips will help you achieve perfect results every time:
- 1. Keep Everything Cold: Cold butter, chilled chicken, and chilled breaded Kiev are crucial. Cold ingredients help prevent the butter from melting out prematurely during breading and cooking. Ensure your butter is thoroughly frozen, and chill the chicken at each stage of preparation.
- 2. Seal the Butter Tightly: Properly sealing the herb butter inside the chicken is essential to prevent leakage. Tuck the edges of the chicken breasts in securely when rolling, and ensure the seam is tightly closed. Chilling the assembled Kiev helps to set the shape and seal.
- 3. Double Breading is Your Friend: The double breading technique (flour, egg, panko, egg, panko) creates a thicker, more secure, and extra crispy crust. This significantly reduces the risk of butter leakage and ensures a beautiful golden-brown coating.
- 4. Don’t Overcook: Overcooking Chicken Kiev will result in dry chicken and potentially leaked butter. Cook until the internal temperature reaches 165°F (74°C) and the breading is golden brown. Use a meat thermometer to ensure accuracy, but avoid piercing the butter center when checking temperature.
- 5. Rest Before Serving: Resting the cooked Chicken Kiev for 5-10 minutes after grilling or baking is essential. This allows the juices to redistribute throughout the chicken, resulting in a more tender and flavorful dish, and allows the molten butter to settle slightly for a less messy, yet still dramatic, release when cut.
Frequently Asked Questions About Elegant Chicken Kiev
Curious about making Chicken Kiev? Here are answers to some common questions to help you confidently create this elegant dish:
Q1: Can I prepare Chicken Kiev ahead of time?
A: Yes, you can prepare Chicken Kiev ahead of time, up to the breading stage. You can assemble and bread the Kiev, then refrigerate them, covered, for up to 4-6 hours before cooking. It’s best to cook them fresh for the crispiest breading and best flavor. Do not freeze breaded Chicken Kiev as the texture can suffer.
Q2: Can I use different herbs in the herb butter?
A: Absolutely! While parsley and chives are classic, you can customize the herb butter with other fresh herbs to your liking. Tarragon, dill, thyme, or a mix of herbs can be used. Experiment with different combinations to find your favorite flavor profile.
Q3: How do I prevent the butter from leaking out during cooking?
A: Butter leakage is a common concern with Chicken Kiev, but it can be minimized by:
* Using very cold butter: Ensure the herb butter is thoroughly frozen.
* Sealing the chicken tightly: Properly wrap and seal the chicken around the butter.
* Chilling at multiple stages: Chilling after assembly and after breading helps to solidify the butter and set the breading.
* Double breading: A double layer of breading provides extra protection.
* Don’t overcook: Overcooking can cause the butter to melt too rapidly and leak. Cook to the correct internal temperature and no longer.
Q4: How do I know when Chicken Kiev is cooked through?
A: The best way to ensure Chicken Kiev is cooked through is to use a meat thermometer. Insert the thermometer into the thickest part of the chicken, avoiding piercing into the butter center. The internal temperature should reach 165°F (74°C). Visually, the breading should be golden brown and crispy, and the chicken should be firm to the touch.
Q5: Can I make Chicken Kiev without grilling or baking? Can I fry it?
A: Yes, Chicken Kiev can be deep-fried for a truly crispy crust and faster cooking time. Deep-fry at 350°F (175°C) for about 6-8 minutes, or until golden brown and cooked through. Be very careful when deep-frying Chicken Kiev, as the molten butter center can be very hot and may splatter. Ensure the oil temperature is maintained and do not overcrowd the fryer. Grilling and baking are often considered healthier and easier methods for home cooks.
Print
Elegant Chicken Kiev recipe
Ingredients
For the Chicken Kiev:
-
- 4 Boneless, Skinless Chicken Breasts (about 6–8 ounces each): Opt for high-quality, plump chicken breasts. Evenly sized breasts will cook more uniformly. Look for breasts that are not excessively thick, as this will make pounding and shaping easier.
-
- 1 cup (2 sticks) Unsalted Butter, very cold: Cold butter is absolutely crucial for Chicken Kiev. It’s what creates the flavorful, molten butter center. Use unsalted butter to control the overall saltiness of the dish. Make sure it’s thoroughly chilled and firm before starting.
-
- ¼ cup Fresh Parsley, finely chopped: Fresh parsley adds a bright, herbaceous note to the herb butter. Flat-leaf parsley (Italian parsley) is preferred for its robust flavor, but curly parsley can also be used. Ensure it is finely chopped to evenly distribute in the butter.
-
- 2 tablespoons Fresh Chives, finely chopped: Fresh chives contribute a delicate oniony flavor that complements the parsley and butter. Like parsley, finely chop the chives for even distribution.
-
- 1 clove Garlic, minced (optional): A small amount of minced garlic can add a subtle savory depth to the herb butter. If you prefer a more classic, herb-forward flavor, you can omit the garlic. Mince it finely if using to avoid overpowering the other flavors.
-
- ½ teaspoon Salt: Salt is essential for seasoning both the butter and the chicken. It enhances the flavors and balances the richness.
-
- ¼ teaspoon Black Pepper: Freshly ground black pepper adds a subtle spice and depth of flavor.
For the Breading:
-
- ½ cup All-Purpose Flour: Flour is the first layer of the breading, helping the egg wash adhere and creating a base for the breadcrumbs.
-
- 2 Large Eggs, lightly beaten: Eggs create a binding layer between the flour and breadcrumbs, ensuring the breading sticks properly and becomes golden and crispy. Lightly beat the eggs with a fork until yolks and whites are just combined.
-
- 1 ½ cups Panko Breadcrumbs: Panko breadcrumbs are Japanese-style breadcrumbs that are coarser and lighter than regular breadcrumbs. They create a wonderfully crispy and light coating. If panko is unavailable, you can use regular breadcrumbs, but panko is highly recommended for the best texture.
-
- ½ teaspoon Salt: Adding salt to the breadcrumbs seasons the breading and enhances the overall flavor.
-
- ¼ teaspoon Black Pepper: A touch of black pepper in the breadcrumbs adds another layer of flavor.
For Cooking:
-
- Vegetable Oil or Olive Oil (for grilling or baking sheet): A small amount of oil is needed to prevent sticking when grilling or baking. Vegetable oil or olive oil works well.
Instructions
Step 1: Prepare the Herb Butter
-
- Soften Butter Slightly: If your butter is rock-hard from the refrigerator, let it sit at room temperature for just 5-10 minutes to soften slightly. It should still be very cold but pliable enough to work with. Do not let it get too soft or melted.
-
- Combine Ingredients: In a small bowl, combine the softened (but still cold) butter, finely chopped fresh parsley, finely chopped fresh chives, minced garlic (if using), salt, and black pepper.
-
- Mix Thoroughly: Use a fork or a small spatula to thoroughly mix all the ingredients together until they are evenly incorporated into the butter.
-
- Shape Butter Patties: Divide the herb butter into 4 equal portions. On a piece of parchment paper or plastic wrap, shape each portion into a small log or rectangle, about 2-3 inches long and ½ inch thick.
-
- Chill Herb Butter: Wrap each butter patty tightly in parchment paper or plastic wrap. Place them on a plate or small tray and freeze them for at least 30 minutes, or until they are very firm and solid. This freezing step is crucial to ensure the butter stays inside the chicken during cooking and melts beautifully when served.
Step 2: Prepare the Chicken Breasts
-
- Pound Chicken Breasts: Place one chicken breast at a time between two sheets of plastic wrap or parchment paper. Using a meat mallet or rolling pin, gently pound the chicken breast to an even thickness of about ¼-inch to ½-inch. Start from the thicker part of the breast and work outwards, being careful not to tear the chicken. The goal is to create a larger, thinner piece of chicken that can be easily rolled around the herb butter. Repeat with the remaining chicken breasts.
-
- Season Chicken: Lightly season both sides of each pounded chicken breast with salt and pepper.
Step 3: Assemble the Chicken Kiev
-
- Place Herb Butter: Remove the frozen herb butter patties from the freezer. Place one frozen herb butter patty in the center of each pounded chicken breast.
-
- Wrap and Secure: Carefully fold the sides of the chicken breast over the herb butter patty, tucking in the edges to completely enclose the butter. Roll the chicken breast up tightly, starting from one end and rolling towards the other, creating a neat, oblong shape. Ensure the butter is completely sealed inside the chicken to prevent leakage during cooking.
-
- Chill Assembled Kiev: Place the assembled Chicken Kiev seam-side down on a plate lined with parchment paper or plastic wrap. Cover loosely with plastic wrap and refrigerate for at least 30 minutes, or up to 1 hour. This chilling step is essential to help the chicken hold its shape and prevent the butter from melting out too quickly during breading and cooking.
Step 4: Breading the Chicken Kiev
-
- Set Up Breading Station: Prepare three shallow dishes or plates. In the first dish, place the all-purpose flour. In the second dish, place the lightly beaten eggs. In the third dish, combine the panko breadcrumbs, salt, and black pepper.
-
- First Flour Dredge: Remove the chilled Chicken Kiev from the refrigerator. Dredge each Kiev in the flour, ensuring it is evenly coated on all sides. Shake off any excess flour.
-
- Egg Wash Dip: Dip each flour-coated Kiev into the beaten eggs, making sure it is fully submerged and coated in egg wash. Let any excess egg drip off.
-
- Panko Breadcrumb Coating: Dredge each egg-washed Kiev in the panko breadcrumbs, pressing gently to ensure the breadcrumbs adhere well to all sides, creating a thick and even coating.
-
- Second Egg Wash and Breadcrumbs (Optional, for extra crispy coating): For an extra crispy and secure breading, you can repeat the egg wash and breadcrumb steps. Dip the panko-coated Kiev back into the egg wash and then back into the panko breadcrumbs for a double layer of breading. This is highly recommended, especially if grilling.
-
- Chill Breaded Kiev: Place the breaded Chicken Kiev back on the parchment-lined plate. Cover loosely and refrigerate for another 30 minutes to 1 hour. This second chilling step helps the breading set and adhere even more firmly, further reducing the risk of butter leakage and ensuring a crispy crust.
Step 5: Cooking the Chicken Kiev – Grilling or Baking Options
Grilling Method (for a smoky flavor and crispy crust):
-
- Preheat Grill: Preheat your grill to medium heat (about 350-400°F or 175-200°C). Lightly oil the grill grates.
-
- Grill Chicken Kiev: Place the breaded Chicken Kiev on the preheated grill grates.
-
- Grill and Rotate: Grill for about 6-8 minutes per side, rotating occasionally to ensure even cooking and browning. The goal is to achieve a golden brown and crispy crust and ensure the chicken is cooked through.
-
- Check for Doneness: Chicken Kiev is done when the internal temperature reaches 165°F (74°C) in the thickest part of the chicken (avoid piercing into the butter center when checking temperature). The breading should be golden brown and crispy.
-
- Rest Before Serving: Remove the grilled Chicken Kiev from the grill and let it rest for 5-10 minutes before serving. This allows the juices to redistribute and the butter center to become perfectly molten.
Baking Method (for a more controlled and even cooking):
-
- Preheat Oven: Preheat your oven to 400°F (200°C). Lightly oil a baking sheet or line it with parchment paper.
-
- Bake Chicken Kiev: Place the breaded Chicken Kiev on the prepared baking sheet.
-
- Bake: Bake for 25-30 minutes, or until the internal temperature reaches 165°F (74°C) in the thickest part of the chicken (avoid piercing into the butter center when checking temperature). The breading should be golden brown and crispy.
-
- Broil for Extra Crispness (Optional): For extra crispy breading, you can broil the Kiev for the last 1-2 minutes of baking, watching carefully to prevent burning.
-
- Rest Before Serving: Remove the baked Chicken Kiev from the oven and let it rest for 5-10 minutes before serving.
Step 6: Serve and Enjoy Immediately!
-
- Serve Hot: Chicken Kiev is best served immediately while it’s hot and the herb butter center is molten and flowing.
-
- Cut and Serve: To serve, carefully cut into the Chicken Kiev with a sharp knife. The herb butter should ooze out beautifully.
-
- Garnish (Optional): Garnish with fresh parsley sprigs or lemon wedges, if desired.
Nutrition
- Serving Size: one normal portion
- Calories: 600-700
- Sugar: 2-3g
- Sodium: 500-700mg
- Fat: 40-50g
- Saturated Fat: 25-30g
- Carbohydrates: 20-25g
- Fiber: 1-2g
- Protein: 40-50g


