
Of all the desserts that scream “summer,” nothing quite captures the essence of a warm, sunny day like strawberry shortcake. For years after going gluten-free, I chased the memory of that perfect shortcake: a tender, slightly sweet biscuit soaking up the juices from ruby-red strawberries, all crowned with a cloud of freshly whipped cream. My early attempts were often disappointing—either crumbly and dry or dense and gummy. It was frustrating. But I was determined to create a gluten-free version that wasn’t just “good for gluten-free,” but genuinely, undeniably delicious. This recipe is the culmination of that quest. The first time I served this to my family, the reaction was pure, blissful silence, followed by requests for seconds. My nephew, a notoriously picky eater, declared it “the best cake ever,” completely unaware that it was gluten-free. That’s when I knew I had a winner. This Easy Gluten-Free Strawberry Shortcake recipe yields incredibly tender, flaky, and moist biscuits that provide the perfect foundation for sweet, macerated strawberries. It’s simple to make, relies on accessible ingredients, and has become the undisputed star of our summer gatherings.
Why This is The Ultimate Gluten-Free Strawberry Shortcake Recipe
Finding a gluten-free dessert that truly rivals its traditional counterpart can be a challenge, but this recipe stands out for several key reasons. It’s more than just a substitute; it’s a stellar dessert in its own right, designed to be foolproof and incredibly satisfying.
The Perfect Biscuit Texture: No More Dry Crumbs!
The number one complaint with gluten-free baking, especially for items like scones and biscuits, is a dry, sandy, or crumbly texture. This recipe specifically tackles that issue head-on. By using a carefully balanced combination of a high-quality gluten-free all-purpose flour blend and almond flour, we achieve a multi-dimensional texture. The all-purpose blend provides structure, while the almond flour adds wonderful moisture, a tender crumb, and a subtle richness. The use of cold butter (or coconut oil) cut into the flour creates small pockets that steam during baking, resulting in those coveted flaky layers. The addition of buttermilk (or a dairy-free alternative) contributes acidity, which reacts with the baking powder for a better rise and adds a classic tangy flavor and tenderness. The result is a shortcake biscuit that is soft, moist, and sturdy enough to hold up to the juicy strawberries and cream without turning to mush.
Incredible Flavor from Simple, Fresh Ingredients
This recipe proves that you don’t need a long list of complicated ingredients to create phenomenal flavor. The star of the show is, of course, the strawberries. We use a technique called macerating—tossing the fresh, sliced strawberries with a bit of sugar and lemon juice. This simple process draws out the natural juices from the berries, creating a luscious, syrupy sauce that is infinitely better than any store-bought topping. The lemon juice not only prevents the berries from browning but also adds a bright, zesty note that cuts through the sweetness and enhances the fresh berry flavor. The biscuits themselves are lightly sweetened, allowing the fruit to shine, and a hint of vanilla extract adds a warm, aromatic depth that ties everything together.
Adaptable and Allergy-Friendly
We understand that dietary needs can be complex. That’s why this recipe was developed with adaptability in mind. It can easily be made dairy-free and vegan without sacrificing texture or taste.
- Dairy-Free: Simply swap the butter for a solid, block-style vegan butter or cold, firm coconut oil. For the buttermilk, you can make a quick vegan version by mixing lemon juice with your favorite non-dairy milk (like almond, soy, or oat) and letting it sit for a few minutes to curdle. Use full-fat canned coconut cream for a rich and decadent dairy-free whipped topping.
- Refined Sugar-Free: You can easily substitute the granulated sugar with coconut sugar in the biscuits and use maple syrup or agave nectar to sweeten the strawberries and whipped cream.
This versatility makes it the perfect dessert to serve to a crowd with diverse dietary requirements, ensuring everyone can enjoy a delicious, homemade treat.
Complete Recipe: Easy Gluten-Free Strawberry Shortcake
Here is everything you need to create this show-stopping summer dessert. Reading the instructions through once before you begin is always a good practice.
Ingredients
For the Gluten-Free Shortcake Biscuits:
- 2 ½ cups (300g) High-Quality 1-to-1 Gluten-Free All-Purpose Flour Blend (one that contains xanthan gum)
- ½ cup (50g) Super-Fine Almond Flour
- ⅓ cup (67g) Granulated Sugar (or coconut sugar)
- 1 tablespoon Baking Powder
- ½ teaspoon Salt
- ½ cup (113g) Cold Unsalted Butter, cut into small cubes (or cold vegan butter/solid coconut oil for dairy-free)
- 1 large Egg, lightly beaten
- 1 teaspoon Vanilla Extract
- ¾ cup (180ml) Buttermilk (or see notes for a dairy-free/vegan alternative)
- 1 tablespoon Heavy Cream or additional buttermilk for brushing (optional, for golden tops)
For the Macerated Strawberry Topping:
- 2 lbs (about 900g) Fresh Strawberries, hulled and sliced
- ¼ cup (50g) Granulated Sugar (or maple syrup, to taste)
- 1 tablespoon Fresh Lemon Juice
For the Homemade Whipped Cream:
- 2 cups (480ml) Cold Heavy Whipping Cream (or 2 cans of chilled full-fat coconut cream for dairy-free)
- 3 tablespoons Powdered Sugar (or maple syrup, to taste)
- 1 teaspoon Vanilla Extract
Step-by-Step Instructions
Follow these detailed steps for perfect gluten-free strawberry shortcakes every time. The key is to work with cold ingredients for the biscuits.
Step 1: Prepare the Strawberry Topping (Macerate)
It’s best to do this first to give the strawberries time to release their juices. In a large bowl, combine the sliced strawberries, granulated sugar, and fresh lemon juice. Gently stir to coat all the berries. Cover the bowl and place it in the refrigerator for at least 30 minutes, or up to 2 hours. The sugar will draw out the moisture, creating a beautiful natural syrup.
Step 2: Prepare the Shortcake Biscuits
- Preheat and Prep: Preheat your oven to 400°F (200°C). Line a large baking sheet with parchment paper.
- Combine Dry Ingredients: In a large mixing bowl, whisk together the gluten-free all-purpose flour, almond flour, granulated sugar, baking powder, and salt. Whisking thoroughly ensures the leavening agent is evenly distributed for a consistent rise.
- Cut in the Cold Butter: Add the cold, cubed butter to the flour mixture. Using a pastry blender, two knives, or your fingertips, cut the butter into the flour until the mixture resembles coarse crumbs with some pea-sized pieces of butter remaining. It’s crucial that the butter stays cold; these small pieces will melt in the oven and create flaky pockets.
- Mix Wet Ingredients: In a separate small bowl, whisk together the egg, vanilla extract, and buttermilk until just combined.
- Combine Wet and Dry: Pour the wet ingredients into the dry ingredient mixture. Use a fork or spatula to mix until a shaggy, slightly sticky dough forms. Be careful not to overmix! Overmixing can lead to tough biscuits. The dough should just come together.
- Shape the Biscuits: Turn the dough out onto a lightly floured (using GF flour) surface. Gently knead it just 2-3 times to bring it together into a cohesive ball. Pat the dough out with your hands until it’s about ¾-inch to 1-inch thick. Do not use a rolling pin, as this can overwork the dough.
- Cut the Biscuits: Using a 2.5 or 3-inch round biscuit cutter, press straight down into the dough to cut out the biscuits. Do not twist the cutter, as this can seal the edges and prevent them from rising tall. Place the cut biscuits onto the prepared baking sheet, about 2 inches apart. Gently gather the scraps, pat them out again, and cut more biscuits until you have used all the dough. You should get about 8-10 biscuits.
- Brush and Bake: For a beautiful golden-brown finish, lightly brush the tops of the biscuits with heavy cream or a bit of buttermilk. Bake for 13-16 minutes, or until the tops are golden brown and a toothpick inserted into the center comes out clean.
- Cool: Let the biscuits cool on the baking sheet for a few minutes before transferring them to a wire rack to cool completely.
Step 3: Make the Whipped Cream
While the biscuits are cooling, prepare the whipped cream. For the best results, chill your mixing bowl and whisk (or beaters) in the freezer for about 10-15 minutes beforehand. Pour the cold heavy cream, powdered sugar, and vanilla extract into the chilled bowl. Using an electric mixer (or a stand mixer with the whisk attachment), beat on medium-high speed until stiff peaks form. This means when you lift the beaters, the cream holds its shape. Be careful not to over-beat, or you will start to make butter. If using coconut cream, scoop out the solid cream from the top of the chilled cans (discard the liquid or save for smoothies) and whip it in the same manner.
Step 4: Assemble and Serve
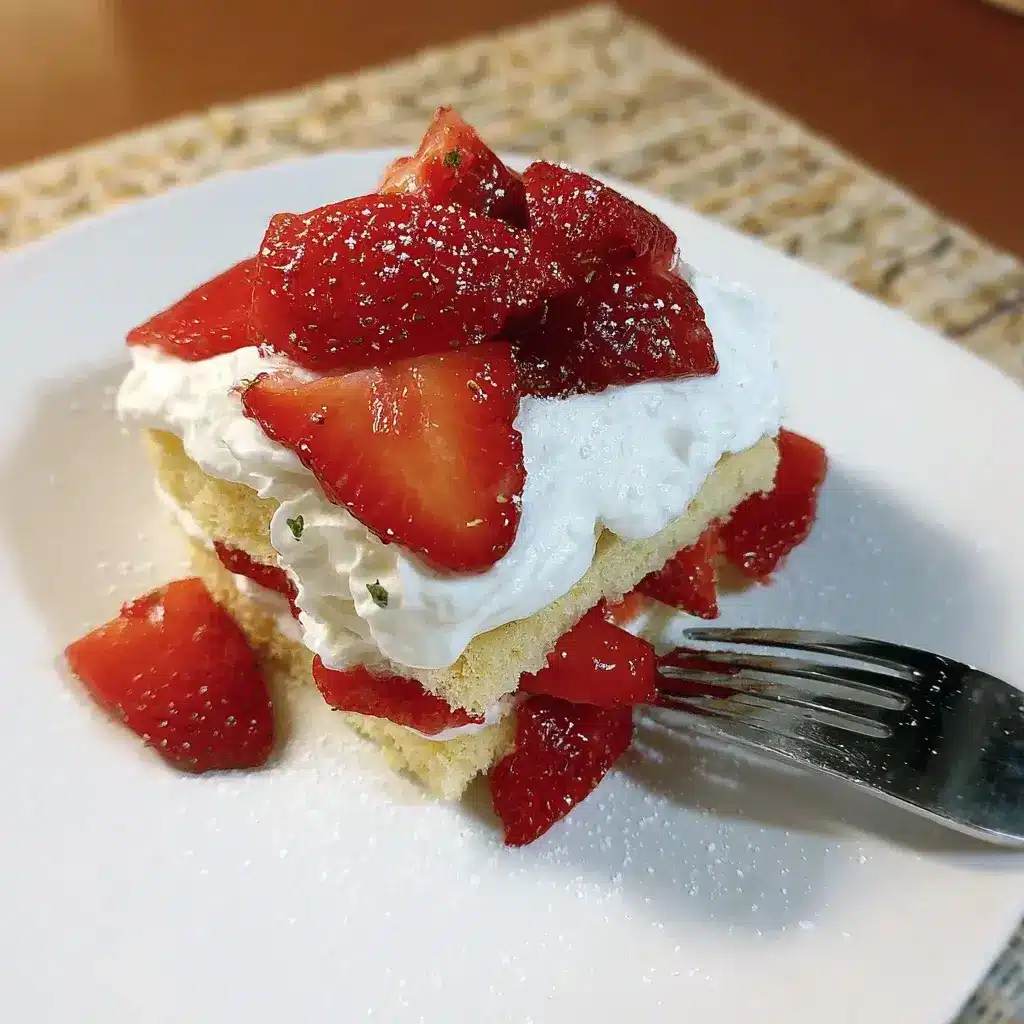
Once the biscuits have cooled, it’s time to assemble your masterpieces. Split a biscuit in half horizontally. Place the bottom half on a plate, spoon a generous amount of the macerated strawberries and their juice over it. Add a large dollop of fresh whipped cream, then top with the other half of the biscuit. For an extra flourish, add another small dollop of cream and a few more strawberry slices on top. Serve immediately.
Nutrition Facts
- Servings: 8-10 shortcakes
- Calories per serving (approximate): 450-500 kcal (This is an estimate and will vary based on the specific brands of flour and dairy/non-dairy products used, and the final serving size).
Preparation Time
- Prep Time: 25 minutes
- Macerating Time: 30 minutes
- Cook Time: 15 minutes
- Total Time: 1 hour 10 minutes
How to Serve Your Gluten-Free Strawberry Shortcake
While the classic assembly is timeless, there are several fun and elegant ways to present this dessert, especially if you’re hosting a party.
- The Classic Individual Serving:
- Split a warm or room-temperature biscuit.
- Spoon a generous portion of the juicy strawberries over the bottom half.
- Top with a large dollop of whipped cream.
- Place the biscuit top on, either perfectly aligned or slightly askew for a rustic look.
- Garnish with a mint sprig for a pop of color.
- DIY Strawberry Shortcake Bar: This is a fantastic idea for summer barbecues or family gatherings. It allows guests to customize their own dessert.
- Arrange the cooled biscuits on a platter.
- Place the macerated strawberries (and their juices) in a large bowl with a serving spoon.
- Place the whipped cream in another bowl.
- Add small bowls of extra toppings like:
- Fresh blueberries or raspberries
- Toasted sliced almonds or coconut flakes
- A drizzle of balsamic glaze (it’s amazing with strawberries!)
- Chocolate shavings or a chocolate drizzle
- Deconstructed Shortcake in a Glass (Trifle Style): For a more elegant, mess-free presentation, layer the components in a clear glass or jar.
- Crumble half a biscuit into the bottom of the glass.
- Add a layer of the strawberry mixture.
- Pipe or spoon in a layer of whipped cream.
- Repeat the layers until the glass is full.
- Top with a final swirl of cream and a perfect strawberry slice.
- Grilled Shortcake Sundaes: For a smoky, caramelized twist, try grilling the biscuits.
- Split the baked and cooled biscuits.
- Lightly butter the cut sides.
- Place them cut-side down on a clean, preheated grill over medium heat for 1-2 minutes, just until they are warm and have light grill marks.
- Assemble as you would a classic shortcake, perhaps with a scoop of vanilla bean ice cream for an extra-decadent treat.
Additional Tips for Perfect Shortcakes
These five tips will help you elevate your gluten-free baking and ensure your shortcakes are flawless every single time.
- The Colder, The Better: The secret to a flaky, tender biscuit is cold fat. Ensure your butter (or coconut oil) is very cold, straight from the fridge. Some bakers even pop their cubed butter in the freezer for 10-15 minutes before using it. Similarly, using cold buttermilk and a cold egg helps keep the butter from softening too quickly as you mix the dough.
- Measure Your Flour Correctly: This is crucial in all baking, but especially with gluten-free flours. Do not scoop the flour directly out of the bag with your measuring cup. This compacts the flour and can result in you using up to 25% too much, leading to dry, dense biscuits. Instead, use the “spoon and level” method: use a spoon to fluff up the flour in its container, then spoon it into your measuring cup until it’s overflowing. Use the back of a knife to level it off. For the most accuracy, use a kitchen scale.
- Don’t Overwork the Dough: This is the golden rule of tender biscuits and scones. Mix the dough only until it just comes together. A few lumps and streaks of flour are okay. When you pat it out, do so gently and only knead it a couple of times to unify it. Overworking develops the gums (like xanthan gum) too much, making the final product tough instead of tender.
- Embrace the Ugly Biscuit: Don’t strive for perfectly smooth, uniform biscuits. A slightly craggy, rustic-looking biscuit often has the best texture. Those nooks and crannies are a sign of the flaky layers you worked to create. They also do a fantastic job of catching all the delicious strawberry juice.
- Let the Berries Macerate Properly: Don’t skip or rush the macerating step. Giving the strawberries at least 30 minutes with the sugar and lemon juice is what transforms them from simple sliced fruit into a glorious, syrupy topping. The juices they release are liquid gold and are essential for soaking into the biscuit and creating the classic shortcake experience.
Frequently Asked Questions (FAQ)
1. Can I make this gluten-free strawberry shortcake recipe ahead of time?
Yes, you can prepare the components separately ahead of time. The biscuits are best the day they are made but can be baked a day in advance. Store them in an airtight container at room temperature. The strawberry topping can be made up to 24 hours in advance and kept covered in the refrigerator. The whipped cream should be made fresh, just before serving, for the best texture. Assemble the shortcakes just before you plan to eat them to prevent the biscuits from becoming soggy.
2. What is the best gluten-free flour to use for this recipe?
For the best results, use a high-quality “cup-for-cup” or “1-to-1” gluten-free all-purpose flour blend that already contains xanthan gum. Brands like Bob’s Red Mill 1-to-1 Baking Flour or King Arthur Gluten-Free Measure for Measure Flour are excellent choices. Combining this with almond flour provides the ideal balance of structure and moisture. Avoid single-ingredient GF flours (like just rice flour or tapioca starch) unless you are an experienced GF baker who is comfortable creating your own blends.
3. Can I use frozen strawberries instead of fresh?
Yes, you can use frozen strawberries if fresh are not in season. Thaw the frozen strawberries completely first, then drain off any excess liquid before proceeding with the macerating step. You may find you need slightly less sugar, as frozen berries can sometimes be sweeter. While the texture will be a bit softer than with fresh berries, the flavor will still be delicious.
4. How do I store leftovers?
It is best to store the components separately. Keep leftover biscuits in an airtight container at room temperature for up to 2 days. Store the strawberry topping and whipped cream in separate airtight containers in the refrigerator for up to 3 days. If you have already assembled shortcakes, they can be stored in the refrigerator, but they are best eaten within a few hours as the biscuits will soften over time.
5. I have a nut allergy. Can I make this recipe nut-free?
Absolutely. To make this recipe nut-free, simply omit the ½ cup of almond flour and replace it with an additional ½ cup (60g) of your 1-to-1 gluten-free all-purpose flour blend. The total amount of the all-purpose blend would then be 3 cups (360g). The biscuits will be slightly less rich but still wonderfully tender and delicious. Always double-check that your gluten-free flour blend is manufactured in a nut-free facility if the allergy is severe.
Easy Gluten Free Strawberry Shortcake recipe
Ingredients
For the Gluten-Free Shortcake Biscuits:
- 2 ½ cups (300g) High-Quality 1-to-1 Gluten-Free All-Purpose Flour Blend (one that contains xanthan gum)
- ½ cup (50g) Super-Fine Almond Flour
- ⅓ cup (67g) Granulated Sugar (or coconut sugar)
- 1 tablespoon Baking Powder
- ½ teaspoon Salt
- ½ cup (113g) Cold Unsalted Butter, cut into small cubes (or cold vegan butter/solid coconut oil for dairy-free)
- 1 large Egg, lightly beaten
- 1 teaspoon Vanilla Extract
- ¾ cup (180ml) Buttermilk (or see notes for a dairy-free/vegan alternative)
- 1 tablespoon Heavy Cream or additional buttermilk for brushing (optional, for golden tops)
For the Macerated Strawberry Topping:
- 2 lbs (about 900g) Fresh Strawberries, hulled and sliced
- ¼ cup (50g) Granulated Sugar (or maple syrup, to taste)
- 1 tablespoon Fresh Lemon Juice
For the Homemade Whipped Cream:
- 2 cups (480ml) Cold Heavy Whipping Cream (or 2 cans of chilled full-fat coconut cream for dairy-free)
- 3 tablespoons Powdered Sugar (or maple syrup, to taste)
- 1 teaspoon Vanilla Extract
Instructions
It’s best to do this first to give the strawberries time to release their juices. In a large bowl, combine the sliced strawberries, granulated sugar, and fresh lemon juice. Gently stir to coat all the berries. Cover the bowl and place it in the refrigerator for at least 30 minutes, or up to 2 hours. The sugar will draw out the moisture, creating a beautiful natural syrup.
Step 2: Prepare the Shortcake Biscuits
- Preheat and Prep: Preheat your oven to 400°F (200°C). Line a large baking sheet with parchment paper.
- Combine Dry Ingredients: In a large mixing bowl, whisk together the gluten-free all-purpose flour, almond flour, granulated sugar, baking powder, and salt. Whisking thoroughly ensures the leavening agent is evenly distributed for a consistent rise.
- Cut in the Cold Butter: Add the cold, cubed butter to the flour mixture. Using a pastry blender, two knives, or your fingertips, cut the butter into the flour until the mixture resembles coarse crumbs with some pea-sized pieces of butter remaining. It’s crucial that the butter stays cold; these small pieces will melt in the oven and create flaky pockets.
- Mix Wet Ingredients: In a separate small bowl, whisk together the egg, vanilla extract, and buttermilk until just combined.
- Combine Wet and Dry: Pour the wet ingredients into the dry ingredient mixture. Use a fork or spatula to mix until a shaggy, slightly sticky dough forms. Be careful not to overmix! Overmixing can lead to tough biscuits. The dough should just come together.
- Shape the Biscuits: Turn the dough out onto a lightly floured (using GF flour) surface. Gently knead it just 2-3 times to bring it together into a cohesive ball. Pat the dough out with your hands until it’s about ¾-inch to 1-inch thick. Do not use a rolling pin, as this can overwork the dough.
- Cut the Biscuits: Using a 2.5 or 3-inch round biscuit cutter, press straight down into the dough to cut out the biscuits. Do not twist the cutter, as this can seal the edges and prevent them from rising tall. Place the cut biscuits onto the prepared baking sheet, about 2 inches apart. Gently gather the scraps, pat them out again, and cut more biscuits until you have used all the dough. You should get about 8-10 biscuits.
- Brush and Bake: For a beautiful golden-brown finish, lightly brush the tops of the biscuits with heavy cream or a bit of buttermilk. Bake for 13-16 minutes, or until the tops are golden brown and a toothpick inserted into the center comes out clean.
- Cool: Let the biscuits cool on the baking sheet for a few minutes before transferring them to a wire rack to cool completely.
Step 3: Make the Whipped Cream
While the biscuits are cooling, prepare the whipped cream. For the best results, chill your mixing bowl and whisk (or beaters) in the freezer for about 10-15 minutes beforehand. Pour the cold heavy cream, powdered sugar, and vanilla extract into the chilled bowl. Using an electric mixer (or a stand mixer with the whisk attachment), beat on medium-high speed until stiff peaks form. This means when you lift the beaters, the cream holds its shape. Be careful not to over-beat, or you will start to make butter. If using coconut cream, scoop out the solid cream from the top of the chilled cans (discard the liquid or save for smoothies) and whip it in the same manner.
Step 4: Assemble and Serve
Once the biscuits have cooled, it’s time to assemble your masterpieces. Split a biscuit in half horizontally. Place the bottom half on a plate, spoon a generous amount of the macerated strawberries and their juice over it. Add a large dollop of fresh whipped cream, then top with the other half of the biscuit. For an extra flourish, add another small dollop of cream and a few more strawberry slices on top. Serve immediately.
Nutrition
- Serving Size: one normal portion
- Calories: 450-500 kcal