


It was almost Easter again, and the familiar excitement of the season was bubbling in our home. The kids were already planning their egg hunts and eagerly anticipating the arrival of the Easter bunny. I, in turn, was thinking about our Easter brunch menu, wanting to add something special and festive to the table. Last year’s deviled egg chicks were such a hit, I wanted to keep the cute and homemade theme going. That’s when I thought of Easter bunny rolls! The idea of soft, fluffy bread rolls shaped like adorable bunnies just seemed perfect. I’d never made shaped rolls before, but the challenge intrigued me. To my delight, the process was surprisingly fun and not as difficult as I imagined. The aroma of baking bread filled the house, mingling with the sweet scent of Easter lilies. And when I pulled those golden-brown bunny rolls out of the oven, they were absolutely charming! The kids were ecstatic, their eyes wide with wonder. These weren’t just bread rolls; they were edible Easter decorations! Soft, slightly sweet, and utterly delightful, these Easter bunny rolls were the perfect addition to our brunch, adding a touch of whimsy and homemade love to our celebration. They were a hit with everyone, from the little ones to the grandparents, and have now become a cherished Easter tradition in our family. And now, I’m so excited to share this heartwarming recipe with you, so you too can bake up a batch of adorable Easter bunny rolls and bring smiles to your Easter table this year!
Easter Bunny Rolls: Bake Up Some Hoppy Happiness for Your Easter Feast
When Easter rolls around, it’s time to bring out all the festive and delightful treats, and what could be more perfect than Easter Bunny Rolls? These aren’t just your average dinner rolls; they are charming, bunny-shaped creations that add a touch of whimsy and homemade goodness to your Easter brunch, dinner, or any springtime gathering. Imagine a basket filled with these golden-brown, fluffy bunny rolls, each with its cute little ears and round body – they are guaranteed to be a showstopper and a conversation starter at your Easter table.
Why are Easter Bunny Rolls the ideal addition to your Easter celebrations? Let’s hop into the reasons:
- Unmatched Cuteness and Festive Appeal: Easter is all about celebrating spring, new beginnings, and the adorable symbols of the season, and bunny rabbits are right at the top of that list! These rolls are shaped to resemble charming bunnies, perfectly capturing the spirit of Easter. Their irresistible cuteness is sure to delight children and adults alike, making them a focal point of your Easter spread. They are simply adorable and instantly enhance the festive atmosphere.
- Homemade Goodness and Delicious Flavor: There’s nothing quite like the taste and aroma of freshly baked homemade bread, and Easter Bunny Rolls deliver that comforting goodness in every bite. These rolls are soft, fluffy, and slightly sweet, making them a perfect accompaniment to both savory and sweet Easter dishes. The homemade touch adds a special warmth and love to your holiday meal, making it even more memorable.
- Fun to Make and a Great Family Activity: Making Easter Bunny Rolls is a fun and engaging activity that the whole family can enjoy, especially kids! Shaping the dough into bunnies is a creative and hands-on process that can be turned into a delightful Easter baking project. This recipe provides a wonderful opportunity to spend quality time together in the kitchen, creating cherished memories while preparing for Easter.
- Versatile and Perfect for Any Easter Meal: Easter Bunny Rolls are incredibly versatile and fit seamlessly into any Easter meal, whether it’s a casual brunch, a formal dinner, or a festive afternoon tea. They can be served alongside savory dishes like ham, quiche, or roasted vegetables, or enjoyed with sweet treats and jams for brunch or tea. Their mild sweetness makes them a versatile bread option that complements a wide range of flavors.
- Impressive and Thoughtful Presentation: Presenting a basket or platter filled with Easter Bunny Rolls is a thoughtful and impressive touch that elevates your Easter table setting. They show your guests that you’ve put in extra effort to create something special and homemade for the occasion. Their charming appearance and delicious taste make them a truly memorable addition to your Easter celebration.
- Make-Ahead Friendly (Partially): While freshly baked rolls are always best, you can prepare the dough for Easter Bunny Rolls ahead of time and bake them closer to serving. You can also freeze baked rolls and reheat them, offering flexibility for busy Easter preparations.
In conclusion, Easter Bunny Rolls are the perfect way to add a touch of homemade charm, festive cheer, and delicious flavor to your Easter celebrations. They are cute, festive, delicious, fun to make, and versatile – making them a truly must-bake recipe for Easter and beyond! Get ready to bake up some hoppy happiness and watch these adorable bunny rolls disappear from your Easter table!
Ingredients: What You’ll Need to Bake Your Easter Bunny Rolls
To bake these delightful Easter Bunny Rolls, you’ll need a collection of baking staples and a few key ingredients to create that perfect soft, fluffy, and slightly sweet roll. Here’s a list of everything you’ll need to gather:
- All-Purpose Flour: 4 cups of all-purpose flour form the foundation of these rolls, providing structure and a soft texture. Bread flour can also be used for a slightly chewier roll, but all-purpose flour is generally preferred for softer bunny rolls.
- Granulated Sugar: ¼ cup of granulated sugar adds a touch of sweetness to the rolls and helps activate the yeast. The sugar also contributes to the golden-brown color of the baked rolls.
- Instant Yeast (or Active Dry Yeast): 2 ¼ teaspoons (or one packet) of instant yeast are essential for leavening the dough and creating light and fluffy rolls. Instant yeast can be added directly to the dry ingredients. If using active dry yeast, it needs to be proofed in warm water with sugar before being added to the dough (see instructions below).
- Salt: 1 teaspoon of salt is crucial for controlling yeast activity, enhancing flavor, and strengthening the gluten in the dough. Don’t skip the salt in bread recipes!
- Milk: 1 cup of milk, warmed to lukewarm (about 105-115°F/40-46°C), provides moisture, richness, and helps activate the yeast. Whole milk will result in richer rolls, but 2% or even non-dairy milk can also be used.
- Water: ½ cup of water, warmed to lukewarm (about 105-115°F/40-46°C), adds moisture to the dough and aids in yeast activation.
- Unsalted Butter: 4 tablespoons (½ stick) of unsalted butter, melted and cooled slightly, adds richness, flavor, and tenderness to the rolls. Butter also contributes to the soft crumb and golden-brown crust.
- Egg: 1 large egg, lightly beaten, adds richness, structure, and helps create a golden-brown crust. A beaten egg is also used for the egg wash before baking to enhance shine and color.
- Egg for Egg Wash (for brushing before baking): 1 large egg, beaten with 1 tablespoon of water, for the egg wash. This creates a glossy, golden-brown crust on the rolls.
- Raisins or Chocolate Chips (optional, for eyes): Raisins or mini chocolate chips, for creating the bunny eyes. These are optional but add a cute finishing touch.
Ingredient Notes and Substitutions:
- Yeast Type: If using active dry yeast instead of instant yeast, proof it first: In a small bowl, combine the active dry yeast with ¼ cup of the lukewarm water and 1 teaspoon of the sugar from the recipe. Let it stand for 5-10 minutes until foamy, which indicates the yeast is active. Then, add this mixture to the wet ingredients in the recipe.
- Milk Alternatives: Non-dairy milk like almond milk, soy milk, or oat milk can be used in place of dairy milk, although the texture and richness might be slightly altered.
- Butter Alternatives: Vegan butter or coconut oil can be used as dairy-free alternatives to butter, but butter contributes significantly to the flavor and texture of the rolls.
- Sweetness Level: The sweetness level of these rolls is mild. If you prefer sweeter rolls, you can increase the sugar slightly, but be mindful that too much sugar can inhibit yeast activity.
- Flour Type: While all-purpose flour is recommended for soft rolls, using a portion of bread flour (up to half) can add chewiness if desired.
- Flavor Variations: You can add a touch of vanilla extract to the dough for a hint of vanilla flavor. Citrus zest (lemon or orange) can also be added for a brighter, spring-like flavor.
With these ingredients gathered, you’re ready to embark on the delightful journey of baking your own Easter Bunny Rolls! Make sure to check that your yeast is fresh for successful leavening and use good quality ingredients for the best flavor.
Instructions: Baking Your Hoppy Easter Bunny Rolls Step-by-Step
Now for the exciting part – bringing your Easter Bunny Rolls to life! Follow these detailed, step-by-step instructions to bake up a batch of these adorable and delicious treats:
Step 1: Prepare the Dough
- Combine Dry Ingredients: In a large mixing bowl, whisk together the all-purpose flour, granulated sugar, instant yeast (if using instant yeast), and salt.
- Warm Wet Ingredients: In a separate microwave-safe bowl or saucepan, warm the milk and water together until lukewarm (about 105-115°F/40-46°C). If using active dry yeast, proof it in ¼ cup of this warm water with 1 teaspoon of sugar as described above while you proceed with the next steps.
- Melt Butter and Whisk Egg: Melt the butter and let it cool slightly. In a small bowl, lightly beat the egg.
- Combine Wet and Dry Ingredients: Pour the warm milk mixture, melted butter, and beaten egg into the bowl with the dry ingredients. If using active dry yeast that has been proofed, add that mixture now as well.
- Mix to Form a Dough: Using a wooden spoon or spatula, stir the ingredients together until a shaggy dough forms.
- Knead the Dough: Turn the dough out onto a lightly floured surface. Knead the dough for 6-8 minutes, or until it becomes smooth, elastic, and slightly tacky but not sticky. You can also knead the dough in a stand mixer fitted with a dough hook for about 4-5 minutes.
- Form Dough into a Ball: Shape the kneaded dough into a smooth ball.
Step 2: First Rise (Bulk Fermentation)
- Place Dough in a Greased Bowl: Lightly grease a large bowl with cooking spray or oil. Place the dough ball in the greased bowl and turn it to coat all sides with oil.
- Cover and Rise: Cover the bowl tightly with plastic wrap or a clean kitchen towel. Let the dough rise in a warm place (about 75-80°F/24-27°C) for 1-1 ½ hours, or until it has doubled in size. The rising time will vary depending on the temperature of your room.
Step 3: Shape the Bunny Rolls
- Punch Down Dough: Once the dough has doubled, gently punch it down to release the air.
- Divide Dough: Turn the dough out onto a lightly floured surface. Divide the dough into 12-14 equal portions.
- Shape Bunny Bodies: For each portion, roll it into a smooth ball. This will be the bunny’s body. Place the body on a parchment-lined baking sheet.
- Shape Bunny Heads and Ears: Take a small piece of dough from one of the portions (or from a reserved piece if you set some aside). Divide this small piece into two even smaller pieces. Roll each of these smaller pieces into a small log shape, tapering at one end to form bunny ears. Attach the ears to one side of the bunny body, gently pressing them to adhere.
- Repeat for All Rolls: Repeat the shaping process for all remaining dough portions, creating 12-14 bunny rolls on the baking sheet, leaving space between them for rising.
Step 4: Second Rise (Proofing)
- Cover and Rise Again: Cover the baking sheet with the shaped bunny rolls loosely with plastic wrap or a clean kitchen towel. Let them rise in a warm place for 30-45 minutes, or until they have puffed up and are almost doubled in size.
Step 5: Preheat Oven and Prepare Egg Wash
- Preheat Oven to 375°F (190°C): Preheat your oven to 375°F (190°C) about 15-20 minutes before the end of the second rise.
- Prepare Egg Wash: In a small bowl, whisk together the egg and 1 tablespoon of water to make the egg wash.
Step 6: Bake the Bunny Rolls
- Brush with Egg Wash: Gently brush the tops and sides of the risen bunny rolls with the egg wash. Be careful not to deflate them.
- Bake for 15-20 Minutes: Bake in the preheated oven for 15-20 minutes, or until the rolls are golden brown and sound hollow when tapped on the bottom. The baking time may vary slightly depending on your oven.
- Check for Doneness: The rolls are done when they are golden brown and spring back lightly when gently pressed.
Step 7: Cool and Decorate (Optional)
- Cool on Baking Sheet: Remove the baking sheet from the oven and let the bunny rolls cool on the baking sheet for a few minutes.
- Transfer to Wire Rack: Transfer the rolls to a wire rack to cool completely or serve warm.
- Add Eyes (Optional): If desired, once the rolls are slightly cooled, gently press raisins or mini chocolate chips into the dough to create eyes for the bunnies.
Step 8: Serve and Enjoy!
- Serve Warm or at Room Temperature: Easter Bunny Rolls are delicious served warm or at room temperature.
- Serve with Butter, Jam, or Honey: Serve them with butter, jam, honey, or alongside your favorite Easter brunch or dinner dishes.
Congratulations! You’ve baked a batch of adorable and delicious Easter Bunny Rolls! These festive treats are now ready to bring smiles and hoppy happiness to your Easter celebrations.
Nutritional Goodness: Easter Bunny Rolls Nutrition Facts
While Easter Bunny Rolls are a delightful treat, it’s also good to be mindful of their nutritional content. Here’s an estimated nutritional breakdown per roll, assuming the recipe yields 14 rolls and using standard ingredient quantities. Please note that these are approximations and can vary based on specific ingredient brands, roll size, and serving sizes used.
Serving Size: 1 Easter Bunny Roll (approximately 1/14th of the recipe)
Approximate Values Per Serving:
- Calories: 180-220 calories (This can vary depending on roll size and ingredients).
- Fat: 4-6 grams
- Saturated Fat: 2-3 grams (primarily from butter and milk)
- Cholesterol: 20-30 mg
- Sodium: 150-200 mg
- Carbohydrates: 30-35 grams
- Fiber: 1-2 grams
- Sugars: 5-8 grams (added sugar and naturally occurring sugars in milk and flour)
- Protein: 4-5 grams
Key Nutritional Highlights:
- Source of Carbohydrates: Rolls provide carbohydrates, which are the body’s primary source of energy.
- Protein Content: They offer a moderate amount of protein from flour, milk, and egg, contributing to satiety and body building.
- Vitamins and Minerals (in smaller amounts): Rolls contain smaller amounts of vitamins and minerals found in flour, milk, and egg, such as B vitamins, calcium, and iron.
- Energy Dense: Rolls are relatively energy-dense due to their carbohydrate and fat content, providing calories for energy.
Important Considerations:
- Refined Carbohydrates: Rolls are primarily made from refined all-purpose flour, which is lower in fiber and nutrients compared to whole wheat flour.
- Added Sugar: The recipe contains added sugar, contributing to the carbohydrate content and sweetness.
- Fat Content: Butter contributes to the fat content, mostly saturated fat. While butter adds flavor and texture, moderation is key for saturated fat intake.
- Portion Control: Enjoy Easter Bunny Rolls in moderation as part of a balanced diet. Be mindful of portion sizes, especially when serving with butter, jam, or other toppings, which will add to the calorie and sugar content.
Disclaimer: This nutritional information is an estimate and should be considered for general informational purposes only. For precise nutritional values, it’s best to use a nutrition calculator with the specific brands and quantities of ingredients you use.
While Easter Bunny Rolls are a delicious treat to enjoy during Easter celebrations, they are best viewed as an occasional indulgence rather than a staple food. Enjoy them as part of a festive meal, savoring their homemade goodness and festive charm, while maintaining a balanced and varied diet overall.
Preparation Timeline: Plan Your Bunny Baking Schedule
Baking Easter Bunny Rolls involves several steps, including dough preparation, rising, shaping, and baking. Here’s a breakdown of the estimated preparation timeline to help you plan your baking schedule:
- Prep Time (Measuring Ingredients, Warming Milk, etc.): 20-25 minutes
- Kneading Time: 6-8 minutes (by hand) or 4-5 minutes (stand mixer)
- First Rise (Bulk Fermentation): 1- 1 ½ hours
- Shaping Time: 20-30 minutes (depending on shaping speed and number of rolls)
- Second Rise (Proofing): 30-45 minutes
- Baking Time: 15-20 minutes
- Cooling Time: 15-20 minutes (before decorating or serving)
Total Preparation Time (Active & Passive): Approximately 2 hours 45 minutes – 3 hours 40 minutes from start to finish.
Total Active Time (Hands-on time): Approximately 1 hour 15 minutes – 1 hour 40 minutes (excluding rising times).
Key Takeaways for Time Management:
- Rising Times are Passive: A significant portion of the preparation time is passive rising time, during which you can attend to other tasks or relax.
- Kneading and Shaping are Active: Kneading and shaping the rolls are the most hands-on and active parts of the process.
- Baking is Relatively Quick: The baking time itself is relatively short, around 15-20 minutes.
- Plan for Rising Time: Factor in the rising times when planning your baking schedule. Ensure you have a warm place for the dough to rise.
Time-Saving Tips and Make-Ahead Strategies:
- Make Dough Ahead (Cold Fermentation): You can prepare the dough a day in advance and let it rise slowly in the refrigerator overnight (cold fermentation). After the first knead, place the dough in a greased bowl, cover tightly, and refrigerate for 8-12 hours. The next day, bring the dough back to room temperature for about 1-2 hours, then proceed with shaping and the second rise. Cold fermentation develops more complex flavors in the dough.
- Prepare Dough in the Morning, Bake Later: You can prepare the dough in the morning, let it have its first rise, shape the rolls, and then let them have their second rise and bake them later in the day for Easter brunch or dinner.
- Freeze Baked Rolls: Baked and cooled Easter Bunny Rolls can be frozen for up to 1-2 months. Freeze them in an airtight freezer-safe bag or container. To reheat, thaw them at room temperature and then warm them in a low oven (300°F/150°C) for a few minutes until heated through. They may not be as perfectly soft as freshly baked, but still delicious and convenient.
Planning for Easter Meal:
- Bake on Easter Morning: For the freshest and warmest rolls, bake them on Easter morning about 1-2 hours before you plan to serve brunch or dinner. Start the dough preparation 3-4 hours before you want to serve the rolls, factoring in rising times.
- Utilize Make-Ahead Options: If you are short on time on Easter Day, utilize the make-ahead options like making the dough the day before or freezing baked rolls to streamline your preparations.
By understanding the preparation timeline and utilizing make-ahead strategies, you can effectively plan your baking schedule for Easter Bunny Rolls and ensure these adorable treats are ready to delight your Easter guests at just the right time.
Serving Suggestions: Presenting Your Adorable Easter Bunny Rolls
The presentation of Easter Bunny Rolls is key to enhancing their charm and festive appeal. Here are some creative and delightful ways to serve and present these hoppy treats:
Serving Basket and Platter Ideas:
- Easter Basket Presentation: Line a wicker Easter basket with a pretty cloth napkin or kitchen towel and arrange the Easter Bunny Rolls inside. This is a classic and adorable way to serve them for Easter brunch or as a centerpiece.
- Spring-Themed Platter: Use a round or oval platter and decorate it with fresh spring greenery like lettuce leaves, spinach leaves, or kale leaves. Arrange the bunny rolls on top of the greens to create a “bunny patch” effect.
- Wooden Serving Board: A rustic wooden serving board provides a charming backdrop for the bunny rolls. Arrange them directly on the board or place a layer of parchment paper or greenery underneath.
- Tiered Serving Stand: For a more elegant presentation, use a tiered serving stand. Place the Easter Bunny Rolls on one or more tiers, interspersed with other Easter treats, fresh fruit, or spring flowers.
- Individual Napkin Wraps: For a buffet or casual setting, wrap each bunny roll individually in a colorful cloth napkin or paper napkin and tie with a ribbon or twine.
Garnish and Decoration Ideas:
- Butterflies or Flowers: Scatter small edible sugar butterflies or edible flowers around the platter or basket for an extra touch of spring whimsy.
- Fresh Herbs: Add sprigs of fresh herbs like rosemary, thyme, or mint around the platter for a fragrant and natural garnish.
- Powdered Sugar Dusting: Lightly dust the bunny rolls with powdered sugar for a delicate sweetness and snowy appearance.
- Colored Sugar Sprinkles: For a kid-friendly touch, sprinkle colored sugar sprinkles on the rolls before or after baking (if after, brush with a little melted butter or milk for sprinkles to adhere).
- Ribbon or Twine Accents: Tie a colorful ribbon or twine around the base of the basket or platter for a festive finishing touch.
- Small Easter Eggs: Scatter a few small decorative Easter eggs around the basket or platter for added Easter theme.
Serving Occasions:
- Easter Brunch: Easter Bunny Rolls are a quintessential addition to Easter brunch. Serve them alongside eggs benedict, quiche, fruit salads, and other brunch favorites.
- Easter Dinner: Serve them as dinner rolls for Easter dinner, complementing ham, lamb, or other main courses.
- Easter Egg Hunts: Offer them as a delightful treat after the Easter egg hunt for hungry egg hunters.
- Spring Tea Parties: Perfect for a charming spring tea party or Easter afternoon tea.
- Kid’s Easter Parties: Kids will adore these bunny rolls at Easter parties or playdates.
Serving Temperature and Accompaniments:
- Serve Warm or at Room Temperature: Easter Bunny Rolls are delicious served warm straight from the oven or at room temperature.
- Butter: Serve with softened butter for spreading.
- Jams and Preserves: Offer a selection of jams, jellies, or preserves for a sweet topping.
- Honey or Honey Butter: Honey or homemade honey butter is a delicious sweet accompaniment.
- Savory Dips or Spreads: For a savory twist, serve them with cream cheese, herb butter, or a spinach and artichoke dip.
By paying attention to the serving basket, platter, garnishes, and accompaniments, you can elevate the presentation of your Easter Bunny Rolls and make them even more appealing and festive for your Easter celebrations. A beautiful presentation adds to the overall enjoyment of these charming and delicious treats.
Additional Tips for Easter Bunny Roll Baking Success
To ensure your Easter Bunny Rolls are a resounding success and you achieve bakery-worthy results, consider these additional expert tips:
Tip 1: Yeast Activity is Key – Ensure Fresh and Active Yeast
- Check Yeast Expiration Date: Always check the expiration date on your yeast package to ensure it is still active. Expired yeast may not leaven the dough properly.
- Proof Active Dry Yeast (If Using): If using active dry yeast, proof it in warm water with sugar as instructed in the recipe. This step is crucial to verify that the yeast is alive and active before adding it to the dough. If the yeast doesn’t foam after 5-10 minutes, it’s likely inactive and you should use fresh yeast.
- Warm Liquids (Not Hot): Ensure the milk and water are lukewarm (105-115°F/40-46°C) when activating the yeast and making the dough. Liquids that are too hot will kill the yeast, while liquids that are too cold will not activate it properly. Use a thermometer to check the temperature if you are unsure.
Tip 2: Kneading for Gluten Development – Soft and Elastic Dough
- Knead Properly: Kneading is essential for developing gluten in the dough, which gives the rolls their structure and chewy texture. Knead for the recommended time (6-8 minutes by hand, 4-5 minutes in a stand mixer) until the dough is smooth, elastic, and slightly tacky but not sticky.
- Windowpane Test: To check if the dough is kneaded sufficiently, perform the windowpane test. Take a small piece of dough and gently stretch it thin. If you can stretch it into a thin, translucent membrane without it tearing (like a windowpane), the gluten is well-developed and the dough is kneaded enough. If it tears easily, continue kneading for a few more minutes.
- Don’t Over-Knead (Less Common with Hand Kneading): While less common with hand kneading, over-kneading can make the dough tough. If using a stand mixer, be mindful of kneading time and check the dough’s texture.
Tip 3: Warm Place for Rising – Optimal Dough Fermentation
- Warm and Draft-Free Environment: Provide a warm and draft-free environment for the dough to rise. A slightly warm oven (turned off), a warm corner of your kitchen, or a proofing box are good options.
- Consistent Temperature: Maintain a consistent temperature (around 75-80°F/24-27°C) for optimal yeast activity and dough rising. Too cold temperatures will slow down rising, while excessively hot temperatures can lead to over-proofing or off-flavors.
- Monitor Rising Time but Watch Dough Volume: Rising times in recipes are guidelines. The most important indicator of a properly risen dough is its volume. The dough should double in size during the first rise and almost double during the second rise. Rising time can vary depending on room temperature and yeast activity.
Tip 4: Shaping Techniques – Adorable Bunny Forms
- Smooth Dough Balls for Bodies: When shaping the bunny bodies, roll the dough portions into smooth, even balls. This provides a nice base for the bunny shape.
- Tapered Ears: When shaping the ears, roll the small dough pieces into logs and taper one end to create the ear shape. This gives the bunnies distinct and recognizable ears.
- Attach Ears Securely: Gently but firmly attach the ears to the bunny bodies, pressing them to adhere well so they don’t detach during baking.
- Consistent Size for Even Baking: Try to shape the bunny rolls into relatively consistent sizes for even baking. Smaller rolls will bake faster than larger ones.
Tip 5: Baking to Golden Perfection – Achieve Soft and Golden Rolls
- Preheat Oven Accurately: Ensure your oven is accurately preheated to 375°F (190°C). Oven thermometers are helpful for verifying oven temperature.
- Bake Until Golden Brown: Bake the rolls for the recommended time (15-20 minutes) or until they are golden brown on top and sound hollow when tapped on the bottom. Golden brown color indicates proper baking and flavor development.
- Don’t Overbake: Overbaked rolls will be dry and tough. Check for doneness around the 15-minute mark and adjust baking time accordingly.
- Egg Wash for Color and Shine: The egg wash is crucial for creating a glossy, golden-brown crust. Brush the rolls evenly with egg wash before baking.
- Cool Slightly Before Serving: Let the baked rolls cool slightly on the baking sheet and then transfer them to a wire rack to cool further before serving. This prevents them from becoming soggy on the bottom.
By incorporating these expert tips into your Easter Bunny Roll baking process, you’ll be well on your way to consistently creating rolls that are not only adorable but also perfectly textured, flavorful, and beautifully baked. Experiment, practice, and enjoy the rewarding process of mastering homemade bread baking and creating these charming Easter treats!
Frequently Asked Questions (FAQ) About Easter Bunny Rolls
Got questions about baking Easter Bunny Rolls? You’re not alone! Here are answers to some frequently asked questions to help you troubleshoot and enhance your bunny baking experience:
Q1: Can I make Easter Bunny Rolls ahead of time?
A: Yes, you can definitely prepare Easter Bunny Rolls ahead of time using various make-ahead strategies.
- Make Dough Ahead (Cold Fermentation): As mentioned in the preparation timeline section, you can prepare the dough a day in advance and let it rise slowly in the refrigerator overnight. This can be a great time-saver and also develops more complex flavors.
- Freeze Baked Rolls: Baked and cooled Easter Bunny Rolls freeze well for up to 1-2 months. This is a convenient option if you want to bake them well in advance. Thaw them at room temperature and reheat in a low oven for a few minutes before serving.
- Prepare Dough to Second Rise Stage and Refrigerate: You can prepare the dough up to the shaping stage, let it have its first rise, shape the bunny rolls, place them on a baking sheet, cover, and then refrigerate them for up to 12 hours. When ready to bake, take them out of the refrigerator, let them sit at room temperature for about 30-45 minutes to warm up slightly and complete the second rise, and then bake as directed.
Q2: My dough isn’t rising, what did I do wrong?
A: Dough not rising is a common baking concern. Here are potential reasons and solutions:
- Inactive Yeast: The most common reason is inactive or expired yeast. Ensure your yeast is fresh and within its expiration date. If using active dry yeast, make sure you proof it correctly and it foams up before adding it to the dough.
- Liquids Too Hot or Too Cold: Liquids that are too hot (above 130°F/54°C) will kill yeast. Liquids that are too cold (below 70°F/21°C) will not activate it properly. Use lukewarm liquids (105-115°F/40-46°C).
- Room Temperature Too Cold: Yeast thrives in warm environments. If your kitchen is too cold, the dough will rise very slowly or not at all. Find a warmer place for rising, such as a slightly warm oven (turned off), a warm corner of your kitchen, or a proofing box.
- Too Much Salt: While salt is necessary, too much salt can inhibit yeast activity. Ensure you are using the correct amount of salt as specified in the recipe.
- Check Ingredients: Double-check that you have added all the necessary ingredients, including yeast and sugar (sugar provides food for the yeast).
- Give it More Time: Sometimes dough just needs more time to rise, especially in cooler environments. Be patient and give it the full rising time recommended in the recipe, or even a little longer.
Q3: Can I make these rolls sweeter?
A: Yes, you can adjust the sweetness of Easter Bunny Rolls to your liking.
- Increase Sugar Slightly: You can increase the granulated sugar in the recipe by 1-2 tablespoons for slightly sweeter rolls. Be mindful that too much sugar can inhibit yeast activity.
- Glaze After Baking: For a sweeter finish, you can glaze the baked and cooled rolls with a simple glaze made from powdered sugar and milk or lemon juice.
- Sweet Fillings (For Variations): For even sweeter variations, you could consider adding a sweet filling to the rolls before baking, such as a cream cheese filling or a fruit filling.
Q4: Can I use whole wheat flour or other flours?
A: While all-purpose flour is recommended for soft and fluffy Easter Bunny Rolls, you can experiment with other flours, but it will affect the texture.
- Whole Wheat Flour (Partial Substitution): You can substitute up to half of the all-purpose flour with whole wheat flour for a slightly nuttier flavor and increased fiber. However, whole wheat flour can make the rolls denser and less fluffy. You may need to add a little more liquid if using whole wheat flour as it absorbs more moisture.
- Bread Flour: Bread flour can be used in place of all-purpose flour, but it will result in slightly chewier rolls. All-purpose flour is generally preferred for softer bunny rolls.
- Other Gluten-Free Flours (Requires Recipe Adjustments): Making gluten-free yeast rolls is more complex and typically requires a specific gluten-free bread flour blend and recipe adjustments. It’s not a simple substitution of all-purpose flour with gluten-free flour in this recipe.
Q5: How do I store leftover Easter Bunny Rolls?
A: Properly storing leftover Easter Bunny Rolls will help maintain their freshness.
- Room Temperature (Short Term): Store leftover rolls in an airtight container at room temperature for up to 2-3 days. They are best consumed within the first 1-2 days for optimal softness.
- Freezer (Long Term): For longer storage, freeze baked and cooled rolls in an airtight freezer-safe bag or container for up to 1-2 months. Thaw them at room temperature and reheat in a low oven for a few minutes before serving.
We hope these FAQs have answered your questions and empowered you to confidently bake your own adorable and delicious Easter Bunny Rolls. Enjoy the process, get creative with decorations, and most importantly, savor the hoppy happiness they bring to your Easter celebrations!
Conclusion: Hop into Easter Baking Fun with Bunny Rolls
Easter Bunny Rolls are more than just bread; they are edible symbols of Easter joy, homemade love, and festive cheer. These charming, bunny-shaped rolls bring a touch of whimsy and deliciousness to your Easter celebrations, creating a heartwarming centerpiece for your brunch, dinner, or any springtime gathering. From their soft, fluffy texture and subtly sweet flavor to their adorable bunny forms and the fun baking process, these rolls are a true delight for both bakers and eaters of all ages.
Baking Easter Bunny Rolls is not just about following a recipe; it’s about creating an experience, sharing a joyful activity with family, and adding a personal, homemade touch to your Easter traditions. The aroma of baking bread filling your home, the smiles on faces as you present these cute bunny rolls, and the satisfaction of knowing you’ve created something special from scratch – these are the moments that make Easter baking so rewarding.
So, this Easter, hop into the baking fun and make Easter Bunny Rolls a part of your celebration. Gather your ingredients, follow the steps, and get ready to transform simple dough into a basketful of hoppy happiness. These rolls are sure to be a hit with everyone at your Easter table, creating lasting memories and becoming a cherished tradition for years to come. Happy Easter baking, and may your bunny rolls be as delightful as the holiday itself! Don’t forget to share this recipe and the joy of Easter Bunny Rolls with your loved ones!
Print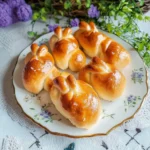
Easter Bunny Rolls recipe
Ingredients
-
- All-Purpose Flour: 4 cups of all-purpose flour form the foundation of these rolls, providing structure and a soft texture. Bread flour can also be used for a slightly chewier roll, but all-purpose flour is generally preferred for softer bunny rolls.
- Granulated Sugar: ¼ cup of granulated sugar adds a touch of sweetness to the rolls and helps activate the yeast. The sugar also contributes to the golden-brown color of the baked rolls.
- Instant Yeast (or Active Dry Yeast): 2 ¼ teaspoons (or one packet) of instant yeast are essential for leavening the dough and creating light and fluffy rolls. Instant yeast can be added directly to the dry ingredients. If using active dry yeast, it needs to be proofed in warm water with sugar before being added to the dough (see instructions below).
- Salt: 1 teaspoon of salt is crucial for controlling yeast activity, enhancing flavor, and strengthening the gluten in the dough. Don’t skip the salt in bread recipes!
- Milk: 1 cup of milk, warmed to lukewarm (about 105-115°F/40-46°C), provides moisture, richness, and helps activate the yeast. Whole milk will result in richer rolls, but 2% or even non-dairy milk can also be used.
- Water: ½ cup of water, warmed to lukewarm (about 105-115°F/40-46°C), adds moisture to the dough and aids in yeast activation.
- Unsalted Butter: 4 tablespoons (½ stick) of unsalted butter, melted and cooled slightly, adds richness, flavor, and tenderness to the rolls. Butter also contributes to the soft crumb and golden-brown crust.
- Egg: 1 large egg, lightly beaten, adds richness, structure, and helps create a golden-brown crust. A beaten egg is also used for the egg wash before baking to enhance shine and color.
- Egg for Egg Wash (for brushing before baking): 1 large egg, beaten with 1 tablespoon of water, for the egg wash. This creates a glossy, golden-brown crust on the rolls.
- Raisins or Chocolate Chips (optional, for eyes): Raisins or mini chocolate chips, for creating the bunny eyes. These are optional but add a cute finishing touch.
Instructions
-
Step 1: Prepare the Dough
- Combine Dry Ingredients: In a large mixing bowl, whisk together the all-purpose flour, granulated sugar, instant yeast (if using instant yeast), and salt.
- Warm Wet Ingredients: In a separate microwave-safe bowl or saucepan, warm the milk and water together until lukewarm (about 105-115°F/40-46°C). If using active dry yeast, proof it in ¼ cup of this warm water with 1 teaspoon of sugar as described above while you proceed with the next steps.
- Melt Butter and Whisk Egg: Melt the butter and let it cool slightly. In a small bowl, lightly beat the egg.
- Combine Wet and Dry Ingredients: Pour the warm milk mixture, melted butter, and beaten egg into the bowl with the dry ingredients. If using active dry yeast that has been proofed, add that mixture now as well.
- Mix to Form a Dough: Using a wooden spoon or spatula, stir the ingredients together until a shaggy dough forms.
- Knead the Dough: Turn the dough out onto a lightly floured surface. Knead the dough for 6-8 minutes, or until it becomes smooth, elastic, and slightly tacky but not sticky. You can also knead the dough in a stand mixer fitted with a dough hook for about 4-5 minutes.
- Form Dough into a Ball: Shape the kneaded dough into a smooth ball.
Step 2: First Rise (Bulk Fermentation)
- Place Dough in a Greased Bowl: Lightly grease a large bowl with cooking spray or oil. Place the dough ball in the greased bowl and turn it to coat all sides with oil.
- Cover and Rise: Cover the bowl tightly with plastic wrap or a clean kitchen towel. Let the dough rise in a warm place (about 75-80°F/24-27°C) for 1-1 ½ hours, or until it has doubled in size. The rising time will vary depending on the temperature of your room.
Step 3: Shape the Bunny Rolls
- Punch Down Dough: Once the dough has doubled, gently punch it down to release the air.
- Divide Dough: Turn the dough out onto a lightly floured surface. Divide the dough into 12-14 equal portions.
- Shape Bunny Bodies: For each portion, roll it into a smooth ball. This will be the bunny’s body. Place the body on a parchment-lined baking sheet.
- Shape Bunny Heads and Ears: Take a small piece of dough from one of the portions (or from a reserved piece if you set some aside). Divide this small piece into two even smaller pieces. Roll each of these smaller pieces into a small log shape, tapering at one end to form bunny ears. Attach the ears to one side of the bunny body, gently pressing them to adhere.
- Repeat for All Rolls: Repeat the shaping process for all remaining dough portions, creating 12-14 bunny rolls on the baking sheet, leaving space between them for rising.
Step 4: Second Rise (Proofing)
- Cover and Rise Again: Cover the baking sheet with the shaped bunny rolls loosely with plastic wrap or a clean kitchen towel. Let them rise in a warm place for 30-45 minutes, or until they have puffed up and are almost doubled in size.
Step 5: Preheat Oven and Prepare Egg Wash
- Preheat Oven to 375°F (190°C): Preheat your oven to 375°F (190°C) about 15-20 minutes before the end of the second rise.
- Prepare Egg Wash: In a small bowl, whisk together the egg and 1 tablespoon of water to make the egg wash.
Step 6: Bake the Bunny Rolls
- Brush with Egg Wash: Gently brush the tops and sides of the risen bunny rolls with the egg wash. Be careful not to deflate them.
- Bake for 15-20 Minutes: Bake in the preheated oven for 15-20 minutes, or until the rolls are golden brown and sound hollow when tapped on the bottom. The baking time may vary slightly depending on your oven.
- Check for Doneness: The rolls are done when they are golden brown and spring back lightly when gently pressed.
Step 7: Cool and Decorate (Optional)
- Cool on Baking Sheet: Remove the baking sheet from the oven and let the bunny rolls cool on the baking sheet for a few minutes.
- Transfer to Wire Rack: Transfer the rolls to a wire rack to cool completely or serve warm.
- Add Eyes (Optional): If desired, once the rolls are slightly cooled, gently press raisins or mini chocolate chips into the dough to create eyes for the bunnies.
Step 8: Serve and Enjoy!
- Serve Warm or at Room Temperature: Easter Bunny Rolls are delicious served warm or at room temperature.
- Serve with Butter, Jam, or Honey: Serve them with butter, jam, honey, or alongside your favorite Easter brunch or dinner dishes.
Nutrition
- Serving Size: one normal portion
- Calories: 180-220
- Sugar: 5-8 grams
- Sodium: 150-200 mg
- Fat: 4-6 grams
- Saturated Fat: 2-3 grams
- Carbohydrates: 30-35 grams
- Fiber: 1-2 grams
- Protein: 4-5 grams
- Cholesterol: 20-30 mg


