
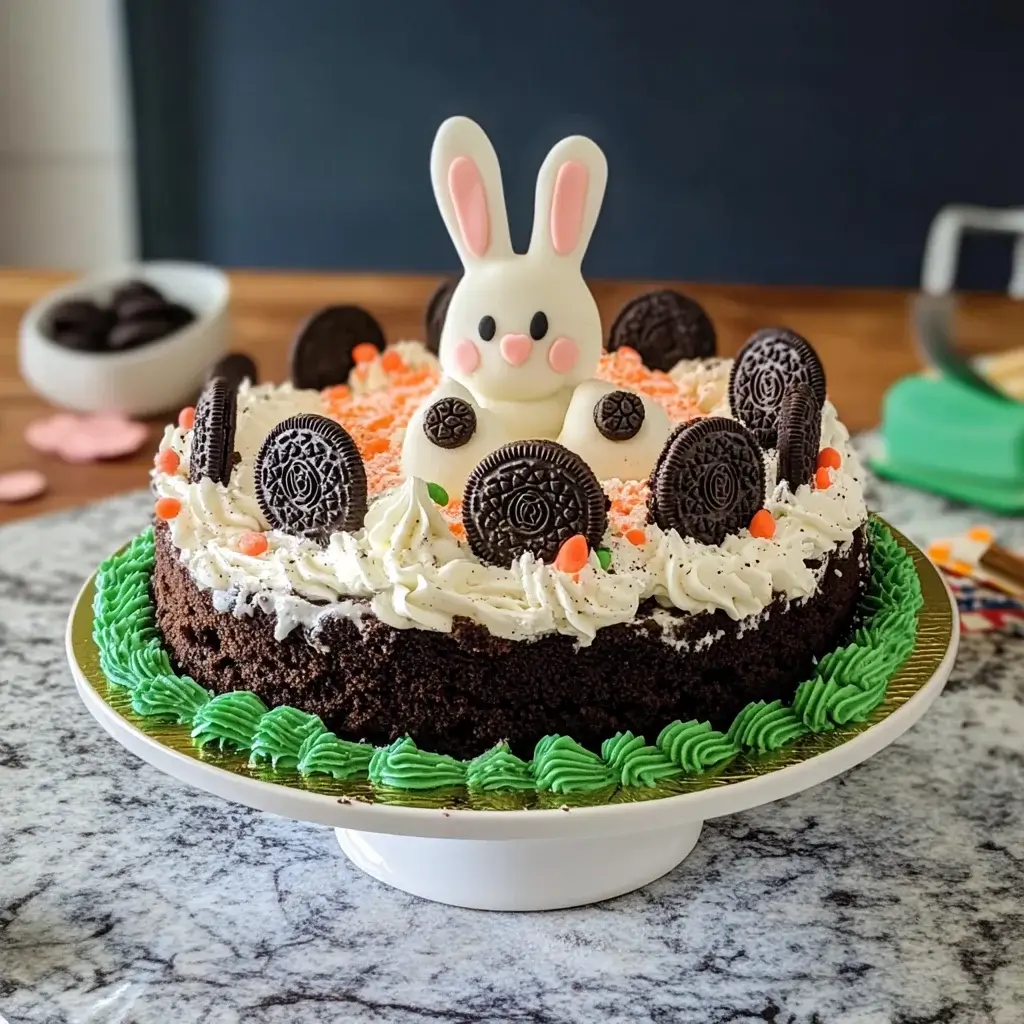

Easter desserts are always a highlight in our family, and this year, I wanted to create something extra special that would combine everyone’s favorite flavors and embody the joyful spirit of the holiday. Enter the Easter Bunny Oreo Ice Cream Cake! Let me tell you, this dessert was an absolute showstopper. The kids were mesmerized by the adorable bunny shape and the promise of Oreos and ice cream, while the adults were equally impressed by the delicious combination of creamy sweetness and crunchy chocolatey goodness. Assembling it was surprisingly fun and easy, making it a perfect activity to involve the little ones. The final result was not only visually stunning but also incredibly delicious, disappearing in record time at our Easter gathering. If you’re looking for a festive, crowd-pleasing dessert that’s sure to bring smiles to faces this Easter, look no further than this Easter Bunny Oreo Ice Cream Cake. It’s pure Easter magic on a plate!
Ingredients: Your Easter Bunny Oreo Ice Cream Cake Shopping List
To create this delightful Easter Bunny Oreo Ice Cream Cake, you’ll need a mix of store-bought convenience items and a few simple pantry staples. Here’s a detailed list to make sure you have everything on hand:
For the Oreo Crust and Cake Base:
- 30 Oreo cookies (regular or Double Stuf), finely crushed: Oreos are the star of this cake, providing a delicious chocolatey base and irresistible crunch. You can use regular Oreos or Double Stuf for extra creaminess. Make sure they are finely crushed for a smooth crust and even distribution in the cake.
- 6 tablespoons unsalted butter, melted: Melted butter binds the crushed Oreo crumbs together to create a sturdy and flavorful crust. Unsalted butter is preferred to control the overall salt level.
- 1/2 gallon (8 cups) vanilla ice cream, softened: Vanilla ice cream is a classic and versatile choice that complements the Oreos perfectly. Choose a good quality vanilla ice cream for the best flavor. Make sure it’s softened enough to spread but not melted, for easy layering.
- Optional: 1/4 cup milk or cream: If your ice cream is very hard, a little milk or cream can help soften it to a spreadable consistency. Start with a smaller amount and add more gradually until you reach the desired texture.
For the Easter Bunny Decoration and Frosting:
- 1 container (16 ounces) whipped topping, thawed (like Cool Whip): Whipped topping provides a light and airy frosting that’s easy to spread and decorate with. Thaw it completely in the refrigerator before using.
- Pink food coloring (gel or liquid): Pink food coloring is essential for creating the Easter Bunny’s pink features, like the ears and nose. Gel food coloring is recommended for vibrant color with less liquid, but liquid food coloring can also be used. Start with a few drops and add more gradually until you achieve your desired shade of pastel pink.
- White candy melts or white chocolate chips: White candy melts or white chocolate chips are used to create the bunny’s ears and optional facial features. Candy melts are easier to work with for melting and setting smoothly.
- Pink or pastel sprinkles: Sprinkles add a festive touch and extra decoration to the cake, enhancing the Easter theme. Choose pastel colors to complement the Easter Bunny design.
- Mini marshmallows: Mini marshmallows are used to create the bunny’s fluffy tail and can also be used for paw details.
- Black decorating gel or mini chocolate chips: Black decorating gel or mini chocolate chips are used to create the bunny’s eyes and nose. Decorating gel is easier to pipe precise features, while mini chocolate chips offer a cute, rounded look.
- Optional: Easter candies for extra decoration: Assorted Easter candies like jelly beans, pastel M&M’s, Cadbury Mini Eggs, or Peeps can be used for additional decoration around the bunny or on top of the cake base.
Ingredient Notes and Substitutions:
- Oreos: You can use any flavor of Oreos you like! Golden Oreos, Mint Oreos, or even limited edition Easter Oreos would all work wonderfully. For a gluten-free option, use gluten-free chocolate sandwich cookies.
- Butter: Unsalted butter is preferred, but salted butter can be used; just omit a pinch of salt if you are very sensitive to saltiness in desserts.
- Ice Cream: Feel free to use your favorite flavor of ice cream! Chocolate, cookies and cream, strawberry, or even a combination of flavors would be delicious. Dairy-free ice cream alternatives like coconut milk or almond milk ice cream can be used for a vegan version.
- Whipped Topping: You can substitute homemade whipped cream for Cool Whip, but it will be less stable and should be served sooner after decorating. For a vegan option, use a vegan whipped topping like coconut whipped cream or a commercially available vegan whipped topping.
- Candy Melts/Chocolate: Milk chocolate or dark chocolate can be used instead of white chocolate for the bunny ears, depending on your preference.
- Sprinkles: Get creative with your sprinkles! Use Easter-themed sprinkles, jimmies, nonpareils, or even edible glitter for extra sparkle.
- Marshmallows: Large marshmallows can be cut into smaller pieces if mini marshmallows are not available.
Instructions: Building Your Easter Bunny Oreo Ice Cream Cake Step-by-Step
Follow these detailed instructions to assemble your adorable and delicious Easter Bunny Oreo Ice Cream Cake:
Step 1: Prepare the Oreo Crust
- Crush the Oreos. Place the Oreo cookies in a food processor and pulse until they are finely crushed into crumbs. Alternatively, place them in a resealable plastic bag and crush them with a rolling pin until finely ground.
- Melt the butter. In a microwave-safe bowl or saucepan, melt the unsalted butter.
- Combine crumbs and butter. In a medium bowl, combine the crushed Oreo crumbs and melted butter. Stir until the crumbs are evenly moistened and the mixture resembles wet sand.
Step 2: Press the Crust into the Pan and Shape Bunny Ears
- Prepare your pan. You’ll need a 9×13 inch baking dish or pan. No need to grease it, as the Oreo crust is buttery enough.
- Press the crust into the pan. Press the Oreo crumb mixture evenly into the bottom of the prepared baking dish. Use the back of a spoon or your fingers to firmly press the crust and create a smooth, even base.
- Reserve crust mixture for bunny ears. Set aside about 1/2 cup of the Oreo crumb mixture.
- Shape bunny ears. On a parchment-lined baking sheet, use the reserved Oreo crumb mixture to shape two bunny ears. You can freehand them or use a bunny ear cookie cutter as a guide. Gently press the crumbs together to form ear shapes, about 4-5 inches long. Place the parchment-lined baking sheet with the bunny ears in the freezer to firm up while you prepare the ice cream layer.
Step 3: Soften and Layer the Ice Cream
- Soften the ice cream. Let the vanilla ice cream soften at room temperature for about 20-30 minutes, or until it’s soft enough to spread easily but not melted. If it’s too hard, you can microwave it in short 10-second intervals, checking frequently, until it reaches a spreadable consistency. Be careful not to melt it. If needed, stir in a tablespoon or two of milk or cream to aid softening.
- Spread ice cream over crust. Spoon the softened vanilla ice cream over the prepared Oreo crust in the baking dish. Spread it evenly to create a smooth layer.
- Freeze the cake. Cover the baking dish tightly with plastic wrap and freeze for at least 4-6 hours, or preferably overnight, to allow the ice cream to firm up completely.
Step 4: Prepare Bunny Ears and Pink Whipped Topping
- Melt white candy melts or white chocolate chips. While the cake is freezing, prepare the bunny ears. Melt the white candy melts or white chocolate chips according to package directions. You can melt them in a microwave in short intervals or using a double boiler.
- Dip Oreo bunny ears in melted candy. Remove the Oreo bunny ears from the freezer. Dip each Oreo bunny ear shape into the melted white candy, coating it completely.
- Add sprinkles to ears (optional). Immediately sprinkle pink or pastel sprinkles onto the candy-coated bunny ears while the candy melt is still wet. This will help the sprinkles adhere.
- Let candy ears set. Place the candy-coated bunny ears on a parchment-lined baking sheet or plate and let the candy melt set completely in the refrigerator or freezer. This will take about 15-20 minutes in the refrigerator or faster in the freezer.
- Tint whipped topping pink. In a medium bowl, gently fold pink food coloring into the thawed whipped topping until you reach your desired pastel pink shade. Start with a few drops and add more gradually. Be careful not to overmix, as this can deflate the whipped topping.
Step 5: Frost and Decorate the Cake
- Remove cake from freezer. Once the ice cream cake is frozen solid and the bunny ears are set, remove the cake from the freezer.
- Frost the cake. Spread the pink whipped topping evenly over the top of the frozen ice cream cake, creating a smooth frosting layer. You can create swirls or a smooth surface, depending on your preference.
- Position bunny ears. Gently insert the candy-coated Oreo bunny ears into the top of the ice cream cake, positioning them towards one end to resemble a bunny.
- Add marshmallow tail. Place a mini marshmallow in the center of the opposite end of the cake to create the bunny’s tail. You can use a few mini marshmallows clustered together for a fluffier tail.
- Create bunny face. Use black decorating gel or mini chocolate chips to create the bunny’s eyes and nose. Position them appropriately on the cake to form a cute bunny face. You can use additional mini marshmallows for bunny paws if desired.
- Add sprinkles and Easter candies (optional). Sprinkle pastel sprinkles over the frosted cake for extra decoration. You can also arrange Easter candies around the bunny or on top of the cake for a more festive look.
Step 6: Serve and Enjoy!
- Freeze briefly before serving (optional). If the whipped topping has softened too much during decorating, you can freeze the cake for another 15-20 minutes to firm it up slightly before serving.
- Slice and serve. To slice the ice cream cake, run a large knife under hot water and wipe it dry before each slice. Slice the cake into squares or rectangles and serve immediately.
- Enjoy the Easter Bunny Oreo Ice Cream Cake! This festive and delicious dessert is best enjoyed right away, while the ice cream is still frozen and the crust is crunchy.
Nutrition Facts: Indulgent Easter Treat
Please note that the nutrition facts provided below are estimates and can vary based on specific brands used, serving size, and decorations. This is a dessert, so enjoy in moderation as part of a balanced diet, especially during Easter celebrations.
- Servings: Approximately 12-16 servings (depending on slice size)
- Calories per serving (estimated, per serving): 400-550 calories (This is a rough estimate and will vary based on ingredients and portion size. Cakes with Double Stuf Oreos and richer ice cream will be higher in calories.)
- Key Nutrients (estimated, per serving):
- Fat: 20-30g (primarily from ice cream, butter, and Oreos)
- Saturated Fat: 12-18g
- Cholesterol: 50-80mg
- Sodium: 200-300mg
- Carbohydrates: 50-70g (primarily from sugar, Oreos, and ice cream)
- Sugar: 40-55g
- Protein: 4-6g
Important Note: This is a dessert intended for special occasions. The calorie and sugar content are significant. Enjoy a slice as a treat and balance your diet with plenty of fruits, vegetables, and whole grains. Consider smaller serving sizes to manage calorie intake.
Preparation Time: Plan Ahead for Freezing
- Prep time: 45-60 minutes (includes crushing Oreos, melting butter, softening ice cream, making bunny ears, and decorating)
- Freezing time: Minimum 4-6 hours, preferably overnight (essential for ice cream to firm up)
- Decoration time: 20-30 minutes (frosting and adding bunny features)
- Total time: Approximately 5 hours 5 minutes to overnight (mostly inactive freezing time)
Make-Ahead Tips:
- Oreo Crust: The Oreo crust can be made a day or two in advance and stored tightly covered at room temperature.
- Bunny Ears: The Oreo bunny ears can be prepared and candy-coated several days in advance and stored in an airtight container at room temperature or in the refrigerator.
- Ice Cream Cake Base: The ice cream cake base (crust and ice cream layer) can be assembled and frozen up to 2-3 days ahead of time. Decorate closer to serving for the freshest appearance of the whipped topping.
How to Serve Your Easter Bunny Oreo Ice Cream Cake: Festive Presentation
This Easter Bunny Oreo Ice Cream Cake is perfect for showcasing as the centerpiece of your Easter dessert table! Here are some serving suggestions:
- As a Dessert Centerpiece:
- Place the entire ice cream cake on a festive platter or cake stand.
- Surround it with Easter decorations like chocolate bunnies, Easter grass, or pastel candies.
- Let it be the star of your Easter buffet or dessert spread.
- Individual Slices:
- Pre-slice the ice cream cake into squares or rectangles for easier serving at a party.
- Arrange slices on dessert plates.
- Garnish each slice with a fresh mint sprig or a small Easter candy for an extra touch.
- With Accompaniments (Optional):
- Serve with a dollop of extra whipped topping or a drizzle of chocolate sauce.
- Offer fresh berries like strawberries or raspberries on the side to complement the sweetness.
- A glass of cold milk or hot chocolate pairs perfectly with this ice cream cake.
- For Kids’ Parties:
- Cut the cake into smaller, kid-friendly portions.
- Add extra sprinkles or colorful Easter candies to make it even more appealing to children.
- Serve with fun, Easter-themed napkins and plates.
Additional Tips for Easter Bunny Oreo Ice Cream Cake Success
Here are five helpful tips to ensure your Easter Bunny Oreo Ice Cream Cake is a delightful success:
- Tip 1: Soften Ice Cream Properly: Don’t rush the ice cream softening process. Soften it just enough to spread easily but not melt. Melted ice cream will refreeze with an icy texture. If it becomes too soft, refreeze it briefly before spreading.
- Tip 2: Firm Crust is Key: Ensure the Oreo crust is firmly pressed into the pan. This creates a solid base for the ice cream layer and prevents it from crumbling when slicing.
- Tip 3: Freeze Thoroughly: Allow ample freezing time for the ice cream cake to become completely solid. This is crucial for clean slices and preventing the cake from melting too quickly when decorating and serving. Overnight freezing is ideal.
- Tip 4: Work Quickly When Decorating: Whipped topping softens at room temperature. Work relatively quickly when frosting and decorating the cake, especially if your kitchen is warm. If the whipped topping starts to soften too much, return the cake to the freezer briefly.
- Tip 5: Get Creative with Decorations: Have fun with the decorations! Customize your bunny with different colored sprinkles, candies, or even edible markers to draw on the candy-coated ears. Involve kids in the decorating process for a fun Easter activity.
FAQ: Your Easter Bunny Oreo Ice Cream Cake Questions Answered
Here are answers to some frequently asked questions about making Easter Bunny Oreo Ice Cream Cake:
Q1: Can I use a different size pan for this ice cream cake?
A: Yes, you can adapt the recipe to different pan sizes. For a thicker cake, use an 8×8 inch square pan. For a thinner cake, you could use a 9×13 inch pan but it will be less tall. Adjust baking time slightly based on pan size.
Q2: Can I make this ice cream cake without whipped topping?
A: Yes, you can use other frostings. You could use a buttercream frosting (though it will be richer), or even a chocolate ganache. Be mindful that buttercream will freeze solid and may be harder to slice directly from the freezer.
Q3: Can I make this cake vegan or dairy-free?
A: Yes, with substitutions! Use vegan Oreos (many varieties are), vegan butter, dairy-free ice cream (coconut milk or almond milk based), and vegan whipped topping (coconut whipped cream or commercially available vegan whipped topping). Ensure your candy melts and decorations are also vegan if needed.
Q4: How do I store leftover Easter Bunny Oreo Ice Cream Cake?
A: Store leftover ice cream cake tightly covered in the freezer. It’s best consumed within a week or two for optimal texture, as ice cream can sometimes develop ice crystals over longer freezer storage.
Q5: Can I make individual Easter Bunny ice cream cakes using this recipe?
A: Yes! You can use muffin tins or individual ramekins to create mini Easter Bunny ice cream cakes. Press the Oreo crust into the bottom of each muffin tin, top with softened ice cream, freeze, and then decorate each mini cake individually with bunny ears and features. Baking time will remain roughly the same.
This Easter Bunny Oreo Ice Cream Cake is a guaranteed crowd-pleaser that combines the fun of Easter with the irresistible flavors of Oreos and ice cream. It’s a festive, make-ahead dessert that will bring joy and smiles to your Easter celebration. Happy baking and Happy Easter!
Print
Easter Bunny Oreo Ice Cream Cake recipe
Ingredients
For the Oreo Crust and Cake Base:
- 30 Oreo cookies (regular or Double Stuf), finely crushed: Oreos are the star of this cake, providing a delicious chocolatey base and irresistible crunch. You can use regular Oreos or Double Stuf for extra creaminess. Make sure they are finely crushed for a smooth crust and even distribution in the cake.
- 6 tablespoons unsalted butter, melted: Melted butter binds the crushed Oreo crumbs together to create a sturdy and flavorful crust. Unsalted butter is preferred to control the overall salt level.
- 1/2 gallon (8 cups) vanilla ice cream, softened: Vanilla ice cream is a classic and versatile choice that complements the Oreos perfectly. Choose a good quality vanilla ice cream for the best flavor. Make sure it’s softened enough to spread but not melted, for easy layering.
- Optional: 1/4 cup milk or cream: If your ice cream is very hard, a little milk or cream can help soften it to a spreadable consistency. Start with a smaller amount and add more gradually until you reach the desired texture.
For the Easter Bunny Decoration and Frosting:
- 1 container (16 ounces) whipped topping, thawed (like Cool Whip): Whipped topping provides a light and airy frosting that’s easy to spread and decorate with. Thaw it completely in the refrigerator before using.
- Pink food coloring (gel or liquid): Pink food coloring is essential for creating the Easter Bunny’s pink features, like the ears and nose. Gel food coloring is recommended for vibrant color with less liquid, but liquid food coloring can also be used. Start with a few drops and add more gradually until you achieve your desired shade of pastel pink.
- White candy melts or white chocolate chips: White candy melts or white chocolate chips are used to create the bunny’s ears and optional facial features. Candy melts are easier to work with for melting and setting smoothly.
- Pink or pastel sprinkles: Sprinkles add a festive touch and extra decoration to the cake, enhancing the Easter theme. Choose pastel colors to complement the Easter Bunny design.
- Mini marshmallows: Mini marshmallows are used to create the bunny’s fluffy tail and can also be used for paw details.
- Black decorating gel or mini chocolate chips: Black decorating gel or mini chocolate chips are used to create the bunny’s eyes and nose. Decorating gel is easier to pipe precise features, while mini chocolate chips offer a cute, rounded look.
- Optional: Easter candies for extra decoration: Assorted Easter candies like jelly beans, pastel M&M’s, Cadbury Mini Eggs, or Peeps can be used for additional decoration around the bunny or on top of the cake base.
Ingredient Notes and Substitutions:
- Oreos: You can use any flavor of Oreos you like! Golden Oreos, Mint Oreos, or even limited edition Easter Oreos would all work wonderfully. For a gluten-free option, use gluten-free chocolate sandwich cookies.
- Butter: Unsalted butter is preferred, but salted butter can be used; just omit a pinch of salt if you are very sensitive to saltiness in desserts.
- Ice Cream: Feel free to use your favorite flavor of ice cream! Chocolate, cookies and cream, strawberry, or even a combination of flavors would be delicious. Dairy-free ice cream alternatives like coconut milk or almond milk ice cream can be used for a vegan version.
- Whipped Topping: You can substitute homemade whipped cream for Cool Whip, but it will be less stable and should be served sooner after decorating. For a vegan option, use a vegan whipped topping like coconut whipped cream or a commercially available vegan whipped topping.
- Candy Melts/Chocolate: Milk chocolate or dark chocolate can be used instead of white chocolate for the bunny ears, depending on your preference.
- Sprinkles: Get creative with your sprinkles! Use Easter-themed sprinkles, jimmies, nonpareils, or even edible glitter for extra sparkle.
- Marshmallows: Large marshmallows can be cut into smaller pieces if mini marshmallows are not available.
Instructions
Step 1: Prepare the Oreo Crust
- Crush the Oreos. Place the Oreo cookies in a food processor and pulse until they are finely crushed into crumbs. Alternatively, place them in a resealable plastic bag and crush them with a rolling pin until finely ground.
- Melt the butter. In a microwave-safe bowl or saucepan, melt the unsalted butter.
- Combine crumbs and butter. In a medium bowl, combine the crushed Oreo crumbs and melted butter. Stir until the crumbs are evenly moistened and the mixture resembles wet sand.
Step 2: Press the Crust into the Pan and Shape Bunny Ears
- Prepare your pan. You’ll need a 9×13 inch baking dish or pan. No need to grease it, as the Oreo crust is buttery enough.
- Press the crust into the pan. Press the Oreo crumb mixture evenly into the bottom of the prepared baking dish. Use the back of a spoon or your fingers to firmly press the crust and create a smooth, even base.
- Reserve crust mixture for bunny ears. Set aside about 1/2 cup of the Oreo crumb mixture.
- Shape bunny ears. On a parchment-lined baking sheet, use the reserved Oreo crumb mixture to shape two bunny ears. You can freehand them or use a bunny ear cookie cutter as a guide. Gently press the crumbs together to form ear shapes, about 4-5 inches long. Place the parchment-lined baking sheet with the bunny ears in the freezer to firm up while you prepare the ice cream layer.
Step 3: Soften and Layer the Ice Cream
- Soften the ice cream. Let the vanilla ice cream soften at room temperature for about 20-30 minutes, or until it’s soft enough to spread easily but not melted. If it’s too hard, you can microwave it in short 10-second intervals, checking frequently, until it reaches a spreadable consistency. Be careful not to melt it. If needed, stir in a tablespoon or two of milk or cream to aid softening.
- Spread ice cream over crust. Spoon the softened vanilla ice cream over the prepared Oreo crust in the baking dish. Spread it evenly to create a smooth layer.
- Freeze the cake. Cover the baking dish tightly with plastic wrap and freeze for at least 4-6 hours, or preferably overnight, to allow the ice cream to firm up completely.
Step 4: Prepare Bunny Ears and Pink Whipped Topping
- Melt white candy melts or white chocolate chips. While the cake is freezing, prepare the bunny ears. Melt the white candy melts or white chocolate chips according to package directions. You can melt them in a microwave in short intervals or using a double boiler.
- Dip Oreo bunny ears in melted candy. Remove the Oreo bunny ears from the freezer. Dip each Oreo bunny ear shape into the melted white candy, coating it completely.
- Add sprinkles to ears (optional). Immediately sprinkle pink or pastel sprinkles onto the candy-coated bunny ears while the candy melt is still wet. This will help the sprinkles adhere.
- Let candy ears set. Place the candy-coated bunny ears on a parchment-lined baking sheet or plate and let the candy melt set completely in the refrigerator or freezer. This will take about 15-20 minutes in the refrigerator or faster in the freezer.
- Tint whipped topping pink. In a medium bowl, gently fold pink food coloring into the thawed whipped topping until you reach your desired pastel pink shade. Start with a few drops and add more gradually. Be careful not to overmix, as this can deflate the whipped topping.
Step 5: Frost and Decorate the Cake
- Remove cake from freezer. Once the ice cream cake is frozen solid and the bunny ears are set, remove the cake from the freezer.
- Frost the cake. Spread the pink whipped topping evenly over the top of the frozen ice cream cake, creating a smooth frosting layer. You can create swirls or a smooth surface, depending on your preference.
- Position bunny ears. Gently insert the candy-coated Oreo bunny ears into the top of the ice cream cake, positioning them towards one end to resemble a bunny.
- Add marshmallow tail. Place a mini marshmallow in the center of the opposite end of the cake to create the bunny’s tail. You can use a few mini marshmallows clustered together for a fluffier tail.
- Create bunny face. Use black decorating gel or mini chocolate chips to create the bunny’s eyes and nose. Position them appropriately on the cake to form a cute bunny face. You can use additional mini marshmallows for bunny paws if desired.
- Add sprinkles and Easter candies (optional). Sprinkle pastel sprinkles over the frosted cake for extra decoration. You can also arrange Easter candies around the bunny or on top of the cake for a more festive look.
Step 6: Serve and Enjoy!
- Freeze briefly before serving (optional). If the whipped topping has softened too much during decorating, you can freeze the cake for another 15-20 minutes to firm it up slightly before serving.
- Slice and serve. To slice the ice cream cake, run a large knife under hot water and wipe it dry before each slice. Slice the cake into squares or rectangles and serve immediately.
- Enjoy the Easter Bunny Oreo Ice Cream Cake! This festive and delicious dessert is best enjoyed right away, while the ice cream is still frozen and the crust is crunchy.
Nutrition
- Serving Size: one normal portion
- Calories: 400-550
- Sugar: 40-55g
- Sodium: 200-300mg
- Fat: 20-30g
- Saturated Fat: 12-18g
- Carbohydrates: 50-70g
- Protein: 4-6g
- Cholesterol: 50-80mg


