
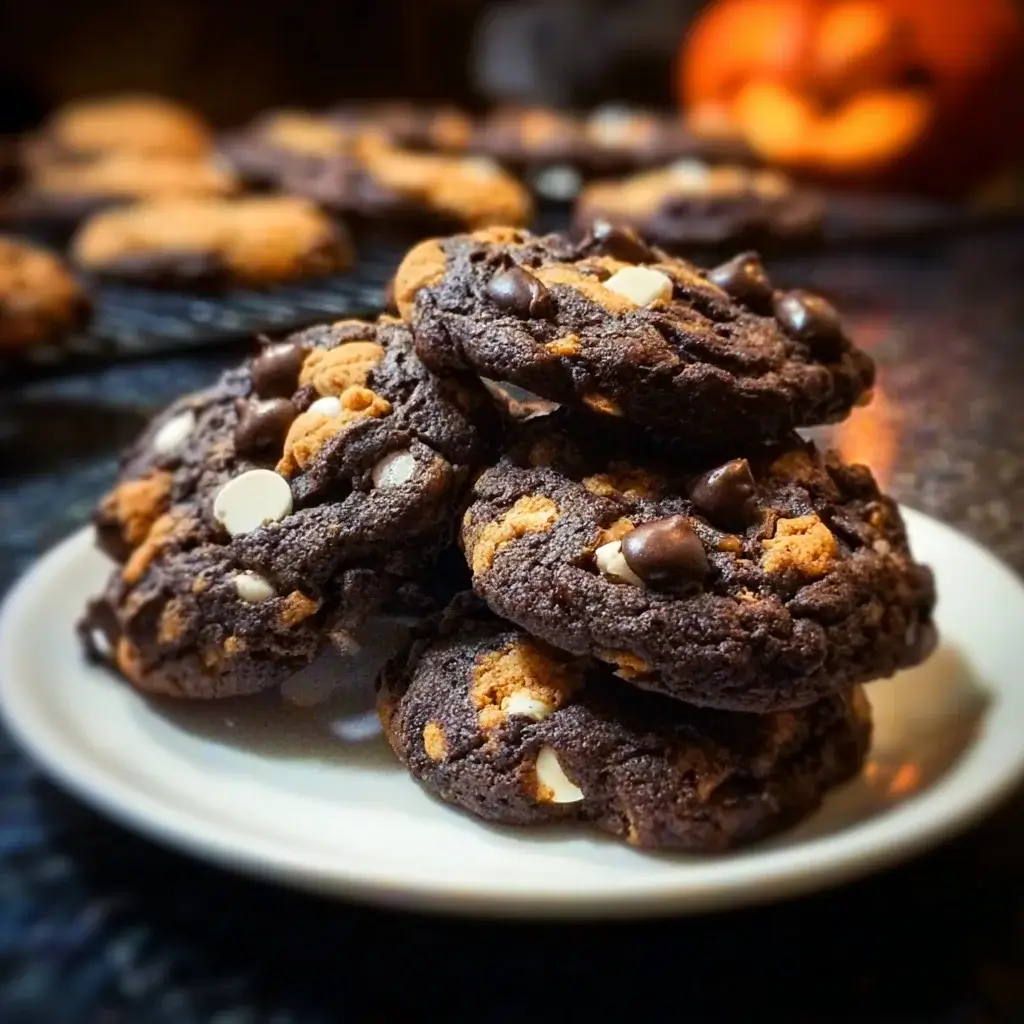

While I love the bright, cartoonish fun of traditional Halloween treats, there’s a part of me that craves something a little more… sinister. A few years ago, I wanted to create a Halloween cookie that felt less like a kid’s party and more like a mysterious, gothic fairytale. I envisioned a cookie as dark as a moonless night, studded with brilliant orange and black gems. The result was these Dark Chocolate Halloween Chip Cookies. The first time I pulled a batch from the oven, I knew I had found it. The kitchen filled with the intoxicatingly deep aroma of rich cocoa, a scent far more complex than a standard chocolate chip cookie. My friends, who are usually the first to grab a classic cookie, were visibly intrigued. They picked them up, admiring the dramatic color contrast before taking a bite. The reaction was immediate—a moment of silence, then a chorus of, “Wow, what is in this?” The secret, a touch of espresso powder and high-quality dark cocoa, creates a flavor that’s intensely chocolatey, sophisticatedly sweet, and utterly addictive. Finished with a sprinkle of flaky sea salt, they are the perfect balance of salty and sweet, chewy and crisp. They have become my signature Halloween offering, a deliciously dark treat for the grown-up ghouls and goblins.
Why You’ll Be Obsessed with These Darkly Delicious Cookies
This isn’t your average, run-of-the-mill cookie recipe. It’s an experience in flavor, texture, and festive elegance. Here’s why these Dark Chocolate Halloween Chip Cookies will become an essential part of your spooky season baking repertoire.
- Intense, Gourmet Chocolate Flavor: This is a cookie for true chocolate lovers. By using dark, Dutch-processed cocoa powder and a secret hint of espresso, we bypass a simple sweet flavor and go straight for deep, rich, and complex chocolate notes. It’s a sophisticated taste that feels incredibly indulgent.
- Stunning Visual Contrast: The visual appeal is undeniable. The almost-black, velvety cookie dough creates a dramatic backdrop for vibrant orange and black Halloween-themed chocolate chips and sprinkles. They look professionally made and are guaranteed to be the showstopper on any dessert table.
- The Perfect Cookie Texture: We all have our cookie texture preferences, and this recipe magically satisfies them all. The edges are perfectly crisp and defined, while the center remains incredibly soft, fudgy, and chewy for days after baking.
- No-Chill Dough for Instant Gratification: Many cookie recipes, especially those with a high butter content, require hours of chilling to prevent spreading. Not this one! This is a no-chill recipe, meaning you can go from mixing the dough to pulling hot, perfect cookies out of the oven in under 30 minutes. It’s perfect for last-minute party prep or a spontaneous baking urge.
- Endlessly Customizable: While this recipe is designed for Halloween, the base dark chocolate cookie is a phenomenal canvas for any holiday or occasion. Swap out the Halloween mix-ins for mint chips, white chocolate, toffee bits, or nuts to enjoy this incredible cookie all year round.
Gather Your Ingredients from the Pantry Crypt
The key to an exceptionally rich and dark cookie lies in using high-quality ingredients. Here’s everything you’ll need to conjure up a batch of these spooky sweets.
For the Dark Chocolate Cookies (Yields approx. 24-30 cookies):
- 1 ½ cups (180g) all-purpose flour
- ¾ cup (75g) high-quality Dutch-processed dark cocoa powder (this is key for the color and flavor)
- 1 teaspoon baking soda
- ½ teaspoon salt
- 1 teaspoon instant espresso powder (optional, but highly recommended for flavor depth)
- 1 cup (226g) unsalted butter, softened to room temperature
- ¾ cup (150g) granulated sugar
- ⅔ cup (140g) packed light brown sugar
- 2 large eggs, at room temperature
- 1 tablespoon pure vanilla extract
- 1 ½ cups Halloween-themed chocolate chips or M&Ms (a mix of orange, black, purple, and green)
- ½ cup Halloween-themed sprinkles (jimmies work best)
- Flaky sea salt, for finishing (like Maldon)
The Recipe Spell: Step-by-Step Instructions
Follow this detailed grimoire to bake a flawless batch of dark and chewy cookies. The process is straightforward, with a few key steps that guarantee a perfect result.
Part 1: Preparing the Cookie Dough
- Preheat Your Cauldron (Oven): Preheat your oven to 375°F (190°C). Line two large baking sheets with parchment paper. This is essential for preventing the dark cookies from sticking and for easy cleanup.
- Mix the Dry Potion: In a medium bowl, whisk together the all-purpose flour, Dutch-processed dark cocoa powder, baking soda, salt, and instant espresso powder. Whisking thoroughly is important; it aerates the flour and ensures the leavening agents and flavorings are evenly distributed throughout the dough. Set aside.
- Cream the Butter and Sugars: In a large bowl with a hand mixer or in the bowl of a stand mixer fitted with the paddle attachment, beat the softened butter, granulated sugar, and light brown sugar on medium-high speed for about 3-4 minutes. The mixture should become very light, pale (as pale as a chocolate base can get!), and fluffy. This step is critical as it whips air into the dough, which contributes to the final texture.
- Add the Eggs and Vanilla: Add the room temperature eggs one at a time, beating well after each addition until it is fully incorporated. Scrape down the sides of the bowl as needed. Beat in the vanilla extract.
- Combine Wet and Dry: Reduce the mixer speed to low and gradually add the dry ingredient mixture to the wet ingredients in two or three additions. Mix only until the last streaks of flour disappear. Do not overmix! Overmixing will develop the gluten and result in a tough, cakey cookie instead of a chewy one.
- Fold in the Halloween Jewels: Remove the bowl from the mixer. Pour in the Halloween chocolate chips and sprinkles. Using a rubber spatula, gently fold the mix-ins into the dough until they are just evenly distributed. Reserve a handful of chips and sprinkles for topping the cookies later.
Part 2: Baking and Finishing Touches
- Scoop the Dough: Using a medium cookie scoop (about 1.5 to 2 tablespoons), scoop mounds of dough onto the prepared baking sheets. Place them about 2-3 inches apart to allow for some spreading.
- The Pro-Decorator’s Trick: For that picture-perfect, bakery-style look, gently press a few of the reserved Halloween chocolate chips and a pinch of sprinkles onto the top of each dough ball before baking. This ensures the vibrant colors are visible and not hidden within the dark dough.
- Bake: Bake for 9-11 minutes. The edges of the cookies should be set and firm, but the centers should still look slightly soft and underdone. This is the secret to a long-lasting chewy texture. Be careful not to overbake, as it’s harder to see the edges browning on a dark cookie.
- The “Cookie Scoot”: For perfectly round cookies, you can perform a “cookie scoot” as soon as they come out of the oven. Take a round cookie cutter or the mouth of a glass that is slightly larger than the cookie and place it over the hot cookie on the pan. Gently swirl the cutter around the cookie, nudging the soft edges into a perfect circle.
- Cool and Salt: Let the cookies cool on the hot baking sheet for 5-7 minutes. This allows the centers to finish setting up. While they are still warm, sprinkle each cookie with a tiny pinch of flaky sea salt. The salt will adhere to the warm, gooey chocolate and create an incredible flavor combination.
- Transfer: After resting, use a spatula to transfer the cookies to a wire rack to cool completely.
Nutrition Facts
- Servings: Approximately 2.5 dozen (30) cookies
- Calories per serving (1 cookie): Approximately 160-190 kcal
Disclaimer: The nutritional information provided is an estimate and can vary based on the specific brands of ingredients used, the exact size of the cookies, and the types of mix-ins.
Preparation Time
- Prep Time: 15 minutes
- Cook Time: 9-11 minutes (per batch)
- Total Time: Approximately 30 minutes
How to Serve Your Sinister Sweets
These cookies are a statement piece. Present them in a way that highlights their spooky elegance and delicious flavor.
- The Midnight Platter: Arrange the cookies on a stark white or rustic wooden platter. The contrast will make the dark cookies and bright colors pop. For extra flair, use melted white chocolate in a piping bag to draw a delicate spiderweb design on the platter before placing the cookies on top.
- The Ultimate Halloween Cookie Box: Create a festive cookie box for a party or as a gift. Combine these dark chocolate cookies with other Halloween favorites like the Mummy Pumpkin Cookies or Hotdog Fingers for a variety of colors, shapes, and flavors.
- Gourmet Ice Cream Sandwiches: Soften a pint of high-quality vanilla bean, salted caramel, or even orange-flavored ice cream. Sandwich a scoop between two of the dark chocolate cookies for an incredibly decadent Halloween dessert.
- Paired with a Potion: These rich cookies are perfect with a beverage to cut through the sweetness.
- For all ages: A tall, cold glass of milk is the classic, unbeatable pairing.
- For adults: Serve alongside a hot cup of black coffee or a strong espresso to amplify the chocolate notes.
- For a festive twist: A “Bloody” Milkshake (vanilla milkshake with strawberry or raspberry puree drizzled down the inside of the glass) makes for a fun and gory companion.
Additional Tips for Baking Perfection
Unlock the full potential of your dark chocolate cookies with these five insider tips.
- Dutch-Processed Cocoa is Non-Negotiable: This is the most important tip. Dutch-processed cocoa powder has been treated to neutralize its acidity, resulting in a smoother, richer chocolate flavor and, most importantly, a much darker, almost-black color. Using natural cocoa powder will result in a lighter brown, more reddish cookie with a tangier flavor. For the “dark” in Dark Chocolate Cookies, you must use Dutch-processed.
- Don’t Skip the Espresso Powder: It may seem strange, but adding a teaspoon of instant espresso or coffee powder is a secret weapon in chocolate baking. It doesn’t make the cookies taste like coffee; instead, it deepens and intensifies the chocolate flavor, making it taste more complex and luxurious.
- The Beauty is on Top: Remember to press extra chocolate chips and sprinkles onto the tops of the dough balls before baking. Dough tends to envelop mix-ins as it bakes. This simple step ensures your cookies look as vibrant and festive as they taste.
- Underbake for a Chewy Texture: The key to a perfectly chewy cookie that stays soft for days is to pull it from the oven when the center still looks a bit gooey and underdone. The residual heat from the baking sheet will continue to cook the cookie as it rests, setting the center to a perfect fudgy consistency without drying it out.
- Flaky Sea Salt is the Finishing Touch: Don’t substitute regular table salt for this final step. Flaky sea salt (like Maldon or Jacobsen) has a large, delicate crystal structure that provides a satisfying crunch and a clean, briny flavor that beautifully contrasts with the rich, sweet chocolate. It elevates the cookie from simply “good” to “gourmet.”
Frequently Asked Questions (FAQ) About Your Dark Creation
Here are the answers to some common questions you might have while on your baking quest.
1. My cookies spread out too much and are thin and crispy. What went wrong?
This is a classic cookie conundrum! The most common culprit is butter that was too soft or melted. Your butter should be at room temperature but still firm enough to hold its shape. Other causes could be measuring the flour incorrectly (too little flour) or placing dough on a hot baking sheet from a previous batch, which melts the butter too quickly.
2. Where can I find Halloween-themed chocolate chips and sprinkles?
During the fall season (starting as early as late August), most major grocery stores will have a dedicated seasonal baking aisle with a wide variety of themed chips, M&Ms, and sprinkles. You can also find them year-round at craft stores like Michaels or JOANN, or from online specialty baking retailers.
3. Can I make this cookie dough ahead of time?
Yes, this dough is great for making ahead! You can prepare the dough, scoop it into balls, and store them in an airtight container in the refrigerator for up to 3 days. When you’re ready to bake, place the chilled dough balls directly on your prepared baking sheet; you may need to add 1-2 minutes to the baking time. You can also freeze the dough balls for up to 3 months for cookies on demand.
4. Can I use regular chocolate chips if I can’t find Halloween ones?
Absolutely! The dark chocolate cookie base is incredibly versatile. Semi-sweet, milk chocolate, or even white chocolate chips would be delicious. The cookie will just lose its specific orange-and-black Halloween aesthetic. For a similar spooky look, you could use regular semi-sweet chips and a generous amount of orange and black nonpareils or jimmies.
5. How do I store these cookies to keep them soft and chewy?
The best way to store these cookies is in an airtight container at room temperature. They will stay soft and chewy for up to 5 days. For an extra trick to keep them moist, add a slice of plain sandwich bread to the container. The cookies will absorb moisture from the bread, keeping them exceptionally soft.

Dark Chocolate Halloween Chip Cookies recipe
Ingredients
-
1 ½ cups (180g) all-purpose flour
-
¾ cup (75g) high-quality Dutch-processed dark cocoa powder (this is key for the color and flavor)
-
1 teaspoon baking soda
-
½ teaspoon salt
-
1 teaspoon instant espresso powder (optional, but highly recommended for flavor depth)
-
1 cup (226g) unsalted butter, softened to room temperature
-
¾ cup (150g) granulated sugar
-
⅔ cup (140g) packed light brown sugar
-
2 large eggs, at room temperature
-
1 tablespoon pure vanilla extract
-
1 ½ cups Halloween-themed chocolate chips or M&Ms (a mix of orange, black, purple, and green)
-
½ cup Halloween-themed sprinkles (jimmies work best)
-
Flaky sea salt, for finishing (like Maldon)
Instructions
Part 1: Preparing the Cookie Dough
-
Preheat Your Cauldron (Oven): Preheat your oven to 375°F (190°C). Line two large baking sheets with parchment paper. This is essential for preventing the dark cookies from sticking and for easy cleanup.
-
Mix the Dry Potion: In a medium bowl, whisk together the all-purpose flour, Dutch-processed dark cocoa powder, baking soda, salt, and instant espresso powder. Whisking thoroughly is important; it aerates the flour and ensures the leavening agents and flavorings are evenly distributed throughout the dough. Set aside.
-
Cream the Butter and Sugars: In a large bowl with a hand mixer or in the bowl of a stand mixer fitted with the paddle attachment, beat the softened butter, granulated sugar, and light brown sugar on medium-high speed for about 3-4 minutes. The mixture should become very light, pale (as pale as a chocolate base can get!), and fluffy. This step is critical as it whips air into the dough, which contributes to the final texture.
-
Add the Eggs and Vanilla: Add the room temperature eggs one at a time, beating well after each addition until it is fully incorporated. Scrape down the sides of the bowl as needed. Beat in the vanilla extract.
-
Combine Wet and Dry: Reduce the mixer speed to low and gradually add the dry ingredient mixture to the wet ingredients in two or three additions. Mix only until the last streaks of flour disappear. Do not overmix! Overmixing will develop the gluten and result in a tough, cakey cookie instead of a chewy one.
-
Fold in the Halloween Jewels: Remove the bowl from the mixer. Pour in the Halloween chocolate chips and sprinkles. Using a rubber spatula, gently fold the mix-ins into the dough until they are just evenly distributed. Reserve a handful of chips and sprinkles for topping the cookies later.
Part 2: Baking and Finishing Touches
-
Scoop the Dough: Using a medium cookie scoop (about 1.5 to 2 tablespoons), scoop mounds of dough onto the prepared baking sheets. Place them about 2-3 inches apart to allow for some spreading.
-
The Pro-Decorator’s Trick: For that picture-perfect, bakery-style look, gently press a few of the reserved Halloween chocolate chips and a pinch of sprinkles onto the top of each dough ball before baking. This ensures the vibrant colors are visible and not hidden within the dark dough.
-
Bake: Bake for 9-11 minutes. The edges of the cookies should be set and firm, but the centers should still look slightly soft and underdone. This is the secret to a long-lasting chewy texture. Be careful not to overbake, as it’s harder to see the edges browning on a dark cookie.
-
The “Cookie Scoot”: For perfectly round cookies, you can perform a “cookie scoot” as soon as they come out of the oven. Take a round cookie cutter or the mouth of a glass that is slightly larger than the cookie and place it over the hot cookie on the pan. Gently swirl the cutter around the cookie, nudging the soft edges into a perfect circle.
-
Cool and Salt: Let the cookies cool on the hot baking sheet for 5-7 minutes. This allows the centers to finish setting up. While they are still warm, sprinkle each cookie with a tiny pinch of flaky sea salt. The salt will adhere to the warm, gooey chocolate and create an incredible flavor combination.
-
Transfer: After resting, use a spatula to transfer the cookies to a wire rack to cool completely.
Nutrition
- Serving Size: one normal portion
- Calories: 160-190 kcal


