

I will never forget the first time I tasted truly crispy shallots. It was at a small Vietnamese restaurant, sprinkled generously over a bowl of Bun Cha. Before then, shallots were just another ingredient in my pantry, something I chopped and sautéed as a flavor base. But those delicate, golden strands of crispy shallots were a revelation! They weren’t just crunchy; they were bursting with an intensely savory, slightly sweet, and deeply umami flavor that elevated the entire dish. From that moment on, I was hooked. I started experimenting with making crispy shallots at home, initially with mixed results – sometimes burnt, sometimes soggy. But after much trial and error (and a few smoky kitchen incidents!), I finally perfected the technique. Now, crispy shallots are a staple in my kitchen. They are incredibly versatile, adding a gourmet touch to everything from simple weeknight meals to elegant dinner party dishes. Whether you sprinkle them over soups, salads, noodles, meats, or vegetables, crispy shallots add an irresistible crunch and a burst of flavor that will transform your cooking. Let me share my foolproof method for making perfectly crispy shallots every time, so you too can experience the magic of this incredible ingredient!
Ingredients
Creating perfectly crispy shallots is surprisingly simple and relies on just a few key ingredients. The quality of these ingredients, especially the shallots and oil, can significantly impact the final result. Here’s a detailed list of what you’ll need:
- Shallots: 1 pound (about 4-6 large shallots). Shallots are the star of the show, and choosing the right ones is crucial. Look for firm, heavy shallots with smooth, dry skins. Avoid shallots that are soft, sprouting, or have blemishes. The type of shallot generally doesn’t matter too much, but French grey shallots or banana shallots are excellent choices if available, known for their delicate flavor. Smaller shallots can be a bit more tedious to peel, while larger ones are easier to handle. Ensure you have enough shallots to yield a good quantity of crispy shallots, as they shrink considerably during cooking.
- Oil for Frying: 2-3 cups of neutral-flavored oil with a high smoke point. The choice of oil is important for both flavor and safety. You need an oil that can withstand high temperatures without smoking or imparting an unwanted flavor. Excellent options include:
- Vegetable Oil: A readily available and affordable option with a neutral flavor.
- Canola Oil: Another neutral-flavored oil with a high smoke point, also widely available.
- Peanut Oil: Offers a slightly nutty flavor and has a very high smoke point, making it ideal for deep frying. Be mindful of peanut allergies if serving to others.
- Avocado Oil: A healthier option with a mild flavor and high smoke point. It can be more expensive than other oils.
- Grapeseed Oil: Light flavor and high smoke point, a good all-purpose frying oil.
- Salt: 1 teaspoon of kosher salt, plus more to taste. Salt is essential for seasoning the shallots and enhancing their flavor. Kosher salt is recommended for its clean taste and ease of use, but sea salt or table salt can also be used. You’ll use some salt to season the shallots before frying and additional salt to season them after frying, if needed.
- Optional Seasonings (for variations):
- Black Pepper: Freshly ground black pepper can add a touch of spice and complexity.
- Garlic Powder: A sprinkle of garlic powder can enhance the savory flavor.
- Onion Powder: Similar to garlic powder, onion powder adds another layer of savory depth.
- Paprika (Smoked or Sweet): Adds a smoky or sweet note and a hint of color.
- Chili Flakes: For a touch of heat, a pinch of red pepper flakes can be added.
- Herbs (Dried Thyme, Rosemary): Dried herbs can be added for a more complex flavor profile, especially for savory applications.
Ingredient Notes and Tips:
- Freshness of Shallots: Use the freshest shallots you can find. They should be firm and free of blemishes for the best flavor and texture.
- Oil Quantity: Ensure you have enough oil to fully submerge the shallots during frying. This promotes even cooking and crisping. The exact amount will depend on the size of your pan.
- Neutral Oil is Key: Using a neutral-flavored oil prevents the oil from overpowering the delicate flavor of the shallots.
- Salt Quality: Good quality salt enhances the overall flavor. Adjust the salt amount to your preference.
- Seasoning Versatility: The basic recipe is fantastic as is, but don’t hesitate to experiment with different seasonings to create your own signature crispy shallot blend. Consider the dishes you plan to use them in when choosing seasonings.
By gathering these simple, high-quality ingredients, you’re well on your way to creating incredibly flavorful and perfectly crispy shallots that will elevate your culinary creations.
Instructions
Making crispy shallots at home is a rewarding process, and with these clear, step-by-step instructions, you’ll achieve perfect results every time. There are a few methods you can use, but frying is the most traditional and effective for achieving maximum crispiness. Here’s how to do it:
Method 1: Frying Crispy Shallots (Classic Method)
- Prepare the Shallots: Peel the shallots. The easiest way to peel shallots is to trim off the root end and the pointy tip, then make a shallow slit lengthwise through the skin. The skin should then slip off easily.
- Slice the Shallots: Thinly slice the shallots. Uniformly thin slices are crucial for even cooking and crisping. You can use a sharp knife, mandoline slicer (use caution!), or food processor with a slicing blade. Aim for slices that are about 1/8 inch thick. Thicker slices will take longer to crisp and may become unevenly cooked.
- Soak Shallots in Water (Optional but Recommended): Place the sliced shallots in a bowl of cold water for about 10-15 minutes. This step is optional but highly recommended. Soaking helps to remove some of the excess starch from the shallots, which can contribute to clumping and uneven crisping. After soaking, drain the shallots thoroughly and pat them completely dry with paper towels. Excess moisture will cause the oil to splatter and can hinder crisping.
- Heat the Oil: Pour 2-3 inches of neutral oil into a heavy-bottomed pot or deep skillet. Use a thermometer to monitor the oil temperature. Heat the oil over medium heat until it reaches 300°F (150°C). If you don’t have a thermometer, you can test the oil by dropping a single shallot slice into it. If it sizzles gently and floats to the top within a few seconds, the oil is ready. It’s crucial to start with oil that isn’t too hot, as this will burn the shallots before they become crispy inside.
- Fry the Shallots in Batches: Carefully add the sliced shallots to the hot oil in batches. Do not overcrowd the pan, as this will lower the oil temperature and lead to soggy shallots. Fry in batches, adding only enough shallots to form a single layer in the oil.
- Fry Until Golden Brown and Crispy: Fry the shallots, stirring occasionally with a slotted spoon or spider strainer, for about 10-20 minutes, or until they turn a light golden brown color and become crispy. The timing will depend on the thickness of the shallot slices and the oil temperature. Initially, the shallots will bubble and soften. As they cook, the bubbling will subside, and they will start to turn golden and crisp. Watch them closely towards the end, as they can go from golden brown to burnt quickly. Aim for a light golden brown color – they will continue to darken slightly after being removed from the oil.
- Remove and Drain: Once the shallots are crispy and golden brown, quickly remove them from the oil using a slotted spoon or spider strainer and transfer them to a wire rack lined with paper towels to drain excess oil. Spread them out in a single layer to prevent steaming and maintain crispiness.
- Season Immediately: While the shallots are still hot, season them generously with kosher salt and any other desired seasonings (black pepper, garlic powder, etc.). Seasoning while hot allows the salt and spices to adhere better.
- Cool Completely: Allow the crispy shallots to cool completely on the wire rack. As they cool, they will crisp up further and become even crunchier.
- Store (if not using immediately): Once completely cooled, store the crispy shallots in an airtight container at room temperature. They will stay crispy for several days, up to a week, if stored properly.
Method 2: Baking Crispy Shallots (Oven Method – Less Crispy but Healthier)
- Prepare and Slice Shallots: Follow steps 1 and 2 from the frying method to peel and thinly slice the shallots. Soaking in water is less critical for baking but can still help.
- Toss with Oil and Seasoning: In a bowl, toss the sliced shallots with 2-3 tablespoons of olive oil or neutral oil, salt, and any desired seasonings. Toss well to coat evenly.
- Spread on Baking Sheet: Spread the seasoned shallots in a single layer on a baking sheet lined with parchment paper. Again, avoid overcrowding.
- Bake: Preheat oven to 300°F (150°C). Bake for 30-45 minutes, stirring every 10-15 minutes, until the shallots are golden brown and crispy. Baking time will vary depending on oven and shallot thickness. Watch carefully to prevent burning.
- Cool and Crisp: Remove from oven and let cool completely on the baking sheet. They will crisp up as they cool.
Method 3: Air Frying Crispy Shallots (Faster and Less Oil)
- Prepare and Slice Shallots: Follow steps 1 and 2 from the frying method to peel and thinly slice the shallots. Soaking in water is optional.
- Toss with Oil and Seasoning: In a bowl, toss the sliced shallots with 1-2 tablespoons of oil (less oil needed for air frying), salt, and desired seasonings.
- Air Fry: Preheat air fryer to 300°F (150°C). Place shallots in the air fryer basket in a single layer (you may need to do this in batches). Air fry for 10-15 minutes, shaking the basket every 3-5 minutes, until golden brown and crispy.
- Cool and Crisp: Remove from air fryer and let cool completely.
Tips for Perfect Crispy Shallots:
- Uniform Slicing is Key: Consistent slice thickness ensures even cooking and crisping.
- Don’t Overcrowd the Pan (Frying): Fry in batches to maintain oil temperature and prevent steaming.
- Low and Slow is Better (Frying): Start with oil that’s not too hot and fry gently over medium heat for even crisping.
- Watch Closely Towards the End: Shallots can burn quickly in the final minutes of cooking.
- Drain Thoroughly: Draining excess oil on a wire rack is essential for crispiness.
- Season While Hot: Seasoning hot shallots allows flavors to adhere better.
- Cool Completely for Maximum Crispness: They become extra crispy as they cool.
By following these detailed instructions and tips, you’ll be able to make perfectly crispy and delicious shallots using your preferred method.
Nutrition Facts
While crispy shallots are primarily used as a flavorful garnish rather than a main dish, it’s helpful to understand their nutritional profile, especially if you are mindful of calorie and fat intake. Here’s an approximate nutritional breakdown per serving. Keep in mind that these values are estimations and can vary based on the amount of oil absorbed and portion sizes.
Servings: Approximately 1 cup of crispy shallots (yield from 1 pound raw shallots)
Serving Size: 1 tablespoon (approximately 5-7 grams)
Approximate Nutrition Facts per Serving (1 tablespoon of fried crispy shallots, estimated):
- Calories: 30-40 calories
- Total Fat: 2.5-3.5 grams
- Saturated Fat: < 0.5 grams (depending on oil type)
- Monounsaturated Fat: Varies (depending on oil type)
- Polyunsaturated Fat: Varies (depending on oil type)
- Cholesterol: 0 mg
- Sodium: 20-40 mg (depending on added salt)
- Total Carbohydrates: 2-3 grams
- Dietary Fiber: < 1 gram
- Sugars: < 1 gram
- Protein: < 1 gram
- Vitamins and Minerals: Trace amounts of vitamins and minerals naturally present in shallots, but significantly reduced after frying.
Key Nutritional Considerations:
- Calorie Density: Crispy shallots are calorie-dense due to the oil absorption during frying. Portion control is important if you are watching your calorie intake.
- Fat Content: The majority of calories come from fat, primarily from the frying oil. The type of fat depends on the oil used (vegetable, canola, peanut, avocado, etc.).
- Minimal Nutrients: The frying process significantly reduces the vitamin and mineral content of raw shallots. Crispy shallots are primarily valued for their flavor and texture rather than their nutritional contribution.
- Sodium Content: Sodium content depends on the amount of salt added. Be mindful of salt intake, especially if you are sodium-sensitive.
Comparison to Raw Shallots (per 1 tablespoon, raw):
- Calories: Approximately 4 calories
- Fat: Negligible
- Carbohydrates: Approximately 1 gram
- Protein: Negligible
- Fiber: Negligible
- Vitamins and Minerals: Raw shallots contain small amounts of Vitamin C, Vitamin B6, Folate, Potassium, and Manganese.
Healthier Alternatives (Less Crispy, Lower Fat):
- Baked Crispy Shallots: Baking reduces the fat content compared to frying but results in a less intensely crispy texture.
- Air-Fried Crispy Shallots: Air frying also uses significantly less oil than deep frying, offering a slightly healthier option with decent crispiness.
- Dehydrated Shallots: Dehydrating shallots creates a crispy texture without added oil, but the flavor is different from fried crispy shallots.
Important Note: These nutrition facts are estimates. For more precise nutritional information, you can use online nutrition calculators or apps and input the specific brands and quantities of ingredients you use, especially the type of oil and amount absorbed. Crispy shallots should be enjoyed in moderation as a flavorful garnish as part of a balanced diet.
Preparation Time
Making crispy shallots is relatively quick, especially considering the flavor payoff they provide. Here’s a breakdown of the preparation time for frying crispy shallots:
Prep Time: 15-20 minutes
- Peeling Shallots: Peeling shallots can take about 5-7 minutes, depending on quantity and your peeling speed.
- Slicing Shallots: Slicing shallots thinly and uniformly takes about 5-10 minutes, especially if using a knife. Using a mandoline or food processor can speed this up, but set-up and clean-up time should be considered.
- Soaking and Drying (Optional): Soaking in water takes 10-15 minutes (passive time). Draining and thoroughly drying takes about 3-5 minutes (active time).
Cook Time: 10-20 minutes
- Heating Oil: Heating the oil to the correct temperature takes about 5-7 minutes.
- Frying Shallots: Frying the shallots in batches takes approximately 10-20 minutes, depending on batch size and desired crispiness.
Cooling Time: 15-20 minutes (recommended)
- Draining and Cooling: Allowing the shallots to drain excess oil and cool completely on a wire rack takes about 15-20 minutes. This is passive time, but crucial for achieving maximum crispiness.
Total Time: Approximately 40-60 minutes (frying method)
Time Variations for Other Methods:
- Baking: Baking time is longer (30-45 minutes cook time) but requires less active monitoring during cooking. Total time is roughly similar to frying.
- Air Frying: Air frying is faster (10-15 minutes cook time). Total time is slightly shorter than frying, around 30-45 minutes.
Make-Ahead Options:
- Sliced Shallots (Prep Ahead): You can peel and slice the shallots a few hours ahead of time and store them in an airtight container in the refrigerator to save time on the day of cooking. However, slice them closer to cooking time for best results to prevent oxidation.
Tips to Save Time:
- Use a Mandoline or Food Processor: If you have these tools, they can significantly speed up the slicing process, especially for large quantities of shallots.
- Peel Shallots in Bulk: If you frequently use shallots, you can peel a larger batch at once and store them in the refrigerator for later use (though freshly peeled is best for crispy shallots).
- Efficient Workflow: Organize your ingredients and equipment beforehand to streamline the process and minimize wasted time.
Despite the slightly longer total time compared to some quick recipes, the active hands-on time for making crispy shallots is relatively short. The majority of the time is passive – frying or baking and cooling – allowing you to multitask or prepare other components of your meal simultaneously. The flavor payoff for the time invested is well worth it, transforming simple dishes into culinary delights.
How to Serve
Crispy shallots are incredibly versatile and can elevate a wide range of dishes with their savory crunch and umami depth. Here are numerous ways to serve and use crispy shallots, categorized for easy reference:
- As a Garnish for Soups and Stews:
- Asian-Inspired Soups: Miso soup, ramen, pho, laksa, tom yum soup, wonton soup, and other Asian noodle soups. Crispy shallots add a textural contrast and enhance the savory broth.
- Creamy Soups: Cream of mushroom soup, butternut squash soup, potato soup, and other creamy vegetable soups. They provide a welcome crunch and prevent the soup from being overly rich.
- Bean and Lentil Soups: Lentil soup, black bean soup, white bean soup, and other hearty legume soups. Crispy shallots add a savory element and textural interest.
- Chili: Sprinkle crispy shallots over chili for added texture and flavor depth.
- Topping for Salads:
- Asian Salads: Vietnamese chicken salad, Thai beef salad, and other Asian-style salads with vinaigrette dressings. Crispy shallots complement the fresh vegetables and tangy dressings.
- Green Salads: Simple green salads with vinaigrette or creamy dressings. They add crunch and savory flavor to basic salads.
- Grain Salads: Quinoa salad, farro salad, and other grain-based salads. Crispy shallots enhance the texture and flavor profile.
- Potato Salad: Add crispy shallots to potato salad for an unexpected crunch and savory note.
- Enhancing Main Courses:
- Grilled or Roasted Meats: Steak, chicken, pork, lamb, and fish. Sprinkle crispy shallots over grilled or roasted meats just before serving to add texture and flavor.
- Noodle Dishes: Stir-fried noodles (chow mein, pad see ew), pasta dishes, and noodle bowls. They add crunch to saucy or slippery noodles.
- Rice Dishes: Fried rice, pilafs, biryani, and steamed rice. Crispy shallots are a classic topping for many rice dishes, especially in Asian cuisines.
- Eggs: Scrambled eggs, omelets, fried eggs, and eggs benedict. They add a savory crunch to egg dishes.
- Adding Texture to Side Dishes:
- Roasted Vegetables: Roasted broccoli, Brussels sprouts, carrots, potatoes, and sweet potatoes. Sprinkle crispy shallots over roasted vegetables for added texture and flavor dimension.
- Mashed Potatoes: Top mashed potatoes with crispy shallots for a gourmet touch and textural contrast.
- Green Beans: Sautéed or steamed green beans. Crispy shallots elevate simple green bean dishes.
- Mac and Cheese: Sprinkle crispy shallots over mac and cheese for added crunch and savory flavor.
- Appetizers and Snacks:
- Dips: Stir crispy shallots into dips like French onion dip, spinach artichoke dip, or hummus for added texture and flavor.
- Cheese Boards: Include a small bowl of crispy shallots on cheese boards to pair with cheeses and crackers.
- Avocado Toast: Top avocado toast with crispy shallots for extra crunch and savory flavor.
- Deviled Eggs: Garnish deviled eggs with crispy shallots for a sophisticated twist.
- Creative Culinary Uses:
- Sandwich and Burger Topping: Add crispy shallots to sandwiches and burgers for extra crunch and flavor.
- Taco Topping: Use crispy shallots as a unique taco topping for vegetarian or meat tacos.
- Pizza Topping: Sprinkle crispy shallots over pizza before or after baking for a savory and crunchy element.
- Stuffing or Dressing: Incorporate crispy shallots into stuffing or dressing for Thanksgiving or holiday meals.
Serving Tips:
- Sprinkle Generously: Don’t be shy! Crispy shallots are meant to be noticed and enjoyed. Sprinkle them generously over dishes for maximum impact.
- Just Before Serving: For optimal crispiness, add crispy shallots just before serving to prevent them from softening from moisture in the dish.
- Room Temperature or Warm: Crispy shallots are best enjoyed at room temperature or slightly warm. Avoid microwaving them, as they will lose their crispness.
- Pair with Complementary Flavors: Consider the flavor profile of your dish and choose seasonings for your crispy shallots that complement the other ingredients.
- Storage for Leftovers: If you have leftover crispy shallots after garnishing, store them separately in an airtight container to maintain crispness.
By exploring these diverse serving suggestions, you’ll discover just how versatile and transformative crispy shallots can be, adding a touch of gourmet flair to your everyday cooking.
Additional Tips
To consistently achieve perfectly crispy shallots every time, here are five essential additional tips to keep in mind:
- Slice Shallots Uniformly Thin: The key to even crisping is consistent slice thickness. Aim for slices that are approximately 1/8 inch thick. Inconsistent thickness leads to some slices burning while others remain soggy. Take your time when slicing, or use a mandoline (with caution) or a food processor with a slicing blade to ensure uniformity.
- Start with Oil at the Right Temperature (and Maintain It): Starting with oil that is too hot will cause the shallots to burn on the outside before they cook through and crisp up inside. Conversely, oil that is too cool will result in soggy, oil-soaked shallots. Use a thermometer to ensure your oil is around 300°F (150°C) before adding the shallots. Maintain this temperature throughout the frying process by adjusting the heat as needed. Frying in batches also helps to maintain oil temperature.
- Don’t Overcrowd the Frying Pan: Overcrowding the pan lowers the oil temperature and steams the shallots instead of frying them, resulting in soggy shallots. Fry the shallots in batches, ensuring they are in a single layer in the hot oil. This allows for proper heat circulation and even crisping. Be patient and fry in multiple batches if necessary.
- Stir Occasionally and Monitor Color Closely: Stir the shallots occasionally during frying to ensure even cooking and prevent sticking. Monitor their color closely, especially in the final minutes of cooking. Shallots can go from golden brown to burnt very quickly. Remove them from the oil when they are a light golden brown color – they will continue to darken and crisp up as they cool.
- Drain Excess Oil Thoroughly and Cool on a Wire Rack: Proper draining is crucial for achieving maximum crispiness. Immediately transfer the fried shallots to a wire rack lined with paper towels to drain excess oil. Spread them out in a single layer to prevent steaming and encourage air circulation. Allow them to cool completely on the wire rack. They will crisp up further and become even crunchier as they cool. Avoid piling them up while cooling, as trapped steam can soften them.
By paying attention to these additional tips, you’ll refine your crispy shallot technique and consistently produce perfectly golden, crunchy, and irresistibly flavorful shallots every time you make them.
FAQ Section
Here are some frequently asked questions about making and using crispy shallots:
Q1: How do I store crispy shallots to keep them crispy?
A: To store crispy shallots and maintain their crispiness, ensure they are completely cooled. Then, transfer them to an airtight container. Store them at room temperature in a cool, dry place away from direct sunlight and moisture. Properly stored crispy shallots will typically stay crispy for several days, up to a week. Avoid storing them in the refrigerator, as moisture can cause them to soften.
Q2: Can I make crispy shallots without frying? Are there healthier alternatives?
A: Yes, you can make crispy shallots using healthier alternatives to deep frying, such as baking or air frying. Baking and air frying use significantly less oil, resulting in a lower-fat and slightly healthier version. However, the texture may be slightly less intensely crispy compared to deep-fried shallots. Baking and air frying methods are detailed in the Instructions section of this article.
Q3: Can I use different types of oil for frying crispy shallots?
A: Yes, you can use different types of neutral-flavored oils with high smoke points for frying crispy shallots. Good options include vegetable oil, canola oil, peanut oil, avocado oil, and grapeseed oil. Avoid oils with low smoke points like olive oil or butter, as they can burn easily and impart a bitter flavor. The choice of oil can slightly affect the final flavor profile – peanut oil, for example, adds a subtly nutty note.
Q4: Why are my crispy shallots bitter? How can I prevent bitterness?
A: Bitterness in crispy shallots is usually caused by overcooking or burning. Shallots contain sugars that caramelize during frying, but if cooked for too long or at too high a temperature, they can burn and become bitter. To prevent bitterness:
- Control Oil Temperature: Maintain oil temperature around 300°F (150°C) and avoid overheating.
- Monitor Color Closely: Remove shallots from the oil when they are light golden brown, not dark brown or burnt. They will continue to darken as they cool.
- Don’t Overcook: Avoid frying for too long. Follow the recommended cooking times and adjust based on visual cues (color).
- Fresh Shallots: Use fresh, good-quality shallots. Older shallots may develop a stronger, potentially bitter flavor.
Q5: Can I use red onions or yellow onions instead of shallots to make crispy onions?
A: While you can make crispy onions using red or yellow onions, the flavor and texture will be different from crispy shallots. Shallots have a milder, sweeter, and more delicate flavor compared to onions. Red and yellow onions have a stronger, more pungent onion flavor. Crispy onions made from red or yellow onions are often used in different culinary applications, such as onion rings or as toppings for burgers and sandwiches. For a true crispy shallot experience with the characteristic delicate flavor, shallots are recommended. However, experimenting with crispy red or yellow onions can also be delicious, depending on your preference and intended use.
We hope this FAQ section addresses any common questions you might have about making and using crispy shallots. Enjoy creating this flavorful and versatile garnish and elevating your culinary creations!
Print
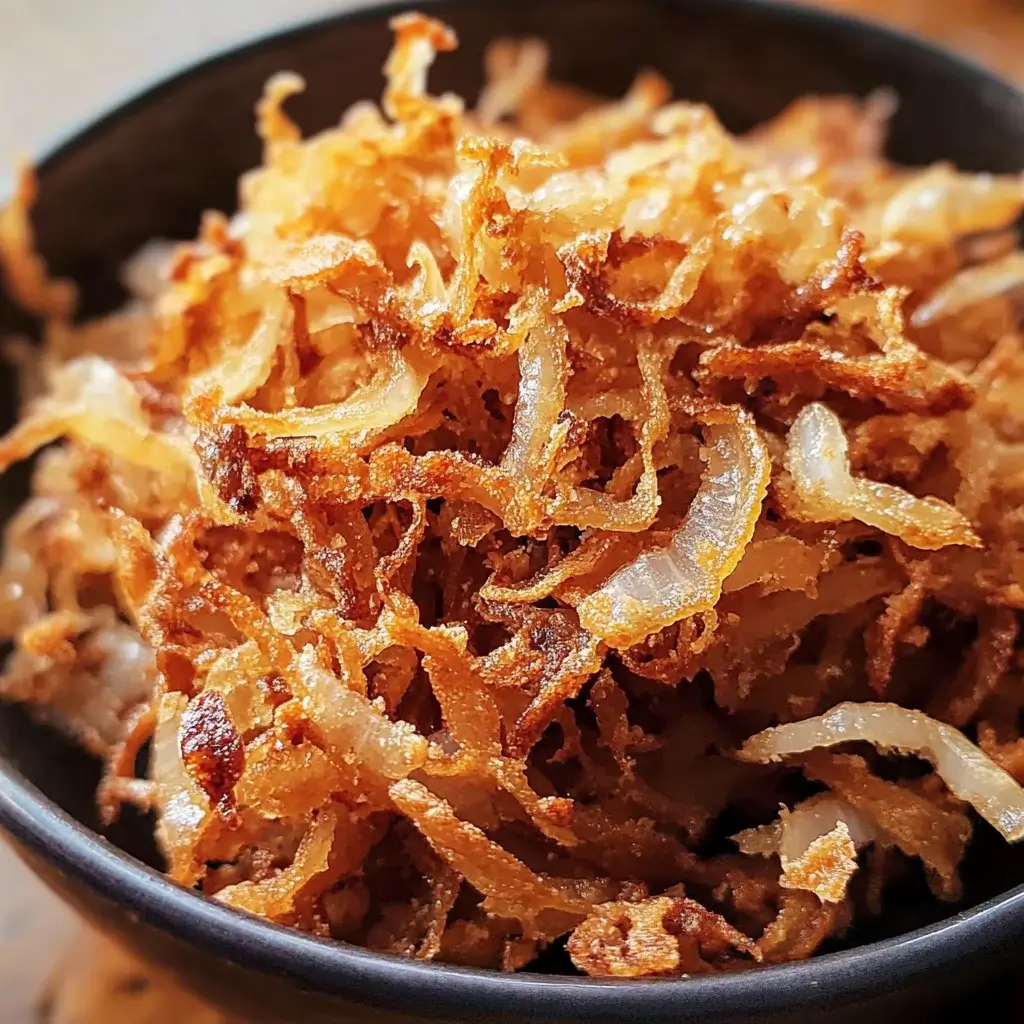
Crispy Shallots recipe
Ingredients
-
- Shallots: 1 pound (about 4-6 large shallots). Shallots are the star of the show, and choosing the right ones is crucial. Look for firm, heavy shallots with smooth, dry skins. Avoid shallots that are soft, sprouting, or have blemishes. The type of shallot generally doesn’t matter too much, but French grey shallots or banana shallots are excellent choices if available, known for their delicate flavor. Smaller shallots can be a bit more tedious to peel, while larger ones are easier to handle. Ensure you have enough shallots to yield a good quantity of crispy shallots, as they shrink considerably during cooking.
-
- Oil for Frying: 2-3 cups of neutral-flavored oil with a high smoke point. The choice of oil is important for both flavor and safety. You need an oil that can withstand high temperatures without smoking or imparting an unwanted flavor. Excellent options include:
- Vegetable Oil: A readily available and affordable option with a neutral flavor.
- Canola Oil: Another neutral-flavored oil with a high smoke point, also widely available.
- Peanut Oil: Offers a slightly nutty flavor and has a very high smoke point, making it ideal for deep frying. Be mindful of peanut allergies if serving to others.
- Avocado Oil: A healthier option with a mild flavor and high smoke point. It can be more expensive than other oils.
- Grapeseed Oil: Light flavor and high smoke point, a good all-purpose frying oil.
Avoid using olive oil or butter for frying crispy shallots, as they have lower smoke points and can burn easily, imparting a bitter taste.
- Oil for Frying: 2-3 cups of neutral-flavored oil with a high smoke point. The choice of oil is important for both flavor and safety. You need an oil that can withstand high temperatures without smoking or imparting an unwanted flavor. Excellent options include:
-
- Salt: 1 teaspoon of kosher salt, plus more to taste. Salt is essential for seasoning the shallots and enhancing their flavor. Kosher salt is recommended for its clean taste and ease of use, but sea salt or table salt can also be used. You’ll use some salt to season the shallots before frying and additional salt to season them after frying, if needed.
-
- Optional Seasonings (for variations):
-
- Black Pepper: Freshly ground black pepper can add a touch of spice and complexity.
-
- Garlic Powder: A sprinkle of garlic powder can enhance the savory flavor.
-
- Onion Powder: Similar to garlic powder, onion powder adds another layer of savory depth.
-
- Paprika (Smoked or Sweet): Adds a smoky or sweet note and a hint of color.
-
- Chili Flakes: For a touch of heat, a pinch of red pepper flakes can be added.
-
- Herbs (Dried Thyme, Rosemary): Dried herbs can be added for a more complex flavor profile, especially for savory applications.
-
- Optional Seasonings (for variations):
Ingredient Notes and Tips:
-
- Freshness of Shallots: Use the freshest shallots you can find. They should be firm and free of blemishes for the best flavor and texture.
-
- Oil Quantity: Ensure you have enough oil to fully submerge the shallots during frying. This promotes even cooking and crisping. The exact amount will depend on the size of your pan.
-
- Neutral Oil is Key: Using a neutral-flavored oil prevents the oil from overpowering the delicate flavor of the shallots.
-
- Salt Quality: Good quality salt enhances the overall flavor. Adjust the salt amount to your preference.
-
- Seasoning Versatility: The basic recipe is fantastic as is, but don’t hesitate to experiment with different seasonings to create your own signature crispy shallot blend. Consider the dishes you plan to use them in when choosing seasonings.
By gathering these simple, high-quality ingredients, you’re well on your way to creating incredibly flavorful and perfectly crispy shallots that will elevate your culinary creations.
Instructions
Method 1: Frying Crispy Shallots (Classic Method)
-
- Prepare the Shallots: Peel the shallots. The easiest way to peel shallots is to trim off the root end and the pointy tip, then make a shallow slit lengthwise through the skin. The skin should then slip off easily.
-
- Slice the Shallots: Thinly slice the shallots. Uniformly thin slices are crucial for even cooking and crisping. You can use a sharp knife, mandoline slicer (use caution!), or food processor with a slicing blade. Aim for slices that are about 1/8 inch thick. Thicker slices will take longer to crisp and may become unevenly cooked.
-
- Soak Shallots in Water (Optional but Recommended): Place the sliced shallots in a bowl of cold water for about 10-15 minutes. This step is optional but highly recommended. Soaking helps to remove some of the excess starch from the shallots, which can contribute to clumping and uneven crisping. After soaking, drain the shallots thoroughly and pat them completely dry with paper towels. Excess moisture will cause the oil to splatter and can hinder crisping.
-
- Heat the Oil: Pour 2-3 inches of neutral oil into a heavy-bottomed pot or deep skillet. Use a thermometer to monitor the oil temperature. Heat the oil over medium heat until it reaches 300°F (150°C). If you don’t have a thermometer, you can test the oil by dropping a single shallot slice into it. If it sizzles gently and floats to the top within a few seconds, the oil is ready. It’s crucial to start with oil that isn’t too hot, as this will burn the shallots before they become crispy inside.
-
- Fry the Shallots in Batches: Carefully add the sliced shallots to the hot oil in batches. Do not overcrowd the pan, as this will lower the oil temperature and lead to soggy shallots. Fry in batches, adding only enough shallots to form a single layer in the oil.
-
- Fry Until Golden Brown and Crispy: Fry the shallots, stirring occasionally with a slotted spoon or spider strainer, for about 10-20 minutes, or until they turn a light golden brown color and become crispy. The timing will depend on the thickness of the shallot slices and the oil temperature. Initially, the shallots will bubble and soften. As they cook, the bubbling will subside, and they will start to turn golden and crisp. Watch them closely towards the end, as they can go from golden brown to burnt quickly. Aim for a light golden brown color – they will continue to darken slightly after being removed from the oil.
-
- Remove and Drain: Once the shallots are crispy and golden brown, quickly remove them from the oil using a slotted spoon or spider strainer and transfer them to a wire rack lined with paper towels to drain excess oil. Spread them out in a single layer to prevent steaming and maintain crispiness.
-
- Season Immediately: While the shallots are still hot, season them generously with kosher salt and any other desired seasonings (black pepper, garlic powder, etc.). Seasoning while hot allows the salt and spices to adhere better.
-
- Cool Completely: Allow the crispy shallots to cool completely on the wire rack. As they cool, they will crisp up further and become even crunchier.
-
- Store (if not using immediately): Once completely cooled, store the crispy shallots in an airtight container at room temperature. They will stay crispy for several days, up to a week, if stored properly.
Method 2: Baking Crispy Shallots (Oven Method – Less Crispy but Healthier)
-
- Prepare and Slice Shallots: Follow steps 1 and 2 from the frying method to peel and thinly slice the shallots. Soaking in water is less critical for baking but can still help.
-
- Toss with Oil and Seasoning: In a bowl, toss the sliced shallots with 2-3 tablespoons of olive oil or neutral oil, salt, and any desired seasonings. Toss well to coat evenly.
-
- Spread on Baking Sheet: Spread the seasoned shallots in a single layer on a baking sheet lined with parchment paper. Again, avoid overcrowding.
-
- Bake: Preheat oven to 300°F (150°C). Bake for 30-45 minutes, stirring every 10-15 minutes, until the shallots are golden brown and crispy. Baking time will vary depending on oven and shallot thickness. Watch carefully to prevent burning.
-
- Cool and Crisp: Remove from oven and let cool completely on the baking sheet. They will crisp up as they cool.
Method 3: Air Frying Crispy Shallots (Faster and Less Oil)
-
- Prepare and Slice Shallots: Follow steps 1 and 2 from the frying method to peel and thinly slice the shallots. Soaking in water is optional.
-
- Toss with Oil and Seasoning: In a bowl, toss the sliced shallots with 1-2 tablespoons of oil (less oil needed for air frying), salt, and desired seasonings.
-
- Air Fry: Preheat air fryer to 300°F (150°C). Place shallots in the air fryer basket in a single layer (you may need to do this in batches). Air fry for 10-15 minutes, shaking the basket every 3-5 minutes, until golden brown and crispy.
-
- Cool and Crisp: Remove from air fryer and let cool completely.
Tips for Perfect Crispy Shallots:
-
- Uniform Slicing is Key: Consistent slice thickness ensures even cooking and crisping.
-
- Don’t Overcrowd the Pan (Frying): Fry in batches to maintain oil temperature and prevent steaming.
-
- Low and Slow is Better (Frying): Start with oil that’s not too hot and fry gently over medium heat for even crisping.
-
- Watch Closely Towards the End: Shallots can burn quickly in the final minutes of cooking.
-
- Drain Thoroughly: Draining excess oil on a wire rack is essential for crispiness.
-
- Season While Hot: Seasoning hot shallots allows flavors to adhere better.
-
- Cool Completely for Maximum Crispness: They become extra crispy as they cool.
By following these detailed instructions and tips, you’ll be able to make perfectly crispy and delicious shallots using your preferred method.
Nutrition
- Serving Size: one normal portion
- Calories: 30-40 calories
- Sugar: 1 gram
- Sodium: 20-40 mg
- Fat: 2.5-3.5 grams
- Carbohydrates: 2-3 grams
- Fiber: 1 gram
- Protein: 1 gram


