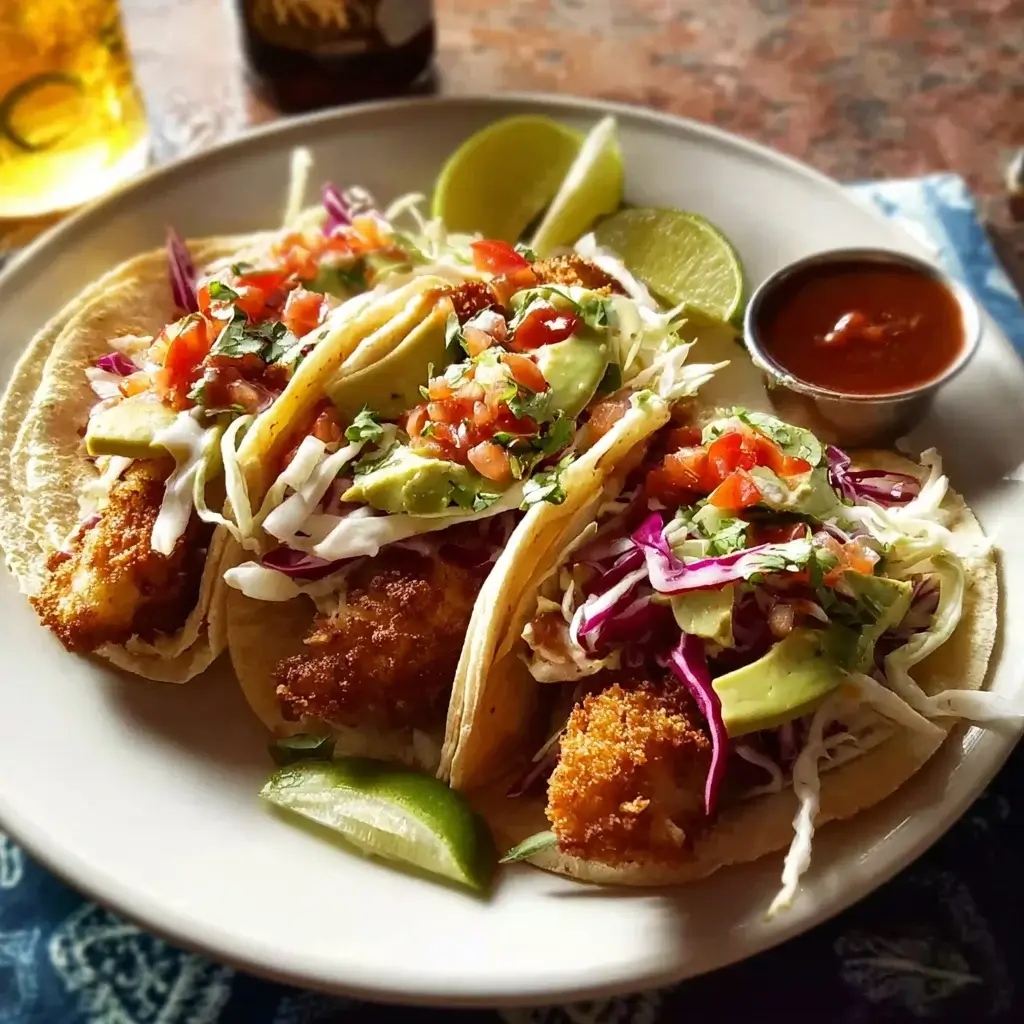

I’ll never forget my first authentic fish taco. It wasn’t in a fancy restaurant, but from a small, sun-bleached stand on a dusty side street in Baja California. The salty ocean air mingled with the scent of sizzling fish and warm corn tortillas. They handed me a simple paper plate with two tacos, the fish impossibly crispy, topped with a pile of crunchy shredded cabbage, a drizzle of some mysterious white sauce, and a mandatory squeeze of fresh lime. It was a moment of pure, unadulterated food bliss. That single bite set me on a years-long quest to replicate the experience in my own kitchen. I tried countless recipes. Some were too greasy, others had fish that was tragically soggy, and many of the sauces just missed the mark. It became my culinary white whale. But after endless tweaking, testing, and tasting, I finally cracked the code. This recipe is the culmination of that journey. It delivers that perfect, holy trinity of fish taco perfection: shatteringly crispy fish with a light, flavorful crust; a bright, acidic, and crunchy slaw that cuts through the richness; and a cool, creamy, zesty lime crema that ties it all together. This isn’t just a recipe for fish tacos; it’s a recipe for that perfect, sun-drenched, toes-in-the-sand moment, no matter where you are. My family now devours these with an enthusiasm that tells me the quest is officially over.
The Ultimate Crispy Baja-Style Fish Tacos
This recipe is designed to deliver a restaurant-quality experience at home. Every component is crafted to create a perfect balance of texture and flavor, resulting in the crispiest, most delicious fish tacos you’ve ever made.
Complete Ingredients List
The magic of these tacos lies in the three core components: the fish, the slaw, and the sauce. We’ve broken down the ingredients for each to keep you organized.
For the Crispy Panko-Crusted Fish:
- Firm White Fish: 1.5 lbs (680g) of a firm white fish. Cod is the classic choice and my personal favorite due to its mild flavor and flaky texture. Other excellent options include tilapia, halibut, or mahi-mahi. Make sure it’s boneless and skinless, then cut it into strips about 1-inch wide and 3-4 inches long.
- All-Purpose Flour: ½ cup (60g). This initial light coating is essential as it gives the egg wash something to cling to, ensuring the panko crust stays put.
- Large Eggs: 2. They act as the binder between the flour and the crispy pokeno coating.
- Panko Breadcrumbs: 2 cups (120g). This is the non-negotiable secret to a light, airy, and incredibly crispy coating. Panko flakes are larger and harder than regular breadcrumbs, so they absorb less oil and create a far superior crunch.
- Seasoning for the Breading:
- 1 teaspoon smoked paprika: Adds a beautiful color and a subtle smoky depth.
- 1 teaspoon garlic powder: For a savory, aromatic base note.
- 1 teaspoon onion powder: Complements the garlic powder for a well-rounded flavor.
- ½ teaspoon chili powder: Provides a mild, warm heat. Adjust to your preference.
- 1 teaspoon fine sea salt: To season the crust itself.
- ½ teaspoon black pepper: For a touch of spice.
- Neutral Oil for Frying: About 2-3 cups of a neutral oil with a high smoke point, such as canola, vegetable, or peanut oil. You need enough for about ½-inch of depth in your skillet.
For the Fresh and Zesty Cabbage Slaw:
- Shredded Cabbage: 4 cups. A mix of green and red cabbage not only adds vibrant color but also a slight variation in texture and flavor. You can buy pre-shredded bags to save time.
- Red Onion: ½, very thinly sliced. Soaking the sliced onion in cold water for 10 minutes before adding it to the slaw will mellow its sharp bite.
- Jalapeño: 1, finely minced. Remove the seeds and membranes for less heat, or leave some in if you like it spicy.
- Fresh Cilantro: ½ cup, roughly chopped. Cilantro is essential for that authentic taco flavor. If you’re not a fan, you can substitute with fresh parsley.
- Lime Juice: The juice of 2 large limes (about ¼ cup). Freshly squeezed lime juice is a must for its bright, acidic kick that cuts through the richness of the fried fish.
- Olive Oil: 1 tablespoon. Helps to coat the cabbage and meld the flavors together.
- Honey or Agave Nectar: 1 teaspoon (optional). A tiny bit of sweetness helps to balance the acidity of the lime juice.
- Salt: ½ teaspoon.
For the Cooling Lime Crema:
- Sour Cream or Plain Greek Yogurt: 1 cup. Sour cream is traditional, but full-fat Greek yogurt is a fantastic, slightly healthier alternative that provides the same creamy tang.
- Mayonnaise: ¼ cup. Adding a bit of mayonnaise makes the crema richer and gives it a smoother consistency.
- Lime Zest: The zest of 1 lime. Zesting the lime before you juice it releases aromatic oils and infuses the sauce with an intense lime flavor.
- Lime Juice: The juice of 1 lime (about 2 tablespoons).
- Garlic: 1 small clove, grated or pressed into a paste. Using a microplane or pressing the garlic ensures it incorporates smoothly without any harsh, raw chunks.
- Salt: ¼ teaspoon, or to taste.
For Assembly:
- Tortillas: 12-16 corn or small flour tortillas.
- Garnishes: Sliced avocado, extra cilantro, cotija cheese, and lime wedges for serving.
Step-by-Step Instructions
Follow these steps in order for the most efficient workflow and the best-tasting tacos. Making the cool components first allows their flavors to meld while you focus on the hot-from-the-fryer fish.
- Prepare the Lime Crema: In a small bowl, combine the sour cream (or Greek yogurt), mayonnaise, lime zest, lime juice, and grated garlic. Whisk until completely smooth. Season with salt to taste. Cover and place in the refrigerator to chill and allow the flavors to meld. This can be made up to 2 days in advance.
- Make the Cabbage Slaw: In a large bowl, combine the shredded green and red cabbage, thinly sliced red onion, minced jalapeño, and chopped cilantro. In a separate small bowl, whisk together the lime juice, olive oil, optional honey/agave, and salt. Pour the dressing over the cabbage mixture and toss well to combine. Let the slaw sit for at least 15-20 minutes at room temperature (or in the fridge) before serving. This brief period allows the cabbage to soften slightly and absorb the dressing.
- Prepare the Fish and Breading Station: Pat the fish strips completely dry with paper towels. This is a critical step; a dry surface helps the breading adhere properly and ensures the fish steams less and fries crispier. Set up a three-stage breading station with shallow dishes:
- Dish 1: Whisk together the all-purpose flour with a pinch of salt and pepper.
- Dish 2: In the second dish, beat the 2 large eggs until smooth.
- Dish 3: In the third dish, combine the panko breadcrumbs with the smoked paprika, garlic powder, onion powder, chili powder, 1 teaspoon of salt, and ½ teaspoon of black pepper. Mix thoroughly.
- Bread the Fish: Working one piece at a time, dredge a fish strip in the seasoned flour, shaking off any excess. Next, dip it into the beaten egg, allowing any excess to drip off. Finally, press the fish firmly into the seasoned panko mixture, ensuring it’s completely coated on all sides. Place the breaded fish strip on a wire rack or a clean plate. Repeat with all the remaining fish.
- Cook the Fish: In a large, heavy-bottomed skillet (like cast iron) or a Dutch oven, pour in about ½-inch of neutral oil. Heat the oil over medium-high heat until it reaches 350-360°F (175-180°C). If you don’t have a thermometer, you can test the oil by dropping in a small piece of panko; if it sizzles vigorously and turns golden brown in about 30 seconds, the oil is ready. Carefully place a few pieces of breaded fish into the hot oil, being careful not to overcrowd the pan. Fry for 2-3 minutes per side, until deep golden brown and cooked through. The fish will flake easily when done.
- Drain and Season: Using a spider strainer or tongs, remove the cooked fish from the oil and transfer it to a wire rack set over a baking sheet to drain. Immediately sprinkle the hot fish with a tiny pinch of salt. This final seasoning adheres best when the fish is hot. Repeat the frying process in batches until all the fish is cooked.
- Warm the Tortillas and Assemble: While the fish is resting, warm your tortillas. You can do this by wrapping a stack in a damp paper towel and microwaving for 30-45 seconds, or by charring them one by one for a few seconds over an open gas flame for the best flavor. To assemble, place a generous helping of the crispy fish onto a warm tortilla. Top with a heaping spoonful of the zesty slaw, a drizzle of the lime crema, and any additional garnishes like sliced avocado and cotija cheese. Serve immediately with extra lime wedges on the side.
Nutrition Facts
- Servings: 4-6 (makes about 12-16 tacos)
- Calories per serving: Approximately 550-650 kcal (based on 3 tacos per serving, including all components. This is an estimate and will vary with the amount of oil absorbed during frying.)
Preparation Time
- Prep Time: 30 minutes
- Cook Time: 15-20 minutes
- Total Time: Approximately 50 minutes
How to Serve
Serving fish tacos is an event. It’s about building the perfect bite. Here’s how to create a full, unforgettable taco experience.
Choosing and Preparing Your Tortillas
The vessel for your taco is just as important as the filling.
- Corn Tortillas: These offer the most authentic flavor and are naturally gluten-free. Look for good quality white or yellow corn tortillas. To bring out their nutty flavor, warm them one at a time in a dry cast-iron skillet for 30 seconds per side, or carefully char them over the open flame of a gas stove using tongs.
- Flour Tortillas: These are softer, more pliable, and less likely to break. They are a great choice if you prefer a less assertive tortilla flavor. Warm them in a dry skillet or in a stack wrapped in a damp paper towel in the microwave.
- Pro Tip: Always double up on corn tortillas for street-taco style! It provides extra structural integrity and prevents a heartbreaking taco collapse.
Build a Taco Toppings Bar
Let everyone customize their own perfect taco. Arrange small bowls with a variety of toppings:
- Sliced Avocado or Guacamole: For extra creaminess.
- Crumbled Cotija Cheese: This salty, crumbly Mexican cheese is the perfect finishing touch. Feta is a decent substitute.
- Pickled Red Onions: Their bright, tangy crunch offers a fantastic contrast.
- Fresh Jalapeño Slices: For those who crave extra heat.
- Diced Mango or Pineapple: A bit of sweet fruit adds a wonderful tropical twist.
- Extra Fresh Cilantro and Lime Wedges: These are non-negotiable!
Perfect Side Dishes
Turn your tacos into a full feast with these complementary sides:
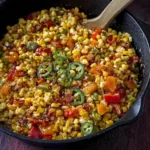
- Mexican Street Corn (Elote): Grilled corn on the cob slathered in a creamy, cheesy, chili-lime sauce.
- Black Beans and Rice: A simple and hearty classic.
- Cilantro-Lime Rice: Fluffy white rice infused with the fresh flavors of cilantro and lime juice.
- Simple Jicama Salad: A refreshing salad made with julienned jicama, orange segments, lime juice, and a sprinkle of chili powder.
Additional Tips for Fish Taco Perfection
These five tips will help you troubleshoot common issues and guarantee flawless results every time.
- Air Fryer or Baked Fish Tacos (The Healthier Method): You can absolutely skip the deep-frying for a lighter version.
- For the Air Fryer: Preheat your air fryer to 400°F (200°C). Arrange the breaded fish in a single layer in the basket (work in batches). Spray generously with cooking spray. Air fry for 8-10 minutes, flipping halfway through, until golden and crispy.
- For the Oven: Preheat your oven to 425°F (220°C). Place the breaded fish on a wire rack set inside a baking sheet. Spray generously with cooking spray. Bake for 12-15 minutes, flipping once, until the coating is golden and the fish is cooked through. The texture will be less “fried” but still deliciously crunchy.
- The Double-Dry for Maximum Crispiness: We mentioned patting the fish dry, but here’s the next level. After cutting your fish into strips, lay them on a plate lined with paper towels and sprinkle lightly with salt. Let them sit for 15 minutes. The salt will draw out excess moisture. Before breading, pat them thoroughly dry one last time. This ensures an ultra-crispy crust that won’t get soggy.
- Use One Wet Hand, One Dry Hand: When breading the fish, designate one hand for the wet ingredients (the egg) and the other hand for the dry ingredients (the flour and panko). This simple technique prevents your fingers from becoming caked in a gummy breading-paste, keeping your breading station clean and your coating even.
- Master Your Oil Temperature: The temperature of your frying oil is the single most important factor for crispy, non-greasy fish. If the oil is too cool, the fish will absorb it like a sponge and become heavy and oily. If it’s too hot, the panko will burn before the fish is cooked through. Use a thermometer for accuracy, or use the panko test described in the instructions. Also, remember that adding the cool fish will lower the oil temperature, so let it come back up to temp between batches.
- Don’t Rush the Slaw: Tossing the slaw and letting it sit for at least 15-20 minutes is a step many people skip. This “macerating” period is crucial. The salt and lime juice begin to break down the tough cell walls of the cabbage, making it more tender and flavorful. It transforms it from a simple pile of cabbage into a cohesive, delicious slaw.
Frequently Asked Questions (FAQ)
1. What is the absolute best type of fish to use for fish tacos?
The best fish is a firm-to-semi-firm, mild-flavored white fish that can hold its shape after being fried. Cod is the gold standard for its flaky texture and clean taste. Tilapia is another excellent, budget-friendly choice that is mild and readily available. Mahi-mahi is a bit firmer and has a slightly sweeter taste, making it a fantastic premium option. Halibut is the most premium choice; it’s very firm and meaty but can be expensive. Avoid delicate fish like sole or flounder, which can fall apart, and oily fish like salmon or tuna, which have flavors that are too strong.
2. How can I make these fish tacos gluten-free?
It’s very easy to adapt this recipe to be gluten-free.
- For the Flour: Substitute the all-purpose flour with a good quality gluten-free 1-to-1 baking blend or cornstarch.
- For the Breading: Use gluten-free Panko breadcrumbs, which are widely available in most supermarkets. They provide the same great crunch.
- For the Tortillas: Stick with 100% corn tortillas, which are naturally gluten-free (but always check the package to be sure).
3. My breading always falls off in the frying pan. What am I doing wrong?
This is a common frustration with a few likely culprits. First, ensure your fish is completely dry before you start the breading process. Second, follow the three-step breading process (flour -> egg -> panko) without skipping any steps. The flour helps the egg stick, and the egg helps the panko stick. Third, press the panko firmly onto the fish to create a good bond. Finally, be gentle when placing the fish in the oil and when flipping it. Don’t move it around unnecessarily. Let it form a solid crust before you try to turn it.
4. Can I prepare parts of this recipe ahead of time?
Yes! Efficient prep makes taco night a breeze.
- The Crema: Can be made up to 2 days in advance and stored in an airtight container in the fridge. The flavors will get even better.
- The Slaw: You can chop all the vegetables for the slaw (cabbage, onion, jalapeño) a day ahead and store them in the fridge. Wait to add the dressing until about 30 minutes before you plan to serve to keep it from getting watery.
- The Fish: The fish should be breaded and fried right before serving for maximum crispiness. Do not bread it ahead of time, as the moisture from the fish will make the panko soggy.
5. What’s the best way to reheat leftover crispy fish?
The microwave is the mortal enemy of leftover fried food. It will turn your crispy fish into a sad, steamy, soggy mess. The best way to revive the crispiness is to use dry heat. Preheat your oven or toaster oven to 375°F (190°C). Place the leftover fish on a wire rack or baking sheet and heat for 5-7 minutes until warmed through and re-crisped. An air fryer is even better; 3-4 minutes at 375°F (190°C) will make it taste almost as good as new.
Print
Crispy Fish Tacos recipe
Ingredients
For the Crispy Panko-Crusted Fish:
-
Firm White Fish: 1.5 lbs (680g) of a firm white fish. Cod is the classic choice and my personal favorite due to its mild flavor and flaky texture. Other excellent options include tilapia, halibut, or mahi-mahi. Make sure it’s boneless and skinless, then cut it into strips about 1-inch wide and 3-4 inches long.
-
All-Purpose Flour: ½ cup (60g). This initial light coating is essential as it gives the egg wash something to cling to, ensuring the panko crust stays put.
-
Large Eggs: 2. They act as the binder between the flour and the crispy pokeno coating.
-
Panko Breadcrumbs: 2 cups (120g). This is the non-negotiable secret to a light, airy, and incredibly crispy coating. Panko flakes are larger and harder than regular breadcrumbs, so they absorb less oil and create a far superior crunch.
-
Seasoning for the Breading:
-
1 teaspoon smoked paprika: Adds a beautiful color and a subtle smoky depth.
-
1 teaspoon garlic powder: For a savory, aromatic base note.
-
1 teaspoon onion powder: Complements the garlic powder for a well-rounded flavor.
-
½ teaspoon chili powder: Provides a mild, warm heat. Adjust to your preference.
-
1 teaspoon fine sea salt: To season the crust itself.
-
½ teaspoon black pepper: For a touch of spice.
-
-
Neutral Oil for Frying: About 2-3 cups of a neutral oil with a high smoke point, such as canola, vegetable, or peanut oil. You need enough for about ½-inch of depth in your skillet.
For the Fresh and Zesty Cabbage Slaw:
-
Shredded Cabbage: 4 cups. A mix of green and red cabbage not only adds vibrant color but also a slight variation in texture and flavor. You can buy pre-shredded bags to save time.
-
Red Onion: ½, very thinly sliced. Soaking the sliced onion in cold water for 10 minutes before adding it to the slaw will mellow its sharp bite.
-
Jalapeño: 1, finely minced. Remove the seeds and membranes for less heat, or leave some in if you like it spicy.
-
Fresh Cilantro: ½ cup, roughly chopped. Cilantro is essential for that authentic taco flavor. If you’re not a fan, you can substitute with fresh parsley.
-
Lime Juice: The juice of 2 large limes (about ¼ cup). Freshly squeezed lime juice is a must for its bright, acidic kick that cuts through the richness of the fried fish.
-
Olive Oil: 1 tablespoon. Helps to coat the cabbage and meld the flavors together.
-
Honey or Agave Nectar: 1 teaspoon (optional). A tiny bit of sweetness helps to balance the acidity of the lime juice.
-
Salt: ½ teaspoon.
For the Cooling Lime Crema:
-
Sour Cream or Plain Greek Yogurt: 1 cup. Sour cream is traditional, but full-fat Greek yogurt is a fantastic, slightly healthier alternative that provides the same creamy tang.
-
Mayonnaise: ¼ cup. Adding a bit of mayonnaise makes the crema richer and gives it a smoother consistency.
-
Lime Zest: The zest of 1 lime. Zesting the lime before you juice it releases aromatic oils and infuses the sauce with an intense lime flavor.
-
Lime Juice: The juice of 1 lime (about 2 tablespoons).
-
Garlic: 1 small clove, grated or pressed into a paste. Using a microplane or pressing the garlic ensures it incorporates smoothly without any harsh, raw chunks.
-
Salt: ¼ teaspoon, or to taste.
For Assembly:
-
Tortillas: 12-16 corn or small flour tortillas.
-
Garnishes: Sliced avocado, extra cilantro, cotija cheese, and lime wedges for serving.
Instructions
-
Prepare the Lime Crema: In a small bowl, combine the sour cream (or Greek yogurt), mayonnaise, lime zest, lime juice, and grated garlic. Whisk until completely smooth. Season with salt to taste. Cover and place in the refrigerator to chill and allow the flavors to meld. This can be made up to 2 days in advance.
-
Make the Cabbage Slaw: In a large bowl, combine the shredded green and red cabbage, thinly sliced red onion, minced jalapeño, and chopped cilantro. In a separate small bowl, whisk together the lime juice, olive oil, optional honey/agave, and salt. Pour the dressing over the cabbage mixture and toss well to combine. Let the slaw sit for at least 15-20 minutes at room temperature (or in the fridge) before serving. This brief period allows the cabbage to soften slightly and absorb the dressing.
-
Prepare the Fish and Breading Station: Pat the fish strips completely dry with paper towels. This is a critical step; a dry surface helps the breading adhere properly and ensures the fish steams less and fries crispier. Set up a three-stage breading station with shallow dishes:
-
Dish 1: Whisk together the all-purpose flour with a pinch of salt and pepper.
-
Dish 2: In the second dish, beat the 2 large eggs until smooth.
-
Dish 3: In the third dish, combine the panko breadcrumbs with the smoked paprika, garlic powder, onion powder, chili powder, 1 teaspoon of salt, and ½ teaspoon of black pepper. Mix thoroughly.
-
-
Bread the Fish: Working one piece at a time, dredge a fish strip in the seasoned flour, shaking off any excess. Next, dip it into the beaten egg, allowing any excess to drip off. Finally, press the fish firmly into the seasoned panko mixture, ensuring it’s completely coated on all sides. Place the breaded fish strip on a wire rack or a clean plate. Repeat with all the remaining fish.
-
Cook the Fish: In a large, heavy-bottomed skillet (like cast iron) or a Dutch oven, pour in about ½-inch of neutral oil. Heat the oil over medium-high heat until it reaches 350-360°F (175-180°C). If you don’t have a thermometer, you can test the oil by dropping in a small piece of panko; if it sizzles vigorously and turns golden brown in about 30 seconds, the oil is ready. Carefully place a few pieces of breaded fish into the hot oil, being careful not to overcrowd the pan. Fry for 2-3 minutes per side, until deep golden brown and cooked through. The fish will flake easily when done.
-
Drain and Season: Using a spider strainer or tongs, remove the cooked fish from the oil and transfer it to a wire rack set over a baking sheet to drain. Immediately sprinkle the hot fish with a tiny pinch of salt. This final seasoning adheres best when the fish is hot. Repeat the frying process in batches until all the fish is cooked.
-
Warm the Tortillas and Assemble: While the fish is resting, warm your tortillas. You can do this by wrapping a stack in a damp paper towel and microwaving for 30-45 seconds, or by charring them one by one for a few seconds over an open gas flame for the best flavor. To assemble, place a generous helping of the crispy fish onto a warm tortilla. Top with a heaping spoonful of the zesty slaw, a drizzle of the lime crema, and any additional garnishes like sliced avocado and cotija cheese. Serve immediately with extra lime wedges on the side.
Nutrition
- Serving Size: one normal portion
- Calories: 550-650 kcal