
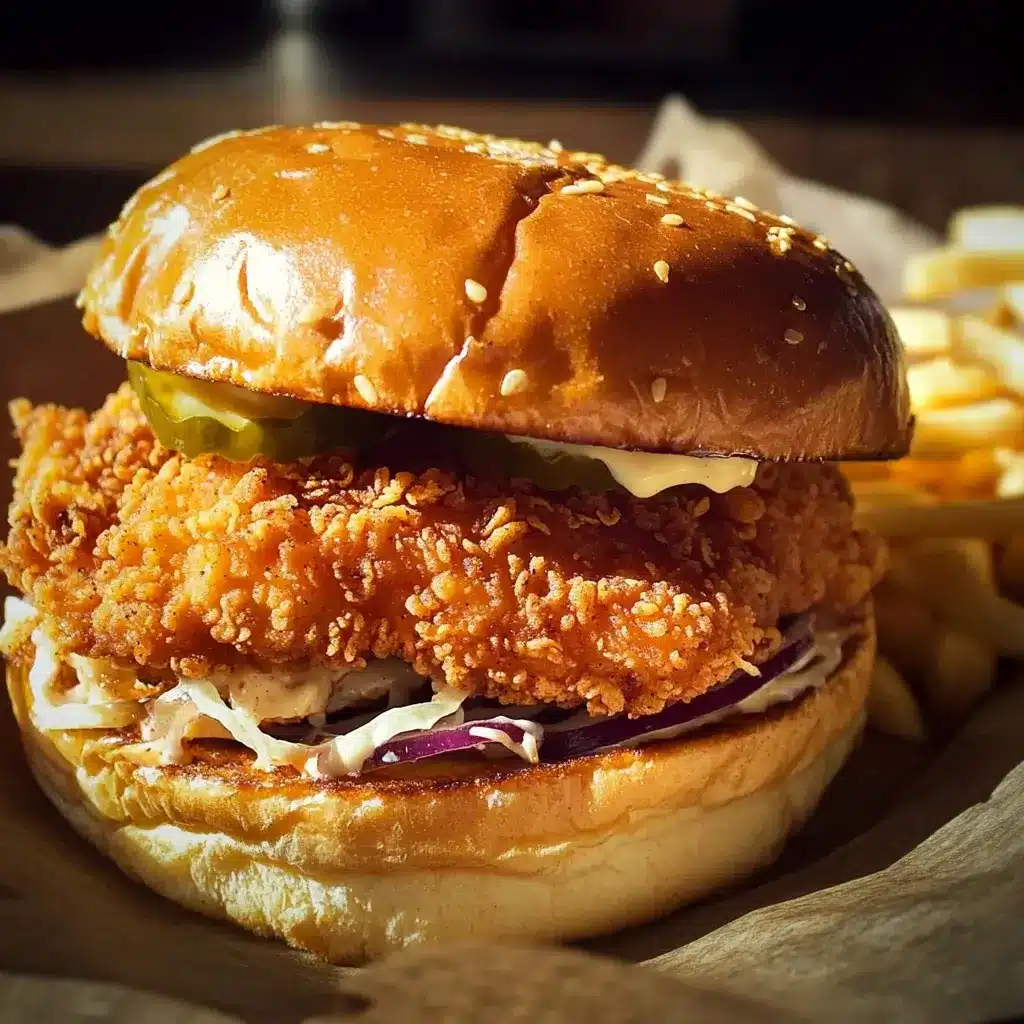

There are sandwiches, and then there are sandwiches. The kind that make you close your eyes in bliss with the first bite, the kind that become legendary in your household. For my family, this Crispy Buttermilk Fried Chicken Sandwich is that sandwich. It all started after a trip where we had an amazing, albeit pricey, gourmet fried chicken sandwich. My husband declared, “We need to make this at home, but better!” Challenge accepted. After countless batches, tweaking the buttermilk brine, perfecting the dredge for maximum cragginess, and concocting the ideal spicy mayo, we finally landed on this version. The first time my kids tried it, their eyes widened, and between mouthfuls of crispy chicken and soft brioche, they mumbled, “This is the best chicken sandwich EVER!” It’s now our go-to for special weekend lunches, game days, or whenever we need a truly satisfying, soul-hugging meal. The combination of the ultra-crispy, flavorful chicken, the tangy pickles, the creamy, spicy mayo, and the soft, buttery bun is simply unbeatable.
The Ultimate Crispy Buttermilk Fried Chicken Sandwich: A Culinary Masterpiece
Forget the fast-food drive-thru and restaurant queues. The quest for the perfect crispy buttermilk fried chicken sandwich ends in your kitchen. This recipe meticulously breaks down each step to ensure an incredibly flavorful, juicy chicken fillet encased in a shatteringly crisp, golden-brown crust, all nestled in a soft bun with a zesty, creamy sauce. It’s an investment in flavor and texture that will reward you with arguably the best chicken sandwich you’ve ever tasted.
Ingredients: The Anatomy of Perfection
Crafting the ultimate fried chicken sandwich requires attention to detail in each component. Quality ingredients are paramount.
For the Buttermilk Marinated Chicken (4 Sandwiches):
- Boneless, Skinless Chicken Thighs (4 large, about 6-8 oz / 170-225g each): Thighs are preferred for their juiciness and flavor, which stand up well to frying. You can use chicken breasts, but pound them to an even 1/2-inch thickness and be mindful not to overcook.
- Buttermilk (2 cups / 480ml): The star of the marinade, tenderizing the chicken and helping the dredge adhere.
- Hot Sauce (2 tablespoons / 30ml, e.g., Frank’s RedHot or your favorite): Adds a subtle kick and depth of flavor to the chicken.
- Kosher Salt (1 tablespoon / 18g): For brining and seasoning the chicken.
- Black Pepper (1 teaspoon / 2g, freshly ground):
- Garlic Powder (1 teaspoon / 3g):
- Smoked Paprika (1 teaspoon / 2g, optional but recommended): Adds a hint of smokiness.
For the Crispy Dredge:
- All-Purpose Flour (2 cups / 240g): The base of our dredge.
- Cornstarch (1/2 cup / 60g): The secret to extra crispiness!
- Kosher Salt (1 tablespoon / 18g):
- Black Pepper (2 teaspoons / 4g, freshly ground):
- Cayenne Pepper (1 teaspoon / 2g, or more to taste for spicier chicken):
- Garlic Powder (2 teaspoons / 6g):
- Onion Powder (1 teaspoon / 3g):
- Smoked Paprika (1 teaspoon / 2g):
For the Spicy Mayo:
- Mayonnaise (1/2 cup / 120ml): Good quality mayo, like Duke’s or Kewpie, for best results.
- Sriracha or Your Favorite Chili Garlic Sauce (2-3 tablespoons / 30-45ml, adjust to heat preference):
- Lime Juice (1 teaspoon / 5ml, fresh): Adds brightness.
- Honey or Maple Syrup (1 teaspoon / 5ml, optional for a touch of sweetness):
- Garlic Powder (1/4 teaspoon / 0.75g):
For Frying:
- Neutral Frying Oil (6-8 cups / 1.4 – 1.9 liters, e.g., peanut, canola, vegetable, or corn oil): Enough for at least 1.5-2 inches depth in your frying vessel.
For Assembling the Sandwiches:
- Brioche Buns (4): Their buttery richness complements the chicken perfectly. Potato buns or other soft, good-quality buns work too.
- Dill Pickle Slices (generous amount): Classic, tangy, and crucial for cutting through the richness. Bread and butter pickles can be used if preferred.
- Optional: Lettuce (e.g., iceberg or butter lettuce for crunch and freshness)
Equipment Needed:
- Large bowls
- Whisk
- Deep, heavy-bottomed pot (like a Dutch oven) or deep fryer
- Kitchen thermometer (candy/deep-fry thermometer)
- Tongs
- Wire rack set over a baking sheet
Step-by-Step Instructions: Your Path to Crispy Chicken Nirvana
Follow these detailed instructions for a sandwich that will rival any restaurant offering.
Phase 1: Marinate the Chicken (Minimum 4 hours, ideally 8-24 hours)
- Prepare Chicken: If using chicken thighs, trim any excess fat. If they are very thick, you can lightly pound them to a more even thickness (about 3/4 inch) for consistent cooking, but it’s often not necessary for thighs.
- Combine Marinade Ingredients: In a large bowl, whisk together the buttermilk, hot sauce, 1 tablespoon kosher salt, 1 teaspoon black pepper, 1 teaspoon garlic powder, and 1 teaspoon smoked paprika (if using).
- Marinate: Add the chicken thighs to the buttermilk mixture, ensuring they are fully submerged. Cover the bowl tightly with plastic wrap and refrigerate for at least 4 hours, or ideally overnight (up to 24 hours). The longer it marinates, the more tender and flavorful the chicken will be.
Phase 2: Prepare the Dredge and Spicy Mayo
- Make the Dredge: In a wide, shallow bowl or dish, whisk together the all-purpose flour, cornstarch, 1 tablespoon kosher salt, 2 teaspoons black pepper, cayenne pepper, 2 teaspoons garlic powder, onion powder, and 1 teaspoon smoked paprika. Set aside.
- Make the Spicy Mayo: In a small bowl, combine the mayonnaise, Sriracha (or chili garlic sauce), fresh lime juice, optional honey/maple syrup, and 1/4 teaspoon garlic powder. Whisk until smooth. Taste and adjust seasoning or heat level as desired. Cover and refrigerate until ready to use. This can be made a day ahead.
Phase 3: Dredge the Chicken
- Set Up Dredging Station: Remove the marinated chicken from the refrigerator about 30 minutes before you plan to fry, allowing it to come closer to room temperature. Place the bowl of dredge next to the marinated chicken. Have a clean wire rack set over a baking sheet ready for the dredged chicken.
- First Dredge: Working with one piece of chicken at a time, remove it from the buttermilk marinade, allowing excess marinade to drip off (but don’t wipe it completely dry; some moisture helps the dredge stick).
- Coat Thoroughly: Place the chicken in the flour mixture, ensuring it’s fully coated on all sides. Press the flour firmly into the chicken.
- Dip Back (Optional, for thicker crust): For an even thicker, craggier crust, briefly dip the floured chicken back into the buttermilk marinade, then immediately back into the flour mixture for a second coating. Again, press the flour firmly.
- Create Crags: Really work the flour into all the nooks and crannies. You can even drizzle a tiny bit (a few drops) of the buttermilk marinade into the dry flour mixture and toss it around to create more little clumps, which will then stick to the chicken and become super crispy bits.
- Rest Dredged Chicken: Place the fully dredged chicken on the wire rack. Let it rest for at least 15-30 minutes at room temperature before frying. This step is crucial as it allows the coating to hydrate and adhere properly to the chicken, preventing it from falling off during frying.
Phase 4: Fry the Chicken
- Heat the Oil: Pour your frying oil into a large, heavy-bottomed pot or Dutch oven to a depth of at least 1.5-2 inches. You need enough oil so the chicken can float freely without touching the bottom. Attach a deep-fry thermometer to the side of the pot. Heat the oil over medium-high heat until it reaches 325-350°F (160-175°C). Maintaining the correct oil temperature is critical for crispy, non-greasy chicken.
- Fry in Batches: Carefully place 1 or 2 pieces of dredged chicken into the hot oil, being careful not to overcrowd the pot. Overcrowding will lower the oil temperature significantly, resulting in greasy chicken. The oil should immediately start bubbling vigorously around the chicken.
- Maintain Temperature: Adjust the heat as needed to keep the oil temperature within the 325-350°F (160-175°C) range throughout the frying process.
- Cook Through: Fry the chicken for about 5-8 minutes per side, depending on the thickness. The chicken is done when it’s deep golden brown and crispy, and the internal temperature reaches 165°F (74°C) when checked with an instant-read meat thermometer inserted into the thickest part. Thighs are more forgiving than breasts.
- Drain Excess Oil: Once cooked, carefully remove the chicken from the oil using tongs and place it on a clean wire rack set over a baking sheet to drain. This allows air to circulate around the chicken, keeping the bottom crispy. Immediately sprinkle the hot chicken lightly with a pinch of extra salt, if desired.
- Return Oil to Temperature: Allow the oil to return to the target temperature before adding the next batch of chicken.
- Keep Cooked Chicken Warm (Optional): If frying in multiple batches, you can keep the cooked chicken warm in a preheated 200°F (95°C) oven on the wire rack while you finish the rest.
Phase 5: Assemble the Sandwiches
- Toast Buns (Optional but Recommended): Lightly toast the cut sides of your brioche buns. You can do this in a dry skillet, under the broiler for a minute (watch carefully!), or on a griddle. Some people like to spread a thin layer of butter or mayo on the buns before toasting.
- Sauce the Buns: Generously spread the spicy mayo on both the top and bottom toasted buns.
- Layer Pickles: Place a generous layer of dill pickle slices on the bottom bun.
- Add Chicken: Place a piece of crispy fried chicken on top of the pickles.
- Add Lettuce (Optional): If using lettuce, add it on top of the chicken or under it.
- Crown it: Place the top bun on the sandwich.
- Serve Immediately: Serve the Crispy Buttermilk Fried Chicken Sandwiches immediately while the chicken is hot and crispy.
Nutritional Snapshot (Approximate)
Nutritional information for a homemade fried chicken sandwich can vary significantly based on chicken size, oil absorption, bun type, and sauce quantity. This is a rough estimate per sandwich.
- Servings: 4 sandwiches
- Serving Size: 1 sandwich
- Calories per serving: Approximately 700-950 calories
- Note: This is an indulgent sandwich. The chicken thigh, breading, frying oil, brioche bun, and mayo are the primary calorie contributors.
Time Investment: Crafting Your Culinary Icon
- Chicken Marinating Time (Passive): Minimum 4 hours, ideally 8-24 hours.
- Active Preparation Time (Making sauce, dredge, dredging chicken): 30-40 minutes.
- Dredged Chicken Rest Time (Passive): 15-30 minutes.
- Frying Time (Active, in batches): 20-30 minutes.
- Assembly Time (Active): 5-10 minutes.
- Total Active Time (Excluding Marinating & Resting): Approximately 1 hour – 1 hour 20 minutes.
- Total Time (Including Minimum 4-hour Marination & Resting): Approximately 5.5 – 6 hours.
How to Serve: The Ultimate Fried Chicken Experience
This sandwich is a star, but thoughtful pairings can elevate the entire meal.
- Classic Sides:
- French Fries: Shoestring, crinkle-cut, or sweet potato fries are a natural fit.
- Coleslaw: Creamy, tangy coleslaw provides a refreshing contrast to the rich sandwich.
- Onion Rings: Another crispy, indulgent favorite.
- Lighter Options:
- Simple Green Salad: A light vinaigrette can help balance the richness.
- Corn on the Cob: Especially if enjoying these sandwiches in warmer weather.
- Beverages:
- Craft Beer: A hoppy IPA or a crisp lager pairs wonderfully.
- Iced Tea or Lemonade: Classic refreshing choices.
- Bourbon Cocktails: An Old Fashioned or a Whiskey Sour can complement the Southern vibe.
- Presentation:
- Serve on a platter with a small bowl of extra spicy mayo for dipping.
- Wrap partially in parchment paper for a “gourmet takeaway” feel and easier handling.
- Consider skewering with a long toothpick or bamboo skewer if your sandwich is piled high.
Additional Tips for Fried Chicken Sandwich Supremacy
- Don’t Skip the Brine/Marinade Time: The buttermilk and salt work magic on the chicken, making it tender, juicy, and flavorful from within. A minimum of 4 hours is good, but overnight is truly transformative.
- Oil Temperature is King: Invest in a good kitchen thermometer. If the oil is too cool, the chicken will absorb too much oil and become greasy. If it’s too hot, the outside will burn before the inside is cooked. Maintain that 325-350°F (160-175°C) sweet spot.
- Double Dredge for Double Crunch: While optional, dipping the chicken back into the buttermilk and then the flour mixture a second time creates an even thicker, more rugged, and ultra-crispy crust. Those extra nooks and crannies are pure gold.
- Let Dredged Chicken Rest: Allowing the dredged chicken to sit on a wire rack for 15-30 minutes before frying helps the coating “set” and adhere much better, reducing the chance of it falling off in the fryer.
- Bun Choice Matters: A soft yet sturdy bun is crucial. Brioche buns are fantastic for their buttery richness and pillowy texture. Potato rolls are another excellent choice. Toasting them adds another layer of flavor and helps prevent sogginess from the sauce.
Frequently Asked Questions (FAQ)
Your common queries about achieving fried chicken sandwich perfection, answered!
- Q: Can I use chicken breasts instead of thighs?
- A: Yes, you can. However, chicken breasts are leaner and can dry out more easily. If using breasts, it’s recommended to pound them to an even 1/2-inch thickness for quicker, more even cooking. Be extra vigilant about not overcooking them; aim for an internal temperature of 165°F (74°C). Thighs generally result in a juicier sandwich.
- Q: How do I make the sandwich less spicy or more spicy?
- A: Less Spicy: Reduce or omit the hot sauce in the marinade and the cayenne pepper in the dredge. For the spicy mayo, use less Sriracha or a milder chili sauce, or even just plain mayo with a hint of lime and garlic.
More Spicy: Increase the hot sauce in the marinade. Add more cayenne pepper (or even a pinch of ghost pepper powder if you’re brave!) to the dredge. Use more Sriracha or a spicier chili sauce (like habanero-based) in the mayo. You can also add a few dashes of your favorite super-hot sauce directly to the cooked chicken.
- A: Less Spicy: Reduce or omit the hot sauce in the marinade and the cayenne pepper in the dredge. For the spicy mayo, use less Sriracha or a milder chili sauce, or even just plain mayo with a hint of lime and garlic.
- Q: Can I bake the chicken instead of frying it for a healthier version?
- A: You can, but it won’t achieve the same iconic crispy texture as deep-frying. To bake: Preheat oven to 400°F (200°C). Dredge the chicken as directed. Place on a wire rack set on a baking sheet. Spray generously with cooking oil spray. Bake for 20-30 minutes, flipping halfway, until golden and cooked through. For an air fryer, cook at 375°F (190°C) for about 15-20 minutes, flipping halfway, until crispy and cooked.
- Q: My breading keeps falling off the chicken. What am I doing wrong?
- A: This is a common issue. Here are key things to check:
- Don’t dry the chicken too much after marinating: Some moisture helps the initial flour layer stick.
- Press the flour firmly: Really work the dredge into the chicken.
- Let it rest after dredging: This 15-30 minute rest is crucial for the coating to hydrate and adhere.
- Oil temperature: If the oil is too cool, the chicken sits in it longer, and the breading can get soggy and fall off. If it’s too hot, violent bubbling can knock it off.
- Don’t overcrowd the pot: This drops oil temperature and can cause the pieces to knock against each other.
- Handle gently: Use tongs to turn the chicken carefully in the oil.
- A: This is a common issue. Here are key things to check:
- Q: What’s the best way to store and reheat leftover fried chicken?
- A: Store leftover fried chicken in an airtight container in the refrigerator for up to 3-4 days. To reheat and maintain some crispiness:
- Oven/Toaster Oven (Recommended): Preheat to 375-400°F (190-200°C). Place chicken on a wire rack on a baking sheet and heat for 10-20 minutes, or until warmed through and crispy.
- Air Fryer: Reheat at 350-375°F (175-190°C) for 5-10 minutes.
- Avoid the microwave if possible, as it tends to make the breading soggy. If you must, microwave briefly to warm through, then crisp under a broiler for a minute or two (watch very carefully).
- A: Store leftover fried chicken in an airtight container in the refrigerator for up to 3-4 days. To reheat and maintain some crispiness:
The Science of Crispy: Why This Recipe Works Wonders
Understanding the “why” behind the steps can help you achieve consistently amazing results.
- The Buttermilk Soak:
- Tenderization: Buttermilk is mildly acidic (due to lactic acid). This acidity gently breaks down proteins in the chicken, making it more tender without turning it mushy like stronger acids might.
- Adhesion: The thickness of buttermilk helps the flour dredge cling to the chicken far better than a water-based brine would.
- Flavor: Buttermilk adds a subtle tang that complements the richness of the fried coating.
- The Double Dredge & Cornstarch:
- Flour Power: All-purpose flour provides the bulk of the coating.
- Cornstarch Magic: Cornstarch is a pure starch that fries up incredibly crisp and light. It absorbs moisture and inhibits gluten development in the flour, leading to a more tender, brittle, and less “bready” crust.
- Building Layers: The process of pressing the flour, optionally dipping back into buttermilk, and dredging again creates layers. These layers separate slightly during frying, forming those coveted craggy, ultra-crispy bits. The resting period allows the flour to fully hydrate, essentially creating a “glue” that holds the coating on.
- Oil Temperature Control:
- Dehydration: When chicken hits hot oil, the moisture on its surface rapidly turns to steam. This outward rush of steam prevents oil from seeping in too quickly and helps to cook the chicken.
- Maillard Reaction & Caramelization: At the correct temperature, the sugars and amino acids in the flour and chicken undergo the Maillard reaction, creating the golden-brown color and complex savory flavors. Sugars also caramelize.
- Crisp Finish: The goal is to dehydrate the outer layer (the dredge) quickly to form a crisp shell before the interior overcooks. If the oil is too cool, the chicken absorbs oil before it crisps, leading to a greasy result. If too hot, the exterior burns before the inside cooks.
- Resting on a Wire Rack:
- Allowing the fried chicken to drain on a wire rack lets air circulate all around it. This prevents the bottom from steaming and becoming soggy, which would happen if it were placed directly on a plate or paper towels.
By understanding these principles, you’re not just following a recipe; you’re mastering the craft of fried chicken.
Customization Corner: Making It Your Own Signature Sandwich
While this recipe is fantastic as is, part of the fun of cooking is personalization!
- Spice Level Variations:
- Nashville Hot Style: After frying, brush the chicken with a spicy oil mixture (typically cayenne pepper, brown sugar, paprika, garlic powder, and hot frying oil).
- Sweet & Spicy: Add more honey or brown sugar to the spicy mayo, or even a touch to the dredge.
- Sauce Alternatives:
- Honey Mustard: A classic pairing with fried chicken.
- Ranch Dressing: For a cool, creamy contrast.
- Blue Cheese Dressing: If you like a bold, funky flavor.
- Classic Mayo & Ketchup: Simple but effective.
- Bun Swaps:
- Potato Rolls: Soft, slightly sweet, and hold up well.
- Pretzel Buns: Offer a unique chewy texture and salty flavor.
- Sourdough Buns: Tangy and sturdy.
- Extra Toppings:
- Cheese Slice: A slice of American, cheddar, or pepper jack melted on the hot chicken.
- Bacon: Crispy bacon strips for ultimate indulgence.
- Coleslaw (on the sandwich): Adds crunch and creaminess directly in the build.
- Fried Egg: A runny yolk adds another layer of richness.
- Dredge Flavor Boosters:
- Add a tablespoon of your favorite BBQ rub to the flour mixture.
- Incorporate finely crushed unsweetened cornflakes or panko breadcrumbs into the dredge for a different type of crunch.
Experiment and find the combination that makes your taste buds sing!
A Final Word: Embrace the Crisp!
This Crispy Buttermilk Fried Chicken Sandwich is more than just a meal; it’s an event. It’s a labor of love that pays off in every crunchy, juicy, flavorful bite. While it might seem like a few steps, each one is designed to build towards that ultimate sandwich experience. So, roll up your sleeves, embrace the process, and get ready to create a fried chicken sandwich that will have everyone asking for your secret recipe. Enjoy the delicious journey!
Print
Crispy Buttermilk Fried Chicken Sandwich recipe
Ingredients
-
- Boneless, Skinless Chicken Thighs (4 large, about 6-8 oz / 170-225g each): Thighs are preferred for their juiciness and flavor, which stand up well to frying. You can use chicken breasts, but pound them to an even 1/2-inch thickness and be mindful not to overcook.
-
- Buttermilk (2 cups / 480ml): The star of the marinade, tenderizing the chicken and helping the dredge adhere.
-
- Hot Sauce (2 tablespoons / 30ml, e.g., Frank’s RedHot or your favorite): Adds a subtle kick and depth of flavor to the chicken.
-
- Kosher Salt (1 tablespoon / 18g): For brining and seasoning the chicken.
-
- Black Pepper (1 teaspoon / 2g, freshly ground):
-
- Garlic Powder (1 teaspoon / 3g):
-
- Smoked Paprika (1 teaspoon / 2g, optional but recommended): Adds a hint of smokiness.
For the Crispy Dredge:
-
- All-Purpose Flour (2 cups / 240g): The base of our dredge.
-
- Cornstarch (1/2 cup / 60g): The secret to extra crispiness!
-
- Kosher Salt (1 tablespoon / 18g):
-
- Black Pepper (2 teaspoons / 4g, freshly ground):
-
- Cayenne Pepper (1 teaspoon / 2g, or more to taste for spicier chicken):
-
- Garlic Powder (2 teaspoons / 6g):
-
- Onion Powder (1 teaspoon / 3g):
-
- Smoked Paprika (1 teaspoon / 2g):
For the Spicy Mayo:
-
- Mayonnaise (1/2 cup / 120ml): Good quality mayo, like Duke’s or Kewpie, for best results.
-
- Sriracha or Your Favorite Chili Garlic Sauce (2-3 tablespoons / 30-45ml, adjust to heat preference):
-
- Lime Juice (1 teaspoon / 5ml, fresh): Adds brightness.
-
- Honey or Maple Syrup (1 teaspoon / 5ml, optional for a touch of sweetness):
-
- Garlic Powder (1/4 teaspoon / 0.75g):
For Frying:
-
- Neutral Frying Oil (6-8 cups / 1.4 – 1.9 liters, e.g., peanut, canola, vegetable, or corn oil): Enough for at least 1.5-2 inches depth in your frying vessel.
For Assembling the Sandwiches:
-
- Brioche Buns (4): Their buttery richness complements the chicken perfectly. Potato buns or other soft, good-quality buns work too.
-
- Dill Pickle Slices (generous amount): Classic, tangy, and crucial for cutting through the richness. Bread and butter pickles can be used if preferred.
-
- Optional: Lettuce (e.g., iceberg or butter lettuce for crunch and freshness)
Equipment Needed:
-
- Large bowls
-
- Whisk
-
- Deep, heavy-bottomed pot (like a Dutch oven) or deep fryer
-
- Kitchen thermometer (candy/deep-fry thermometer)
-
- Tongs
-
- Wire rack set over a baking sheet
Instructions
-
- Prepare Chicken: If using chicken thighs, trim any excess fat. If they are very thick, you can lightly pound them to a more even thickness (about 3/4 inch) for consistent cooking, but it’s often not necessary for thighs.
-
- Combine Marinade Ingredients: In a large bowl, whisk together the buttermilk, hot sauce, 1 tablespoon kosher salt, 1 teaspoon black pepper, 1 teaspoon garlic powder, and 1 teaspoon smoked paprika (if using).
-
- Marinate: Add the chicken thighs to the buttermilk mixture, ensuring they are fully submerged. Cover the bowl tightly with plastic wrap and refrigerate for at least 4 hours, or ideally overnight (up to 24 hours). The longer it marinates, the more tender and flavorful the chicken will be.
Phase 2: Prepare the Dredge and Spicy Mayo
-
- Make the Dredge: In a wide, shallow bowl or dish, whisk together the all-purpose flour, cornstarch, 1 tablespoon kosher salt, 2 teaspoons black pepper, cayenne pepper, 2 teaspoons garlic powder, onion powder, and 1 teaspoon smoked paprika. Set aside.
-
- Make the Spicy Mayo: In a small bowl, combine the mayonnaise, Sriracha (or chili garlic sauce), fresh lime juice, optional honey/maple syrup, and 1/4 teaspoon garlic powder. Whisk until smooth. Taste and adjust seasoning or heat level as desired. Cover and refrigerate until ready to use. This can be made a day ahead.
Phase 3: Dredge the Chicken
-
- Set Up Dredging Station: Remove the marinated chicken from the refrigerator about 30 minutes before you plan to fry, allowing it to come closer to room temperature. Place the bowl of dredge next to the marinated chicken. Have a clean wire rack set over a baking sheet ready for the dredged chicken.
-
- First Dredge: Working with one piece of chicken at a time, remove it from the buttermilk marinade, allowing excess marinade to drip off (but don’t wipe it completely dry; some moisture helps the dredge stick).
-
- Coat Thoroughly: Place the chicken in the flour mixture, ensuring it’s fully coated on all sides. Press the flour firmly into the chicken.
-
- Dip Back (Optional, for thicker crust): For an even thicker, craggier crust, briefly dip the floured chicken back into the buttermilk marinade, then immediately back into the flour mixture for a second coating. Again, press the flour firmly.
-
- Create Crags: Really work the flour into all the nooks and crannies. You can even drizzle a tiny bit (a few drops) of the buttermilk marinade into the dry flour mixture and toss it around to create more little clumps, which will then stick to the chicken and become super crispy bits.
-
- Rest Dredged Chicken: Place the fully dredged chicken on the wire rack. Let it rest for at least 15-30 minutes at room temperature before frying. This step is crucial as it allows the coating to hydrate and adhere properly to the chicken, preventing it from falling off during frying.
Phase 4: Fry the Chicken
-
- Heat the Oil: Pour your frying oil into a large, heavy-bottomed pot or Dutch oven to a depth of at least 1.5-2 inches. You need enough oil so the chicken can float freely without touching the bottom. Attach a deep-fry thermometer to the side of the pot. Heat the oil over medium-high heat until it reaches 325-350°F (160-175°C). Maintaining the correct oil temperature is critical for crispy, non-greasy chicken.
-
- Fry in Batches: Carefully place 1 or 2 pieces of dredged chicken into the hot oil, being careful not to overcrowd the pot. Overcrowding will lower the oil temperature significantly, resulting in greasy chicken. The oil should immediately start bubbling vigorously around the chicken.
-
- Maintain Temperature: Adjust the heat as needed to keep the oil temperature within the 325-350°F (160-175°C) range throughout the frying process.
-
- Cook Through: Fry the chicken for about 5-8 minutes per side, depending on the thickness. The chicken is done when it’s deep golden brown and crispy, and the internal temperature reaches 165°F (74°C) when checked with an instant-read meat thermometer inserted into the thickest part. Thighs are more forgiving than breasts.
-
- Drain Excess Oil: Once cooked, carefully remove the chicken from the oil using tongs and place it on a clean wire rack set over a baking sheet to drain. This allows air to circulate around the chicken, keeping the bottom crispy. Immediately sprinkle the hot chicken lightly with a pinch of extra salt, if desired.
-
- Return Oil to Temperature: Allow the oil to return to the target temperature before adding the next batch of chicken.
-
- Keep Cooked Chicken Warm (Optional): If frying in multiple batches, you can keep the cooked chicken warm in a preheated 200°F (95°C) oven on the wire rack while you finish the rest.
Phase 5: Assemble the Sandwiches
-
- Toast Buns (Optional but Recommended): Lightly toast the cut sides of your brioche buns. You can do this in a dry skillet, under the broiler for a minute (watch carefully!), or on a griddle. Some people like to spread a thin layer of butter or mayo on the buns before toasting.
-
- Sauce the Buns: Generously spread the spicy mayo on both the top and bottom toasted buns.
-
- Layer Pickles: Place a generous layer of dill pickle slices on the bottom bun.
-
- Add Chicken: Place a piece of crispy fried chicken on top of the pickles.
-
- Add Lettuce (Optional): If using lettuce, add it on top of the chicken or under it.
-
- Crown it: Place the top bun on the sandwich.
-
- Serve Immediately: Serve the Crispy Buttermilk Fried Chicken Sandwiches immediately while the chicken is hot and crispy.
Nutrition
- Serving Size: one normal portion
- Calories: 700-950


