


Of all the traditions our family has adopted for Halloween, from carving pumpkins to our annual scary movie marathon, nothing gets the kids more excited than our day of spooky baking. Last year, we stumbled upon the idea for these Creepy Crawly Cupcakes, and they were an absolute, earth-shattering hit. I watched my youngest, usually a bit squeamish, meticulously place licorice “legs” on a chocolate spider, his face a perfect mixture of concentration and glee. My teenager, who often feigns being “too cool” for family activities, was the first one to snap a picture for his friends, proudly showing off our “disgustingly delicious” creations. The rich, moist chocolate cupcake paired with the tangy, sweet cream cheese frosting is a classic combination that’s hard to beat, but it’s the decorations that truly steal the show. They transformed our kitchen into a mad scientist’s laboratory and our dessert platter into a scene from a creature feature. These cupcakes aren’t just a treat; they’re an activity, a conversation starter, and a guaranteed way to make some wonderfully spooky memories.
The Ultimate Guide to Baking Eerily Delicious Creepy Crawly Cupcakes
Welcome to your definitive guide for creating the most talked-about treat of the Halloween season: Creepy Crawly Cupcakes! Whether you’re a seasoned baker looking for a festive new project or a complete novice wanting to impress at the school bake sale, this recipe is for you. These cupcakes are the perfect blend of spooky and sweet, designed to delight guests of all ages.
This isn’t just a simple recipe; it’s a blueprint for Halloween fun. We’ll walk you through creating a batch of incredibly moist, deep-dark chocolate cupcakes from scratch. Forget the boxed mix – our recipe uses simple pantry staples to achieve a professional bakery-level taste and texture. We’ll then whip up a tangy and luscious cream cheese frosting, the perfect canvas for our creepy crawly designs.
But the real magic happens in the decoration. We’ll show you exactly how to transform these delicious cupcakes into spine-chilling spiders and other buggy-eyed creatures using everyday candies and a bit of creative flair. This comprehensive article covers everything from a detailed ingredient list and step-by-step instructions to expert tips, serving suggestions, and a helpful FAQ section to ensure your baking adventure is a monstrous success. Get ready to unleash your inner baker and create a dessert that will have everyone crawling back for more!
Ingredients for Your Spooky Creation
Before you begin your ghoulishly good baking session, it’s essential to gather all your components. This recipe is broken down into three parts: the cupcakes, the frosting, and the all-important decorations. Using high-quality ingredients will make a noticeable difference in the final taste and texture.
For the Decadent Chocolate Cupcakes (Yields 24 cupcakes):
- All-Purpose Flour: 2 cups (250g) – This provides the main structure for our cupcakes.
- Granulated Sugar: 2 cups (400g) – For sweetness and to help create a tender crumb.
- Unsweetened Cocoa Powder: ¾ cup (75g) – Use a good quality cocoa powder for a deep, rich chocolate flavor.
- Baking Soda: 2 teaspoons – This is our primary leavening agent, reacting with the acidic ingredients to create lift.
- Baking Powder: 1 teaspoon – Provides an extra bit of leavening for a light, fluffy texture.
- Salt: 1 teaspoon – Balances the sweetness and enhances the chocolate flavor.
- Large Eggs: 2, at room temperature – Room temperature eggs incorporate better into the batter, creating a more uniform texture.
- Buttermilk: 1 cup (240ml), at room temperature – The secret ingredient for incredibly moist cupcakes! Its acidity reacts with the baking soda and tenderizes the gluten.
- Vegetable Oil: ½ cup (120ml) – Guarantees a moist cupcake that stays fresh for days.
- Vanilla Extract: 2 teaspoons – Adds a wonderful depth of flavor that complements the chocolate.
- Boiling Water: 1 cup (240ml) – This “blooms” the cocoa powder, releasing its intense chocolatey flavor and ensuring a super moist cake.
For the Tangy Cream Cheese Frosting:
- Cream Cheese: 16 ounces (452g), full-fat, softened to room temperature – The star of the show! It must be fully softened to avoid lumps.
- Unsalted Butter: ½ cup (113g), softened to room temperature – Adds richness, stability, and a smooth, buttery flavor.
- Powdered Sugar: 4 cups (480g), sifted – Sifting is crucial to prevent a gritty or lumpy frosting.
- Vanilla Extract: 1 teaspoon
- Pinch of Salt: Balances the sweetness of the sugar.
For the Creepy Crawly Decorations:
- Chocolate Sprinkles (Jimmies): ½ cup – These will create the “hairy” body of our spiders.
- Black Shoestring Licorice: 1 package – For crafting the eight spooky legs of our spiders.
- Large Chocolate-Covered Malt Balls or Chocolate Drops: 24 – These will form the spider’s head.
- Red Candy-Coated Chocolates (like M&M’s) or Red Sprinkles: 48 small pieces – To create the menacing red eyes.
- Semi-Sweet Chocolate Chips: ½ cup, for melting – Used to create a web effect on some cupcakes.
Step-by-Step Instructions: Baking Your Bug-Infested Batch
Follow these detailed instructions carefully for perfect results. Baking is a science, so precision is key! We’ll break it down into three manageable parts: making the cupcakes, whipping the frosting, and assembling your creepy crawlies.
Part 1: Preparing the Perfect Chocolate Cupcakes
- Preheat and Prep: Preheat your oven to 350°F (175°C). Line two standard 12-cup muffin tins with paper cupcake liners. This recipe makes 24 cupcakes, so you’ll need both tins ready.
- Combine Dry Ingredients: In a large mixing bowl, whisk together the all-purpose flour, granulated sugar, unsweetened cocoa powder, baking soda, baking powder, and salt. Whisking for about 30 seconds helps to aerate the ingredients and ensure they are evenly distributed, which is crucial for a perfect, even rise.
- Combine Wet Ingredients: In a separate medium-sized bowl, lightly beat the two room-temperature eggs. Then, whisk in the buttermilk, vegetable oil, and vanilla extract until everything is well combined.
- Marry the Wet and Dry: Pour the wet ingredient mixture into the large bowl with the dry ingredients. Using a stand mixer with a paddle attachment on low speed or a handheld electric mixer, mix until just combined. Be careful not to overmix at this stage; a few small lumps are okay. Overmixing develops gluten, which can lead to tough, rubbery cupcakes.
- The Secret Step: With the mixer on low, very carefully and slowly pour the 1 cup of boiling water into the batter. The batter will be very thin and liquidy – this is exactly what you want! This step is what makes these cupcakes exceptionally moist. Mix just until the water is incorporated.
- Fill the Liners: Using a ladle or an ice cream scoop for even portions, fill each cupcake liner about two-thirds full. Do not overfill, as they will rise significantly during baking.
- Bake to Perfection: Place the muffin tins in the preheated oven and bake for 18-22 minutes. The cupcakes are done when a wooden toothpick inserted into the center of a cupcake comes out clean or with a few moist crumbs attached (but no wet batter).
- Cool Completely: Remove the cupcakes from the oven and let them cool in the tins for about 5-10 minutes before transferring them to a wire rack. It is absolutely essential that the cupcakes cool completely before you attempt to frost them. Frosting warm cupcakes will result in a soupy, melted mess. This can take at least an hour.
Part 2: Whipping Up the Velvety Cream Cheese Frosting
- Beat the Base: In the bowl of a stand mixer fitted with the paddle attachment, or using a handheld mixer, beat the softened cream cheese and softened butter together on medium-high speed until the mixture is completely smooth, light, and fluffy. This should take about 3-4 minutes. Scrape down the sides and bottom of the bowl periodically to ensure everything is incorporated.
- Add Sugar Gradually: Turn the mixer speed down to low. Gradually add the sifted powdered sugar, one cup at a time, mixing well after each addition. This gradual process prevents a sugar explosion in your kitchen.
- Whip It Good: Once all the sugar is incorporated, add the vanilla extract and a pinch of salt. Increase the mixer speed to medium-high and whip for another 2-3 minutes until the frosting is exceptionally light, airy, and spreadable.
Part 3: The Creepy Crawly Assembly
This is where your cupcakes come to life! Set up an assembly station with your cooled cupcakes, frosting, and all your decorative candies.
- Frost the Cupcakes: Using an offset spatula or a butter knife, apply a generous, smooth layer of cream cheese frosting on top of each completely cooled cupcake.
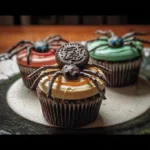
- Create the Furry Body: Immediately after frosting a cupcake, turn it upside down and gently dip the frosted top into a bowl of chocolate sprinkles. Roll it around slightly to coat the entire surface. The sprinkles will stick to the frosting, creating the perfect “hairy” spider body. Place the cupcake right side up.
- Add the Head: Gently press one large chocolate-covered malt ball or chocolate drop onto one side of the sprinkled cupcake top. This will be your spider’s head.
- Craft the Legs: Take your black shoestring licorice and cut it into small pieces, each about 2 inches long. You will need 8 legs for each spider cupcake. Carefully insert four licorice “legs” into each side of the cupcake, just below the “head.” You can bend them slightly to give them a more realistic, spindly appearance.
- Give Them Eyes: To make the eyes, you can either use a tiny dab of leftover frosting as “glue” to stick on two small red candy-coated chocolates, or you can use a toothpick to place two small dots of red decorator’s gel onto the chocolate head.
- Optional – The Spiderweb Cupcake: For a bit of variety, leave a few cupcakes with just the plain cream cheese frosting. Melt the ½ cup of semi-sweet chocolate chips in the microwave in 30-second intervals, stirring in between, until smooth. Transfer the melted chocolate to a small piping bag or a ziplock bag with a tiny corner snipped off. Starting from the center of the cupcake, pipe a spiral of chocolate outwards. Then, take a toothpick and drag it from the center of the cupcake to the edge in straight lines, creating a classic spiderweb effect.
Nutrition Facts
- Servings: 24 cupcakes
- Calories per serving (1 cupcake): Approximately 390-420 calories
Disclaimer: The nutritional information provided is an estimate and can vary based on the specific brands of ingredients used.
Timing Your Terrifying Treats: Prep and Cook Time
Planning your baking time is crucial, especially when preparing for a party. Here’s a breakdown of how long this spooky project will take.
- Preparation Time: 25 minutes (for mixing batter and preparing frosting)
- Cook Time: 18-22 minutes
- Cooling Time: 60-90 minutes (This is non-negotiable for successful frosting!)
- Decorating Time: 30-45 minutes (depending on your speed and artistic flair)
- Total Time: Approximately 2.5 – 3 hours
How to Serve Your Creepy Crawly Cupcakes for Maximum Impact
The presentation is just as important as the taste! Serving these cupcakes in a creative way will elevate their spooky charm and make your Halloween spread unforgettable.
- Create a Haunted Cupcake Graveyard:
- Arrange the cupcakes on a large black platter or a baking sheet covered in black fabric.
- Crumble chocolate cookies (like Oreos, with the cream removed) around the cupcakes to simulate “dirt.”
- Place a few gummy worms peeking out from the “dirt” for an extra creepy touch.
- Use small, tombstone-shaped cookies or crackers to place amongst the cupcakes.
- Build a Spider’s Lair Display:
- Use a tiered cupcake stand to give your spiders a multi-level web to inhabit.
- Stretch faux spider web material (available at most craft stores during Halloween) all over the stand and around the base.
- Place a few plastic spider rings on the stand and platter for added effect.
- Position the cupcakes with the spiderweb design strategically among the spider cupcakes.
- Perfect Pairings for a Spooky Party:
- Witches’ Brew Punch: Serve the cupcakes alongside a vibrant green or purple punch. Add dry ice for a smoky, bubbling cauldron effect (with adult supervision).
- Savory Snacks: Balance the sweetness with savory Halloween-themed snacks like “mummy dogs” (hot dogs wrapped in pastry strips) or a “pumpkin” cheese ball.
- Individual Servings: For a classroom party or grab-and-go event, place each cupcake in a clear plastic cup. This protects the delicate decorations and makes them easy for little hands to handle.
Additional Tips for Perfectly Petrifying Cupcakes
Take your Creepy Crawly Cupcakes from great to ghoulishly grand with these five professional tips.
- The Buttermilk Shortcut: If you don’t have buttermilk on hand, don’t fret! You can easily make a substitute. For every 1 cup of buttermilk needed, simply measure out 1 tablespoon of white vinegar or lemon juice into a liquid measuring cup. Then, fill the rest of the cup with regular milk up to the 1-cup line. Let it sit for 5-10 minutes. It will curdle slightly and be ready to use. This provides the necessary acidity to react with the baking soda for a tender crumb.
- Don’t Fear the Thin Batter: When you add the boiling water, the cupcake batter will look alarmingly thin, almost like chocolate milk. This is correct! Trust the process. This unique method is what creates an incredibly moist and tender cupcake. Do not be tempted to add more flour to thicken it.
- Mastering the Frosting Temperature: The temperature of your cream cheese and butter is the single most important factor for smooth, lump-free frosting. They must be truly at room temperature – soft to the touch but not greasy or melted. If your frosting seems too soft or runny, don’t add more sugar, which can make it sickly sweet. Instead, place the entire bowl in the refrigerator for 15-20 minutes to firm up before whipping it again.
- Creative Crawlers – Think Beyond the Spider: While spiders are classic, feel free to get creative! Use the same cupcake and frosting base to make other bugs. Arrange green M&M’s in a line with two antennae made of licorice for a caterpillar. Or, stick a gummy worm halfway into the frosting so it looks like it’s burrowing into the cupcake “dirt.” This is a great way to use up different candies you might have on hand.
- Make-Ahead Magic for a Stress-Free Halloween: You can easily prepare components of this recipe in advance. The chocolate cupcakes can be baked up to two days ahead. Store them in an airtight container at room temperature once they are completely cool. The cream cheese frosting can also be made a day or two in advance and stored in an airtight container in the refrigerator. Let it come to room temperature for about 30 minutes and give it a quick re-whip with your mixer to restore its fluffy texture before frosting and decorating on the day of your event.
Creepy Crawly Cupcakes FAQ: Your Questions Answered
Here are answers to some of the most common questions about making these spooky treats.
1. Can I use a boxed chocolate cake mix instead of making the cupcakes from scratch?
Absolutely! If you’re short on time, a boxed cake mix is a great shortcut. To elevate the flavor and texture of a standard mix, try these “doctored” tips: substitute the water called for on the box with buttermilk or coffee, substitute the oil with melted butter (use the same amount), and add an extra egg to the batter. This will result in a richer, more homemade-tasting cupcake that provides a sturdy base for the frosting and decorations.
2. My cream cheese frosting is lumpy. How can I fix it?
Lumpy frosting is almost always caused by cream cheese that was too cold when mixed. Unfortunately, once it’s lumpy, it’s very difficult to fix completely. The best defense is a good offense: ensure your cream cheese and butter are thoroughly softened before you begin. If you do have a few small lumps, you can try gently warming the side of the mixing bowl with a hairdryer for a few seconds while the mixer is running, which can sometimes help smooth them out. Sifting your powdered sugar is also essential to prevent lumps.
3. How should I store the finished Creepy Crawly Cupcakes?
Because of the cream cheese frosting, these cupcakes must be stored in the refrigerator. Place them in a tall, airtight container (to avoid squishing the decorations) and they will stay fresh for up to 3-4 days. For the best taste and texture, allow the cupcakes to sit at room temperature for about 20-30 minutes before serving. This will allow the frosting and cake to soften slightly.
4. Are there any allergy-friendly variations I can make?
Yes, with a few substitutions. For a gluten-free version, you can substitute the all-purpose flour with a high-quality 1-to-1 gluten-free baking flour blend. For a dairy-free version, use a dairy-free cream cheese alternative and dairy-free butter substitute in the frosting, and use a plant-based milk (like almond or soy milk) with a tablespoon of vinegar for the buttermilk substitute in the cake. Be sure to also check that all your decorative candies are free from the specific allergen you are avoiding.
5. I don’t have black licorice. What else can I use for the spider legs?
No problem! You can get creative with alternatives. Pretzel sticks (broken into smaller pieces) are a great option and provide a delicious salty-sweet crunch. You could also use melted chocolate: pipe thin lines of chocolate onto a piece of parchment paper in the shape of spider legs, let them harden in the fridge, and then carefully insert them into the cupcake. Black pull-and-peel licorice twists also work well.
Creepy Crawly Cupcakes Recipe
Ingredients
For the Decadent Chocolate Cupcakes (Yields 24 cupcakes):
-
All-Purpose Flour: 2 cups (250g) – This provides the main structure for our cupcakes.
-
Granulated Sugar: 2 cups (400g) – For sweetness and to help create a tender crumb.
-
Unsweetened Cocoa Powder: ¾ cup (75g) – Use a good quality cocoa powder for a deep, rich chocolate flavor.
-
Baking Soda: 2 teaspoons – This is our primary leavening agent, reacting with the acidic ingredients to create lift.
-
Baking Powder: 1 teaspoon – Provides an extra bit of leavening for a light, fluffy texture.
-
Salt: 1 teaspoon – Balances the sweetness and enhances the chocolate flavor.
-
Large Eggs: 2, at room temperature – Room temperature eggs incorporate better into the batter, creating a more uniform texture.
-
Buttermilk: 1 cup (240ml), at room temperature – The secret ingredient for incredibly moist cupcakes! Its acidity reacts with the baking soda and tenderizes the gluten.
-
Vegetable Oil: ½ cup (120ml) – Guarantees a moist cupcake that stays fresh for days.
-
Vanilla Extract: 2 teaspoons – Adds a wonderful depth of flavor that complements the chocolate.
-
Boiling Water: 1 cup (240ml) – This “blooms” the cocoa powder, releasing its intense chocolatey flavor and ensuring a super moist cake.
For the Tangy Cream Cheese Frosting:
-
Cream Cheese: 16 ounces (452g), full-fat, softened to room temperature – The star of the show! It must be fully softened to avoid lumps.
-
Unsalted Butter: ½ cup (113g), softened to room temperature – Adds richness, stability, and a smooth, buttery flavor.
-
Powdered Sugar: 4 cups (480g), sifted – Sifting is crucial to prevent a gritty or lumpy frosting.
-
Vanilla Extract: 1 teaspoon
-
Pinch of Salt: Balances the sweetness of the sugar.
For the Creepy Crawly Decorations:
-
Chocolate Sprinkles (Jimmies): ½ cup – These will create the “hairy” body of our spiders.
-
Black Shoestring Licorice: 1 package – For crafting the eight spooky legs of our spiders.
-
Large Chocolate-Covered Malt Balls or Chocolate Drops: 24 – These will form the spider’s head.
-
Red Candy-Coated Chocolates (like M&M’s) or Red Sprinkles: 48 small pieces – To create the menacing red eyes.
-
Semi-Sweet Chocolate Chips: ½ cup, for melting – Used to create a web effect on some cupcakes.
Instructions
Part 1: Preparing the Perfect Chocolate Cupcakes
-
Preheat and Prep: Preheat your oven to 350°F (175°C). Line two standard 12-cup muffin tins with paper cupcake liners. This recipe makes 24 cupcakes, so you’ll need both tins ready.
-
Combine Dry Ingredients: In a large mixing bowl, whisk together the all-purpose flour, granulated sugar, unsweetened cocoa powder, baking soda, baking powder, and salt. Whisking for about 30 seconds helps to aerate the ingredients and ensure they are evenly distributed, which is crucial for a perfect, even rise.
-
Combine Wet Ingredients: In a separate medium-sized bowl, lightly beat the two room-temperature eggs. Then, whisk in the buttermilk, vegetable oil, and vanilla extract until everything is well combined.
-
Marry the Wet and Dry: Pour the wet ingredient mixture into the large bowl with the dry ingredients. Using a stand mixer with a paddle attachment on low speed or a handheld electric mixer, mix until just combined. Be careful not to overmix at this stage; a few small lumps are okay. Overmixing develops gluten, which can lead to tough, rubbery cupcakes.
-
The Secret Step: With the mixer on low, very carefully and slowly pour the 1 cup of boiling water into the batter. The batter will be very thin and liquidy – this is exactly what you want! This step is what makes these cupcakes exceptionally moist. Mix just until the water is incorporated.
-
Fill the Liners: Using a ladle or an ice cream scoop for even portions, fill each cupcake liner about two-thirds full. Do not overfill, as they will rise significantly during baking.
-
Bake to Perfection: Place the muffin tins in the preheated oven and bake for 18-22 minutes. The cupcakes are done when a wooden toothpick inserted into the center of a cupcake comes out clean or with a few moist crumbs attached (but no wet batter).
-
Cool Completely: Remove the cupcakes from the oven and let them cool in the tins for about 5-10 minutes before transferring them to a wire rack. It is absolutely essential that the cupcakes cool completely before you attempt to frost them. Frosting warm cupcakes will result in a soupy, melted mess. This can take at least an hour.
Part 2: Whipping Up the Velvety Cream Cheese Frosting
-
Beat the Base: In the bowl of a stand mixer fitted with the paddle attachment, or using a handheld mixer, beat the softened cream cheese and softened butter together on medium-high speed until the mixture is completely smooth, light, and fluffy. This should take about 3-4 minutes. Scrape down the sides and bottom of the bowl periodically to ensure everything is incorporated.
-
Add Sugar Gradually: Turn the mixer speed down to low. Gradually add the sifted powdered sugar, one cup at a time, mixing well after each addition. This gradual process prevents a sugar explosion in your kitchen.
-
Whip It Good: Once all the sugar is incorporated, add the vanilla extract and a pinch of salt. Increase the mixer speed to medium-high and whip for another 2-3 minutes until the frosting is exceptionally light, airy, and spreadable.
Part 3: The Creepy Crawly Assembly
This is where your cupcakes come to life! Set up an assembly station with your cooled cupcakes, frosting, and all your decorative candies.
-
Frost the Cupcakes: Using an offset spatula or a butter knife, apply a generous, smooth layer of cream cheese frosting on top of each completely cooled cupcake.
-
Create the Furry Body: Immediately after frosting a cupcake, turn it upside down and gently dip the frosted top into a bowl of chocolate sprinkles. Roll it around slightly to coat the entire surface. The sprinkles will stick to the frosting, creating the perfect “hairy” spider body. Place the cupcake right side up.
-
Add the Head: Gently press one large chocolate-covered malt ball or chocolate drop onto one side of the sprinkled cupcake top. This will be your spider’s head.
-
Craft the Legs: Take your black shoestring licorice and cut it into small pieces, each about 2 inches long. You will need 8 legs for each spider cupcake. Carefully insert four licorice “legs” into each side of the cupcake, just below the “head.” You can bend them slightly to give them a more realistic, spindly appearance.
-
Give Them Eyes: To make the eyes, you can either use a tiny dab of leftover frosting as “glue” to stick on two small red candy-coated chocolates, or you can use a toothpick to place two small dots of red decorator’s gel onto the chocolate head.
-
Optional – The Spiderweb Cupcake: For a bit of variety, leave a few cupcakes with just the plain cream cheese frosting. Melt the ½ cup of semi-sweet chocolate chips in the microwave in 30-second intervals, stirring in between, until smooth. Transfer the melted chocolate to a small piping bag or a ziplock bag with a tiny corner snipped off. Starting from the center of the cupcake, pipe a spiral of chocolate outwards. Then, take a toothpick and drag it from the center of the cupcake to the edge in straight lines, creating a classic spiderweb effect.
Nutrition
- Serving Size: one normal portion
- Calories: 390-420


