


Walking into a bustling Chinese bakery is an experience for the senses. The warm, sweet air thick with the aroma of baking bread, the sight of gleaming egg tarts, fluffy pineapple buns, and rows upon rows of perfectly arranged pastries – it’s pure nostalgic comfort for me. Among all those treasures, the Coconut Bun always held a special place in my heart. That incredibly soft, slightly sweet milk bread encasing a rich, fragrant, buttery coconut filling, often topped with a signature criss-cross pattern or a sprinkle of streusel… it was, and still is, pure bliss. For years, I assumed recreating that specific texture and flavour at home was impossible, reserved only for seasoned bakery masters. But after much trial, error, and delicious research, I finally landed on this recipe. Making them at home fills my kitchen with that familiar bakery scent, and the satisfaction of pulling a tray of golden, soft coconut buns from my own oven? Absolutely priceless. My family now requests these constantly, claiming they’re even better than store-bought (I’ll humbly take the compliment!).
The Enduring Allure of the Chinese Coconut Bun
Chinese Coconut Buns, or Gai Mei Bao (雞尾包) in Cantonese, are a cornerstone of Hong Kong-style bakeries worldwide. Their name, which translates literally to “Cocktail Bun,” might seem puzzling. Legend has it that resourceful Hong Kong bakers in the 1950s, faced with leftover buns from the previous day, decided to incorporate them into a new creation. They ground up the old buns, mixed them with sugar and coconut to create a filling, and encased this mixture in fresh dough, thus giving birth to the “cocktail” bun – a mix of ingredients. While modern recipes (like this one) use fresh ingredients for the filling, the name stuck, and the bun became an enduring favourite.
What makes them so irresistible? It’s a trifecta of textures and flavours:
- The Bread: Incredibly soft, tender, and slightly milky, often achieved using techniques like Tangzhong for maximum fluffiness and moisture retention. It has a subtle sweetness that complements the filling perfectly.
- The Filling: A rich, moist, and intensely fragrant mixture of shredded coconut, butter, sugar, and often milk powder and a binder like flour or egg. It’s sweet but balanced, with the unmistakable tropical aroma of coconut shining through.
- The Topping (Optional but Classic): Often features simple lines of a buttery dough or a sprinkle of streusel topping, adding a slight textural contrast and visual appeal. Sometimes simply brushed with egg wash and sprinkled with sesame seeds or sliced almonds.
These buns are more than just a snack; they’re a taste of home for many, a nostalgic treat, and a testament to the ingenuity and deliciousness found in Chinese baking.
Unlocking Ultimate Softness: The Magic of Tangzhong
Many modern Asian bread recipes employ a technique called Tangzhong (or Yudane in Japan) to achieve that signature pillowy softness and extend the bread’s shelf life. This recipe utilizes the Tangzhong method.
What is Tangzhong? It’s essentially a roux made by cooking a small portion of the flour and liquid (water or milk) from the recipe until it thickens into a paste (around 65°C or 149°F). This process gelatinizes the starches in the flour, allowing them to absorb and hold onto more water.
Why Use It?
- Increased Moisture: The gelatinized starch holds onto extra liquid throughout the kneading, proofing, and baking process, resulting in a significantly moister bread.
- Softer Texture: This extra moisture contributes to a super soft, tender, and slightly springy crumb.
- Better Shelf Life: Breads made with Tangzhong tend to stay softer for longer compared to breads made using direct dough methods.
While you can make coconut buns without Tangzhong, incorporating this simple extra step makes a noticeable difference in achieving that authentic, cloud-like bakery texture.
Gathering Your Ingredients: The Building Blocks of Deliciousness
Accuracy in baking is key, especially with enriched doughs. Using a kitchen scale is highly recommended for flour and liquids.
For the Tangzhong:
- Bread Flour: 20 grams (approx. 2.5 tablespoons)
- Water (or Milk): 100 grams (approx. 1/2 cup minus 1 tablespoon)
For the Main Dough:
- Bread Flour: 350 grams (approx. 2 and 3/4 cups), plus more for dusting
- Granulated Sugar: 50 grams (approx. 1/4 cup)
- Salt: 5 grams (approx. 1 teaspoon)
- Instant Yeast: 5 grams (approx. 1.5 teaspoons)
- Milk Powder (optional but recommended): 20 grams (approx. 2.5 tablespoons) – enhances flavour and softness
- Large Egg: 1 (approx. 50 grams), lightly beaten
- Milk (Whole recommended): 110-120 grams (approx. 1/2 cup), lukewarm
- Unsalted Butter: 40 grams (approx. 3 tablespoons), softened at room temperature
- Prepared Tangzhong: All of the batch you made (approx. 120 grams)
For the Fragrant Coconut Filling:
- Unsalted Butter: 50 grams (approx. 3.5 tablespoons), softened
- Granulated Sugar: 60 grams (approx. 5 tablespoons) – adjust to taste/coconut sweetness
- Large Egg: 1 (approx. 50 grams), lightly beaten
- Milk Powder: 30 grams (approx. 4 tablespoons)
- Cake Flour (or All-Purpose Flour): 20 grams (approx. 2.5 tablespoons) – acts as a binder
- Desiccated Coconut (Unsweetened recommended): 100 grams (approx. 1 cup, packed)
For the Topping Streusel (Optional Classic Style):
- Unsalted Butter: 25 grams (approx. 1.5 tablespoons), cold and cubed
- Powdered Sugar: 20 grams (approx. 2.5 tablespoons)
- All-Purpose Flour: 35 grams (approx. 4.5 tablespoons)
For the Egg Wash:
- Large Egg: 1, beaten
- Water (or Milk): 1 tablespoon
Ingredient Notes:
- Bread Flour: Has a higher protein content than all-purpose flour, crucial for developing strong gluten needed for soft, chewy bread structure.
- Milk Powder: Adds richness, tenderness, and a subtle milky flavour characteristic of many Asian breads.
- Desiccated Coconut: Use unsweetened, finely shredded coconut for the best texture and flavour control. If you only have sweetened, reduce the sugar in the filling slightly.
- Yeast: Ensure your instant yeast is fresh and active.
Step-by-Step Instructions: Baking Your Own Bakery-Style Coconut Buns
Follow these steps carefully for the best results. Using a stand mixer is recommended for kneading, but hand kneading is also possible.
Step 1: Make the Tangzhong
- In a small saucepan, whisk together the 20g bread flour and 100g water (or milk) until no lumps remain.
- Place the saucepan over medium-low heat. Cook, whisking constantly, until the mixture thickens into a smooth paste, resembling mashed potatoes. Use a thermometer to check for 65°C (149°F) if possible. This should take 2-3 minutes.
- Remove from heat immediately. Transfer the Tangzhong to a small bowl. Cover the surface directly with plastic wrap (to prevent a skin from forming) and let it cool completely to room temperature. You can speed this up in the refrigerator, but bring it back to room temp before adding to the dough.
Step 2: Prepare the Coconut Filling
- In a medium bowl, cream the softened 50g butter and 60g granulated sugar together using a spatula or electric mixer until light and fluffy.
- Gradually beat in the 1 beaten egg until fully incorporated.
- Stir in the 30g milk powder and 20g cake flour (or AP flour) until combined.
- Fold in the 100g desiccated coconut until evenly distributed.
- Cover the bowl and refrigerate the filling for at least 30 minutes (or until ready to use). This helps it firm up, making it easier to handle.
Step 3: Make the Main Dough (Stand Mixer Instructions)
- In the bowl of your stand mixer, combine the 350g bread flour, 50g sugar, 5g salt, 5g instant yeast, and optional 20g milk powder. Whisk briefly to combine.
- Add the cooled Tangzhong, 1 beaten egg, and about 110g of the lukewarm milk.
- Using the dough hook attachment, mix on low speed until a shaggy dough forms.
- Increase the speed to medium-low (e.g., speed 2-4 on a KitchenAid) and knead for about 8-10 minutes. The dough will start rough but should become smoother and more elastic. If it seems excessively dry, add the remaining 10g milk cautiously; if too sticky, add a tiny bit of flour (1 tsp at a time).
- Add the 40g softened butter, one piece at a time, mixing on low speed until incorporated.
- Increase the speed back to medium-low and continue kneading for another 10-15 minutes, or until the dough becomes very smooth, elastic, and passes the “windowpane test.” (To check: pinch off a small piece of dough and gently stretch it thin. You should be able to stretch it thin enough to see light through it without it tearing easily). This gluten development is crucial for soft buns.
*(Hand Kneading Alternative: Combine dry ingredients in a large bowl. Make a well, add wet ingredients (Tangzhong, egg, milk). Mix to form a shaggy dough. Turn out onto a lightly floured surface. Knead for 10-15 mins until smoother. Gradually incorporate softened butter and continue kneading vigorously for another 15-25 mins until smooth, elastic, and windowpane stage is reached. It’s a workout!) *
Step 4: First Proof (Bulk Fermentation)
- Lightly grease a large bowl with oil or cooking spray.
- Shape the kneaded dough into a smooth ball. Place it in the greased bowl, turning it once to coat the surface lightly with oil.
- Cover the bowl tightly with plastic wrap or a damp cloth.
- Let the dough rise in a warm, draft-free place for 60-90 minutes, or until doubled in size. The exact time depends on room temperature and yeast activity.
Step 5: Prepare the Topping Streusel (If Using)
- While the dough is proofing, prepare the streusel if you’re using it.
- In a small bowl, combine the 25g cold cubed butter, 20g powdered sugar, and 35g all-purpose flour.
- Use your fingertips or a pastry blender to rub the butter into the dry ingredients until the mixture resembles coarse crumbs. Don’t overwork it.
- Chill the streusel mixture in the refrigerator until needed.
Step 6: Divide and Shape the Dough
- Once the dough has doubled, gently punch it down to release the air.
- Turn the dough out onto a very lightly floured surface.
- Divide the dough into equal portions. For standard-sized buns, divide into 10 or 12 pieces (each weighing around 60-70g). Use a kitchen scale for accuracy.
- Gently shape each portion into a smooth ball (pre-shaping).
- Cover the dough balls loosely with plastic wrap and let them rest for 15 minutes. This relaxes the gluten, making them easier to shape.
Step 7: Fill and Form the Buns
- Line one or two large baking sheets with parchment paper.
- Take one dough ball. On a lightly floured surface, gently roll it out into an oval shape, about 4-5 inches long.
- Retrieve the chilled coconut filling from the refrigerator. Divide the filling equally among the dough portions (use a scale or eyeball it).
- Place one portion of the filling down the center of the rolled-out oval, leaving a border around the edges. Shape the filling into a log.
- Fold one long side of the dough over the filling. Fold the other long side over, overlapping slightly, like folding a letter. Press the seam gently to seal. You should have a log shape.
- You can leave them as logs or gently curve them into a crescent shape if desired. Place the shaped bun, seam-side down, onto the prepared baking sheet.
- Repeat with the remaining dough balls and filling, placing the buns about 2 inches apart on the baking sheet(s).
Step 8: Second Proof
- Loosely cover the shaped buns on the baking sheets with plastic wrap (grease the underside lightly if worried about sticking) or a lightweight cloth.
- Let the buns rise in a warm place for another 45-60 minutes, or until they look noticeably puffy and almost doubled in size. When gently poked, the indentation should spring back slowly. Don’t overproof.
- About 15-20 minutes before the end of the proofing time, preheat your oven to 350°F (175°C). Position a rack in the center of the oven.
Step 9: Apply Egg Wash and Topping
- In a small bowl, whisk together the 1 egg and 1 tablespoon of water or milk for the egg wash.
- Gently brush the tops and sides of the proofed buns with the egg wash. Be careful not to deflate them.
- If using streusel: Sprinkle the chilled streusel topping evenly over the buns.
- If making classic lines: You can pipe thin lines of a simple paste made from flour, butter, and sugar across the top, or simply leave them plain with egg wash. Some bakeries add sesame seeds or almond slivers after the egg wash.
Step 10: Bake
- Place the baking sheet(s) into the preheated 350°F (175°C) oven.
- Bake for 15-20 minutes, or until the buns are beautifully golden brown on top and cooked through. If you have an instant-read thermometer, the internal temperature should reach around 190-200°F (88-93°C).
- If the tops are browning too quickly, you can loosely tent the buns with aluminum foil for the last few minutes of baking. Rotate the baking sheet halfway through if your oven bakes unevenly.
Step 11: Cool
- Carefully remove the baking sheets from the oven.
- Let the buns cool on the baking sheets for a few minutes before transferring them to a wire rack to cool completely.
- Optional Finishing Touch: While the buns are still warm, you can brush them lightly with a simple syrup (equal parts sugar and water, heated until dissolved and cooled) or a thin honey glaze (honey warmed slightly with a splash of water) for extra shine and a touch of sweetness.
Nutritional Information (Estimated)
Please note that these values are estimates and can vary based on exact ingredient brands, bun size, and whether optional ingredients (like milk powder or streusel) are used.
- Servings: 10-12 buns
- Calories per serving (1 bun): Approximately 300-380 kcal (higher end if streusel topping is used and buns are larger)
This estimate considers the bread, filling, and egg wash. Plain buns without rich fillings or toppings would be lower. These are satisfyingly rich treats!
Time Commitment: Planning Your Bake
Making enriched bread takes time, mostly for proofing. Plan accordingly!
- Active Preparation Time:
- Tangzhong: 5 minutes
- Filling: 10 minutes (+30 mins chilling)
- Dough Kneading: 20-30 minutes (mixer) / 30-45 minutes (hand)
- Dividing & Shaping: 20-25 minutes
- Egg Wash & Topping: 5 minutes
- Total Active Time: Approx. 60 – 75 minutes
- Passive Time:
- Tangzhong Cooling: 30-60 minutes
- First Proof: 60-90 minutes
- Dough Rest: 15 minutes
- Second Proof: 45-60 minutes
- Baking Time: 15-20 minutes
- Total Passive Time: Approx. 2.5 – 3.5 hours
Total Time (Start to Finish): Approximately 3.5 – 5 hours (largely dependent on proofing times)
How to Best Enjoy and Serve Your Coconut Buns
These buns are delightful just as they are, but here are some serving suggestions:
- Best Served: Fresh and slightly warm from the oven is peak perfection! However, they are still delicious at room temperature on the day they are baked.
- Reheating: To revive day-old buns, microwave briefly (10-15 seconds) or warm in a low oven (300°F/150°C) for a few minutes until softened.
- Perfect Pairings:
- Enjoy with a cup of hot Hong Kong-style milk tea (港式奶茶).
- Pair with coffee or regular tea.
- A simple glass of cold milk is also a classic choice.
- Occasions:
- Fantastic for breakfast or brunch.
- A delightful afternoon snack (common in Hong Kong tea culture).
- A satisfying, not-too-heavy dessert.
- Pack them for picnics or lunchboxes.
- Presentation: Arrange them simply on a platter or wire rack. If gifting, place them in a bakery box lined with wax paper for an authentic touch.
Baker’s Secrets: Additional Tips for Coconut Bun Success
- Don’t Overheat the Tangzhong: Cook the Tangzhong gently and stop as soon as it thickens. Overcooking can make it too stiff and potentially impact the final dough hydration. Let it cool completely.
- Chill the Filling Firmly: A well-chilled coconut filling is much easier to handle and shape inside the soft dough. If it gets too soft while you’re working, pop it back in the fridge for a few minutes.
- Achieve Proper Gluten Development: Don’t skimp on the kneading time. Reaching the windowpane stage is crucial for that light, airy, and soft texture characteristic of these buns. The dough should feel smooth and elastic.
- Respect the Proofing Times: Both the first and second proofs are vital. Under-proofing results in dense buns, while over-proofing can cause them to collapse during baking and may lead to a sour taste. Watch the visual cues (doubled size, puffy appearance, slow spring back when poked).
- Monitor Baking Closely: Oven temperatures vary. Keep an eye on the buns during the last 5-10 minutes of baking. They should be a beautiful golden brown. If they brown too quickly, tent with foil. Baking too long will result in dry buns.
Frequently Asked Questions (FAQ) about Chinese Coconut Buns
Q1: Why are they called “Cocktail Buns”? Does it contain alcohol?
A1: No, there’s no alcohol involved! The name “Cocktail Bun” (雞尾包 – Gai Mei Bao) is believed to originate from Hong Kong in the 1950s. Bakers supposedly created the coconut filling as a way to use up leftover, unsold plain buns by grinding them and mixing them with sugar and coconut – a “cocktail” of ingredients. While modern fillings use fresh ingredients, the traditional name persists.
Q2: Can I make these Coconut Buns without the Tangzhong method?
A2: Yes, you can adapt standard milk bread recipes. Omit the Tangzhong step and incorporate the flour and liquid amounts from the Tangzhong directly into the main dough ingredients. However, you will likely lose some of the signature ultra-softness and moistness that Tangzhong provides, and the buns may stale slightly faster.
Q3: I only have sweetened shredded coconut. Can I still use it?
A3: Yes, you can use sweetened shredded coconut. However, be mindful that it will make the filling considerably sweeter. It’s recommended to reduce the amount of granulated sugar added to the filling (perhaps halve it initially, taste the filling if possible, and adjust). The texture might also be slightly different. Unsweetened desiccated coconut generally provides a better, more purely coconut flavour.
Q4: How should I store leftover Coconut Buns?
A4: Store leftover buns in an airtight container or zip-top bag at room temperature for up to 2-3 days. They are best enjoyed within the first day or two for optimal softness. Avoid storing them in the refrigerator, as this tends to make bread stale faster. See reheating tips above.
Q5: Can I freeze these Coconut Buns?
A5: Yes! Coconut buns freeze quite well. Let them cool completely after baking. Wrap each bun individually and tightly in plastic wrap, then place them in a freezer-safe bag or container. They can be frozen for up to 1-2 months. To serve, thaw at room temperature or gently reheat in the microwave or a low oven directly from frozen (it will take longer than reheating day-old buns). You can also freeze the unbaked, shaped buns after the second proof, but baking results might vary slightly.
Making Chinese Coconut Buns at home is a rewarding baking project that brings the delightful aromas and flavours of a beloved bakery treat right into your kitchen. With a little patience, especially during the proofing stages, and attention to detail, you can achieve that incredibly soft bread and luscious coconut filling. Enjoy the process and the delicious results! Happy Baking!
Print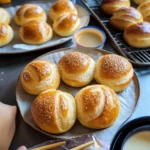
Chinese Bakery Coconut Buns Recipe
Ingredients
For the Tangzhong:
- Bread Flour: 20 grams (approx. 2.5 tablespoons)
- Water (or Milk): 100 grams (approx. 1/2 cup minus 1 tablespoon)
For the Main Dough:
- Bread Flour: 350 grams (approx. 2 and 3/4 cups), plus more for dusting
- Granulated Sugar: 50 grams (approx. 1/4 cup)
- Salt: 5 grams (approx. 1 teaspoon)
- Instant Yeast: 5 grams (approx. 1.5 teaspoons)
- Milk Powder (optional but recommended): 20 grams (approx. 2.5 tablespoons) – enhances flavour and softness
- Large Egg: 1 (approx. 50 grams), lightly beaten
- Milk (Whole recommended): 110-120 grams (approx. 1/2 cup), lukewarm
- Unsalted Butter: 40 grams (approx. 3 tablespoons), softened at room temperature
- Prepared Tangzhong: All of the batch you made (approx. 120 grams)
For the Fragrant Coconut Filling:
- Unsalted Butter: 50 grams (approx. 3.5 tablespoons), softened
- Granulated Sugar: 60 grams (approx. 5 tablespoons) – adjust to taste/coconut sweetness
- Large Egg: 1 (approx. 50 grams), lightly beaten
- Milk Powder: 30 grams (approx. 4 tablespoons)
- Cake Flour (or All-Purpose Flour): 20 grams (approx. 2.5 tablespoons) – acts as a binder
- Desiccated Coconut (Unsweetened recommended): 100 grams (approx. 1 cup, packed)
For the Topping Streusel (Optional Classic Style):
- Unsalted Butter: 25 grams (approx. 1.5 tablespoons), cold and cubed
- Powdered Sugar: 20 grams (approx. 2.5 tablespoons)
- All-Purpose Flour: 35 grams (approx. 4.5 tablespoons)
For the Egg Wash:
- Large Egg: 1, beaten
- Water (or Milk): 1 tablespoon
Instructions
Step 1: Make the Tangzhong
- In a small saucepan, whisk together the 20g bread flour and 100g water (or milk) until no lumps remain.
- Place the saucepan over medium-low heat. Cook, whisking constantly, until the mixture thickens into a smooth paste, resembling mashed potatoes. Use a thermometer to check for 65°C (149°F) if possible. This should take 2-3 minutes.
- Remove from heat immediately. Transfer the Tangzhong to a small bowl. Cover the surface directly with plastic wrap (to prevent a skin from forming) and let it cool completely to room temperature. You can speed this up in the refrigerator, but bring it back to room temp before adding to the dough.
Step 2: Prepare the Coconut Filling
- In a medium bowl, cream the softened 50g butter and 60g granulated sugar together using a spatula or electric mixer until light and fluffy.
- Gradually beat in the 1 beaten egg until fully incorporated.
- Stir in the 30g milk powder and 20g cake flour (or AP flour) until combined.
- Fold in the 100g desiccated coconut until evenly distributed.
- Cover the bowl and refrigerate the filling for at least 30 minutes (or until ready to use). This helps it firm up, making it easier to handle.
Step 3: Make the Main Dough (Stand Mixer Instructions)
- In the bowl of your stand mixer, combine the 350g bread flour, 50g sugar, 5g salt, 5g instant yeast, and optional 20g milk powder. Whisk briefly to combine.
- Add the cooled Tangzhong, 1 beaten egg, and about 110g of the lukewarm milk.
- Using the dough hook attachment, mix on low speed until a shaggy dough forms.
- Increase the speed to medium-low (e.g., speed 2-4 on a KitchenAid) and knead for about 8-10 minutes. The dough will start rough but should become smoother and more elastic. If it seems excessively dry, add the remaining 10g milk cautiously; if too sticky, add a tiny bit of flour (1 tsp at a time).
- Add the 40g softened butter, one piece at a time, mixing on low speed until incorporated.
- Increase the speed back to medium-low and continue kneading for another 10-15 minutes, or until the dough becomes very smooth, elastic, and passes the “windowpane test.” (To check: pinch off a small piece of dough and gently stretch it thin. You should be able to stretch it thin enough to see light through it without it tearing easily). This gluten development is crucial for soft buns.
*(Hand Kneading Alternative: Combine dry ingredients in a large bowl. Make a well, add wet ingredients (Tangzhong, egg, milk). Mix to form a shaggy dough. Turn out onto a lightly floured surface. Knead for 10-15 mins until smoother. Gradually incorporate softened butter and continue kneading vigorously for another 15-25 mins until smooth, elastic, and windowpane stage is reached. It’s a workout!) *
Step 4: First Proof (Bulk Fermentation)
- Lightly grease a large bowl with oil or cooking spray.
- Shape the kneaded dough into a smooth ball. Place it in the greased bowl, turning it once to coat the surface lightly with oil.
- Cover the bowl tightly with plastic wrap or a damp cloth.
- Let the dough rise in a warm, draft-free place for 60-90 minutes, or until doubled in size. The exact time depends on room temperature and yeast activity.
Step 5: Prepare the Topping Streusel (If Using)
- While the dough is proofing, prepare the streusel if you’re using it.
- In a small bowl, combine the 25g cold cubed butter, 20g powdered sugar, and 35g all-purpose flour.
- Use your fingertips or a pastry blender to rub the butter into the dry ingredients until the mixture resembles coarse crumbs. Don’t overwork it.
- Chill the streusel mixture in the refrigerator until needed.
Step 6: Divide and Shape the Dough
- Once the dough has doubled, gently punch it down to release the air.
- Turn the dough out onto a very lightly floured surface.
- Divide the dough into equal portions. For standard-sized buns, divide into 10 or 12 pieces (each weighing around 60-70g). Use a kitchen scale for accuracy.
- Gently shape each portion into a smooth ball (pre-shaping).
- Cover the dough balls loosely with plastic wrap and let them rest for 15 minutes. This relaxes the gluten, making them easier to shape.
Step 7: Fill and Form the Buns
- Line one or two large baking sheets with parchment paper.
- Take one dough ball. On a lightly floured surface, gently roll it out into an oval shape, about 4-5 inches long.
- Retrieve the chilled coconut filling from the refrigerator. Divide the filling equally among the dough portions (use a scale or eyeball it).
- Place one portion of the filling down the center of the rolled-out oval, leaving a border around the edges. Shape the filling into a log.
- Fold one long side of the dough over the filling. Fold the other long side over, overlapping slightly, like folding a letter. Press the seam gently to seal. You should have a log shape.
- You can leave them as logs or gently curve them into a crescent shape if desired. Place the shaped bun, seam-side down, onto the prepared baking sheet.
- Repeat with the remaining dough balls and filling, placing the buns about 2 inches apart on the baking sheet(s).
Step 8: Second Proof
- Loosely cover the shaped buns on the baking sheets with plastic wrap (grease the underside lightly if worried about sticking) or a lightweight cloth.
- Let the buns rise in a warm place for another 45-60 minutes, or until they look noticeably puffy and almost doubled in size. When gently poked, the indentation should spring back slowly. Don’t overproof.
- About 15-20 minutes before the end of the proofing time, preheat your oven to 350°F (175°C). Position a rack in the center of the oven.
Step 9: Apply Egg Wash and Topping
- In a small bowl, whisk together the 1 egg and 1 tablespoon of water or milk for the egg wash.
- Gently brush the tops and sides of the proofed buns with the egg wash. Be careful not to deflate them.
- If using streusel: Sprinkle the chilled streusel topping evenly over the buns.
- If making classic lines: You can pipe thin lines of a simple paste made from flour, butter, and sugar across the top, or simply leave them plain with egg wash. Some bakeries add sesame seeds or almond slivers after the egg wash.
Step 10: Bake
- Place the baking sheet(s) into the preheated 350°F (175°C) oven.
- Bake for 15-20 minutes, or until the buns are beautifully golden brown on top and cooked through. If you have an instant-read thermometer, the internal temperature should reach around 190-200°F (88-93°C).
- If the tops are browning too quickly, you can loosely tent the buns with aluminum foil for the last few minutes of baking. Rotate the baking sheet halfway through if your oven bakes unevenly.
Step 11: Cool
- Carefully remove the baking sheets from the oven.
- Let the buns cool on the baking sheets for a few minutes before transferring them to a wire rack to cool completely.
- Optional Finishing Touch: While the buns are still warm, you can brush them lightly with a simple syrup (equal parts sugar and water, heated until dissolved and cooled) or a thin honey glaze (honey warmed slightly with a splash of water) for extra shine and a touch of sweetness.
Nutrition
- Serving Size: one normal portion
- Calories: 300-380 kcal


