
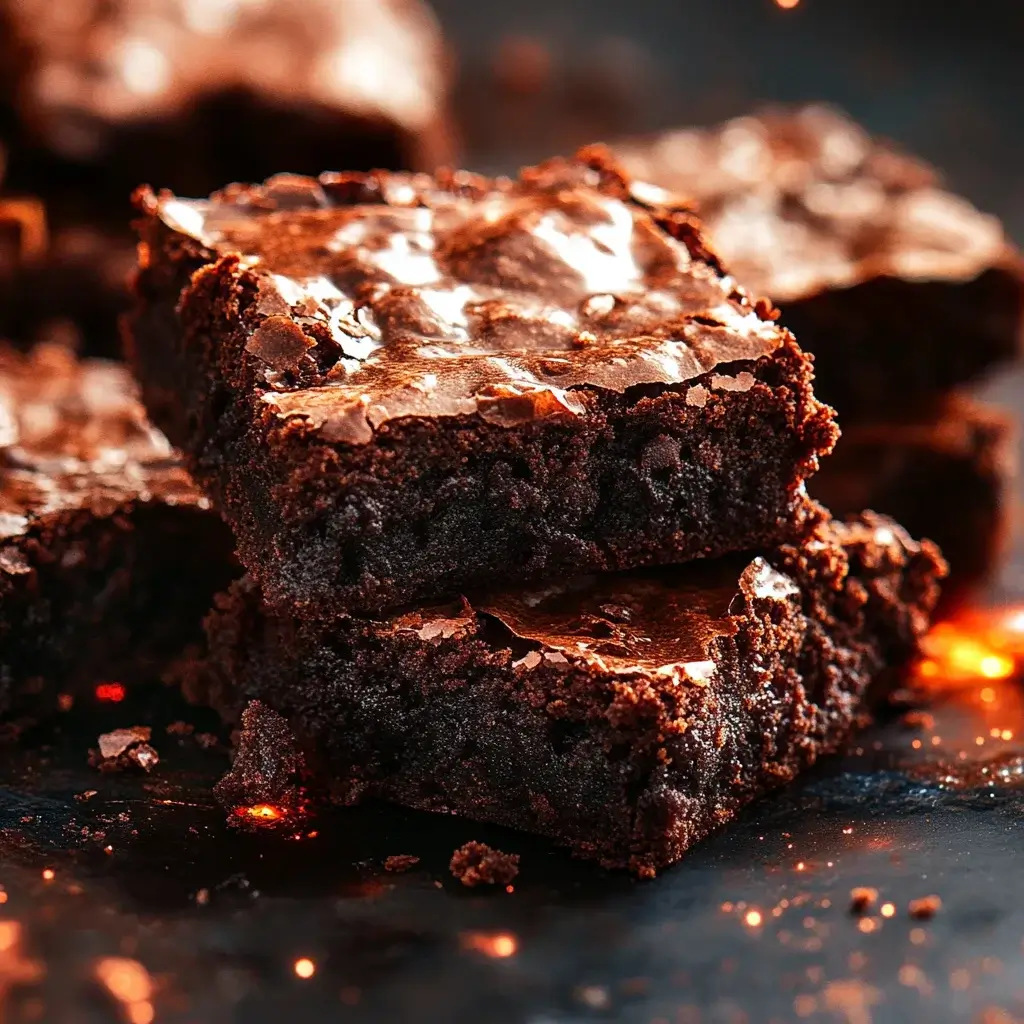

Okay, let me just say, the quest for the perfect chewy chocolate brownie has been a lifelong mission in my kitchen. I’ve baked countless batches, tweaked endless recipes, and endured many that were too cakey, too dry, or just not quite it. But this recipe? This is THE ONE. The first time I pulled these Chewy Chocolate Brownies from the oven, the aroma alone was intoxicating – a deep, rich chocolate scent that promised pure indulgence. The real magic happened after they cooled (the hardest part, truly!). That first bite was heaven: a slightly crisp edge giving way to an incredibly moist, dense, and satisfyingly chewy center, bursting with intense chocolate flavor. My family went absolutely wild for them. The pan was empty in what felt like minutes, and the requests for “those amazing chewy brownies” have been non-stop ever since. They have that perfect crinkly top, the dream texture, and a chocolate punch that satisfies even the most ardent chocoholic. Trust me, these are the brownies you’ve been searching for.
The Ultimate Chewy Chocolate Brownie Recipe: Your Quest Ends Here!
Welcome, fellow chocolate lovers, to what might just be the end of your search for the ultimate chewy chocolate brownie. This recipe is meticulously crafted to deliver that elusive, perfect texture: delightfully chewy, wonderfully moist, and intensely chocolatey, with those beautiful, characteristic crinkly tops. We’re not aiming for cakey, nor are we going for purely fudgy (though there’s a delightful fudginess to them); we’re targeting that satisfying, substantial chew that makes a brownie truly memorable. Forget complicated steps or exotic ingredients; this recipe uses pantry staples to create a pan of pure, unadulterated brownie bliss. Whether you’re a seasoned baker or a beginner, these instructions will guide you to brownie perfection. Prepare for these to become your new go-to recipe for every occasion, from a simple weeknight treat to a crowd-pleasing party dessert.
Ingredients: The Building Blocks of Brownie Bliss
Achieving the perfect chewy chocolate brownie relies on the right combination and proportion of ingredients. Here’s what you’ll need to gather:
- Unsalted Butter: 1 cup (2 sticks or 227g), melted
- Granulated Sugar: 1 ¾ cups (350g)
- Light Brown Sugar: ½ cup (100g), packed
- Large Eggs: 4, at room temperature
- Vanilla Extract: 2 teaspoons, pure
- Unsweetened Cocoa Powder: ¾ cup (75g), good quality (Dutch-process or natural will work, Dutch-process often gives a darker color and richer flavor)
- All-Purpose Flour: 1 ¼ cups (150g), spooned and leveled
- Salt: 1 teaspoon
- Semi-Sweet or Bittersweet Chocolate Chips or Chunks: 1 ½ cups (255g), plus an optional ½ cup for sprinkling on top
- Optional Add-ins:
- Chopped Walnuts or Pecans: 1 cup
- Espresso Powder: 1-2 teaspoons (dissolved in the melted butter or vanilla extract to intensify chocolate flavor)
A Note on Ingredients:
- Melted Butter: Using melted butter (rather than creamed softened butter) is key for a chewier, fudgier brownie.
- Sugars: The combination of granulated and brown sugar contributes to both chewiness (brown sugar due to its molasses content) and a lovely crust.
- Eggs: Four eggs provide structure and richness, also contributing to the chewy texture. Room temperature eggs incorporate better.
- Cocoa Powder vs. Melted Chocolate: This recipe primarily uses cocoa powder for its intense chocolate flavor, supplemented by chocolate chips/chunks for gooey pockets of melted chocolate. If you prefer an even deeper chocolate base, you can replace some of the cocoa powder and butter with 4-6 ounces of melted unsweetened or bittersweet baking chocolate.
- Flour: Using just enough flour is crucial. Too much flour leads to a cakey brownie. Always spoon your flour into the measuring cup and level it off.
Instructions: Your Step-by-Step Guide to Chewy Perfection
Follow these instructions carefully, and you’ll be rewarded with a pan of unbelievably chewy chocolate brownies.
- Preheat and Prepare: Preheat your oven to 350°F (175°C). Grease a 9×13 inch baking pan thoroughly with butter or non-stick cooking spray. For easier removal and cleanup, line the pan with parchment paper, leaving a 2-inch overhang on two opposite sides to act as “handles.” Grease the parchment paper as well.
- Melt Butter: In a medium saucepan, melt the butter over low heat. Once melted, remove from heat. If you’re using espresso powder, you can whisk it into the hot melted butter now until dissolved.
- Combine Wet Ingredients (Part 1 – Sugars & Butter): Pour the melted butter into a large mixing bowl. Add the granulated sugar and packed light brown sugar. Whisk vigorously for about 1-2 minutes until well combined and slightly glossy. The mixture might look a bit grainy, which is fine.
- Incorporate Eggs and Vanilla: Add the room temperature eggs one at a time, whisking well after each addition until fully incorporated and the batter is smooth and slightly thickened. After the last egg, whisk vigorously for another minute. This step helps create that desirable crinkly top. Stir in the pure vanilla extract.
- Combine Dry Ingredients: In a separate medium bowl, whisk together the all-purpose flour, unsweetened cocoa powder, and salt. Whisking ensures there are no lumps, especially from the cocoa powder, and that the salt is evenly distributed.
- Add Dry to Wet Ingredients: Gradually add the dry ingredient mixture to the wet ingredient mixture. Using a rubber spatula or wooden spoon, fold the dry ingredients in until just combined. Be very careful not to overmix at this stage. Overmixing develops gluten in the flour, which can lead to tough or cakey brownies instead of chewy ones. Stop mixing when you see just a few streaks of flour remaining.
- Fold in Chocolate Chips/Chunks (and Nuts if using): Gently fold in 1 ½ cups of chocolate chips or chunks (and nuts, if using) until they are evenly distributed throughout the batter. Again, do not overmix.
- Spread Batter in Pan: Pour the brownie batter into the prepared 9×13 inch baking pan. Use the spatula to spread it evenly into all corners. If desired, sprinkle the optional ½ cup of extra chocolate chips evenly over the top of the batter.
- Bake: Place the pan in the preheated oven on the middle rack. Bake for 28-35 minutes. The baking time can vary depending on your oven and the type of pan used (metal pans tend to bake faster than glass).
- The Toothpick Test for Chewy Brownies: To check for doneness, insert a wooden toothpick into the center of the brownies. For chewy brownies, you want the toothpick to come out with moist, fudgy crumbs attached, but not wet batter. If it comes out clean, the brownies are likely overbaked and will be drier and more cake-like. Start checking around the 28-minute mark. The edges should look set and slightly pulled away from the sides of the pan, and the top should have that beautiful crinkly sheen.
- Cool Completely (Crucial Step!): Once baked, remove the pan from the oven and place it on a wire cooling rack. This is perhaps the most challenging step due to the incredible aroma, but you must let the brownies cool completely in the pan before cutting them. This usually takes at least 2-3 hours, or even longer. Cooling allows the brownies to set properly, developing their chewy texture and making them much easier to cut into neat squares. Cutting them while warm will result in a gooey, messy (though still delicious) experience. For even cleaner cuts, you can chill them in the refrigerator for about 30 minutes after they’ve cooled to room temperature.
- Cut and Serve: Once completely cooled, use the parchment paper overhangs to lift the entire brownie slab out of the pan and onto a cutting board. Use a large, sharp knife to cut them into squares. For the cleanest cuts, wipe the knife clean with a damp paper towel between each cut.
Nutrition Facts (Approximate)
- Servings: This recipe yields approximately 20-24 brownies, depending on how you cut them.
- Calories per Serving (approximate, based on 24 brownies): 250-300 calories.
Disclaimer: Nutritional information is an estimate and can vary significantly based on the specific brands of ingredients used, exact measurements, portion sizes, and any optional add-ins.
Preparation Time: From Craving to Chewy Delight
These brownies are relatively quick to mix up, with the longest part being the (essential) cooling time.
- Prep Time: 20-25 minutes (measuring, mixing)
- Bake Time: 28-35 minutes
- Cooling Time: Minimum 2-3 hours (essential for texture and cutting)
- Total Time (to being able to cut them): Approximately 3 hours to 4 hours
How to Serve: Elevating Your Brownie Experience
While these Chewy Chocolate Brownies are phenomenal on their own, here are some delightful ways to serve them:
- The Classic:
- Serve a warm (gently reheated) brownie with a tall glass of cold milk.
- Enjoy with a hot cup of coffee or tea.
- À La Mode Sensation:
- Top a slightly warmed brownie with a generous scoop of vanilla bean ice cream.
- Drizzle with hot fudge sauce, caramel sauce, or raspberry coulis for extra decadence.
- Add a dollop of freshly whipped cream and a sprinkle of chocolate shavings.
- Brownie Sundae Bar:
- Cut brownies into smaller squares and set up a “sundae bar” with various ice creams, sauces (chocolate, caramel, strawberry), whipped cream, sprinkles, chopped nuts, cherries, and crushed cookies. Perfect for parties!
- For Gifting:
- Arrange cooled and cut brownies attractively in a decorative tin or box, layered with parchment paper. They make wonderful homemade gifts.
- Crumble Topping:
- Crumble leftover (if there are any!) brownies over yogurt, oatmeal, or even as a topping for a no-bake cheesecake.
- Fruit Pairings:
- Serve alongside fresh berries like raspberries, strawberries, or blackberries, which provide a lovely tart contrast to the rich chocolate.
- With a Dusting:
- A light dusting of powdered sugar just before serving can add an elegant touch.
Additional Tips for Achieving Ultimate Chewiness (5 Tips)
Unlock the secrets to consistently perfect chewy chocolate brownies with these expert tips:
- The Right Fat and Sugar Ratio is Key: This recipe is formulated with a higher ratio of fat (melted butter) and sugar (a mix of granulated and brown) to flour. Melted butter coats the flour proteins, limiting gluten development, which contributes to chewiness. Brown sugar, with its molasses content, adds moisture and chew. Don’t be tempted to reduce the sugar significantly, as it plays a crucial role in both texture and flavor.
- Don’t Overbake – The Golden Rule: This is perhaps the most critical factor for chewy brownies. Overbaking dries them out and makes them cakey. Start checking for doneness a few minutes before the recipe suggests. Remember, you’re looking for moist crumbs on the toothpick, not a completely clean one. The brownies will continue to cook slightly from residual heat as they cool.
- Resist the Urge: Cool Completely Before Cutting: As mentioned, this is vital. When brownies are warm, their structure is still setting. Cutting them too soon will result in a gooey mess and they won’t have that signature chew. Patience during the cooling process allows the internal structure to firm up, the flavors to meld, and the texture to become perfectly chewy. Chilling them briefly after cooling can make for even cleaner slices.
- Measure Flour Correctly – No Scooping!: Using too much flour is a common culprit for cakey brownies. To measure flour accurately, use the “spoon and level” method: lightly spoon the flour into your measuring cup until it’s overflowing, then use the straight edge of a knife to level it off. Do not scoop the flour directly from the bag with the measuring cup, as this compacts it and you’ll end up with too much.
- The Pan Matters (A Little): Light-colored metal pans are generally recommended for even baking. Dark metal pans absorb more heat and can cause the edges to bake faster or even burn. Glass pans are insulators and bake differently; if using a glass pan, you might need to reduce the oven temperature by 25°F (about 15°C) or extend the baking time slightly, keeping a close eye on doneness. Always use the pan size specified in the recipe (9×13 inch for this one) for best results.
FAQ: Your Chewy Chocolate Brownie Conundrums Solved
Here are answers to some frequently asked questions about making these amazing brownies:
- Q: What’s the difference between chewy, fudgy, and cakey brownies, and how do I achieve each?
- A: It primarily comes down to the ratio of fat, sugar, flour, and leavening agents.
- Chewy Brownies (like this recipe): Typically use melted butter, a good amount of sugar (often including brown sugar for moisture and chew), and a moderate amount of flour. Eggs also play a role in binding and chewiness. They strike a balance between fudgy and cakey.
- Fudgy Brownies: Have a higher fat-to-flour ratio (more butter and often melted chocolate in the batter) and fewer eggs. They are dense, moist, and intensely chocolatey.
- Cakey Brownies: Have a higher flour content and less fat. They often use creamed butter (like a cake), may include leavening agents like baking powder, and have a lighter, more open crumb.
- A: It primarily comes down to the ratio of fat, sugar, flour, and leavening agents.
- Q: How do I store Chewy Chocolate Brownies to keep them fresh?
- A: Once completely cooled and cut, store the brownies in an airtight container at room temperature. They should stay fresh and chewy for 3-4 days. Storing them in the refrigerator can extend their shelf life slightly but may also make them a bit firmer; let them come to room temperature before serving if refrigerated.
- Q: Can I freeze these brownies?
- A: Yes, these brownies freeze beautifully! Once cooled and cut, wrap individual brownies tightly in plastic wrap, then place them in a freezer-safe zip-top bag or airtight container. They can be frozen for up to 3 months. To thaw, either leave them at room temperature for a few hours or gently warm them in the microwave for a few seconds.
- Q: Can I add other mix-ins besides chocolate chips and nuts?
- A: Absolutely! Feel free to get creative. Some great options include:
- Other Chocolate: White chocolate chips, peanut butter chips, butterscotch chips.
- Candies: Chopped Reese’s Peanut Butter Cups, M&M’s, chopped Snickers.
- Dried Fruit: Chopped dried cherries or cranberries.
- Swirls: A swirl of salted caramel sauce or peanut butter dolloped and lightly swirled into the batter before baking.
Fold in about 1 to 1 ½ cups of your chosen mix-ins with or instead of the chocolate chips.
- A: Absolutely! Feel free to get creative. Some great options include:
- Q: My brownies always turn out cakey, even when I follow a “chewy” recipe. What am I doing wrong?
- A: There are several common culprits:
- Too Much Flour: Ensure you’re measuring your flour correctly using the spoon and level method.
- Overmixing: Once you add the flour, mix only until it’s just combined. Overmixing develops gluten, leading to a tougher, more cake-like texture.
- Overbaking: This is a major one. Pull them out when a toothpick has moist crumbs.
- Type of Fat: Using creamed softened butter instead of melted butter can lead to a cakier result.
- Too Many Leavening Agents: This recipe doesn’t use baking powder or baking soda (beyond what might be in some cocoa powders) specifically to maintain chewiness. Adding them would make the brownies lighter and more cake-like.
- A: There are several common culprits:
This Chewy Chocolate Brownie recipe is more than just a set of instructions; it’s your passport to brownie nirvana. The combination of rich chocolate flavor and that perfectly satisfying chewy texture makes them utterly irresistible. Bake a batch, share them with loved ones (or keep them all for yourself – we won’t judge!), and watch them disappear. Happy baking!
Print
Chewy Chocolate Brownies recipe
Ingredients
-
- Unsalted Butter: 1 cup (2 sticks or 227g), melted
-
- Granulated Sugar: 1 ¾ cups (350g)
-
- Light Brown Sugar: ½ cup (100g), packed
-
- Large Eggs: 4, at room temperature
-
- Vanilla Extract: 2 teaspoons, pure
-
- Unsweetened Cocoa Powder: ¾ cup (75g), good quality (Dutch-process or natural will work, Dutch-process often gives a darker color and richer flavor)
-
- All-Purpose Flour: 1 ¼ cups (150g), spooned and leveled
-
- Salt: 1 teaspoon
-
- Semi-Sweet or Bittersweet Chocolate Chips or Chunks: 1 ½ cups (255g), plus an optional ½ cup for sprinkling on top
-
- Optional Add-ins:
-
- Chopped Walnuts or Pecans: 1 cup
-
- Espresso Powder: 1-2 teaspoons (dissolved in the melted butter or vanilla extract to intensify chocolate flavor)
-
- Optional Add-ins:
A Note on Ingredients:
-
- Melted Butter: Using melted butter (rather than creamed softened butter) is key for a chewier, fudgier brownie.
-
- Sugars: The combination of granulated and brown sugar contributes to both chewiness (brown sugar due to its molasses content) and a lovely crust.
-
- Eggs: Four eggs provide structure and richness, also contributing to the chewy texture. Room temperature eggs incorporate better.
-
- Cocoa Powder vs. Melted Chocolate: This recipe primarily uses cocoa powder for its intense chocolate flavor, supplemented by chocolate chips/chunks for gooey pockets of melted chocolate. If you prefer an even deeper chocolate base, you can replace some of the cocoa powder and butter with 4-6 ounces of melted unsweetened or bittersweet baking chocolate.
-
- Flour: Using just enough flour is crucial. Too much flour leads to a cakey brownie. Always spoon your flour into the measuring cup and level it off.
Instructions
-
- Preheat and Prepare: Preheat your oven to 350°F (175°C). Grease a 9×13 inch baking pan thoroughly with butter or non-stick cooking spray. For easier removal and cleanup, line the pan with parchment paper, leaving a 2-inch overhang on two opposite sides to act as “handles.” Grease the parchment paper as well.
-
- Melt Butter: In a medium saucepan, melt the butter over low heat. Once melted, remove from heat. If you’re using espresso powder, you can whisk it into the hot melted butter now until dissolved.
-
- Combine Wet Ingredients (Part 1 – Sugars & Butter): Pour the melted butter into a large mixing bowl. Add the granulated sugar and packed light brown sugar. Whisk vigorously for about 1-2 minutes until well combined and slightly glossy. The mixture might look a bit grainy, which is fine.
-
- Incorporate Eggs and Vanilla: Add the room temperature eggs one at a time, whisking well after each addition until fully incorporated and the batter is smooth and slightly thickened. After the last egg, whisk vigorously for another minute. This step helps create that desirable crinkly top. Stir in the pure vanilla extract.
-
- Combine Dry Ingredients: In a separate medium bowl, whisk together the all-purpose flour, unsweetened cocoa powder, and salt. Whisking ensures there are no lumps, especially from the cocoa powder, and that the salt is evenly distributed.
-
- Add Dry to Wet Ingredients: Gradually add the dry ingredient mixture to the wet ingredient mixture. Using a rubber spatula or wooden spoon, fold the dry ingredients in until just combined. Be very careful not to overmix at this stage. Overmixing develops gluten in the flour, which can lead to tough or cakey brownies instead of chewy ones. Stop mixing when you see just a few streaks of flour remaining.
-
- Fold in Chocolate Chips/Chunks (and Nuts if using): Gently fold in 1 ½ cups of chocolate chips or chunks (and nuts, if using) until they are evenly distributed throughout the batter. Again, do not overmix.
-
- Spread Batter in Pan: Pour the brownie batter into the prepared 9×13 inch baking pan. Use the spatula to spread it evenly into all corners. If desired, sprinkle the optional ½ cup of extra chocolate chips evenly over the top of the batter.
-
- Bake: Place the pan in the preheated oven on the middle rack. Bake for 28-35 minutes. The baking time can vary depending on your oven and the type of pan used (metal pans tend to bake faster than glass).
-
- The Toothpick Test for Chewy Brownies: To check for doneness, insert a wooden toothpick into the center of the brownies. For chewy brownies, you want the toothpick to come out with moist, fudgy crumbs attached, but not wet batter. If it comes out clean, the brownies are likely overbaked and will be drier and more cake-like. Start checking around the 28-minute mark. The edges should look set and slightly pulled away from the sides of the pan, and the top should have that beautiful crinkly sheen.
-
- Bake: Place the pan in the preheated oven on the middle rack. Bake for 28-35 minutes. The baking time can vary depending on your oven and the type of pan used (metal pans tend to bake faster than glass).
-
- Cool Completely (Crucial Step!): Once baked, remove the pan from the oven and place it on a wire cooling rack. This is perhaps the most challenging step due to the incredible aroma, but you must let the brownies cool completely in the pan before cutting them. This usually takes at least 2-3 hours, or even longer. Cooling allows the brownies to set properly, developing their chewy texture and making them much easier to cut into neat squares. Cutting them while warm will result in a gooey, messy (though still delicious) experience. For even cleaner cuts, you can chill them in the refrigerator for about 30 minutes after they’ve cooled to room temperature.
-
- Cut and Serve: Once completely cooled, use the parchment paper overhangs to lift the entire brownie slab out of the pan and onto a cutting board. Use a large, sharp knife to cut them into squares. For the cleanest cuts, wipe the knife clean with a damp paper towel between each cut.
Nutrition
- Serving Size: one normal portion
- Calories: 250-300


