


There are some culinary combinations so elemental, so deeply ingrained in our collective memory, that they feel less like a recipe and more like a birthright. For me, cheese and pepperoni on crackers is one of those combinations. I can still vividly recall the simple joy of coming home from school, ravenously hungry, and being allowed to assemble my own snack. I’d line up the buttery crackers in a neat row, carefully place a slice of sharp cheddar on each, and then crown them with a circle of spicy pepperoni. That first bite was always a miniature explosion of everything a kid could want: the salty, satisfying snap of the cracker, the creamy, tangy cheese, and the savory, greasy kick of the pepperoni. It was my creation, my perfect little meal. Decades later, not much has changed. While my palate may have expanded, I still find myself returning to this timeless trio. It’s the effortless appetizer I throw together when friends drop by unexpectedly, the simple and satisfying lunch on a busy workday, and the nostalgic comfort snack that never, ever fails to hit the spot. It’s proof that you don’t need a complex recipe or fancy ingredients to create a moment of pure, unadulterated deliciousness.
The Enduring Appeal of a Simple Classic: A Flavor Analysis
Before we even lay out the ingredients, it’s worth exploring why this combination is so powerfully effective. Its success isn’t an accident; it’s a perfect storm of complementary flavors and textures that appeal to our most basic culinary instincts. This simple stack is a masterclass in sensory satisfaction.
The Trifecta of Taste
This snack hits three of the most crave-able flavor profiles simultaneously:
- Salty: The cracker provides the initial salty crunch, the cheese adds a savory, often salty tang, and the pepperoni delivers a concentrated burst of salt from its cured nature. This saltiness triggers a pleasure response in our brains, making us want more.
- Fatty: Both cheese and pepperoni are rich in fat. Fat is a carrier of flavor, meaning it helps to spread the taste of the other ingredients across our palate, creating a richer, fuller, and more lingering experience. It also provides a satisfying mouthfeel that contributes to a feeling of satiety and indulgence.
- Savory (Umami): This is the “fifth taste,” often described as meatiness or savoriness. Aged cheeses, like cheddar, are high in umami, and cured meats like pepperoni are umami powerhouses. When combined, they create a synergistic effect, making the overall flavor more complex and deeply satisfying than either ingredient would be on its own.
The Textural Harmony
The experience of eating is as much about texture as it is about taste, and this is where cheese and pepperoni on crackers truly excels.
- The Crunch: The cracker is the foundation, providing a firm, audible, and satisfying crunch. This textural contrast is crucial. It prevents the snack from being a one-note, soft experience and adds a dynamic element to each bite.
- The Creaminess: The cheese offers a smooth, creamy counterpoint to the cracker’s crispness. Whether it’s the firm creaminess of a slice of cheddar or the gooey, melty texture of broiled provolone, it provides a luxurious middle layer.
- The Chew: The pepperoni adds a final, distinct texture. It has a firm, slightly chewy quality that requires a bit more effort, making the eating experience more engaging and prolonging the release of its spicy, savory flavor.
Together, these elements create a snack that is perfectly balanced, incredibly crave-able, and deceptively complex. It’s a culinary lesson in how three simple components can unite to become something far greater than the sum of their parts.
Choosing Your Champions: The Ingredients
While the concept is simple, the quality and type of your ingredients will have a massive impact on the final product. Think of this less as a rigid recipe and more as a template for your own perfect creation. This recipe will outline a classic, crowd-pleasing version.
Yields: Approximately 24 crackers
Serving Size: 4-6 people as a light appetizer
- Crackers: 24 of your favorite crackers (see notes below for suggestions)
- Cheese: 6 ounces of cheese, sliced into cracker-sized pieces (about 1/4 inch thick)
- Pepperoni: 24-48 slices of pepperoni (use one for a balanced bite, two for a pepperoni-forward flavor)
A Deeper Dive into Your Ingredient Choices:
- The Cracker: The Foundation
- Buttery & Round (e.g., Ritz): The classic choice. The buttery, slightly sweet flavor complements the salty toppings perfectly, and the flaky texture is a delight.
- Flaky & Rectangular (e.g., Club Crackers): Very similar to buttery rounds, offering a light, multi-layered crunch.
- Whole Grain or Wheat (e.g., Triscuits, Wheat Thins): Adds a nutty, earthy flavor and a much more robust, hearty crunch that can stand up to bolder cheeses.
- Seeded Crackers: Crackers with sesame, poppy, or everything bagel seasoning add another layer of texture and savory flavor.
- The Cheese: The Heart of the Matter
- Medium or Sharp Cheddar: The quintessential pairing. Its tangy, nutty flavor provides a perfect contrast to the spicy pepperoni. Slicing it from a block will always yield better flavor than pre-sliced varieties.
- Provolone or Low-Moisture Mozzarella: If you plan on warming or broiling your crackers, these are the champions of the “cheese pull.” Their mild, milky flavor allows the pepperoni to be the star.
- Colby or Monterey Jack: These are milder, creamier cheeses that offer a wonderfully smooth texture and are great for taming the heat of a spicier pepperoni.
- Smoked Gouda or Havarti: For a more sophisticated twist, the smoky notes of Gouda or the incredibly creamy, buttery flavor of Havarti can elevate this simple snack to new heights.
- The Pepperoni: The Crown Jewel
- Classic Deli Style: These are the larger, thinner slices you’d find on a New York-style pizza. They offer great coverage and a classic, balanced flavor.
- “Cup-and-Char” Style: These are smaller, thicker pepperoni slices that curl up into a “cup” when heated, collecting their delicious rendered fat in the middle. They are fantastic for the warm/broiled method.
- Spicy or Hot Pepperoni: If you enjoy a bit of heat, look for varieties labeled “hot” or those that include extra spices like cayenne.
Instructions: Two Ways to Build Your Perfect Bite
You can enjoy this snack in two primary ways: the classic, no-fuss cold assembly or the warm and melty broiled method, which turns it into a miniature cracker pizza.
Method 1: The Classic Cold Assembly (No-Cook)
This is the fastest, easiest method, perfect for a quick snack or a large party platter where you need to assemble on the fly.
Step 1: Prepare Your Ingredients (Mise en Place)
Arrange your crackers, sliced cheese, and pepperoni on a clean work surface or cutting board. This makes the assembly process smooth and efficient.
Step 2: Assemble the Stacks
Lay out your crackers in a single layer. Place one slice of cheese on each cracker. Top the cheese with one or two slices of pepperoni.
Step 3: Serve Immediately
Arrange the finished crackers on a platter or board and serve immediately for the best texture and crunch.
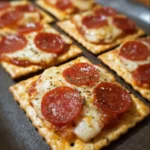
Method 2: The Warm and Melty Method (Broiled)
This method takes a few extra minutes but rewards you with gooey, melted cheese and crispy, rendered pepperoni. It is an absolute game-changer.
Step 1: Preheat the Broiler
Position an oven rack about 6 inches from the top heating element and preheat your broiler on high. Line a large, rimmed baking sheet with aluminum foil or parchment paper for easy cleanup.
Step 2: Assemble on the Baking Sheet
Arrange your crackers in a single layer on the prepared baking sheet. Top each cracker with a slice of cheese, followed by the pepperoni. Ensure they are not overlapping to allow for even cooking.
Step 3: Broil with Caution
Place the baking sheet under the preheated broiler. Do not walk away. A broiler works incredibly fast. Watch the crackers carefully for 1 to 3 minutes. They are done when the cheese is fully melted and bubbly, and the edges of the pepperoni are slightly crisp.
Step 4: Cool and Serve
Carefully remove the baking sheet from the oven. Let the crackers cool for a minute or two on the pan—the melted cheese will be extremely hot. Use a spatula to transfer them to a serving platter and enjoy warm.
Nutrition Facts
- Servings: 6
- Calories per serving (4 crackers): Approximately 200-250 kcal
Disclaimer: This nutritional information is a rough estimate and will vary significantly based on the specific brands and types of crackers, cheese, and pepperoni you choose.
Preparation Time
- Classic Cold Method: 5 minutes
- Warm and Melty Method: 10 minutes (including broiler preheating time)
- Total Time: Under 10 minutes for either method
How to Serve: Presentation and Pairings
Even a simple snack can feel special with a little thought put into its presentation.
- The Classic Party Platter:
- Arrange the crackers in neat rows or a circular pattern on a large platter or wooden board.
- Garnish the center of the platter with a small bowl of olives, cornichons, or a sprig of fresh herbs like parsley or rosemary to add a pop of color.
- The “DIY” Cracker Board:
- For a fun and interactive experience, create a deconstructed board. Place a pile of crackers in one section, fanned-out slices of cheese in another, and a mound of pepperoni in a third.
- Add small bowls of complementary items like fig jam, hot honey, or pesto for guests to customize their own creations.
- A Perfect Partner for Soup:
- Serve a small plate of these crackers alongside a bowl of creamy tomato soup or a hearty minestrone. They act as a more flavorful, substantial alternative to plain old soup crackers.
- The Upgraded Lunchbox:
- Pack the components separately in a bento-style lunchbox for a fun, build-your-own lunch that prevents the crackers from getting soggy.
Additional Tips for Snacking Supremacy
- Bring Cheese to Room Temperature: For the cold version, letting your cheese sit out for about 20-30 minutes before slicing and serving makes a world of difference. It softens the texture and allows the full, complex flavor of the cheese to come through.
- The Hot Honey Drizzle: For an incredible sweet, spicy, and savory flavor explosion, drizzle a small amount of hot honey over the warm, broiled crackers just before serving. It’s a simple addition that makes them taste like a gourmet appetizer.
- Add a Third Element: Elevate your stacks with a small addition. A tiny basil leaf tucked between the cheese and pepperoni, a thin slice of jalapeño for extra heat, a sliver of a black olive for briny flavor, or a small dollop of pesto can add a surprising amount of complexity.
- Prevent the Sog: The number one enemy of this snack is a soggy cracker. For parties, it’s best to assemble them just before guests arrive or to use the DIY board approach. If pre-assembling, choose a sturdier cracker like a Triscuit or whole-wheat variety, which will hold its crunch longer.
- Master the Broiler: The difference between perfectly melted and burnt is about 30 seconds. Keep the oven light on and watch them like a hawk. It’s better to pull them out a little early than to let them go too long.
Frequently Asked Questions (FAQ)
1. Can I make these ahead of time for a party?
It is strongly recommended to assemble them right before serving to ensure the crackers stay crispy. You can, however, do all the prep work ahead of time. Slice your cheese and arrange it on a plate covered with plastic wrap, have your pepperoni ready, and your crackers in a bowl. When it’s time to serve, the assembly will take only a couple of minutes.
2. What are some good non-pork alternatives to pepperoni?
There are many great options! Turkey pepperoni is widely available and is a leaner choice. You could also use slices of salami, soppressata, or even a spicy chorizo. For a vegetarian option, you can use a plant-based pepperoni substitute or simply top the cheese with a sun-dried tomato, a roasted red pepper slice, or a marinated artichoke heart.
3. My crackers always get soggy. What am I doing wrong?
Sogginess is usually caused by moisture from the cheese and pepperoni seeping into the cracker over time. The key is timing. The longer they sit after being assembled, the softer the cracker will become. Assemble just before serving. Using a lower-moisture cheese (like a block of aged cheddar vs. fresh mozzarella) and patting any excess grease off the pepperoni with a paper towel can also help.
4. What’s the absolute best cheese for getting a good “cheese pull” on the warm version?
For that classic, stringy pizza-like cheese pull, low-moisture mozzarella is the undisputed champion. Provolone is a very close second and adds a bit more flavor. You can also use a mix of mozzarella for the melt and a sharper cheese like cheddar or Parmesan for flavor.
5. How can I make a gluten-free version of this snack?
Easily! The cheese and pepperoni are naturally gluten-free (though you should always check the pepperoni label for any additives). Simply substitute the regular crackers with your favorite brand of gluten-free crackers. There are many excellent options available today made from rice, nuts, seeds, or corn that offer a fantastic crunch.
Cheese And Pepperoni On Crackers recipe
Ingredients
-
Crackers: 24 of your favorite crackers (see notes below for suggestions)
-
Cheese: 6 ounces of cheese, sliced into cracker-sized pieces (about 1/4 inch thick)
-
Pepperoni: 24-48 slices of pepperoni (use one for a balanced bite, two for a pepperoni-forward flavor)
Instructions
This is the fastest, easiest method, perfect for a quick snack or a large party platter where you need to assemble on the fly.
Step 1: Prepare Your Ingredients (Mise en Place)
Arrange your crackers, sliced cheese, and pepperoni on a clean work surface or cutting board. This makes the assembly process smooth and efficient.
Step 2: Assemble the Stacks
Lay out your crackers in a single layer. Place one slice of cheese on each cracker. Top the cheese with one or two slices of pepperoni.
Step 3: Serve Immediately
Arrange the finished crackers on a platter or board and serve immediately for the best texture and crunch.
This method takes a few extra minutes but rewards you with gooey, melted cheese and crispy, rendered pepperoni. It is an absolute game-changer.
Step 1: Preheat the Broiler
Position an oven rack about 6 inches from the top heating element and preheat your broiler on high. Line a large, rimmed baking sheet with aluminum foil or parchment paper for easy cleanup.
Step 2: Assemble on the Baking Sheet
Arrange your crackers in a single layer on the prepared baking sheet. Top each cracker with a slice of cheese, followed by the pepperoni. Ensure they are not overlapping to allow for even cooking.
Step 3: Broil with Caution
Place the baking sheet under the preheated broiler. Do not walk away. A broiler works incredibly fast. Watch the crackers carefully for 1 to 3 minutes. They are done when the cheese is fully melted and bubbly, and the edges of the pepperoni are slightly crisp.
Step 4: Cool and Serve
Carefully remove the baking sheet from the oven. Let the crackers cool for a minute or two on the pan—the melted cheese will be extremely hot. Use a spatula to transfer them to a serving platter and enjoy warm.
Nutrition
- Serving Size: one normal portion
- Calories: 200-250


