

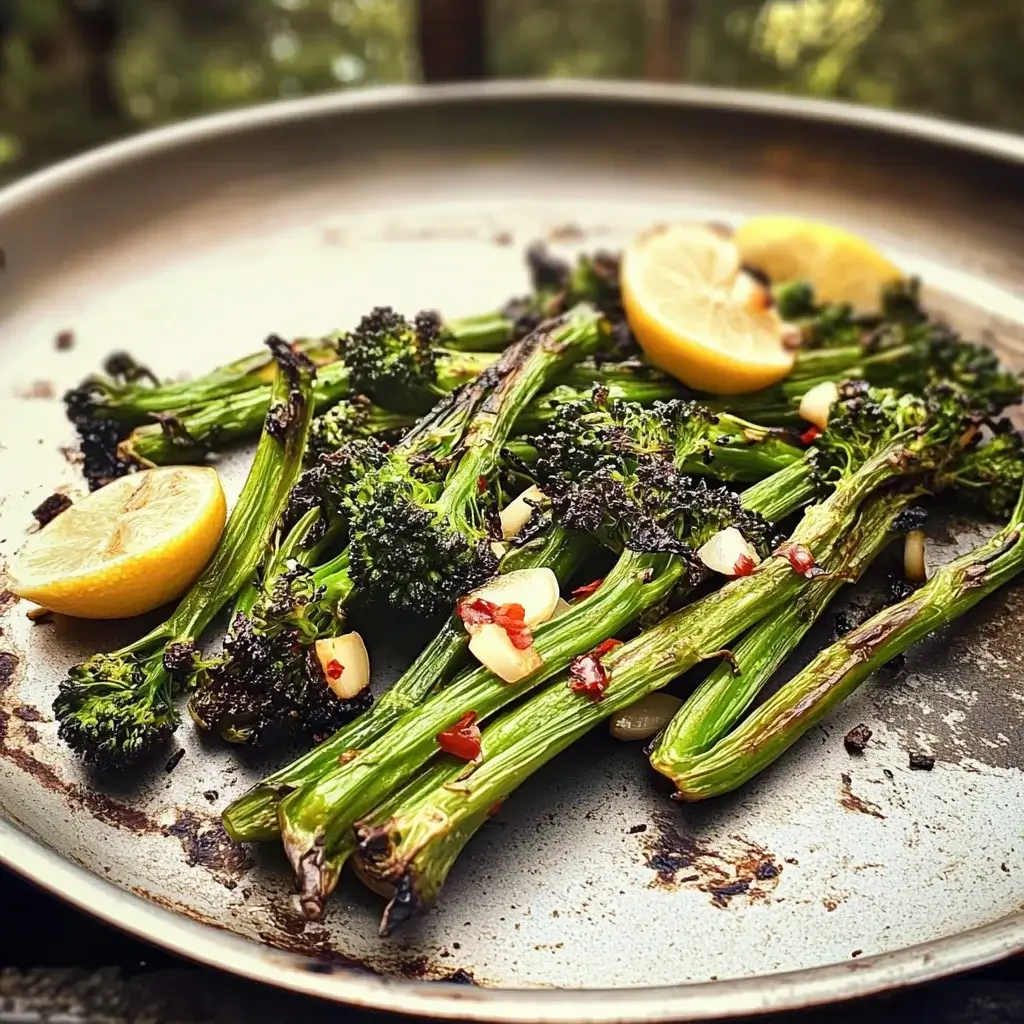

Honestly, I used to think vegetables were just… necessary. Something green to put on the plate next to the real star of the meal. Then I discovered the magic of high-heat roasting, specifically with broccolini. Forget sad, steamed spears! The first time I pulled a sheet pan of this Charred Broccolini from the oven – edges deeply browned and crispy, stems tender but still vibrant green, glistening with garlic-infused oil and brightened with a squeeze of lemon – it was a game-changer. The slight bitterness mellowed into a nutty sweetness, the char added an incredible smoky depth, and the simple garlic-lemon finish made it utterly addictive. My family, who usually politely tolerate greens, now actively requests this. It’s become our go-to side dish for everything from quick weeknight salmon to fancy holiday roasts because it’s ridiculously easy, impressively flavorful, and makes even the most vegetable-skeptic person ask for seconds. It’s proof that simple ingredients, treated right, can be truly spectacular.
Ingredients for Vibrant Charred Broccolini with Garlic and Lemon
This recipe relies on a few high-quality ingredients where simplicity allows each flavor to shine. The technique is as important as the components themselves.
Here’s what you’ll need (serves approximately 3-4 as a side dish):
- Broccolini: 1 large bunch (about 1 lb or 450g)
- Selection: Look for bunches with firm, bright green stalks and tightly closed florets. Avoid any that look yellowed, wilted, or have flowering buds. Stems should be relatively similar in thickness for even cooking. Broccolini (sometimes called baby broccoli) is a hybrid, often mistaken for young broccoli, but it has longer, thinner stems and smaller florets with a milder, slightly sweeter flavor than regular broccoli.
- Olive Oil: 3 tablespoons
- Recommendation: Extra virgin olive oil adds great flavor, but a good quality regular olive oil or avocado oil (which has a high smoke point) also works well, especially given the high roasting temperature.
- Garlic: 3-4 cloves, thinly sliced or roughly minced
- Fresh is Key: Use fresh garlic cloves for the best pungent, aromatic flavor. Slicing thinly allows the garlic to infuse the oil beautifully and get slightly crispy without burning as quickly as finely minced garlic. Roughly mincing is also fine, but keep an eye on it. Avoid garlic powder for this preparation – the texture and flavor won’t be the same. Adjust quantity based on clove size and your love for garlic.
- Lemon: ½ medium lemon
- You’ll use both the zest (optional but recommended) and the juice. Using fresh lemon juice provides essential brightness and acidity that cuts through the richness of the oil and complements the char. Zesting the lemon before juicing adds an extra layer of aromatic lemon oil.
- Salt: ½ teaspoon kosher salt or coarse sea salt (adjust to taste)
- Coarser salt distributes well and adds nice little pops of flavor. Start with ½ teaspoon and add more after cooking if needed.
- Black Pepper: ¼ teaspoon freshly ground black pepper (adjust to taste)
- Freshly ground pepper offers significantly more flavor than pre-ground.
- Red Pepper Flakes: ¼ teaspoon (optional, for a touch of heat)
- Adds a gentle warmth that pairs wonderfully with the garlic and lemon. Adjust the amount based on your heat preference, or omit entirely.
- Optional Addition:
- Parmesan Cheese: 2-3 tablespoons, finely grated (for serving) – Adds a salty, umami finish.
Ingredient Notes:
- Ensure the broccolini is washed and thoroughly dried before tossing with oil. Excess water will steam the broccolini instead of allowing it to char properly.
- The timing of adding the garlic is crucial to prevent burning (see instructions).
Step-by-Step Instructions for Perfectly Charred Broccolini
Achieving that desirable char without burning the broccolini or the garlic requires high heat and careful timing. Roasting is the easiest and most consistent method.
Oven Roasting Method (Recommended):
- Preheat Oven and Pan: This is crucial for getting a good char! Place a large, rimmed baking sheet into your oven. Preheat the oven to 425°F (220°C). Letting the pan heat up with the oven helps sear the broccolini immediately when it hits the surface.
- Prepare the Broccolini:
- Wash the broccolini thoroughly under cold running water.
- Dry Thoroughly: Pat the broccolini completely dry with paper towels or use a salad spinner. Excess moisture will prevent proper charring and result in steaming.
- Trim: Trim off about ½ inch from the tough, woody bottom ends of the stalks. If any stalks are particularly thick (significantly thicker than a pencil), you can slice them in half lengthwise so they cook at the same rate as the thinner stalks. Leave the thinner stalks whole.
- Toss with Oil and Seasoning:
- Place the trimmed and dried broccolini in a large bowl.
- Drizzle with the olive oil.
- Sprinkle with the kosher salt, freshly ground black pepper, and red pepper flakes (if using).
- Use your hands or tongs to toss everything together until the broccolini stalks and florets are evenly coated with oil and seasonings.
- Arrange on Hot Pan:
- Carefully remove the preheated baking sheet from the oven (use oven mitts!).
- Immediately spread the seasoned broccolini onto the hot baking sheet in a single layer.
- Do Not Crowd the Pan: Ensure there is space between the pieces. If the broccolini is too crowded, it will steam instead of char. Use two pans if necessary.
- Roast (Initial Phase):
- Place the baking sheet back into the hot oven on the middle rack.
- Roast for 10-12 minutes. The broccolini should start to become tender-crisp and develop some browned spots, especially on the florets.
- Add Garlic:
- After the initial 10-12 minutes, remove the baking sheet from the oven.
- Scatter the sliced or minced garlic evenly over the broccolini. Give the pan a gentle shake or quickly toss the broccolini with tongs to distribute the garlic. Adding the garlic partway through prevents it from burning in the high heat before the broccolini is cooked.
- Roast (Final Phase):
- Return the baking sheet to the oven.
- Continue roasting for another 5-8 minutes, or until the stems are tender-crisp (easily pierced with a fork but not mushy) and the florets are nicely charred and slightly crispy at the edges. Keep a close eye on the garlic during this phase to ensure it doesn’t burn – it should be golden brown and fragrant, not dark brown or black.
- Finish with Lemon:
- Remove the baking sheet from the oven.
- Immediately zest the lemon half directly over the hot broccolini (if using zest).
- Squeeze the juice from the lemon half all over the broccolini.
- Toss gently to combine. The heat from the broccolini will release the aromas of the lemon zest and juice.
- Taste and Serve:
- Taste a piece and adjust seasoning if necessary, adding a pinch more salt or pepper if desired.
- Transfer the charred broccolini to a serving platter.
- Sprinkle with optional grated Parmesan cheese, if desired.
- Serve immediately while hot and crispy.
Alternative Methods:
- Grilling: Toss broccolini with oil and seasonings (hold the garlic and lemon). Grill over medium-high heat for 6-10 minutes, turning occasionally, until tender-crisp and charred. Toss with minced garlic (or garlic-infused oil), lemon juice, and zest immediately after removing from the grill.
- Pan-Searing (Cast Iron): Heat olive oil in a large cast-iron skillet over medium-high heat until shimmering. Add broccolini in a single layer (work in batches if needed). Cook without moving for 3-4 minutes until charred on one side. Flip and cook another 2-3 minutes. Add garlic and cook for 1 more minute until fragrant. Remove from heat, toss with lemon juice and zest.
Nutrition Facts (Approximate)
These nutritional values are estimates, as actual figures depend on the exact size of the broccolini bunch, the amount of oil absorbed, and whether optional Parmesan cheese is added. This dish is generally considered healthy, packed with vitamins and fiber.
- Servings: 3-4 side dish servings
- Serving Size: Approximately 1/3 to 1/4 of the recipe
- Approximate Calories per Serving: 120 – 180 calories (without Parmesan)
Breakdown Considerations:
- Fat: Primarily from the olive oil. Ranges from 10-15 grams per serving, mostly healthy monounsaturated fats. Adding Parmesan increases fat content slightly.
- Carbohydrates: Relatively low, around 8-12 grams per serving. Broccolini is a good source of fiber (typically 3-5 grams per serving).
- Protein: Moderate for a vegetable, around 3-5 grams per serving.
- Vitamins and Minerals: Broccolini is an excellent source of Vitamin C, Vitamin K, Vitamin A, folate, and potassium.
- Sodium: Primarily from added salt and potentially Parmesan cheese. Easily controlled by adjusting added salt.
Dietary Notes: This recipe is naturally gluten-free, vegetarian, and can be vegan/Paleo/Whole30 if Parmesan cheese is omitted. It’s also keto-friendly due to its low carbohydrate content.
Disclaimer: For highly accurate nutritional information, use an online calculator with your specific ingredient measurements. This data is a guideline.
Preparation and Cooking Time
This side dish comes together quickly, making it ideal for weeknight meals but impressive enough for guests.
- Preparation Time: 10 minutes
- Washing and thoroughly drying the broccolini.
- Trimming the stems.
- Slicing or mincing the garlic, measuring oil and seasonings.
- Preheating the oven and pan (passive time, but essential).
- Cooking Time: 15 – 20 minutes
- Initial roasting phase: 10-12 minutes.
- Final roasting phase (with garlic): 5-8 minutes.
- Total Time: Approximately 25 – 30 minutes (including oven preheating time makes it slightly longer overall, but active time is low).
How to Serve Your Vibrant Charred Broccolini
Charred Broccolini is a versatile side that complements a wide array of main dishes. Its bright, savory, and slightly smoky flavor profile adds vibrancy to any plate.
- Classic Side Dish Pairings:
- Fish: Excellent alongside baked, grilled, or pan-seared salmon, cod, halibut, snapper, or shrimp. The lemon notes are particularly complementary.
- Chicken: Pairs wonderfully with roasted chicken, grilled chicken breast, chicken piccata, or simple pan-seared thighs.
- Steak: A great green counterpoint to grilled steak, reverse-seared steak, or flank steak.
- Pork: Serve with pork chops, pork tenderloin, or even pulled pork.
- Pasta: Serve alongside or tossed into pasta dishes, especially those with cream sauces (where the lemon cuts richness) or simple olive oil and garlic sauces.
- Component in Bowls:
- Grain Bowls: Add to bowls with quinoa, farro, brown rice, grilled chicken or chickpeas, and a tahini or vinaigrette dressing.
- Power Bowls: Use as a key vegetable component in nutritious power bowls.
- On Platters:
- Arrange on an antipasto or mezze platter.
- Serve as part of a roasted vegetable medley.
- Standalone Snack/Appetizer:
- Delicious enough to eat straight off the pan or served as a simple, healthy appetizer.
- Elevate with Garnishes:
- Cheese: A sprinkle of finely grated Parmesan or Pecorino Romano right after roasting adds salty, umami depth. Feta could also work for a different profile.
- Nuts: Toasted slivered almonds, pine nuts, or chopped walnuts add a lovely crunch.
- Herbs: A sprinkle of fresh chopped parsley or basil can add extra freshness.
- Extra Lemon: Serve with extra lemon wedges for those who like it particularly bright.
- Balsamic Glaze: A light drizzle of balsamic glaze after roasting adds sweetness and tang.
Serve immediately after cooking for the best texture – the char is crispest when fresh from the oven.
5 Essential Tips for Unforgettable Charred Broccolini
Take your charred broccolini from good to truly exceptional with these key techniques:
- High Heat + Hot Pan = Superior Char: Don’t be shy with the oven temperature (425°F/220°C is ideal). Crucially, preheat your baking sheet in the oven. Placing the oiled broccolini directly onto a screaming hot surface jump-starts the searing process, creating better char and preventing the broccolini from steaming in its own moisture before it gets a chance to brown.
- Dry is Your Ally: Water is the enemy of charring. After washing the broccolini, pat it completely dry with paper towels or use a salad spinner. Any lingering moisture will turn into steam in the hot oven, hindering the browning and crisping process and leading to softer, less flavorful results.
- Give It Space (Don’t Crowd the Pan): Arrange the broccolini in a single, even layer on the baking sheet with some space between the pieces. If the pan is overcrowded, moisture gets trapped, and the broccolini will steam rather than roast and char. Use two baking sheets if your bunch is large to ensure everything has room to breathe and brown properly.
- Time the Garlic Perfectly: Garlic burns quickly and easily at high roasting temperatures, turning bitter and unpleasant. Add the sliced or minced garlic only during the last 5-8 minutes of roasting. This gives it enough time to become fragrant, slightly golden, and infuse the oil without incinerating before the broccolini is perfectly tender-crisp and charred.
- Finish Strong with Acid (Lemon): Adding the lemon juice (and optional zest) immediately after the broccolini comes out of the hot oven is key. The heat helps volatilize the lemon’s aromatic compounds, brightening the overall flavor profile and cutting through the richness of the olive oil and the slight bitterness of the char. It wakes everything up and makes the dish taste vibrant and balanced. Don’t add it before roasting, as it can hinder browning.
By mastering these five points, you’ll consistently achieve broccolini that is perfectly charred, intensely flavorful, and tender-crisp every single time.
Frequently Asked Questions (FAQ)
Here are answers to common questions about making Charred Broccolini:
- Q: What’s the difference between broccolini and broccoli? Can I substitute regular broccoli?
- A: Broccolini (sometimes called baby broccoli) is actually a hybrid of standard broccoli and Chinese broccoli (Gai Lan). It has longer, thinner, more tender stems and smaller florets than regular broccoli, with a milder, slightly sweeter flavor. While you can substitute regular broccoli florets in this recipe, the results will be different. You’ll need to adjust the cooking time (regular broccoli florets might cook faster or slower depending on size) and the texture/flavor profile won’t be quite the same. If using regular broccoli, ensure the florets are cut into similar-sized pieces for even cooking. The stems of regular broccoli are usually too tough to cook this way unless peeled and sliced thinly.
- Q: My garlic keeps burning! How do I prevent this?
- A: This is the most common issue! The key is timing. Do not add the garlic at the beginning with the broccolini. Because the oven is at a high temperature (425°F/220°C) needed for charring, the small pieces of garlic will burn long before the broccolini is cooked. Add the garlic only during the last 5-8 minutes of the total roasting time. This is enough time for it to become fragrant and golden without turning dark brown or black and bitter. Using thinly sliced garlic instead of finely minced can also help, as slices are slightly less prone to burning instantly.
- Q: Why did my broccolini turn out soggy instead of charred and crispy?
- A: There are a few likely culprits for soggy broccolini:
- It Wasn’t Dry Enough: Excess moisture from washing will steam the vegetable. Ensure it’s patted thoroughly dry.
- Oven Temp Too Low: Insufficient heat prevents proper searing and charring. Make sure your oven is fully preheated to 425°F/220°C.
- Pan Was Crowded: Overloading the baking sheet traps steam. Always cook in a single layer with space between pieces; use two pans if needed.
- Pan Wasn’t Preheated: Starting on a cold pan means the broccolini sits in oil and slowly heats up, promoting steaming rather than immediate searing. Preheating the pan is key!
- A: There are a few likely culprits for soggy broccolini:
- Q: Can I make this ahead of time? How does it reheat?
- A: Charred Broccolini is definitely best served fresh, right after cooking, when the charred edges are crispiest. While you can make it ahead, it will lose much of its signature crispy texture upon refrigeration and reheating. If you must make it ahead, store it in an airtight container in the refrigerator for up to 2 days. To reheat, spread it on a baking sheet and warm it in a hot oven (around 375°F/190°C) for 5-7 minutes, or quickly stir-fry it in a hot skillet until heated through. Avoid the microwave, as it tends to make it softer. It won’t be quite as good as fresh, but it’s doable.
- Q: Besides roasting, what are other good ways to cook broccolini?
- A: Broccolini is very versatile! Besides roasting (which gives the best char), you can:
- Sauté/Stir-Fry: Cook quickly in a hot wok or skillet with oil, garlic, ginger, soy sauce, etc.
- Grill: Gets a lovely smoky flavor similar to roasting.
- Blanch: Briefly boil (1-2 minutes) then plunge into ice water. This preserves the bright green color and tender-crisp texture, often done before sautéing or adding to salads.
- Steam: A simple, healthy preparation, though it lacks the flavor depth of charring.
- Pan-Sear: Using a cast-iron skillet gives a great sear, similar to roasting but done on the stovetop.
- A: Broccolini is very versatile! Besides roasting (which gives the best char), you can:
Charred Broccolini with Garlic and Lemon recipe
Ingredients
- Broccolini: 1 large bunch (about 1 lb or 450g)
- Selection: Look for bunches with firm, bright green stalks and tightly closed florets. Avoid any that look yellowed, wilted, or have flowering buds. Stems should be relatively similar in thickness for even cooking. Broccolini (sometimes called baby broccoli) is a hybrid, often mistaken for young broccoli, but it has longer, thinner stems and smaller florets with a milder, slightly sweeter flavor than regular broccoli.
- Olive Oil: 3 tablespoons
- Recommendation: Extra virgin olive oil adds great flavor, but a good quality regular olive oil or avocado oil (which has a high smoke point) also works well, especially given the high roasting temperature.
- Garlic: 3-4 cloves, thinly sliced or roughly minced
- Fresh is Key: Use fresh garlic cloves for the best pungent, aromatic flavor. Slicing thinly allows the garlic to infuse the oil beautifully and get slightly crispy without burning as quickly as finely minced garlic. Roughly mincing is also fine, but keep an eye on it. Avoid garlic powder for this preparation – the texture and flavor won’t be the same. Adjust quantity based on clove size and your love for garlic.
- Lemon: ½ medium lemon
- You’ll use both the zest (optional but recommended) and the juice. Using fresh lemon juice provides essential brightness and acidity that cuts through the richness of the oil and complements the char. Zesting the lemon before juicing adds an extra layer of aromatic lemon oil.
- Salt: ½ teaspoon kosher salt or coarse sea salt (adjust to taste)
- Coarser salt distributes well and adds nice little pops of flavor. Start with ½ teaspoon and add more after cooking if needed.
- Black Pepper: ¼ teaspoon freshly ground black pepper (adjust to taste)
- Freshly ground pepper offers significantly more flavor than pre-ground.
- Red Pepper Flakes: ¼ teaspoon (optional, for a touch of heat)
- Adds a gentle warmth that pairs wonderfully with the garlic and lemon. Adjust the amount based on your heat preference, or omit entirely.
- Optional Addition:
- Parmesan Cheese: 2-3 tablespoons, finely grated (for serving) – Adds a salty, umami finish.
Ingredient Notes:
- Ensure the broccolini is washed and thoroughly dried before tossing with oil. Excess water will steam the broccolini instead of allowing it to char properly.
- The timing of adding the garlic is crucial to prevent burning (see instructions).
Instructions
- Preheat Oven and Pan: This is crucial for getting a good char! Place a large, rimmed baking sheet into your oven. Preheat the oven to 425°F (220°C). Letting the pan heat up with the oven helps sear the broccolini immediately when it hits the surface.
- Prepare the Broccolini:
- Wash the broccolini thoroughly under cold running water.
- Dry Thoroughly: Pat the broccolini completely dry with paper towels or use a salad spinner. Excess moisture will prevent proper charring and result in steaming.
- Trim: Trim off about ½ inch from the tough, woody bottom ends of the stalks. If any stalks are particularly thick (significantly thicker than a pencil), you can slice them in half lengthwise so they cook at the same rate as the thinner stalks. Leave the thinner stalks whole.
- Toss with Oil and Seasoning:
- Place the trimmed and dried broccolini in a large bowl.
- Drizzle with the olive oil.
- Sprinkle with the kosher salt, freshly ground black pepper, and red pepper flakes (if using).
- Use your hands or tongs to toss everything together until the broccolini stalks and florets are evenly coated with oil and seasonings.
- Arrange on Hot Pan:
- Carefully remove the preheated baking sheet from the oven (use oven mitts!).
- Immediately spread the seasoned broccolini onto the hot baking sheet in a single layer.
- Do Not Crowd the Pan: Ensure there is space between the pieces. If the broccolini is too crowded, it will steam instead of char. Use two pans if necessary.
- Roast (Initial Phase):
- Place the baking sheet back into the hot oven on the middle rack.
- Roast for 10-12 minutes. The broccolini should start to become tender-crisp and develop some browned spots, especially on the florets.
- Add Garlic:
- After the initial 10-12 minutes, remove the baking sheet from the oven.
- Scatter the sliced or minced garlic evenly over the broccolini. Give the pan a gentle shake or quickly toss the broccolini with tongs to distribute the garlic. Adding the garlic partway through prevents it from burning in the high heat before the broccolini is cooked.
- Roast (Final Phase):
- Return the baking sheet to the oven.
- Continue roasting for another 5-8 minutes, or until the stems are tender-crisp (easily pierced with a fork but not mushy) and the florets are nicely charred and slightly crispy at the edges. Keep a close eye on the garlic during this phase to ensure it doesn’t burn – it should be golden brown and fragrant, not dark brown or black.
- Finish with Lemon:
- Remove the baking sheet from the oven.
- Immediately zest the lemon half directly over the hot broccolini (if using zest).
- Squeeze the juice from the lemon half all over the broccolini.
- Toss gently to combine. The heat from the broccolini will release the aromas of the lemon zest and juice.
- Taste and Serve:
- Taste a piece and adjust seasoning if necessary, adding a pinch more salt or pepper if desired.
- Transfer the charred broccolini to a serving platter.
- Sprinkle with optional grated Parmesan cheese, if desired.
- Serve immediately while hot and crispy.
Alternative Methods:
- Grilling: Toss broccolini with oil and seasonings (hold the garlic and lemon). Grill over medium-high heat for 6-10 minutes, turning occasionally, until tender-crisp and charred. Toss with minced garlic (or garlic-infused oil), lemon juice, and zest immediately after removing from the grill.
- Pan-Searing (Cast Iron): Heat olive oil in a large cast-iron skillet over medium-high heat until shimmering. Add broccolini in a single layer (work in batches if needed). Cook without moving for 3-4 minutes until charred on one side. Flip and cook another 2-3 minutes. Add garlic and cook for 1 more minute until fragrant. Remove from heat, toss with lemon juice and zest.
Nutrition
- Serving Size: one normal portion
- Calories: 120 – 180


