
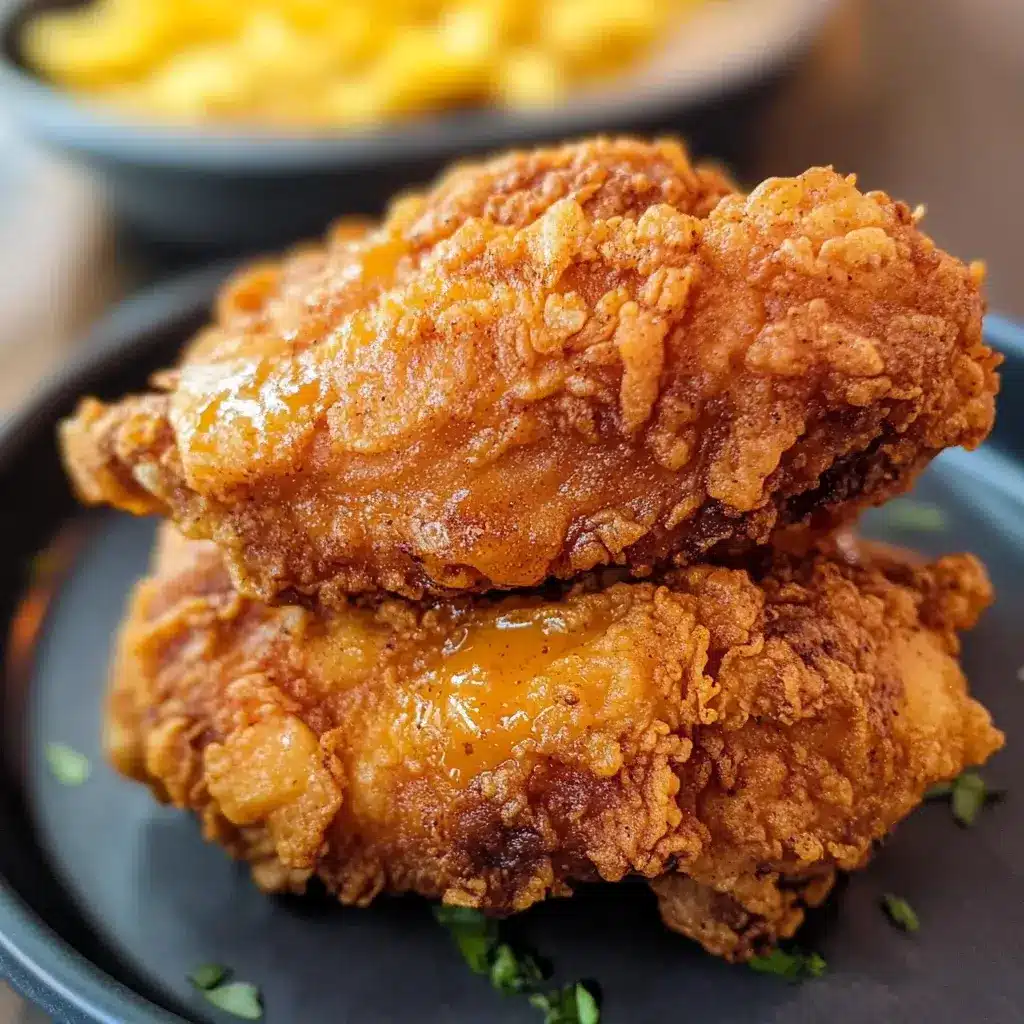

If there’s one dish that universally spells comfort, celebration, and a little bit of delicious indulgence, it has to be perfectly cooked fried chicken. And when you add the magic of buttermilk to the equation, you elevate it to legendary status. My journey to mastering Buttermilk Fried Chicken was inspired by countless Sunday dinners, family picnics, and the lingering memory of the crispiest, juiciest chicken I’d ever tasted at a little roadside diner down South. I was determined to recreate that experience in my own kitchen. It took time, patience, and a lot of (delicious) experimentation to get the brine just right, the dredge perfectly seasoned, and the frying technique down pat. But when I finally pulled that first batch of golden, craggy-crusted chicken from the skillet, and the aroma filled my home, I knew I’d cracked it. My family’s reaction confirmed it – the audible crunch, the delighted murmurs, the clean plates. This Buttermilk Fried Chicken recipe isn’t just about technique; it’s about creating those moments of pure, unadulterated joy around the dinner table. It’s the kind of food that makes memories.
Complete Ingredients for Perfect Buttermilk Fried Chicken
The beauty of classic Buttermilk Fried Chicken lies in its simplicity and the quality of its ingredients. Each component plays a vital role in creating that signature flavor and texture.
For the Chicken & Buttermilk Marinade (The Secret to Tenderness & Flavor):
- Whole Chicken: 1 (approximately 3.5 – 4 lbs), cut into 8 or 9 pieces (2 breasts split, 2 thighs, 2 drumsticks, 2 wings, and optionally the back for stock or extra pieces). Alternatively, use 3.5 – 4 lbs of your favorite bone-in, skin-on chicken pieces.
- Full-Fat Buttermilk: 3 cups. This is the star! Its acidity tenderizes the chicken marvelously and helps the flour coating stick.
- Hot Sauce (e.g., Louisiana-style like Tabasco or Crystal): 2 tablespoons (adjust to your preference). Adds a subtle background tang and complexity, not necessarily overwhelming heat.
- Salt: 1.5 tablespoons (Kosher salt preferred), for the marinade.
- Black Pepper: 1.5 teaspoons, freshly ground, for the marinade.
For the Seasoned Flour Dredge (The Crispy, Flavorful Coat):
- All-Purpose Flour: 3 cups. Provides the structure for our crispy crust.
- Cornstarch: 1/2 cup. The secret weapon for extra-crispy chicken that stays crisp.
- Salt: 2.5 tablespoons (Kosher salt preferred). Seasoning the flour well is crucial.
- Black Pepper: 1.5 tablespoons, freshly ground. A generous amount for that classic peppery bite.
- Paprika: 1 tablespoon (sweet paprika for color and mild flavor; smoked paprika for a deeper, smoky note).
- Garlic Powder: 2 teaspoons. Adds savory depth.
- Onion Powder: 2 teaspoons. Complements the garlic and rounds out the flavor.
- Cayenne Pepper: 1/2 – 1 teaspoon (optional, adjust to your desired level of gentle heat).
For Frying (The Transformation to Golden Glory):
- Frying Oil: Approximately 6-8 cups (such as peanut oil, vegetable oil, canola oil, or a blend). The amount will depend on the size of your frying vessel. You want enough oil for the chicken to be at least halfway submerged, or to float if deep frying.
- Peanut Oil: High smoke point, neutral flavor – a classic choice.
- Vegetable/Canola Oil: Affordable, neutral, widely available.
- Lard or Shortening (Traditional): Imparts a distinct, rich flavor and excellent browning. Some cooks like to use a blend of lard/shortening and vegetable oil.
Essential Equipment:
- Large Non-Reactive Bowl: For marinating the chicken (glass or stainless steel).
- Large Shallow Dish or Heavy-Duty Ziplock Bag: For the seasoned flour dredge.
- Heavy-Bottomed Skillet (Cast Iron is King): A 12-inch cast iron skillet provides excellent heat retention and even cooking, ideal for frying chicken. A heavy Dutch oven (5-7 quarts) also works very well.
- Long Tongs: For safely handling and turning the chicken in hot oil.
- Deep-Fry Thermometer or Instant-Read Thermometer: Absolutely essential for monitoring and maintaining the correct oil temperature.
- Wire Cooling Rack set over a Baking Sheet: For draining the fried chicken, allowing air to circulate all around to maintain maximum crispiness.
Using fresh, high-quality chicken and real buttermilk will make a noticeable difference in your final product. Don’t skimp on the seasonings in the flour – that’s where much of the iconic flavor comes from!
Step-by-Step Instructions for Crispy, Juicy Buttermilk Fried Chicken
Achieving Buttermilk Fried Chicken perfection involves several key stages, each contributing to the final masterpiece. Patience during the marinating and resting stages is rewarded handsomely!
Phase 1: The Buttermilk Marinade (Tenderizing & Flavoring) – Minimum 4 Hours, Best Overnight
- Prepare the Chicken: If using a whole chicken, cut it into 8 or 9 pieces. Pat all chicken pieces thoroughly dry with paper towels. This helps the marinade penetrate better.
- Create the Buttermilk Marinade: In your large non-reactive bowl, whisk together the buttermilk, hot sauce, 1.5 tablespoons of salt, and 1.5 teaspoons of black pepper until the salt is dissolved and everything is well combined.
- Marinate the Chicken: Add the chicken pieces to the buttermilk marinade, ensuring each piece is fully submerged. Turn them a few times to coat evenly. Cover the bowl tightly with plastic wrap or a lid.
- Refrigerate and Let Magic Happen: Place the marinating chicken in the refrigerator for at least 4 hours. For the most tender and flavorful results, marinate overnight (up to 24 hours). The longer it marinates, the more the buttermilk’s acidity works to tenderize the meat.
Phase 2: The Seasoned Flour Dredge (Building the Crust) – About 30-40 minutes before frying
- Set Up Dredging Station: In your large shallow dish or heavy-duty ziplock bag, combine the all-purpose flour, cornstarch, 2.5 tablespoons of salt, 1.5 tablespoons of black pepper, paprika, garlic powder, onion powder, and optional cayenne pepper. Whisk or shake thoroughly until the seasonings are evenly distributed throughout the flour.
- Remove Chicken from Marinade: Take the chicken pieces out of the buttermilk marinade one by one, allowing any excess buttermilk to drip off for a few seconds. Do not pat the chicken dry or rinse it. The residual buttermilk is what helps the seasoned flour stick. Place the chicken pieces on a separate plate or wire rack temporarily.
- Dredge the Chicken Thoroughly: Working with one piece of chicken at a time:
- Place it in the seasoned flour mixture.
- Turn to coat all sides completely, ensuring flour gets into every nook and cranny.
- Press the flour firmly onto the chicken with your hands. This is key for a coating that adheres well.
- Shake off any loose, excess flour.
- Optional Double Dredge for Extra Craggy Crust: For an even thicker, more textured, and craggier crust (which means more crispy bits!), after the first dredge, quickly dip the flour-coated chicken piece back into the remaining buttermilk marinade for just a second, let excess drip off, and then immediately dredge it again in the seasoned flour, pressing firmly.
- Rest the Coated Chicken: Place the flour-coated chicken pieces on a clean wire rack set over a baking sheet. It’s crucial to let the coated chicken rest at room temperature for at least 20-30 minutes (up to 1 hour is fine). During this resting period, the flour absorbs moisture from the buttermilk, creating a more cohesive, almost paste-like coating that will stick much better during frying and result in a crispier finish. The coating will look a bit “set” or even slightly damp in spots – this is exactly what you want.
Phase 3: The Art of Frying (Achieving Golden Perfection)
- Prepare Draining Station: Ensure your wire rack over a baking sheet is ready and placed near your stovetop for easy transfer of cooked chicken.
- Heat the Frying Oil: Pour your chosen frying oil into your cast iron skillet or Dutch oven. You want a depth of about 1 to 1.5 inches for pan-frying (chicken will be about half submerged) or enough for chicken to float if deep-frying in a larger vessel. Attach your deep-fry thermometer to the side of the pan, ensuring the tip is immersed in oil but not touching the bottom. Heat the oil over medium to medium-high heat until it reaches a steady temperature of 350°F (175°C). This initial higher temperature accounts for the drop when cold chicken is added.
- Carefully Add Chicken (Don’t Overcrowd!): Once the oil is at 350°F, gently place a few pieces of chicken into the hot oil using long tongs. Start with skin-side down if pan-frying. It’s critical not to overcrowd the pan. Adding too much chicken at once will dramatically lower the oil temperature, leading to greasy, poorly cooked chicken with a soggy crust. Fry in batches of 3-4 pieces at a time, depending on your pan size.
- Monitor and Maintain Oil Temperature: After adding the chicken, the oil temperature will drop. Adjust your stove’s heat as necessary to maintain a consistent frying temperature between 300-325°F (150-160°C) throughout the cooking process. This is the sweet spot for cooking the chicken through while achieving a perfectly golden, crispy crust.
- Fry Until Golden and Cooked Through:
- Fry the chicken for about 6-8 minutes on the first side, or until the crust is deeply golden brown and well-set. Resist the urge to move it around too much initially.
- Using tongs, carefully flip each piece of chicken. Continue to fry for another 6-10 minutes on the second side, depending on the size and thickness of the pieces.
- Total frying time will be approximately 12-18 minutes per batch. Dark meat (thighs, drumsticks) may take a bit longer than white meat (breasts, wings). Breasts, being thicker, often take the longest.
- Check for Doneness: The chicken is fully cooked when its internal temperature reaches 165°F (74°C). Insert an instant-read thermometer into the thickest part of each piece, avoiding the bone. Juices should run clear when pierced. The crust should be a rich, even golden brown and wonderfully crispy.
- Drain and Season Lightly: As each piece of chicken is perfectly cooked, remove it from the oil with tongs, allowing any excess oil to drip back into the skillet for a moment. Immediately place the hot chicken on the prepared wire rack to drain. If desired, give each piece a very light, final sprinkle of fine salt while it’s still piping hot. This adds one last layer of seasoning.
- Repeat with Remaining Batches: Before adding the next batch of chicken, allow the oil temperature to return to 325-350°F. Use a fine-mesh skimmer or slotted spoon to remove any large bits of loose coating from the oil between batches; this prevents them from burning and imparting a bitter flavor to the oil and subsequent chicken.
Serve your magnificent Buttermilk Fried Chicken while it’s hot and crispy, and prepare for applause!
Nutritional Information (Approximate)
Buttermilk Fried Chicken is a beloved comfort food, and it’s certainly an indulgence. The following nutritional information is an approximation and can vary widely based on factors like the specific chicken pieces consumed (dark vs. white meat, size), the amount of oil absorbed during frying, the type of oil used, and whether the skin is eaten.
- Servings: This recipe makes about 8-9 pieces of chicken, serving approximately 4-6 people.
- Calories per Serving (Approximate, for one average mixed piece, e.g., a thigh or half a breast): 400-550 calories.
- A wing or drumstick might be in the 300-400 calorie range.
- A large breast piece could be 500-700 calories.
Breakdown Considerations:
- Protein: Chicken is an excellent source of complete protein. Each piece provides a substantial amount.
- Fat: This is where fried chicken’s richness lies. Fat comes from the chicken skin itself, as well as the oil absorbed by the flour coating during frying. The type of oil (vegetable vs. lard) will influence the saturated fat content.
- Carbohydrates: Primarily from the all-purpose flour and cornstarch in the dredge.
- Sodium: Contributed by the salt used in the marinade and the seasoned flour. Using low-sodium hot sauce and adjusting salt additions can help manage this, but well-seasoned fried chicken will inherently contain a fair amount of sodium.
- Cholesterol: Found in chicken, particularly in the skin and dark meat.
Notes on “Healthier” Approaches (It’s Still Fried Chicken!):
- Air Frying/Baking: While not traditional “fried” chicken, these methods can produce a tasty, crispier chicken with significantly less oil. You’d follow the marinating and dredging steps, then cook according to your air fryer’s instructions or bake at a high temperature (around 400°F/200°C) on a wire rack until cooked through and crispy.
- Skin Removal: Removing the skin after frying (if you can bear to part with that crispy goodness!) will reduce fat and calorie intake significantly.
- Portion Control: Enjoying one or two pieces alongside plenty of fresh vegetables or a salad is a good strategy.
Buttermilk Fried Chicken is a treat to be savored. Enjoy it mindfully as part of a varied and balanced diet.
Preparation and Cook Time
Making exceptional Buttermilk Fried Chicken is a journey, not a sprint. The marinating time is key, so plan ahead!
- Active Preparation Time: Approximately 35-45 minutes.
- This includes:
- Cutting the chicken (if using a whole bird) (10-15 minutes).
- Preparing the buttermilk marinade (5 minutes).
- Mixing the seasoned flour dredge (5 minutes).
- Dredging the chicken pieces (15-20 minutes).
- This includes:
- Inactive Preparation Time (Crucial Stages):
- Buttermilk Marinating: Minimum of 4 hours, but ideally 8-24 hours (overnight is best).
- Resting Coated Chicken: 20-30 minutes at room temperature (can go up to 1 hour).
- Cook Time (Frying in Batches): Approximately 40-50 minutes.
- Heating the oil initially: 5-10 minutes.
- Frying each batch: Typically 12-18 minutes. If frying in 2-3 batches, this adds up.
- Allowing oil to return to temperature between batches: 2-3 minutes per interval.
- Total Active Time (Excluding Marinating/Resting): Approximately 1 hour 15 minutes to 1 hour 35 minutes.
- Total Time (Including Minimum 4-hour Marinate & Resting): Approximately 5 hours 55 minutes to 6 hours 45 minutes. (This increases significantly with overnight marination).
Key Takeaway: While the hands-on work is manageable, the marinating process is non-negotiable for the best flavor and texture. This is a dish to plan for, making the delicious payoff even more rewarding.
How to Serve Your Glorious Buttermilk Fried Chicken
Serving Buttermilk Fried Chicken is all about embracing its comforting, celebratory nature. It’s the star of the show, best accompanied by classic, crowd-pleasing sides.
Classic Southern & Comfort Food Pairings:
- Creamy Mashed Potatoes & Gravy: A quintessential pairing. The smooth potatoes and rich gravy (perhaps a country-style milk gravy or one made from pan drippings) are perfect foils for the crispy chicken.
- Fluffy Buttermilk Biscuits: Ideal for soaking up gravy or enjoying with a touch of honey or butter.
- Tangy Coleslaw: Whether creamy or vinegar-based, coleslaw provides a crucial refreshing crunch and acidity to cut through the richness of the chicken.
- Baked Macaroni and Cheese: The ultimate comfort food duo. A cheesy, bubbly mac and cheese is always a hit.
- Collard Greens or Southern-Style Green Beans: Slow-cooked greens (perhaps with smoked turkey or ham hock) or tender green beans offer a savory vegetable component.
- Corn on the Cob: Sweet, buttery corn, especially delightful in the summer months.
- Potato Salad: A classic creamy or mustard-based potato salad is a picnic and potluck staple.
- Cornbread: Warm, crumbly cornbread, perhaps with a pat of butter and a drizzle of honey.
Presentation & Serving Style:
- Family-Style Platter: Pile the golden, crispy chicken high on a large platter. This allows everyone to choose their favorite pieces and creates an inviting, communal feel. Garnish with fresh parsley sprigs for a touch of color.
- Picnic Perfection: Buttermilk Fried Chicken is famously delicious even at room temperature, making it ideal for picnics. Pack it in a lined basket once it has cooled a bit.
- Individual Plates: For a more formal (yet still comforting) meal, serve 2-3 pieces of chicken per person alongside a selection of sides.
Refreshing Drink Accompaniments:
- Sweet Iced Tea: The classic Southern beverage of choice.
- Freshly Squeezed Lemonade: Its tartness beautifully balances the richness.
- Cold Beer: A crisp American lager, pilsner, or even a hoppy IPA can be a great match.
- Sparkling Water with Citrus: A lighter, refreshing option.
Perfect Occasions:
- Sunday Dinners: A time-honored tradition.
- Family Gatherings & Reunions: Always a crowd-pleaser.
- Picnics & Potlucks: A portable and popular choice.
- Holidays & Celebrations: Adds a festive, comforting touch.
- Anytime a Comfort Food Craving Hits!
No matter how you serve it, Buttermilk Fried Chicken is designed to bring joy. Make sure you have plenty of napkins on hand!
Additional Tips for Buttermilk Fried Chicken Excellence
Achieving fried chicken nirvana is an art form. These five additional tips will help you create Buttermilk Fried Chicken that’s consistently crispy, juicy, and packed with flavor:
- Don’t Skimp on the Buttermilk Marinating Time – It’s Transformative:
- Why it matters: This isn’t just a quick dip. The acidity in buttermilk tenderizes the chicken by gently breaking down its proteins, leading to exceptionally moist and tender meat. The salt in the marinade also acts as a brine, helping the chicken retain moisture during the high heat of frying. While 4 hours is the minimum, marinating overnight (up to 24 hours) makes a remarkable difference in both texture and flavor penetration. Patience here truly pays off.
- Master Oil Temperature Control – Your Key to Crisp, Not Greasy:
- Why it matters: This is arguably the most critical technical aspect of frying.
- Preheat Correctly: Start with oil at 350°F (175°C) to account for the temperature drop when cold chicken is added.
- Maintain Frying Temp: Aim for a steady 300-325°F (150-160°C) once chicken is in. A deep-fry thermometer is non-negotiable for accuracy.
- Too Low: The chicken will absorb excess oil, resulting in a greasy, heavy crust and oily meat.
- Too High: The crust will brown too quickly and potentially burn before the chicken is cooked through to a safe internal temperature.
Adjust your stove’s heat as needed throughout the frying process.
- Why it matters: This is arguably the most critical technical aspect of frying.
- The “Resting the Dredge” Step is Crucial for Coating Adhesion:
- Why it matters: After coating the chicken in the seasoned flour, letting it rest on a wire rack for 20-30 minutes (or up to an hour) at room temperature is a game-changer. This allows the flour to hydrate fully from the residual buttermilk on the chicken’s surface, forming a more cohesive, almost paste-like layer. This “set” coating adheres much more effectively during frying, significantly reducing the chances of it flaking off and leaving bare spots.
- Season Generously at Every Layer – Flavor Shouldn’t Be an Afterthought:
- Why it matters: Truly flavorful fried chicken is seasoned from the inside out.
- Marinade: Salt, pepper, and hot sauce in the buttermilk infuse the meat itself.
- Dredge: The seasoned flour mixture is where the primary crust flavor comes from. Don’t be shy with the salt, pepper, and other spices here.
- Post-Fry (Optional but Recommended): A very light dusting of fine salt immediately after the chicken comes out of the hot oil and is draining can enhance the overall taste and make the flavors pop. This multi-layered approach ensures every bite is savory and delicious.
- Why it matters: Truly flavorful fried chicken is seasoned from the inside out.
- Drain on a Wire Rack for All-Around Crispiness – Avoid Soggy Bottoms!
- Why it matters: Placing freshly fried chicken directly onto paper towels might seem intuitive for absorbing excess oil, but it traps steam underneath. This trapped steam quickly softens the beautiful, crispy crust on the bottom of the chicken. By draining the chicken on a wire rack set over a baking sheet, air can circulate freely around each piece. This allows excess oil to drip away while preserving the crispiness of the entire crust, top to bottom.
Embracing these tips will elevate your Buttermilk Fried Chicken from simply good to truly exceptional, making every crispy, juicy bite a testament to your culinary skill.
Frequently Asked Questions (FAQ) about Buttermilk Fried Chicken
Here are answers to some of the most common questions home cooks have when making Buttermilk Fried Chicken:
- Q: Can I use low-fat buttermilk or a buttermilk substitute (like milk with lemon juice)?
- A: While full-fat buttermilk is traditional and yields the richest flavor and best coating adhesion, you can use low-fat buttermilk in a pinch; the results will still be good. For buttermilk substitutes (like milk mixed with lemon juice or vinegar), they can provide the necessary acidity for tenderizing, but they often lack the thickness and specific flavor profile of true cultured buttermilk, which can affect how well the flour dredge adheres and the overall taste. If possible, stick with real buttermilk for the most authentic results.
- Q: What’s the secret to getting a really thick, craggy, crispy crust?
- A: Several factors contribute:
- Double Dredge: After the first flour coating, quickly dip the chicken back into the buttermilk marinade and then dredge it again in the seasoned flour. This builds up more layers.
- Don’t Shake Off Too Much Flour: While you want to remove loose excess, leaving a good, slightly shaggy coating is desirable.
- Add Some Buttermilk to the Flour: Some cooks like to drizzle a tablespoon or two of the buttermilk marinade into the dry flour mixture and toss it with their fingers to create little clumps. These clumps, when they stick to the chicken, fry up into extra-crispy bits.
- Proper Oil Temperature: Oil that’s hot enough sears the crust quickly, setting its texture.
- A: Several factors contribute:
- Q: My oil temperature keeps dropping too much when I add the chicken. What should I do?
- A: This is usually due to one or a combination of things:
- Overcrowding the Pan: This is the most common culprit. Fry in smaller batches.
- Oil Not Hot Enough Initially: Ensure your oil reaches 350°F (175°C) before adding the first batch of chicken.
- Insufficient Oil Volume: If you don’t have enough oil in the pan, its temperature will be more susceptible to fluctuations.
- Pan Choice: A heavy-bottomed pan (like cast iron) retains heat much better than a thin one.
- Stove Power: Ensure your burner is providing enough consistent heat.
Allow the oil to recover its temperature between batches.
- A: This is usually due to one or a combination of things:
- Q: Can I prepare the chicken (marinate and dredge) ahead of time and fry it later?
- A: You can definitely marinate the chicken overnight. You can also dredge it and let it rest on a wire rack in the refrigerator, loosely covered, for a few hours before frying. However, for the best crust, it’s often recommended to let the dredged chicken sit at room temperature for 20-30 minutes just before it hits the oil. If you dredge it too far in advance and refrigerate for a very long time, the coating might become overly damp.
- Q: How do I store and reheat leftover Buttermilk Fried Chicken to keep it crispy?
- A: Store leftover fried chicken in an airtight container in the refrigerator for up to 3-4 days. To reheat and try to revive crispiness:
- Oven (Best Method): Preheat your oven to 375-400°F (190-200°C). Place the chicken on a wire rack set on a baking sheet (to allow air circulation). Bake for 15-20 minutes, or until heated through and the skin has re-crisped.
- Air Fryer: This is also an excellent method. Reheat at around 350-375°F (175-190°C) for 5-10 minutes, checking frequently, until hot and crispy.
- Avoid the Microwave: Microwaving will make the crust steamy and soggy, though it will heat the chicken.
It likely won’t be as perfectly crispy as when freshly fried, but these methods are your best bet.
- A: Store leftover fried chicken in an airtight container in the refrigerator for up to 3-4 days. To reheat and try to revive crispiness:
With these insights, you’re well-equipped to fry up a batch of Buttermilk Fried Chicken that would make any Southern grandmother proud!
Print
Buttermilk Fried Chicken recipe
Ingredients
-
- Whole Chicken: 1 (approximately 3.5 – 4 lbs), cut into 8 or 9 pieces (2 breasts split, 2 thighs, 2 drumsticks, 2 wings, and optionally the back for stock or extra pieces). Alternatively, use 3.5 – 4 lbs of your favorite bone-in, skin-on chicken pieces.
-
- Full-Fat Buttermilk: 3 cups. This is the star! Its acidity tenderizes the chicken marvelously and helps the flour coating stick.
-
- Hot Sauce (e.g., Louisiana-style like Tabasco or Crystal): 2 tablespoons (adjust to your preference). Adds a subtle background tang and complexity, not necessarily overwhelming heat.
-
- Salt: 1.5 tablespoons (Kosher salt preferred), for the marinade.
-
- Black Pepper: 1.5 teaspoons, freshly ground, for the marinade.
For the Seasoned Flour Dredge (The Crispy, Flavorful Coat):
-
- All-Purpose Flour: 3 cups. Provides the structure for our crispy crust.
-
- Cornstarch: 1/2 cup. The secret weapon for extra-crispy chicken that stays crisp.
-
- Salt: 2.5 tablespoons (Kosher salt preferred). Seasoning the flour well is crucial.
-
- Black Pepper: 1.5 tablespoons, freshly ground. A generous amount for that classic peppery bite.
-
- Paprika: 1 tablespoon (sweet paprika for color and mild flavor; smoked paprika for a deeper, smoky note).
-
- Garlic Powder: 2 teaspoons. Adds savory depth.
-
- Onion Powder: 2 teaspoons. Complements the garlic and rounds out the flavor.
-
- Cayenne Pepper: 1/2 – 1 teaspoon (optional, adjust to your desired level of gentle heat).
For Frying (The Transformation to Golden Glory):
-
- Frying Oil: Approximately 6-8 cups (such as peanut oil, vegetable oil, canola oil, or a blend). The amount will depend on the size of your frying vessel. You want enough oil for the chicken to be at least halfway submerged, or to float if deep frying.
-
- Peanut Oil: High smoke point, neutral flavor – a classic choice.
-
- Vegetable/Canola Oil: Affordable, neutral, widely available.
-
- Lard or Shortening (Traditional): Imparts a distinct, rich flavor and excellent browning. Some cooks like to use a blend of lard/shortening and vegetable oil.
-
- Frying Oil: Approximately 6-8 cups (such as peanut oil, vegetable oil, canola oil, or a blend). The amount will depend on the size of your frying vessel. You want enough oil for the chicken to be at least halfway submerged, or to float if deep frying.
Essential Equipment:
-
- Large Non-Reactive Bowl: For marinating the chicken (glass or stainless steel).
-
- Large Shallow Dish or Heavy-Duty Ziplock Bag: For the seasoned flour dredge.
-
- Heavy-Bottomed Skillet (Cast Iron is King): A 12-inch cast iron skillet provides excellent heat retention and even cooking, ideal for frying chicken. A heavy Dutch oven (5-7 quarts) also works very well.
-
- Long Tongs: For safely handling and turning the chicken in hot oil.
-
- Deep-Fry Thermometer or Instant-Read Thermometer: Absolutely essential for monitoring and maintaining the correct oil temperature.
-
- Wire Cooling Rack set over a Baking Sheet: For draining the fried chicken, allowing air to circulate all around to maintain maximum crispiness.
Using fresh, high-quality chicken and real buttermilk will make a noticeable difference in your final product. Don’t skimp on the seasonings in the flour – that’s where much of the iconic flavor comes from!
Instructions
-
- Prepare the Chicken: If using a whole chicken, cut it into 8 or 9 pieces. Pat all chicken pieces thoroughly dry with paper towels. This helps the marinade penetrate better.
-
- Create the Buttermilk Marinade: In your large non-reactive bowl, whisk together the buttermilk, hot sauce, 1.5 tablespoons of salt, and 1.5 teaspoons of black pepper until the salt is dissolved and everything is well combined.
-
- Marinate the Chicken: Add the chicken pieces to the buttermilk marinade, ensuring each piece is fully submerged. Turn them a few times to coat evenly. Cover the bowl tightly with plastic wrap or a lid.
-
- Refrigerate and Let Magic Happen: Place the marinating chicken in the refrigerator for at least 4 hours. For the most tender and flavorful results, marinate overnight (up to 24 hours). The longer it marinates, the more the buttermilk’s acidity works to tenderize the meat.
Phase 2: The Seasoned Flour Dredge (Building the Crust) – About 30-40 minutes before frying
-
- Set Up Dredging Station: In your large shallow dish or heavy-duty ziplock bag, combine the all-purpose flour, cornstarch, 2.5 tablespoons of salt, 1.5 tablespoons of black pepper, paprika, garlic powder, onion powder, and optional cayenne pepper. Whisk or shake thoroughly until the seasonings are evenly distributed throughout the flour.
-
- Remove Chicken from Marinade: Take the chicken pieces out of the buttermilk marinade one by one, allowing any excess buttermilk to drip off for a few seconds. Do not pat the chicken dry or rinse it. The residual buttermilk is what helps the seasoned flour stick. Place the chicken pieces on a separate plate or wire rack temporarily.
-
- Dredge the Chicken Thoroughly: Working with one piece of chicken at a time:
-
- Place it in the seasoned flour mixture.
-
- Turn to coat all sides completely, ensuring flour gets into every nook and cranny.
-
- Press the flour firmly onto the chicken with your hands. This is key for a coating that adheres well.
-
- Shake off any loose, excess flour.
-
- Dredge the Chicken Thoroughly: Working with one piece of chicken at a time:
-
- Optional Double Dredge for Extra Craggy Crust: For an even thicker, more textured, and craggier crust (which means more crispy bits!), after the first dredge, quickly dip the flour-coated chicken piece back into the remaining buttermilk marinade for just a second, let excess drip off, and then immediately dredge it again in the seasoned flour, pressing firmly.
-
- Rest the Coated Chicken: Place the flour-coated chicken pieces on a clean wire rack set over a baking sheet. It’s crucial to let the coated chicken rest at room temperature for at least 20-30 minutes (up to 1 hour is fine). During this resting period, the flour absorbs moisture from the buttermilk, creating a more cohesive, almost paste-like coating that will stick much better during frying and result in a crispier finish. The coating will look a bit “set” or even slightly damp in spots – this is exactly what you want.
Phase 3: The Art of Frying (Achieving Golden Perfection)
-
- Prepare Draining Station: Ensure your wire rack over a baking sheet is ready and placed near your stovetop for easy transfer of cooked chicken.
-
- Heat the Frying Oil: Pour your chosen frying oil into your cast iron skillet or Dutch oven. You want a depth of about 1 to 1.5 inches for pan-frying (chicken will be about half submerged) or enough for chicken to float if deep-frying in a larger vessel. Attach your deep-fry thermometer to the side of the pan, ensuring the tip is immersed in oil but not touching the bottom. Heat the oil over medium to medium-high heat until it reaches a steady temperature of 350°F (175°C). This initial higher temperature accounts for the drop when cold chicken is added.
-
- Carefully Add Chicken (Don’t Overcrowd!): Once the oil is at 350°F, gently place a few pieces of chicken into the hot oil using long tongs. Start with skin-side down if pan-frying. It’s critical not to overcrowd the pan. Adding too much chicken at once will dramatically lower the oil temperature, leading to greasy, poorly cooked chicken with a soggy crust. Fry in batches of 3-4 pieces at a time, depending on your pan size.
-
- Monitor and Maintain Oil Temperature: After adding the chicken, the oil temperature will drop. Adjust your stove’s heat as necessary to maintain a consistent frying temperature between 300-325°F (150-160°C) throughout the cooking process. This is the sweet spot for cooking the chicken through while achieving a perfectly golden, crispy crust.
-
- Fry Until Golden and Cooked Through:
-
- Fry the chicken for about 6-8 minutes on the first side, or until the crust is deeply golden brown and well-set. Resist the urge to move it around too much initially.
-
- Using tongs, carefully flip each piece of chicken. Continue to fry for another 6-10 minutes on the second side, depending on the size and thickness of the pieces.
-
- Total frying time will be approximately 12-18 minutes per batch. Dark meat (thighs, drumsticks) may take a bit longer than white meat (breasts, wings). Breasts, being thicker, often take the longest.
-
- Fry Until Golden and Cooked Through:
-
- Check for Doneness: The chicken is fully cooked when its internal temperature reaches 165°F (74°C). Insert an instant-read thermometer into the thickest part of each piece, avoiding the bone. Juices should run clear when pierced. The crust should be a rich, even golden brown and wonderfully crispy.
-
- Drain and Season Lightly: As each piece of chicken is perfectly cooked, remove it from the oil with tongs, allowing any excess oil to drip back into the skillet for a moment. Immediately place the hot chicken on the prepared wire rack to drain. If desired, give each piece a very light, final sprinkle of fine salt while it’s still piping hot. This adds one last layer of seasoning.
-
- Repeat with Remaining Batches: Before adding the next batch of chicken, allow the oil temperature to return to 325-350°F. Use a fine-mesh skimmer or slotted spoon to remove any large bits of loose coating from the oil between batches; this prevents them from burning and imparting a bitter flavor to the oil and subsequent chicken.
Nutrition
- Serving Size: one normal portion
- Calories: 500-700


