


Of all the desserts that have graced my kitchen, few have left such a lasting, “wow-inducing” impression as this Black Sesame Tart with Yuzu Curd. I first made it for a small dinner party, wanting something elegant and a little unexpected to cap off the evening. As I pulled it from the oven, the kitchen filled with an aroma that was at once deeply nutty and toasted from the sesame, yet simultaneously bright and floral from the yuzu. The visual itself was striking—the slate-grey filling against the golden-brown crust. But the true magic happened with the first bite. The crisp, buttery, sesame-flecked crust gave way to a velvety, rich filling, and then, a split-second later, the electric tang of the yuzu curd cut through everything, cleansing the palate and leaving a trail of complex citrus notes. My guests were silent for a moment, and then a chorus of “What is this?” erupted. It became the centerpiece of conversation, a dessert that wasn’t just eaten, but experienced. It’s that perfect balance—the earthy depth of sesame and the sunny audacity of yuzu—that makes this tart more than just a recipe; it’s a culinary journey.
The Allure of Black Sesame and Yuzu: A Perfect Culinary Marriage
Before we dive into the nuts and bolts of baking, let’s appreciate the two stars of this recipe. Black sesame and yuzu are cornerstone ingredients in Japanese and East Asian cuisine, beloved for their distinct and powerful flavor profiles.
Black Sesame (黒ごま, Kuro Goma): Far more than just a topping for buns, black sesame boasts a deep, nutty, and slightly bitter flavor that is significantly more intense than its white counterpart. When toasted and ground into a paste, it releases an earthy richness that is almost savory, providing a profound, grounding base for desserts. In this tart, it creates a filling that is complex, velvety, and utterly unique. It’s the sophisticated, mysterious element of our dessert.
Yuzu (ゆず): This Japanese citrus is a true force of nature. It looks like a small, bumpy grapefruit but possesses a flavor all its own. Imagine a supercharged lemon meeting a fragrant mandarin orange with a hint of floral grapefruit. Its aroma is intoxicating, and its acidity is bright and sharp without being harsh. Yuzu juice provides the perfect high note, a burst of sunshine that cuts through the richness of the butter in the crust and the nutty depth of the sesame filling. It’s the vibrant, energetic soul of the tart.
Together, they create a symphony of flavors. The robust, toasted notes of the black sesame are lifted and brightened by the zesty, aromatic yuzu. It’s a sophisticated pairing that feels both timeless and modern, guaranteed to intrigue and delight anyone who tastes it.
A Comprehensive Guide to Your Black Sesame Tart with Yuzu Curd
This recipe is broken down into three main components: the black sesame sweet crust (pâte sucrée), the silky yuzu curd, and the final assembly. While it requires several steps, each one is straightforward. The key is to read through the entire recipe first and allow for the necessary chilling and cooling times.
Essential Equipment
Having the right tools will make the process smoother and more successful.
- 9-inch (23 cm) tart pan with a removable bottom
- Food processor
- Rolling pin
- Parchment paper
- Pie weights or dried beans/rice
- Medium saucepan
- Fine-mesh sieve
- Whisk
- Mixing bowls
- Spatula
Ingredients for the Ultimate Tart Experience
Precision in baking is key. Using a kitchen scale for grams is highly recommended for the most accurate results, but cup measurements are also provided.
For the Black Sesame Pâte Sucrée (Sweet Tart Crust):
- 1 ½ cups (190g) All-purpose flour
- ¼ cup (30g) Toasted black sesame seeds, finely ground
- ⅓ cup (65g) Granulated sugar
- ½ tsp Salt
- ½ cup (113g) Unsalted butter, cold and cut into ½-inch cubes
- 1 large Egg yolk
- 1-2 tbsp Ice-cold water
For the Luscious Yuzu Curd:
- ½ cup (120ml) Bottled yuzu juice (ensure it’s 100% yuzu juice)
- ½ cup (100g) Granulated sugar
- 3 large Eggs
- 1 large Egg yolk
- Pinch of salt
- 6 tbsp (85g) Unsalted butter, cut into small pieces and at room temperature
Step-by-Step Instructions for a Flawless Tart
Follow these detailed instructions carefully, paying close attention to temperatures and textures for a professional-quality result.
Part 1: Crafting the Crispy Black Sesame Pâte Sucrée
This crust is the foundation of our tart. The ground black sesame seeds not only add a beautiful speckled appearance but also infuse the buttery crust with a deep, nutty flavor.
- Grind the Sesame Seeds: If you haven’t already, place the toasted black sesame seeds in a spice grinder or a clean coffee grinder and pulse until they form a fine powder. Be careful not to over-grind, or you’ll get sesame paste.
- Combine Dry Ingredients: In the bowl of a food processor, combine the all-purpose flour, ground black sesame, granulated sugar, and salt. Pulse a few times to mix everything evenly.
- Cut in the Butter: Scatter the cold, cubed butter over the flour mixture. Pulse in short bursts (about 8-10 times) until the mixture resembles coarse cornmeal with some pea-sized pieces of butter still visible. These butter pockets are what create a flaky crust.
- Add the Wet Ingredients: In a small bowl, lightly whisk the egg yolk with 1 tablespoon of ice-cold water. Add this to the food processor and pulse just until the dough starts to clump together. If it seems too dry, add the second tablespoon of water, one teaspoon at a time. Do not overmix; the dough should not form a smooth ball in the processor.
- Form and Chill the Dough: Turn the crumbly dough out onto a clean surface and gently knead it just once or twice to bring it together into a cohesive disk. Wrap the disk tightly in plastic wrap and refrigerate for at least 1 hour, or up to 2 days. Chilling is crucial for relaxing the gluten and making the dough easy to roll out.
- Roll and Fit the Dough: On a lightly floured surface, roll the chilled dough out into a circle about 12 inches in diameter and ⅛-inch thick. Carefully transfer the dough to your 9-inch tart pan. Gently press it into the bottom and up the sides of the pan. Trim any excess dough by running your rolling pin over the top edge of the pan. Prick the bottom of the crust with a fork a few times.
- Freeze the Crust: Place the dough-lined tart pan in the freezer for at least 30 minutes. Freezing the crust before baking helps prevent it from shrinking.
- Blind Bake the Crust: Preheat your oven to 375°F (190°C). Line the frozen tart shell with a piece of parchment paper and fill it with pie weights or dried beans. Bake for 20-25 minutes, or until the edges are lightly golden.
- Finish Baking: Carefully remove the parchment paper and pie weights. Return the tart crust to the oven and bake for another 10-15 minutes, or until the bottom is dry and pale golden brown. Let the crust cool completely in the pan on a wire rack.
Part 2: Creating the Velvety Yuzu Curd
This curd is bright, tangy, and incredibly smooth. The key here is gentle heat and constant whisking to prevent the eggs from scrambling.
- Set Up a Double Boiler (Optional but Recommended): You can make the curd directly in a saucepan over low heat, but a double boiler (a heatproof bowl set over a saucepan of simmering water, ensuring the bottom of the bowl doesn’t touch the water) provides gentle, indirect heat and reduces the risk of curdling.
- Whisk Eggs and Sugar: In your heatproof bowl or saucepan, whisk together the sugar, eggs, and extra egg yolk until they are well combined and slightly pale.
- Incorporate Yuzu Juice: Slowly whisk in the yuzu juice and the pinch of salt until everything is smooth.
- Cook the Curd: Place the bowl over the simmering water (or the saucepan over low-medium heat). Cook, whisking constantly, until the mixture thickens enough to coat the back of a spoon. This process will take about 10-15 minutes. Do not let it boil. You’ll know it’s ready when you can draw a line with your finger through the curd on the back of the spoon and the line holds its shape.
- Emulsify the Butter: Remove the curd from the heat. Add the room temperature butter, one piece at a time, whisking until each piece is fully incorporated and the curd is smooth and glossy. Adding the butter off the heat ensures a silky, emulsified texture.
- Strain for Silkiness: Pour the finished curd through a fine-mesh sieve into a clean bowl. This crucial step removes any tiny bits of cooked egg (chalazae) and ensures a perfectly smooth texture.
- Cool the Curd: Press a piece of plastic wrap directly onto the surface of the curd to prevent a skin from forming. Let it cool to room temperature.
Part 3: Assembling and Finishing Your Masterpiece
Now it’s time to bring the elements together for the final bake.
- Prepare for the Final Bake: Reduce the oven temperature to 325°F (160°C).
- Fill the Tart: Place your completely cooled, blind-baked tart shell on a baking sheet (this makes it easier to move). Pour the room-temperature yuzu curd into the shell, spreading it evenly with a spatula.
- The Final Bake: Carefully transfer the baking sheet to the oven. Bake for 15-20 minutes. The curd is set when the edges are firm, but the center still has a slight jiggle or wobble when you gently shake the pan. It will continue to set as it cools.
- Cool Completely: Remove the tart from the oven and let it cool completely to room temperature on a wire rack (about 1-2 hours).
- Chill: Once at room temperature, carefully transfer the tart to the refrigerator and chill for at least 4 hours, or preferably overnight. This step is essential for the curd to fully set and for the flavors to meld.
The Final Details: Nutrition and Timing
Preparation and Cooking Time
- Active Time: Approximately 1 hour
- Inactive Time (Chilling and Cooling): Approximately 6 hours 30 minutes
- Total Time: Approximately 7 hours 30 minutes
Nutrition Facts
- Servings: 10-12 slices
- Calories Per Serving (approximate): 350-400 kcal
Disclaimer: The nutritional information provided is an estimate and can vary based on the specific ingredients and brands used.
How to Serve and Present Your Black Sesame Yuzu Tart
The beauty of this tart is in its elegant simplicity, but a few finishing touches can elevate it even further. Serve chilled, directly from the refrigerator.
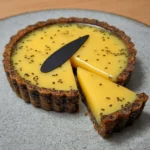
- The Minimalist: The tart is a work of art on its own. The contrast between the dark, speckled crust and the pale yellow curd is stunning. Simply slice and serve for a clean, sophisticated presentation.
- A Cloud of Cream: A dollop of unsweetened or very lightly sweetened whipped cream on the side or on top of each slice provides a wonderful textural contrast. The airy creaminess balances the dense curd and crisp crust beautifully.
- A Dusting of Drama: For a touch of visual flair and a complementary flavor, lightly dust the top of the tart with either toasted black sesame seeds, powdered sugar, or a small amount of high-quality matcha powder just before serving.
- Fresh Berry Counterpoint: Serve slices with a few fresh berries, such as raspberries or blueberries. Their juicy tartness complements the yuzu and adds a pop of color.
- Candied Yuzu Peel: For the truly ambitious, a few slivers of homemade or store-bought candied yuzu peel placed on top of each slice adds an intense burst of citrus and a lovely chewy texture.
Pro Tips for Tart-Making Perfection
- The Importance of Cold Ingredients: For the crust (pâte sucrée), keeping your butter, water, and even your egg yolk cold is non-negotiable. Cold fat creates steam pockets as it bakes, resulting in a tender, flaky crust rather than a tough, dense one. If your kitchen is warm, don’t hesitate to pop the flour mixture back in the fridge for 10 minutes before adding the wet ingredients.
- Don’t Skip the Blind Baking: This is a crucial step for any tart with a wet filling. Blind baking pre-bakes the crust, ensuring it becomes crisp and golden and creating a barrier that prevents the yuzu curd from making it soggy. A perfectly crisp crust is half the battle won.
- Strain Your Curd, No Exceptions: It might seem like an unnecessary step, but pushing your cooked yuzu curd through a fine-mesh sieve is the secret to a professional, flawlessly smooth, and silky texture. It catches any potential bits of scrambled egg and ensures a luxurious mouthfeel.
- Patience is a Virtue (Especially Cooling Time): Resisting the urge to slice into the tart before it has chilled completely is essential. The final chilling period (at least 4 hours, but overnight is better) is not just for cooling; it’s when the curd firms up to the perfect sliceable consistency. Slicing it too early will result in a runny mess.
- Source Quality Ingredients: The flavors in this tart are bold and direct, so the quality of your ingredients will shine through. Use good-quality butter, fresh eggs, and most importantly, source 100% pure yuzu juice. It can often be found in Japanese or Asian markets or online. Avoid “yuzu blends” which are often diluted with other citrus juices and sugar. For the sesame, using pre-toasted seeds and grinding them yourself just before use will provide the most fragrant, intense flavor.
Frequently Asked Questions (FAQ)
1. Can I make this tart ahead of time?
Absolutely! This is an excellent make-ahead dessert. You can prepare the tart completely 1-2 days in advance and keep it covered in the refrigerator. The flavors actually meld and deepen overnight. You can also make the components separately: the tart dough can be wrapped and refrigerated for up to 3 days or frozen for up to a month, and the yuzu curd can be made and stored in an airtight container in the fridge for up to a week.
2. What can I substitute for yuzu juice if I can’t find it?
While yuzu has a unique flavor, a good substitute can be made by combining the juice of Meyer lemons with a splash of grapefruit or lime juice. A common ratio is 2 parts fresh Meyer lemon juice to 1 part fresh lime juice. It won’t be an exact match, but it will give you a similarly complex and tart citrus profile. Regular lemon juice can also be used in a pinch, but the flavor will be less floral and aromatic.
3. My tart crust shrunk significantly during blind baking! What did I do wrong?
Shrinkage is usually caused by one of two things: overworking the dough or not chilling it enough. Overworking develops gluten, which acts like a rubber band and pulls the dough inward when heated. Not chilling or freezing the dough-lined pan before baking means the butter melts too quickly, causing the sides to slump. To prevent this, handle the dough as little as possible, and never skip the chilling/freezing step before it goes into the oven.
4. Why is my yuzu curd runny and not setting properly?
There are a couple of potential culprits. First, you may not have cooked it long enough on the stovetop. It needs to reach a temperature of around 170°F (77°C) to properly thicken and cook the eggs. It should be thick enough to visibly coat the back of a spoon. Second, you may not have chilled the final tart for long enough. The curd needs several hours in the refrigerator to fully set to a firm, sliceable consistency.
5. Can I make this recipe gluten-free?
Yes, you can adapt the crust to be gluten-free. For the best results, use a high-quality all-purpose gluten-free flour blend that contains xanthan gum. The texture may be slightly more sandy or crumbly than a traditional flour crust, but it will still be delicious. Follow the crust recipe as written, substituting the flour 1:1. The yuzu curd filling is naturally gluten-free.
Black Sesame Tart With Yuzu Curd recipe
Ingredients
For the Black Sesame Pâte Sucrée (Sweet Tart Crust):
-
1 ½ cups (190g) All-purpose flour
-
¼ cup (30g) Toasted black sesame seeds, finely ground
-
⅓ cup (65g) Granulated sugar
-
½ tsp Salt
-
½ cup (113g) Unsalted butter, cold and cut into ½-inch cubes
-
1 large Egg yolk
-
1-2 tbsp Ice-cold water
For the Luscious Yuzu Curd:
-
½ cup (120ml) Bottled yuzu juice (ensure it’s 100% yuzu juice)
-
½ cup (100g) Granulated sugar
-
3 large Eggs
-
1 large Egg yolk
-
Pinch of salt
-
6 tbsp (85g) Unsalted butter, cut into small pieces and at room temperature
Instructions
Part 1: Crafting the Crispy Black Sesame Pâte Sucrée
This crust is the foundation of our tart. The ground black sesame seeds not only add a beautiful speckled appearance but also infuse the buttery crust with a deep, nutty flavor.
-
Grind the Sesame Seeds: If you haven’t already, place the toasted black sesame seeds in a spice grinder or a clean coffee grinder and pulse until they form a fine powder. Be careful not to over-grind, or you’ll get sesame paste.
-
Combine Dry Ingredients: In the bowl of a food processor, combine the all-purpose flour, ground black sesame, granulated sugar, and salt. Pulse a few times to mix everything evenly.
-
Cut in the Butter: Scatter the cold, cubed butter over the flour mixture. Pulse in short bursts (about 8-10 times) until the mixture resembles coarse cornmeal with some pea-sized pieces of butter still visible. These butter pockets are what create a flaky crust.
-
Add the Wet Ingredients: In a small bowl, lightly whisk the egg yolk with 1 tablespoon of ice-cold water. Add this to the food processor and pulse just until the dough starts to clump together. If it seems too dry, add the second tablespoon of water, one teaspoon at a time. Do not overmix; the dough should not form a smooth ball in the processor.
-
Form and Chill the Dough: Turn the crumbly dough out onto a clean surface and gently knead it just once or twice to bring it together into a cohesive disk. Wrap the disk tightly in plastic wrap and refrigerate for at least 1 hour, or up to 2 days. Chilling is crucial for relaxing the gluten and making the dough easy to roll out.
-
Roll and Fit the Dough: On a lightly floured surface, roll the chilled dough out into a circle about 12 inches in diameter and ⅛-inch thick. Carefully transfer the dough to your 9-inch tart pan. Gently press it into the bottom and up the sides of the pan. Trim any excess dough by running your rolling pin over the top edge of the pan. Prick the bottom of the crust with a fork a few times.
-
Freeze the Crust: Place the dough-lined tart pan in the freezer for at least 30 minutes. Freezing the crust before baking helps prevent it from shrinking.
-
Blind Bake the Crust: Preheat your oven to 375°F (190°C). Line the frozen tart shell with a piece of parchment paper and fill it with pie weights or dried beans. Bake for 20-25 minutes, or until the edges are lightly golden.
-
Finish Baking: Carefully remove the parchment paper and pie weights. Return the tart crust to the oven and bake for another 10-15 minutes, or until the bottom is dry and pale golden brown. Let the crust cool completely in the pan on a wire rack.
Part 2: Creating the Velvety Yuzu Curd
This curd is bright, tangy, and incredibly smooth. The key here is gentle heat and constant whisking to prevent the eggs from scrambling.
-
Set Up a Double Boiler (Optional but Recommended): You can make the curd directly in a saucepan over low heat, but a double boiler (a heatproof bowl set over a saucepan of simmering water, ensuring the bottom of the bowl doesn’t touch the water) provides gentle, indirect heat and reduces the risk of curdling.
-
Whisk Eggs and Sugar: In your heatproof bowl or saucepan, whisk together the sugar, eggs, and extra egg yolk until they are well combined and slightly pale.
-
Incorporate Yuzu Juice: Slowly whisk in the yuzu juice and the pinch of salt until everything is smooth.
-
Cook the Curd: Place the bowl over the simmering water (or the saucepan over low-medium heat). Cook, whisking constantly, until the mixture thickens enough to coat the back of a spoon. This process will take about 10-15 minutes. Do not let it boil. You’ll know it’s ready when you can draw a line with your finger through the curd on the back of the spoon and the line holds its shape.
-
Emulsify the Butter: Remove the curd from the heat. Add the room temperature butter, one piece at a time, whisking until each piece is fully incorporated and the curd is smooth and glossy. Adding the butter off the heat ensures a silky, emulsified texture.
-
Strain for Silkiness: Pour the finished curd through a fine-mesh sieve into a clean bowl. This crucial step removes any tiny bits of cooked egg (chalazae) and ensures a perfectly smooth texture.
-
Cool the Curd: Press a piece of plastic wrap directly onto the surface of the curd to prevent a skin from forming. Let it cool to room temperature.
Part 3: Assembling and Finishing Your Masterpiece
Now it’s time to bring the elements together for the final bake.
-
Prepare for the Final Bake: Reduce the oven temperature to 325°F (160°C).
-
Fill the Tart: Place your completely cooled, blind-baked tart shell on a baking sheet (this makes it easier to move). Pour the room-temperature yuzu curd into the shell, spreading it evenly with a spatula.
-
The Final Bake: Carefully transfer the baking sheet to the oven. Bake for 15-20 minutes. The curd is set when the edges are firm, but the center still has a slight jiggle or wobble when you gently shake the pan. It will continue to set as it cools.
-
Cool Completely: Remove the tart from the oven and let it cool completely to room temperature on a wire rack (about 1-2 hours).
-
Chill: Once at room temperature, carefully transfer the tart to the refrigerator and chill for at least 4 hours, or preferably overnight. This step is essential for the curd to fully set and for the flavors to meld.
Nutrition
- Serving Size: one normal portion
- Calories: 350-400


