


The first time I ever presented a Banoffee Pie at a family gathering, there was a moment of hushed awe. The towering whipped cream, the glistening toffee, the promise of sweet banana and a buttery biscuit base – it was a sight to behold. My notoriously picky nephew, who usually turns his nose up at anything with fruit, took one tentative bite, and his eyes widened. “This,” he declared, mouth full, “is the BEST pie ever!” The rest of the family wholeheartedly agreed. Slices disappeared in record time, accompanied by contented murmurs and requests for the recipe. It’s since become my go-to dessert for special occasions, or even just when we need a seriously indulgent treat. It’s a showstopper that, believe it or not, doesn’t require any baking (if you use store-bought dulce de leche) and comes together with minimal fuss, making me look like a culinary superstar every single time.
Why This Banoffee Pie Will Steal the Show (and Your Heart)
Banoffee Pie, a glorious concoction of bananas, cream, and toffee (from boiled condensed milk or dulce de leche) on a buttery biscuit base, is a British dessert classic that has won hearts worldwide. And for good reason! If you’re looking for a dessert that’s both incredibly impressive and surprisingly straightforward, look no further.
- Irresistible Flavor Combination: The marriage of sweet, ripe bananas with rich, gooey toffee, fluffy whipped cream, and a crumbly, buttery biscuit crust is pure heaven. It’s a symphony of sweet, creamy, and slightly salty notes that dance on your palate.
- Textural Paradise: This pie is a masterclass in contrasting textures. You get the crunch from the biscuit base, the smooth, yielding softness of the bananas, the sticky lusciousness of the toffee, and the airy lightness of the whipped cream.
- No-Bake Wonder (Mostly): The classic, easiest versions of Banoffee Pie require no baking at all if you opt for a store-bought dulce de leche or a tin of pre-made caramel. The base is simply pressed into a tin and chilled, making it an ideal dessert for warmer months or when you don’t want to turn on the oven.
- Showstopper Presentation: Despite its relative ease of preparation, a well-made Banoffee Pie looks incredibly impressive. The layers are distinct, the whipped cream can be piped or swirled beautifully, and a dusting of chocolate shavings adds a touch of elegance.
- Crowd-Pleasing Appeal: It’s rare to find someone who doesn’t love Banoffee Pie. Its comforting, nostalgic flavors appeal to both adults and children, making it a guaranteed hit at dinner parties, potlucks, or family celebrations.
- Adaptable & Forgiving: While there’s a classic formula, Banoffee Pie is quite forgiving. You can adjust the sweetness, play with the type of biscuits for the base, or add a hint of coffee or rum to the toffee for a grown-up twist.
This isn’t just a pie; it’s an experience. It’s the kind of dessert that elicits oohs and aahs before a single bite is even taken.
Understanding the Layers of Banoffee Bliss
Each component of a Banoffee Pie plays a crucial role in its overall deliciousness. Let’s break down the anatomy of this iconic dessert:
- The Crust – The Buttery Foundation:
- Traditional Choice: Digestive biscuits are the classic go-to for a Banoffee Pie crust in the UK. Their slightly sweet, wheaty flavor and crumbly texture are perfect.
- Alternatives: Graham crackers are an excellent North American substitute. You could also use Hobnobs for an oaty crunch, shortbread for extra buttery richness, or even chocolate biscuits for a different flavor dimension.
- The Binder: Melted butter is mixed with the biscuit crumbs to bind them together, creating a firm yet tender base that holds its shape when chilled.
- The Toffee – The Sweet, Gooey Heart:
- The Easy Way (Highly Recommended): Using a can of ready-made dulce de leche or Carnation Caramel (often found in the baking aisle) is the simplest and quickest method. This rich, thick caramel is essentially sweetened condensed milk that has been cooked until it transforms into a luscious toffee.
- The Traditional DIY Method: This involves boiling an unopened can of sweetened condensed milk in water for several hours. While authentic, it requires careful attention to ensure the can remains submerged and doesn’t run dry, which could cause it to explode. Safety is paramount with this method.
- Stovetop Caramel: You can also make a quick caramel sauce from scratch using butter, brown sugar, and condensed milk, cooked gently until thickened.
- The Bananas – The Fruity Star:
- Ripeness is Key: Use bananas that are ripe but still firm. They should be sweet but not mushy or overly bruised. Overripe bananas can make the pie soggy and taste too intense.
- Slicing: Slice the bananas to a medium thickness (about ¼ to ½ inch). Too thin, and they might get lost; too thick, and they can be awkward to eat.
- The Cream – The Cloud-Like Topping:
- Real Whipped Cream: Freshly whipped double cream (heavy cream) is non-negotiable for authentic Banoffee Pie. Its richness and light texture perfectly balance the sweetness of the toffee and bananas.
- Sweetness (Optional): Some people like to add a touch of icing sugar (powdered sugar) and vanilla extract to the cream while whipping, but it’s often left unsweetened to contrast with the rich filling.
- The Garnish – The Finishing Touch (Optional but Recommended):
- Chocolate Shavings: Grated dark chocolate or chocolate curls are the classic garnish, adding a slight bitterness that complements the sweetness.
- Cocoa Powder: A light dusting of cocoa powder can also look elegant.
- Extra Toffee Drizzle: For the truly decadent, a little extra drizzle of toffee over the cream can be a delightful touch.
Understanding these components will help you appreciate the balance and craft involved in creating the perfect Banoffee Pie.
The Ultimate Banoffee Pie: Recipe
This recipe aims for the classic, easy-to-achieve version using ready-made caramel for maximum deliciousness with minimal fuss.
Ingredients
For the Biscuit Crust:
- 250g (approx. 9 oz or 1 ½ sleeves) digestive biscuits (or graham crackers)
- 125g (approx. ½ cup or 1 stick) unsalted butter, melted
- 1 tablespoon granulated sugar (optional, for extra sweetness and crunch)
For the Toffee Filling:
- 1 can (397g / approx. 14 oz) dulce de leche or ready-made caramel (like Carnation Caramel)
- If making your own quick toffee: 100g (½ cup) unsalted butter, 100g (½ cup packed) dark brown sugar, 1 can (397g) sweetened condensed milk.
For the Banana Layer:
- 3-4 medium ripe but firm bananas
- 1 teaspoon lemon juice (optional, to prevent browning)
For the Cream Topping:
- 400ml (approx. 1 ¾ cups) double cream (heavy cream), well chilled
- 1 tablespoon icing sugar (powdered sugar), optional
- 1 teaspoon vanilla extract, optional
For Garnish (Optional):
- Grated dark chocolate or chocolate curls
- Cocoa powder
Equipment Needed:
- Food processor (or a zip-top bag and rolling pin)
- 23cm (9-inch) loose-bottomed tart tin or springform pan
- Mixing bowls
- Spatula
- Electric mixer (or whisk and strong arm) for whipping cream
Step-by-Step Instructions: Assembling Your Masterpiece
Follow these steps carefully to create a Banoffee Pie that will wow everyone.
Phase 1: Prepare the Biscuit Crust
- Crush the Biscuits: Place the digestive biscuits in a food processor and pulse until they form fine crumbs. Alternatively, put them in a sturdy zip-top bag, seal it, and crush them with a rolling pin.
- Combine with Butter: Transfer the biscuit crumbs to a medium mixing bowl. If using, stir in the optional granulated sugar. Pour the melted butter over the crumbs and mix thoroughly with a fork or spatula until all the crumbs are evenly moistened and the mixture resembles wet sand.
- Press into Tin: Tip the buttery crumb mixture into your 23cm (9-inch) loose-bottomed tart tin or springform pan. Press the crumbs firmly and evenly into the base and up the sides of the tin using the back of a spoon or the flat bottom of a glass. Aim for a compact, even layer.
- Chill the Crust: Place the prepared crust in the refrigerator to chill and firm up for at least 30 minutes (or in the freezer for 15 minutes if you’re short on time). This helps the crust set properly.
Phase 2: Prepare the Toffee Filling
- If using ready-made dulce de leche/caramel: Simply open the can. Sometimes it can be quite thick, so you might want to give it a good stir to loosen it slightly, making it easier to spread.
- If making quick stovetop toffee (Alternative):
- Melt the 100g unsalted butter and 100g dark brown sugar in a medium saucepan over low heat, stirring until the sugar dissolves.
- Pour in the can of sweetened condensed milk and bring to a gentle simmer, stirring constantly.
- Cook for 5-7 minutes, stirring continuously to prevent burning, until the mixture thickens to a rich, golden caramel color and consistency. It should coat the back of a spoon.
- Remove from heat and let it cool for about 15-20 minutes, stirring occasionally. It will thicken further as it cools.
Phase 3: Assemble the Pie
- Spread the Toffee: Once the crust is chilled and firm, and your toffee is ready (and slightly cooled if homemade), carefully spread the dulce de leche or caramel evenly over the chilled biscuit base.
- Prepare and Arrange Bananas: Peel and slice the bananas into rounds about ¼ to ½ inch thick. If you’re concerned about them browning (especially if not serving immediately), toss them gently with the teaspoon of lemon juice. Arrange the banana slices in a single, slightly overlapping layer over the toffee. You might need a second layer in some areas to use up all the bananas and create a generous filling.
- Chill Again (Important!): Cover the pie loosely with plastic wrap (try not to let it touch the bananas) and return it to the refrigerator to chill for at least 1 hour, or ideally 2-3 hours. This allows the toffee to firm up slightly and the flavors to meld.
Phase 4: Whip and Add the Cream Topping
- Whip the Cream: Just before serving (or up to a few hours before if storing carefully in the fridge), pour the well-chilled double cream into a large, clean mixing bowl. If using, add the icing sugar and vanilla extract.
- Beat to Soft/Medium Peaks: Using an electric mixer on medium speed (or a whisk), beat the cream until it forms soft to medium peaks. It should be thick and billowy, holding its shape but not overly stiff or grainy. Be careful not to over-whip, or it will turn buttery.
- Top the Pie: Gently spoon or pipe the whipped cream over the banana layer, covering it completely. You can create lovely swirls or use a piping bag with a star nozzle for a more decorative finish.
Phase 5: Garnish and Serve
- Garnish: If using, sprinkle the grated dark chocolate or chocolate curls over the whipped cream, or give it a light dusting of cocoa powder.
- Serve Chilled: Serve the Banoffee Pie immediately, chilled. To get clean slices, dip a sharp knife in hot water and wipe it dry between each cut.
Nutrition Facts (Estimated)
- Servings: This recipe serves approximately 8-10 people.
- Calories per serving (estimated, for 1/8th of the pie): Approximately 500-650 calories.
Disclaimer: Nutritional information is an estimate and can vary significantly based on specific ingredient brands (especially the caramel/dulce de leche and biscuits), exact measurements, and portion sizes. Banoffee Pie is an indulgent dessert, best enjoyed in moderation.
Preparation & Chilling Time
- Active Preparation Time:
- Crust: 15 minutes
- Toffee (if homemade): 10-15 minutes
- Assembly & Cream: 15-20 minutes
- Total Active Prep Time: Approximately 40-50 minutes (less if using store-bought caramel)
- Chilling Time:
- Crust chill: 30 minutes (minimum)
- Pie chill (after adding toffee & bananas): 1-3 hours (minimum)
- Total Time from Start to Finish: Approximately 2 hours 10 minutes to 4 hours (mostly inactive chilling time).
The beauty of this pie is that much of the time is hands-off chilling, allowing the flavors to develop and the pie to set perfectly.
How to Serve Your Sensational Banoffee Pie
Serving Banoffee Pie is all about showcasing its glorious layers and enjoying its decadent flavors.
- Serve Chilled: Banoffee Pie is best served cold, straight from the refrigerator. This ensures the layers hold their shape and the textures are at their prime.
- Clean Slices: For neat presentation:
- Use a sharp, thin-bladed knife.
- Dip the knife in hot water and wipe it clean between each slice. This helps prevent the cream and toffee from sticking and smearing.
- Individual Portions: For a more elegant or party-friendly presentation, consider making individual Banoffee Pies in small tartlet tins or even clear glasses/jars for a deconstructed look.
- Accompaniments (Though Rarely Needed!):
- Honestly, Banoffee Pie is so rich and complete on its own that it rarely needs anything else.
- However, a cup of strong coffee or black tea can be a lovely counterpoint to its sweetness.
- Presentation on the Plate:
- Place a slice neatly on a dessert plate.
- If you want to get fancy, a tiny drizzle of extra caramel sauce around the plate or a few fresh mint leaves can add a touch of color, but simplicity often works best.
- Timing is Everything: Add the whipped cream topping as close to serving time as possible for the best texture and appearance, especially if it’s not stabilized. If made a few hours ahead, keep it well-chilled.
Enjoy the oohs and aahs as you present this masterpiece!
Pro Tips for Banoffee Perfection: Elevating Your Pie Game
Want to ensure your Banoffee Pie is truly unforgettable? Here are five expert tips:
- Prevent Soggy Bananas (Slightly): While some moisture transfer is inevitable, tossing your sliced bananas in a tiny amount of lemon juice can help prevent them from browning too quickly and can slow down the process of them becoming overly soft if the pie is made well in advance. Don’t use too much, or it will alter the flavor.
- Perfect the Crust Consistency: For a crust that’s firm but not rock-hard, ensure your biscuit crumbs are fine and evenly moistened with the melted butter. Press firmly into the tin. If it’s too crumbly, you might need a touch more melted butter. Chilling thoroughly is key to it setting.
- Toffee Texture Control: If using store-bought dulce de leche and it’s extremely thick, you can warm it very gently for a few seconds in the microwave or by placing the can in warm water to make it more spreadable. If making stovetop toffee, be sure to cook it long enough to thicken properly but avoid overcooking, which can make it too hard once cooled.
- Stabilize Your Cream (for Make-Ahead): If you need to make the pie several hours in advance and want your whipped cream to hold its shape perfectly without weeping, you can stabilize it. Whisk in 1-2 teaspoons of unflavored gelatin bloomed in a little cold water (and then gently warmed to dissolve) or use a commercial whipped cream stabilizer. Alternatively, whipping in a tablespoon of instant skim milk powder or a bit of cream cheese can also help.
- Garnish Just Before Serving: Add your chocolate shavings or cocoa powder right before you serve the pie. This ensures they look fresh and don’t absorb moisture from the cream, which can make them look dull or clumpy.
Frequently Asked Questions (FAQ) About Banoffee Pie
Here are answers to some common questions that might arise when making this delectable dessert:
- Q: Can I make Banoffee Pie ahead of time?
- A: Yes, to some extent. You can make the biscuit base and toffee layer up to a day in advance and keep it well-covered in the refrigerator. However, it’s best to add the bananas and whipped cream on the day of serving, ideally just a few hours before, to prevent the bananas from browning excessively and the cream from deflating or weeping. If you use stabilized cream, it will hold up better.
- Q: How do I prevent my Banoffee Pie from becoming soggy?
- A: A well-chilled, firm crust is the first line of defense. Using ripe but firm bananas (not overripe and mushy) is also crucial. Avoid letting the pie sit at room temperature for too long. The toffee layer also acts as a slight barrier between the bananas and the crust. Serving it within 24 hours of full assembly is generally best for optimal texture.
- Q: What can I use instead of digestive biscuits for the crust?
- A: Graham crackers are the most common substitute, especially in North America. Other options include Hobnobs (for an oaty texture), shortbread biscuits (for extra buttery flavor), or even ginger snaps for a spicy kick. Chocolate biscuits like Oreos (scrape off the filling) can also create a delicious chocolatey base.
- Q: My toffee (dulce de leche) is too thick to spread. What can I do?
- A: If your store-bought dulce de leche is very stiff, you can gently warm it. Either transfer it to a microwave-safe bowl and heat in 10-15 second intervals, stirring in between, until just softened (don’t make it hot), or place the sealed can in a bowl of warm (not boiling) water for 10-15 minutes. Stir well before spreading.
- Q: Can I freeze Banoffee Pie?
- A: Freezing Banoffee Pie is generally not recommended, especially once fully assembled with bananas and whipped cream. Bananas tend to become mushy and discolored upon thawing, and whipped cream can separate or become watery. The crust may also become soggy. It’s best enjoyed fresh. If you must, you could freeze the biscuit base and toffee layer separately, then thaw and assemble with fresh bananas and cream.
This Banoffee Pie recipe is your ticket to creating a dessert that is universally loved and surprisingly simple to master. The combination of textures and sweet, creamy flavors makes it an unforgettable treat for any occasion. So, roll up your sleeves, gather your ingredients, and prepare to indulge in a slice (or two!) of pure bliss. Happy pie making!
Print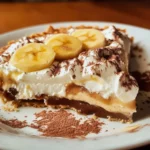
Banoffee Pie recipe
Ingredients
For the Biscuit Crust:
-
- 250g (approx. 9 oz or 1 ½ sleeves) digestive biscuits (or graham crackers)
-
- 125g (approx. ½ cup or 1 stick) unsalted butter, melted
-
- 1 tablespoon granulated sugar (optional, for extra sweetness and crunch)
For the Toffee Filling:
-
- 1 can (397g / approx. 14 oz) dulce de leche or ready-made caramel (like Carnation Caramel)
-
- If making your own quick toffee: 100g (½ cup) unsalted butter, 100g (½ cup packed) dark brown sugar, 1 can (397g) sweetened condensed milk.
-
- 1 can (397g / approx. 14 oz) dulce de leche or ready-made caramel (like Carnation Caramel)
For the Banana Layer:
-
- 3–4 medium ripe but firm bananas
-
- 1 teaspoon lemon juice (optional, to prevent browning)
For the Cream Topping:
-
- 400ml (approx. 1 ¾ cups) double cream (heavy cream), well chilled
-
- 1 tablespoon icing sugar (powdered sugar), optional
-
- 1 teaspoon vanilla extract, optional
For Garnish (Optional):
-
- Grated dark chocolate or chocolate curls
-
- Cocoa powder
Equipment Needed:
-
- Food processor (or a zip-top bag and rolling pin)
-
- 23cm (9-inch) loose-bottomed tart tin or springform pan
-
- Mixing bowls
-
- Spatula
-
- Electric mixer (or whisk and strong arm) for whipping cream
Instructions
Phase 1: Prepare the Biscuit Crust
-
- Crush the Biscuits: Place the digestive biscuits in a food processor and pulse until they form fine crumbs. Alternatively, put them in a sturdy zip-top bag, seal it, and crush them with a rolling pin.
-
- Combine with Butter: Transfer the biscuit crumbs to a medium mixing bowl. If using, stir in the optional granulated sugar. Pour the melted butter over the crumbs and mix thoroughly with a fork or spatula until all the crumbs are evenly moistened and the mixture resembles wet sand.
-
- Press into Tin: Tip the buttery crumb mixture into your 23cm (9-inch) loose-bottomed tart tin or springform pan. Press the crumbs firmly and evenly into the base and up the sides of the tin using the back of a spoon or the flat bottom of a glass. Aim for a compact, even layer.
-
- Chill the Crust: Place the prepared crust in the refrigerator to chill and firm up for at least 30 minutes (or in the freezer for 15 minutes if you’re short on time). This helps the crust set properly.
Phase 2: Prepare the Toffee Filling
-
- If using ready-made dulce de leche/caramel: Simply open the can. Sometimes it can be quite thick, so you might want to give it a good stir to loosen it slightly, making it easier to spread.
-
- If making quick stovetop toffee (Alternative):
-
- Melt the 100g unsalted butter and 100g dark brown sugar in a medium saucepan over low heat, stirring until the sugar dissolves.
-
- Pour in the can of sweetened condensed milk and bring to a gentle simmer, stirring constantly.
-
- Cook for 5-7 minutes, stirring continuously to prevent burning, until the mixture thickens to a rich, golden caramel color and consistency. It should coat the back of a spoon.
-
- Remove from heat and let it cool for about 15-20 minutes, stirring occasionally. It will thicken further as it cools.
-
- If making quick stovetop toffee (Alternative):
Phase 3: Assemble the Pie
-
- Spread the Toffee: Once the crust is chilled and firm, and your toffee is ready (and slightly cooled if homemade), carefully spread the dulce de leche or caramel evenly over the chilled biscuit base.
-
- Prepare and Arrange Bananas: Peel and slice the bananas into rounds about ¼ to ½ inch thick. If you’re concerned about them browning (especially if not serving immediately), toss them gently with the teaspoon of lemon juice. Arrange the banana slices in a single, slightly overlapping layer over the toffee. You might need a second layer in some areas to use up all the bananas and create a generous filling.
-
- Chill Again (Important!): Cover the pie loosely with plastic wrap (try not to let it touch the bananas) and return it to the refrigerator to chill for at least 1 hour, or ideally 2-3 hours. This allows the toffee to firm up slightly and the flavors to meld.
Phase 4: Whip and Add the Cream Topping
-
- Whip the Cream: Just before serving (or up to a few hours before if storing carefully in the fridge), pour the well-chilled double cream into a large, clean mixing bowl. If using, add the icing sugar and vanilla extract.
-
- Beat to Soft/Medium Peaks: Using an electric mixer on medium speed (or a whisk), beat the cream until it forms soft to medium peaks. It should be thick and billowy, holding its shape but not overly stiff or grainy. Be careful not to over-whip, or it will turn buttery.
-
- Top the Pie: Gently spoon or pipe the whipped cream over the banana layer, covering it completely. You can create lovely swirls or use a piping bag with a star nozzle for a more decorative finish.
Phase 5: Garnish and Serve
-
- Garnish: If using, sprinkle the grated dark chocolate or chocolate curls over the whipped cream, or give it a light dusting of cocoa powder.
-
- Serve Chilled: Serve the Banoffee Pie immediately, chilled. To get clean slices, dip a sharp knife in hot water and wipe it dry between each cut.
Nutrition
- Serving Size: one normal portion
- Calories: 500-650


