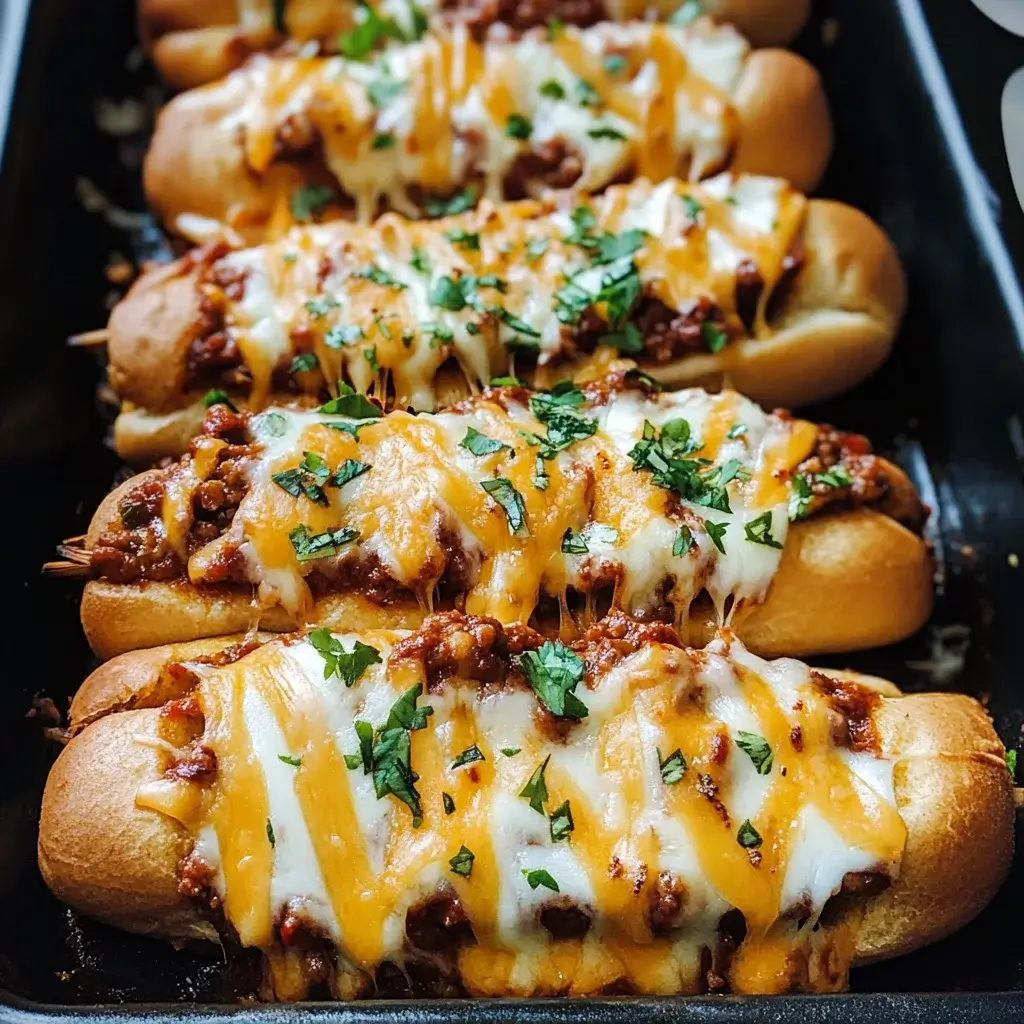

There’s a certain kind of messy, unadulterated joy that comes with eating a chili cheese dog. It’s comfort food dialed up to eleven. For years, making them at home involved a bit of juggling – boiling or grilling dogs, heating chili separately, assembling individual servings that often resulted in a chili-splattered counter. Then, I discovered the magic of baking them. The first time I lined up chili-and-cheese-laden hot dogs in a baking dish and slid them into the oven, I wasn’t sure what to expect. What emerged 15 minutes later was pure genius: perfectly warm hot dogs nestled in soft buns, topped with bubbling hot chili and gloriously melted, gooey cheese, all achieved with minimal fuss and contained mess. The family went absolutely wild! It became an instant hit, perfect for game days, easy Friday night dinners, or anytime we needed a dose of pure, unpretentious deliciousness. The beauty is in the simplicity and the shared experience of pulling apart those perfectly melded dogs from the pan.
The Genius of Baking Chili Cheese Dogs: Why This Method Wins
While grilling or boiling hot dogs certainly has its place, taking the chili cheese dog experience into the oven offers a unique set of advantages that make it a standout method, particularly when feeding more than one or two people or aiming for ultimate cheesy meltiness.
1. Even Heating and Melded Flavors: Baking allows for gentle, even heating of all the components simultaneously. The hot dog warms through, the bun softens perfectly under the chili, the chili gets hot and bubbly, and the cheese melts into a glorious, gooey blanket over everything. This simultaneous heating allows the flavors to meld together beautifully in a way that assembling cold components doesn’t quite achieve. The bottom of the bun absorbs just enough chili goodness without becoming completely saturated (with the right technique!).
2. Perfect for a Crowd: Assembling chili cheese dogs individually can be time-consuming and messy if you’re making several. The baked method allows you to prepare an entire batch – often 8, 10, or even more depending on your baking dish – all at once. You line them up, top them uniformly, and bake. This is incredibly efficient for family dinners, parties, potlucks, or game day gatherings. Everyone gets a hot, perfectly assembled chili cheese dog at the same time.
3. Superior Cheese Melt: The consistent, ambient heat of the oven is ideal for achieving that perfect cheese melt. Whether you like a simple layer of cheddar or a blend of cheeses, baking ensures it melts evenly and becomes wonderfully gooey, clinging to the chili and the dog. You can even give it a quick blast under the broiler at the end for some tempting golden-brown bubbly spots.
4. Contained Mess & Easier Cleanup: Let’s be honest, chili cheese dogs can be messy to make and eat. Baking them contains much of the potential spillage within the baking dish. Lining the dish with foil or parchment paper can make cleanup almost negligible. No splattered chili on the stovetop or grill grates. While eating them might still require napkins, the preparation is significantly tidier.
5. Mostly Hands-Off Cooking: Once assembled and placed in the oven, the cooking process is largely hands-off. This frees you up to prepare other side dishes, mingle with guests, or simply relax for 15-20 minutes, unlike methods that require constant watching or flipping.
Baking transforms the humble chili cheese dog from a potentially chaotic assembly job into a streamlined, crowd-pleasing, and utterly delicious experience, maximizing flavour and minimizing fuss.
Complete Ingredients with Amounts: Your Baked Chili Dog Arsenal
Gather these ingredients for a classic batch of crowd-pleasing baked chili cheese dogs. This recipe typically makes 8 servings.
- Hot Dogs: 1 package (usually 8) standard-size hot dogs. Choose your favorite type – all-beef, pork blend, turkey dogs, or even plant-based dogs work.
- Hot Dog Buns: 1 package (usually 8) standard hot dog buns. Opt for slightly sturdier buns if possible, as they hold up better to the chili. Brioche or potato buns add a nice touch.
- Chili: 1 can (approx. 15 ounces) chili without beans (preferred for classic chili dogs, but use chili with beans if you like). Or use about 1.5 – 2 cups of your favorite homemade chili. Ensure it’s relatively thick; overly thin chili will make buns soggy faster.
- Shredded Cheese: 1.5 to 2 cups shredded cheese. Sharp cheddar is classic, but Colby Jack, Monterey Jack, a Mexican blend, or even pepper jack for a kick are excellent choices. Shredding your own cheese often melts better than pre-shredded (which contains anti-caking agents).
- Optional Toppings (For Serving):
- Finely chopped yellow or white onion
- Sliced jalapeños (fresh or pickled)
- Yellow mustard
- Sour cream or Greek yogurt
- Chopped fresh cilantro or green onions
- Hot sauce
Ingredient Considerations:
- Hot Dog Quality: A better quality hot dog often yields a better flavour. Consider natural casing hot dogs for a bit of “snap.”
- Chili Thickness: If your chili (canned or homemade) seems too thin, you can simmer it briefly on the stovetop to thicken it slightly before using.
- Bun Choice: Standard white buns work, but slightly denser buns like potato rolls or brioche buns tend to resist sogginess a bit better. Avoid very flimsy, cheap buns if possible.
Instructions: Assembling and Baking Your Chili Cheese Dogs
Follow these simple steps to chili cheese dog perfection in the oven.
Step 1: Preheat Oven and Prepare Baking Dish
- Preheat your oven to 350°F (175°C).
- Choose a baking dish large enough to hold the 8 hot dogs nestled in their buns snugly side-by-side. A 9×13 inch baking dish usually works perfectly.
- (Optional but Recommended for Easy Cleanup): Line the baking dish with aluminum foil or parchment paper, leaving a little overhang if desired.
Step 2: Prepare the Buns and Hot Dogs
- Open the hot dog buns and place them into the prepared baking dish, cut-side up. Arrange them snugly together – this helps them support each other once filled.
- Place one hot dog into each bun.
Step 3: Add the Chili
- If your chili is cold, you may want to warm it slightly in the microwave or on the stovetop first. This helps ensure everything heats through evenly in the oven. It doesn’t need to be piping hot, just not refrigerator-cold.
- Spoon the chili evenly over the top of each hot dog, staying mostly within the confines of the bun. Use about 2-3 tablespoons of chili per dog, or adjust to your preference. Avoid overloading excessively, as it increases the chance of sogginess.
Step 4: Top with Cheese
- Sprinkle the shredded cheese generously and evenly over the chili-topped hot dogs. Make sure to cover the chili well. Use more or less cheese according to your preference – more cheese helps create a better “seal.”
Step 5: Bake
- Carefully place the baking dish into the preheated oven.
- Bake for 15 to 20 minutes.
- The chili cheese dogs are ready when the chili is hot and bubbly, the cheese is completely melted and gooey, and the hot dogs are heated through. The buns should be soft and warm.
Step 6: Optional Broiling (For Bubbly Browned Cheese)
- If you like your cheese slightly browned and extra bubbly, switch the oven setting to BROIL (High) after the initial baking time.
- Place the baking dish under the broiler (keep the oven door slightly ajar and watch constantly), for 1-3 minutes, just until the cheese starts to bubble and brown in spots. Do NOT walk away during this step, as the cheese can go from perfect to burnt very quickly under the broiler.
Step 7: Serve
- Carefully remove the baking dish from the oven using oven mitts.
- Let the baked chili cheese dogs rest for a minute or two – they will be very hot.
- Use a spatula to carefully lift out individual chili cheese dogs and serve immediately. Offer optional toppings on the side.
Nutrition Facts (Servings and Calories per Serving)
Nutritional information for baked chili cheese dogs is highly variable and depends significantly on the specific type of hot dogs, buns, chili (canned vs. homemade, beans vs. no beans, fat content), and the amount of cheese used. The following are rough estimates per single baked chili cheese dog, assuming standard beef hot dogs, white buns, canned chili without beans, and standard cheddar cheese.
- Servings: 1 Baked Chili Cheese Dog (Recipe makes 8)
- Estimated Calories per Serving: Approximately 450 – 650 calories
Approximate Nutritional Breakdown (Highly Variable per dog):
- Fat: 25-45g (Significant contributions from hot dog, chili, cheese)
- Saturated Fat: 10-20g
- Sodium: 900-1500mg+ (Hot dogs, canned chili, cheese, and buns are all typically high in sodium)
- Carbohydrates: 30-45g (Primarily from the bun)
- Fiber: 2-5g (Higher if using chili with beans or whole wheat buns)
- Protein: 15-25g (From hot dog, cheese, chili)
Important Considerations:
- Sodium Content: This dish is typically very high in sodium. Be mindful if you follow a low-sodium diet. Choosing lower-sodium hot dogs, chili, and cheese options can help mitigate this, but it will likely remain a high-sodium meal.
- Ingredient Choices Impact: Using turkey dogs, leaner chili, reduced-fat cheese, and whole wheat buns can lower the calorie and fat content but will alter the classic taste and texture.
- Portion Size: Enjoy as an occasional indulgence as part of a balanced diet.
Preparation Time: Quick Assembly, Fast Bake
This recipe is known for its speed and efficiency, making it great for various occasions.
- Active Preparation Time:
- Preheating Oven & Preparing Dish: 5 minutes
- Arranging Buns & Dogs: 2-3 minutes
- Topping with Chili & Cheese: 5-7 minutes
- Total Active Time: Approximately 12 – 15 minutes
- Inactive Time (Baking & Resting):
- Baking: 15-20 minutes
- Optional Broiling: 1-3 minutes
- Resting: 1-2 minutes
- Total Inactive Time: Approximately 17 – 25 minutes
- Total Overall Time:
- From starting prep to serving: Approximately 30 – 40 minutes.
This quick turnaround makes baked chili cheese dogs a feasible option even for a busy weeknight treat or a last-minute party food idea.
How to Serve: Presentation and Perfect Pairings
Serving these baked chili cheese dogs is all about embracing the casual, fun nature of the dish. Here’s how to present them and what to pair them with:
- Direct from the Dish: Often, the easiest way is to bring the baking dish right to the table (on a trivet!) and let everyone carefully serve themselves with a sturdy spatula.
- Plated Individually: Use a spatula to lift each dog onto a plate. Be prepared with forks and knives, as they can be gloriously messy!
- Topping Bar: The ultimate way to serve for a crowd!
- Set out small bowls of various toppings alongside the baked chili cheese dogs.
- Include classics: Chopped onions, shredded lettuce, sliced jalapeños, extra shredded cheese, mustard, hot sauce.
- Consider fun extras: Crumbled bacon, pico de gallo, sour cream, crumbled Fritos or potato chips for crunch.
- Perfect Side Dishes: Keep the sides simple and complementary to the hearty main dish.
- Classic Comfort: French fries (baked or fried), tater tots, onion rings.
- Cool & Creamy: Coleslaw (creamy or vinegar-based), potato salad, macaroni salad.
- Simple & Crunchy: Potato chips, corn chips (great for scooping extra chili!).
- Lighter Balance: A simple green salad with a light vinaigrette, sliced cucumbers and tomatoes, or corn on the cob.
- Occasions:
- Game Day: The ultimate football food! Easy to make ahead and keep warm (or reheat briefly).
- Casual Parties & Potlucks: Always a crowd-pleaser and easy to transport in the baking dish.
- Easy Weeknight Dinners: Quick, satisfying, and minimal cleanup.
- Bonfire Nights/Outdoor Gatherings: A warm, hearty treat.
No matter how you serve them, embrace the fun and have plenty of napkins ready!
Additional Tips for Chili Cheese Dog Domination (5 Tips)
Elevate your baked chili cheese dog game with these simple yet effective pro tips:
- Choose the Right Bun (And Consider Toasting): The bun is the foundation. While standard buns work, slightly sturdier options like brioche, potato buns, or bakery-style buns hold up better to the weight and moisture of the chili and cheese. For extra insurance against sogginess, consider lightly toasting the inside of the buns before placing the hot dogs in them. You can do this quickly under the broiler (watch carefully!) or on a dry skillet for just a minute. This creates a slight barrier.
- Chili Consistency is Key: Use a relatively thick chili. Chili that is too thin or watery will quickly saturate the buns, leading to a mushy mess. If using canned chili, opt for varieties labelled “thick” or consider simmering thinner chili on the stovetop for 10-15 minutes to reduce some liquid before assembling. If using homemade chili, aim for a stew-like consistency.
- Strategic Assembly in the Pan: Arrange the buns snugly in the baking dish. Packing them side-by-side helps them support each other and contains the toppings better. When adding chili, try to keep it mostly on top of the hot dog and avoid letting large amounts pool directly onto the bun’s cut surface, especially near the bottom.
- Shred Your Own Cheese for Optimal Melt: While convenient, pre-shredded cheese contains cellulose and other anti-caking agents that can slightly inhibit melting, sometimes resulting in a grainier texture. For the ultimate smooth, gooey, melted cheese experience, buy a block of cheddar (or your preferred cheese) and shred it yourself just before using. It really does make a difference!
- Line Your Pan for Effortless Cleanup: This might seem obvious, but don’t underestimate the power of lining your baking dish! Use aluminum foil or parchment paper, ensuring it comes up the sides slightly. After baking and serving, once the dish has cooled, you can often just lift out the liner and discard it, leaving you with a virtually clean baking dish. This makes the entire process even more appealing, especially for parties or busy nights.
FAQ Section: Your Baked Chili Cheese Dog Queries Answered
Here are answers to some frequently asked questions about making this comforting dish:
Q1: Can I use homemade chili instead of canned chili?
- A: Absolutely! Homemade chili often has a deeper, richer flavour and allows you to control the ingredients (like spice level and sodium). Just make sure your homemade chili has a relatively thick consistency, similar to canned chili meant for topping. If it’s very soupy, simmer it down a bit first. You’ll need about 1.5 to 2 cups of chili for 8 hot dogs. Using leftover homemade chili is a fantastic way to make this dish!
Q2: What are the best types of hot dogs to use?
- A: This largely comes down to personal preference!
- All-Beef Franks: A classic choice, often offering a robust flavour.
- Pork and Beef Blends: Very common and widely enjoyed.
- Natural Casing Franks: These have a slight “snap” when you bite into them, which many people love.
- Turkey or Chicken Dogs: A lighter option, though the flavour profile will differ.
- Plant-Based Dogs: Many excellent vegetarian and vegan hot dogs are available now that work well in this preparation.
Ultimately, use a brand and type of hot dog that you enjoy eating on its own.
Q3: Can I assemble baked chili cheese dogs ahead of time?
- A: It’s generally best to assemble them just before baking to prevent the buns from getting soggy from the chili sitting on them for too long. Assembling 15-30 minutes ahead is usually fine. If you need to do more prep in advance:
- Cook/choose your hot dogs.
- Prepare/warm your chili.
- Shred your cheese.
- Prepare any toppings (chop onions, etc.).
- Have the buns ready in the (lined) baking dish.
- When ready, quickly place dogs in buns, top with warm chili and cheese, and bake immediately. This minimizes assembly time right before eating.
Q4: How do I prevent the buns from getting soggy?
- A: Soggy buns are the main challenge. Here’s a recap of the best strategies:
- Use Sturdy Buns: Avoid the cheapest, flimsiest options.
- Thick Chili: Ensure your chili isn’t too thin or watery.
- Lightly Toast Buns: Briefly toast the inside cut surfaces of the buns before adding the hot dog.
- Strategic Chili Placement: Try to keep the bulk of the chili directly on top of the hot dog.
- Don’t Let Them Sit Assembled Too Long: Assemble just before baking.
- Eat Promptly: Serve and eat them reasonably quickly after they come out of the oven.
Q5: Can I make this recipe gluten-free?
- A: Yes, making baked chili cheese dogs gluten-free is quite feasible:
- Gluten-Free Hot Dog Buns: Use your favorite brand of gluten-free hot dog buns. Their texture can vary, but many good options exist.
- Check Hot Dogs: Most hot dogs are gluten-free, but always check the packaging to be sure, as some may contain fillers.
- Check Chili: Verify that your chosen canned chili is gluten-free, or use a homemade chili recipe made with gluten-free ingredients (thickeners like cornstarch instead of flour if needed).
- Check Cheese & Toppings: Most shredded cheeses and basic toppings like onions are naturally gluten-free, but always double-check labels if you have severe allergies or sensitivities.

Baked Chili Cheese Dogs recipe
Ingredients
-
- Hot Dogs: 1 package (usually 8) standard-size hot dogs. Choose your favorite type – all-beef, pork blend, turkey dogs, or even plant-based dogs work.
-
- Hot Dog Buns: 1 package (usually 8) standard hot dog buns. Opt for slightly sturdier buns if possible, as they hold up better to the chili. Brioche or potato buns add a nice touch.
-
- Chili: 1 can (approx. 15 ounces) chili without beans (preferred for classic chili dogs, but use chili with beans if you like). Or use about 1.5 – 2 cups of your favorite homemade chili. Ensure it’s relatively thick; overly thin chili will make buns soggy faster.
-
- Shredded Cheese: 1.5 to 2 cups shredded cheese. Sharp cheddar is classic, but Colby Jack, Monterey Jack, a Mexican blend, or even pepper jack for a kick are excellent choices. Shredding your own cheese often melts better than pre-shredded (which contains anti-caking agents).
-
- Optional Toppings (For Serving):
-
- Finely chopped yellow or white onion
-
- Sliced jalapeños (fresh or pickled)
-
- Yellow mustard
-
- Sour cream or Greek yogurt
-
- Chopped fresh cilantro or green onions
-
- Hot sauce
-
- Optional Toppings (For Serving):
Ingredient Considerations:
-
- Hot Dog Quality: A better quality hot dog often yields a better flavour. Consider natural casing hot dogs for a bit of “snap.”
-
- Chili Thickness: If your chili (canned or homemade) seems too thin, you can simmer it briefly on the stovetop to thicken it slightly before using.
-
- Bun Choice: Standard white buns work, but slightly denser buns like potato rolls or brioche buns tend to resist sogginess a bit better. Avoid very flimsy, cheap buns if possible.
Instructions
-
- Preheat your oven to 350°F (175°C).
-
- Choose a baking dish large enough to hold the 8 hot dogs nestled in their buns snugly side-by-side. A 9×13 inch baking dish usually works perfectly.
-
- (Optional but Recommended for Easy Cleanup): Line the baking dish with aluminum foil or parchment paper, leaving a little overhang if desired.
Step 2: Prepare the Buns and Hot Dogs
-
- Open the hot dog buns and place them into the prepared baking dish, cut-side up. Arrange them snugly together – this helps them support each other once filled.
-
- Place one hot dog into each bun.
Step 3: Add the Chili
-
- If your chili is cold, you may want to warm it slightly in the microwave or on the stovetop first. This helps ensure everything heats through evenly in the oven. It doesn’t need to be piping hot, just not refrigerator-cold.
-
- Spoon the chili evenly over the top of each hot dog, staying mostly within the confines of the bun. Use about 2-3 tablespoons of chili per dog, or adjust to your preference. Avoid overloading excessively, as it increases the chance of sogginess.
Step 4: Top with Cheese
-
- Sprinkle the shredded cheese generously and evenly over the chili-topped hot dogs. Make sure to cover the chili well. Use more or less cheese according to your preference – more cheese helps create a better “seal.”
Step 5: Bake
-
- Carefully place the baking dish into the preheated oven.
-
- Bake for 15 to 20 minutes.
-
- The chili cheese dogs are ready when the chili is hot and bubbly, the cheese is completely melted and gooey, and the hot dogs are heated through. The buns should be soft and warm.
Step 6: Optional Broiling (For Bubbly Browned Cheese)
-
- If you like your cheese slightly browned and extra bubbly, switch the oven setting to BROIL (High) after the initial baking time.
-
- Place the baking dish under the broiler (keep the oven door slightly ajar and watch constantly), for 1-3 minutes, just until the cheese starts to bubble and brown in spots. Do NOT walk away during this step, as the cheese can go from perfect to burnt very quickly under the broiler.
Step 7: Serve
-
- Carefully remove the baking dish from the oven using oven mitts.
-
- Let the baked chili cheese dogs rest for a minute or two – they will be very hot.
-
- Use a spatula to carefully lift out individual chili cheese dogs and serve immediately. Offer optional toppings on the side.
Nutrition
- Serving Size: one normal portion
- Calories: 450 – 650