The first time I decided to make a Baked Alaska, my family looked at me like I’d announced I was building a rocket in the backyard. The very name sounds complex, a culinary feat reserved for fancy restaurants. But I was determined. The image of that golden, pillowy meringue encasing cold ice cream and warm cake was too enticing. The process was, admittedly, a multi-stage adventure involving careful freezing and a slightly nerve-wracking meringue moment. But when I finally brought it to the table, perfectly browned and ready to be sliced, the gasps of admiration were worth every second. The contrast of the warm, toasted meringue, the ice-cold, creamy ice cream, and the soft cake base was an absolute revelation. It wasn’t just a dessert; it was an event! Now, it’s my go-to for when I really want to impress, proving that even seemingly daunting recipes can be conquered with a little patience and a lot of enthusiasm.
Why Baked Alaska Will Dazzle Your Guests (and You!)
Baked Alaska is more than just a dessert; it’s a culinary spectacle. This iconic creation, featuring a base of sponge cake topped with a generous dome of ice cream, all completely encased in a fluffy meringue that’s quickly baked or torched to golden perfection, is a true showstopper. Here’s why it deserves a place on your “must-try” list:
- The Element of Surprise: The magic of Baked Alaska lies in the incredible contrast of temperatures and textures. How does the ice cream stay frozen when it’s “baked”? It’s a delightful paradox that fascinates and delights everyone.
- A Symphony of Textures and Flavors: You get the soft, yielding cake, the cold, creamy ice cream (in any flavor you desire!), and the light, airy, marshmallow-like meringue with its beautifully toasted exterior. It’s a trifecta of deliciousness.
- Visually Stunning: A well-made Baked Alaska is a work of art. The billowy, golden-brown meringue peaks create a dramatic and elegant presentation that’s guaranteed to elicit oohs and aahs.
- Surprisingly Adaptable: While there’s a classic structure, you can customize it endlessly. Choose your favorite cake base (sponge, pound cake, even brownies!), select any ice cream flavor (or multiple layers!), and even flavor your meringue.
- The “Wow” Factor: Let’s be honest, successfully making and serving a Baked Alaska earns you serious bragging rights. It’s a dessert that signals skill and effort, making any occasion feel extra special.
- A Fun Culinary Challenge: For those who enjoy a bit of a project in the kitchen, Baked Alaska offers a rewarding experience. It involves several steps, but none are overly complicated on their own. The assembly is where the magic happens.
This dessert isn’t just about eating; it’s about creating a memorable experience. It’s the perfect grand finale for a special dinner party or celebration.
Deconstructing the Magic: The Key Components of Baked Alaska
To understand how Baked Alaska works, let’s break down its essential layers:
- The Base – The Foundation:
- Traditional Choice: A sturdy sponge cake or Génoise is classic. It needs to be firm enough to support the weight of the ice cream and meringue.
- Alternatives: Pound cake, butter cake, or even a layer of brownies can work beautifully. The key is that it should be fully cooled and preferably a day old, which makes it easier to handle. It should be cut to the same size or slightly larger than the mold you use for the ice cream.
- The Heart – The Ice Cream:
- Flavor Freedom: This is where you can get creative! Classic choices include vanilla, chocolate, or strawberry, but feel free to use your favorite. You can even layer different flavors for a Neapolitan effect.
- The Mold: The ice cream needs to be molded into a shape, typically a dome or a log, that will sit neatly on the cake base. A metal or oven-safe glass bowl lined with plastic wrap is often used.
- Rock Hard Freeze: The ice cream must be frozen absolutely solid before being encased in meringue. This is crucial for it to withstand the brief heat of baking/torching.
- The Cloak – The Meringue:
- The Insulator: This is the secret to Baked Alaska’s magic. Meringue is an excellent insulator due to the air trapped within its structure. When the Baked Alaska is briefly exposed to high heat, the meringue toasts and sets on the outside, protecting the ice cream within from melting.
- Type: A Swiss or Italian meringue is often preferred because they are more stable than a French meringue. However, a well-made French meringue can also work if applied quickly and baked immediately.
- Swiss Meringue: Egg whites and sugar are gently heated over a bain-marie before whipping, dissolving the sugar and creating a very stable, glossy meringue. (This is what we’ll use in the recipe).
- Italian Meringue: Hot sugar syrup is drizzled into whipping egg whites, cooking them and resulting in a very stable, marshmallowy meringue.
- French Meringue: Raw egg whites are whipped with sugar. Simpler, but less stable.
- Complete Coverage: The meringue must completely seal the ice cream and cake base, with no gaps. Any exposed ice cream will melt rapidly.
The success of Baked Alaska hinges on careful preparation of each layer and meticulous assembly, especially ensuring the ice cream is thoroughly frozen and the meringue provides a complete seal.
Spectacular Baked Alaska: The Recipe
This recipe uses a Swiss meringue for stability and ease. It assumes you have a pre-made cake base.
Ingredients
For the Cake Base:
- 1 round sponge cake or pound cake layer, about 20-23cm (8-9 inches) in diameter and 2-3cm (¾-1 inch) thick, fully cooled (store-bought is fine, or use your favorite recipe)
For the Ice Cream Layer:
- 1.5 – 2 litres (approx. 6-8 cups) good quality ice cream, slightly softened (choose one or a combination of flavors)
- You’ll also need a freezer-proof bowl, about 18-20cm (7-8 inches) in diameter at the top (slightly smaller than your cake base), to mold the ice cream.
For the Swiss Meringue:
- 6 large egg whites (approx. 180-200g), at room temperature
- 300g (1 ½ cups) granulated sugar or caster (superfine) sugar
- ½ teaspoon cream of tartar (optional, helps stabilize the egg whites)
- 1 teaspoon pure vanilla extract
- Pinch of salt
Equipment Needed:
- Freezer-proof bowl (for molding ice cream), approx. 18-20cm (7-8 inches) diameter
- Plastic wrap
- Baking sheet lined with parchment paper or a silicone baking mat
- Electric mixer (stand mixer highly recommended for meringue)
- Heatproof bowl (for Swiss meringue, to fit over a saucepan)
- Saucepan
- Kitchen thermometer (optional, but helpful for Swiss meringue)
- Offset spatula or piping bag with a large star tip
- Kitchen torch (optional, for browning meringue)
Step-by-Step Instructions: Assembling Your Frozen Masterpiece
Baked Alaska is a multi-stage process. Read through all steps before starting.
Phase 1: Prepare the Ice Cream Dome (At least 6 hours ahead, preferably overnight)
- Line the Mold: Line your chosen freezer-proof bowl completely with plastic wrap, leaving plenty of overhang. This will help you easily remove the molded ice cream.
- Pack the Ice Cream: Allow your ice cream to soften slightly at room temperature for about 10-15 minutes, just until it’s spreadable but not melted. If using multiple flavors, you can layer them or swirl them into the bowl.
- Fill the Mold: Scoop the softened ice cream into the lined bowl, pressing it down firmly with the back of a spoon to eliminate air pockets. Smooth the surface (which will become the bottom of your ice cream dome).
- Cover and Freeze Solid: Cover the surface of the ice cream with the overhanging plastic wrap. Place the bowl in the freezer and freeze for at least 6 hours, or preferably overnight, until the ice cream is absolutely rock solid. This is CRUCIAL.
Phase 2: Prepare the Cake Base and Initial Assembly (When ready to make meringue)
- Trim the Cake: If necessary, trim your cake layer so it’s about 2.5cm (1 inch) larger in diameter than the top of your ice cream mold. This creates a platform for the ice cream and a base for the meringue to seal against. Place the cake layer on an ovenproof serving platter or a baking sheet lined with parchment paper.
- Unmold the Ice Cream: Once the ice cream is frozen solid, remove it from the freezer. Use the plastic wrap overhang to lift the dome of ice cream out of the bowl. Peel off the plastic wrap.
- Position Ice Cream on Cake: Quickly center the ice cream dome, flat-side down, onto the cake base.
- Return to Freezer: Immediately return the cake and ice cream assembly to the freezer while you prepare the meringue. It needs to stay as cold as possible. Keep it in the freezer for at least 30 more minutes.
Phase 3: Make the Swiss Meringue
- Prepare Bain-Marie: Fill a saucepan with a few inches of water and bring it to a simmer over medium heat. Find a heatproof bowl (preferably the bowl of your stand mixer if it’s metal) that fits snugly over the saucepan without touching the simmering water.
- Combine Ingredients: In the heatproof bowl, combine the egg whites, granulated sugar, cream of tartar (if using), and pinch of salt. Whisk them together briefly by hand.
- Heat Egg White Mixture: Place the bowl over the simmering water. Whisk constantly and gently until the sugar has completely dissolved and the mixture is warm to the touch. This usually takes about 3-5 minutes. If you have a kitchen thermometer, it should reach about 60-70°C (140-160°F). To test if the sugar is dissolved, rub a little of the mixture between your fingers; it should feel smooth, not gritty.
- Whip the Meringue: Carefully remove the bowl from the heat. If using a stand mixer, attach the whisk attachment. If using a hand mixer, proceed in the same bowl. Beat the warm egg white mixture on low speed for a minute, then gradually increase the speed to high.
- Beat to Stiff, Glossy Peaks: Continue to beat on high speed for 8-12 minutes, or until the meringue is very thick, glossy, and forms stiff, upright peaks when the whisk is lifted. The outside of the bowl should feel cool to the touch. Beat in the vanilla extract during the last minute of whipping. The meringue should be stable and voluminous.
Phase 4: Assemble and Brown the Baked Alaska
- Preheat Oven (if baking): If you plan to brown the Baked Alaska in the oven, preheat it to a very high temperature – 230-250°C (450-475°F). Make sure your oven rack is positioned in the middle.
- Retrieve from Freezer: Working quickly, remove the cake and ice cream assembly from the freezer.
- Cover with Meringue: Immediately cover the entire ice cream dome and cake base with the prepared Swiss meringue. Use an offset spatula to spread it generously and evenly, ensuring there are NO GAPS. The meringue must completely seal the ice cream all the way down to the parchment paper or platter. Create decorative swirls and peaks with the spatula, or transfer the meringue to a piping bag fitted with a large star tip and pipe it decoratively over the surface. The thicker the meringue layer, the better the insulation.
- Brown the Meringue: You have two options:
- Oven Method: Quickly place the assembled Baked Alaska into the preheated oven. Bake for just 3-5 minutes, watching it like a hawk, until the meringue is beautifully golden brown all over.
- Kitchen Torch Method (Preferred for control): If you have a kitchen torch, this method gives you more control and avoids heating the entire dessert as much. Hold the torch a few inches away from the meringue and move it continuously to toast the peaks and swirls until golden brown.
- Serve Immediately: Once the meringue is browned, serve the Baked Alaska immediately.
Nutrition Facts (Estimated)
- Servings: This recipe serves approximately 8-10 people.
- Calories per serving (estimated, for 1/8th): Approximately 400-600 calories.
Disclaimer: Nutritional information is an estimate and varies widely based on the type of cake, ice cream flavors used, specific brands, and exact portion sizes. Baked Alaska is an indulgent dessert meant for special occasions.
Preparation & Freezing/Baking Time
- Active Preparation Time:
- Molding ice cream: 15-20 minutes
- Making meringue: 20-25 minutes
- Assembly & browning: 10-15 minutes
- Total Active Prep Time: Approximately 45-60 minutes (spread over different stages)
- Freezing Time:
- Ice cream mold: Minimum 6 hours, preferably overnight
- Assembled cake/ice cream: Minimum 30 minutes
- Baking/Torching Time: 3-5 minutes
Total Project Time: This is a multi-stage dessert that requires significant advance planning due to freezing times, typically started the day before serving.
How to Serve Your Spectacular Baked Alaska
Serving Baked Alaska is the grand finale!
- Serve Immediately: This cannot be stressed enough. Once the meringue is browned, the clock is ticking. The contrast between the warm meringue and cold ice cream is best enjoyed right away.
- Use a Sharp Knife: To slice, use a large, sharp knife. It can be helpful to dip the knife in hot water and wipe it clean between slices to get neater cuts, especially through the meringue and ice cream.
- Dramatic Presentation: If you used an ovenproof serving platter, you can bring the whole dessert to the table. Otherwise, carefully transfer slices to individual dessert plates.
- Optional Flair: Some restaurants add a final flourish by briefly flambéing it with a high-proof alcohol like rum or brandy at the table (exercise extreme caution if attempting this).
- Accompaniments (Usually Unnecessary):
- Baked Alaska is a complete dessert on its own.
- A drizzle of raspberry coulis or chocolate sauce can be offered on the side if desired, but it truly shines solo.
Prepare for applause as you present this culinary masterpiece!
Pro Tips for Baked Alaska Triumph: Secrets to Success
Making Baked Alaska can seem daunting, but these tips will help ensure a flawless result:
- Ice Cream MUST Be Rock Solid: This is the golden rule. Don’t skimp on freezing time for the ice cream mold. If it’s not frozen hard enough, it will melt too quickly when the meringue is applied and baked/torched.
- Complete Meringue Seal is Crucial: Ensure every inch of the ice cream and the edges of the cake base are thickly covered with meringue. Any gaps will allow heat to penetrate and melt the ice cream prematurely. Think of the meringue as a perfect, edible igloo.
- Work Quickly During Final Assembly: Once you take the frozen ice cream/cake assembly out of the freezer to cover it with meringue, speed is your friend. Have your meringue ready to go. The longer it sits at room temperature, the more risk of melting.
- Stable Meringue is Key: Using a Swiss or Italian meringue provides much better stability than a basic French meringue. They hold their shape better and are less likely to weep or collapse, especially important for a dessert that involves temperature contrasts.
- Don’t Overbake/Over-Torch: The goal is to toast the meringue to a beautiful golden brown, not to cook it through or, worse, melt the ice cream. Watch it constantly during the browning process, as it can go from perfect to burnt very quickly. A kitchen torch offers the most control.
Frequently Asked Questions (FAQ) About Baked Alaska
Here are answers to some common questions about this impressive dessert:
- Q: How does the ice cream not melt in the oven?
- A: There are two main reasons:
- Insulation: The meringue, being full of tiny air bubbles, acts as an excellent insulator, protecting the ice cream from the direct heat of the oven for a short period.
- Brief, High Heat: The Baked Alaska is only in the very hot oven for a few minutes, just long enough to brown the exterior of the meringue. The ice cream itself is frozen rock solid, so it takes time for heat to penetrate.
- A: There are two main reasons:
- Q: Can I make Baked Alaska ahead of time?
- A: You can prepare components ahead. The ice cream dome can be molded and frozen for days, even weeks. The cake base can be made a day or two in advance. You can even fully assemble it with the meringue and then freeze it (unbaked/untorched) for up to a few days. However, it’s best to brown the meringue just before serving. If you freeze the fully assembled, unbaked Alaska, let it sit at room temperature for about 10-15 minutes before browning to prevent the meringue from cracking, then proceed with baking or torching.
- Q: What kind of cake works best for the base?
- A: A fairly sturdy cake is ideal. Sponge cake (Génoise), pound cake, or a firm butter cake are excellent choices. Avoid very light, airy, or crumbly cakes that might not support the weight or could become soggy. Some people even use a layer of brownies for a richer dessert.
- Q: Can I use different flavors of ice cream?
- A: Absolutely! This is where you can get creative. Use a single favorite flavor, or layer two or three complementary flavors (like Neapolitan). Just ensure each layer is firmly packed and frozen before adding the next if layering in the mold.
- Q: My meringue isn’t getting stiff peaks. What went wrong?
- A: Several things could be the culprit:
- Grease or Fat: Any trace of grease, oil, or egg yolk in your bowl or on your whisks will prevent egg whites from whipping up properly. Ensure everything is scrupulously clean.
- Egg Whites Not at Room Temperature: Room temperature egg whites whip up to a greater volume.
- Sugar Added Too Soon (for French Meringue): If making a French meringue, adding sugar too early can hinder volume. (This is less of an issue with Swiss or Italian meringue where sugar is incorporated differently).
- Humidity: High humidity can sometimes make it harder to achieve stiff peaks.
- For Swiss Meringue: Ensure the sugar is fully dissolved before you start whipping.
- A: Several things could be the culprit:
Baked Alaska is truly a dessert that makes a statement. While it requires planning and a bit of care, the process is incredibly rewarding, and the result is an unforgettable culinary experience. With its delightful contrasts of hot and cold, soft and creamy, it’s a testament to the magic of food science and a guaranteed crowd-pleaser. Give it a try – you might just surprise yourself with your pastry prowess!
Print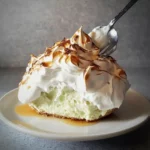
Baked Alaska recipe
Ingredients
For the Cake Base:
-
- 1 round sponge cake or pound cake layer, about 20-23cm (8–9 inches) in diameter and 2-3cm (¾–1 inch) thick, fully cooled (store-bought is fine, or use your favorite recipe)
For the Ice Cream Layer:
-
- 1.5 – 2 litres (approx. 6-8 cups) good quality ice cream, slightly softened (choose one or a combination of flavors)
-
- You’ll also need a freezer-proof bowl, about 18-20cm (7-8 inches) in diameter at the top (slightly smaller than your cake base), to mold the ice cream.
-
- 1.5 – 2 litres (approx. 6-8 cups) good quality ice cream, slightly softened (choose one or a combination of flavors)
For the Swiss Meringue:
-
- 6 large egg whites (approx. 180-200g), at room temperature
-
- 300g (1 ½ cups) granulated sugar or caster (superfine) sugar
-
- ½ teaspoon cream of tartar (optional, helps stabilize the egg whites)
-
- 1 teaspoon pure vanilla extract
-
- Pinch of salt
Instructions
Phase 1: Prepare the Ice Cream Dome (At least 6 hours ahead, preferably overnight)
-
- Line the Mold: Line your chosen freezer-proof bowl completely with plastic wrap, leaving plenty of overhang. This will help you easily remove the molded ice cream.
-
- Pack the Ice Cream: Allow your ice cream to soften slightly at room temperature for about 10-15 minutes, just until it’s spreadable but not melted. If using multiple flavors, you can layer them or swirl them into the bowl.
-
- Fill the Mold: Scoop the softened ice cream into the lined bowl, pressing it down firmly with the back of a spoon to eliminate air pockets. Smooth the surface (which will become the bottom of your ice cream dome).
-
- Cover and Freeze Solid: Cover the surface of the ice cream with the overhanging plastic wrap. Place the bowl in the freezer and freeze for at least 6 hours, or preferably overnight, until the ice cream is absolutely rock solid. This is CRUCIAL.
Phase 2: Prepare the Cake Base and Initial Assembly (When ready to make meringue)
-
- Trim the Cake: If necessary, trim your cake layer so it’s about 2.5cm (1 inch) larger in diameter than the top of your ice cream mold. This creates a platform for the ice cream and a base for the meringue to seal against. Place the cake layer on an ovenproof serving platter or a baking sheet lined with parchment paper.
-
- Unmold the Ice Cream: Once the ice cream is frozen solid, remove it from the freezer. Use the plastic wrap overhang to lift the dome of ice cream out of the bowl. Peel off the plastic wrap.
-
- Position Ice Cream on Cake: Quickly center the ice cream dome, flat-side down, onto the cake base.
-
- Return to Freezer: Immediately return the cake and ice cream assembly to the freezer while you prepare the meringue. It needs to stay as cold as possible. Keep it in the freezer for at least 30 more minutes.
Phase 3: Make the Swiss Meringue
-
- Prepare Bain-Marie: Fill a saucepan with a few inches of water and bring it to a simmer over medium heat. Find a heatproof bowl (preferably the bowl of your stand mixer if it’s metal) that fits snugly over the saucepan without touching the simmering water.
-
- Combine Ingredients: In the heatproof bowl, combine the egg whites, granulated sugar, cream of tartar (if using), and pinch of salt. Whisk them together briefly by hand.
-
- Heat Egg White Mixture: Place the bowl over the simmering water. Whisk constantly and gently until the sugar has completely dissolved and the mixture is warm to the touch. This usually takes about 3-5 minutes. If you have a kitchen thermometer, it should reach about 60-70°C (140-160°F). To test if the sugar is dissolved, rub a little of the mixture between your fingers; it should feel smooth, not gritty.
-
- Whip the Meringue: Carefully remove the bowl from the heat. If using a stand mixer, attach the whisk attachment. If using a hand mixer, proceed in the same bowl. Beat the warm egg white mixture on low speed for a minute, then gradually increase the speed to high.
-
- Beat to Stiff, Glossy Peaks: Continue to beat on high speed for 8-12 minutes, or until the meringue is very thick, glossy, and forms stiff, upright peaks when the whisk is lifted. The outside of the bowl should feel cool to the touch. Beat in the vanilla extract during the last minute of whipping. The meringue should be stable and voluminous.
Phase 4: Assemble and Brown the Baked Alaska
-
- Preheat Oven (if baking): If you plan to brown the Baked Alaska in the oven, preheat it to a very high temperature – 230-250°C (450-475°F). Make sure your oven rack is positioned in the middle.
-
- Retrieve from Freezer: Working quickly, remove the cake and ice cream assembly from the freezer.
-
- Cover with Meringue: Immediately cover the entire ice cream dome and cake base with the prepared Swiss meringue. Use an offset spatula to spread it generously and evenly, ensuring there are NO GAPS. The meringue must completely seal the ice cream all the way down to the parchment paper or platter. Create decorative swirls and peaks with the spatula, or transfer the meringue to a piping bag fitted with a large star tip and pipe it decoratively over the surface. The thicker the meringue layer, the better the insulation.
-
- Brown the Meringue: You have two options:
-
- Oven Method: Quickly place the assembled Baked Alaska into the preheated oven. Bake for just 3-5 minutes, watching it like a hawk, until the meringue is beautifully golden brown all over.
-
- Kitchen Torch Method (Preferred for control): If you have a kitchen torch, this method gives you more control and avoids heating the entire dessert as much. Hold the torch a few inches away from the meringue and move it continuously to toast the peaks and swirls until golden brown.
-
- Brown the Meringue: You have two options:
-
- Serve Immediately: Once the meringue is browned, serve the Baked Alaska immediately.
Nutrition
- Serving Size: one normal portion
- Calories: 400-600