

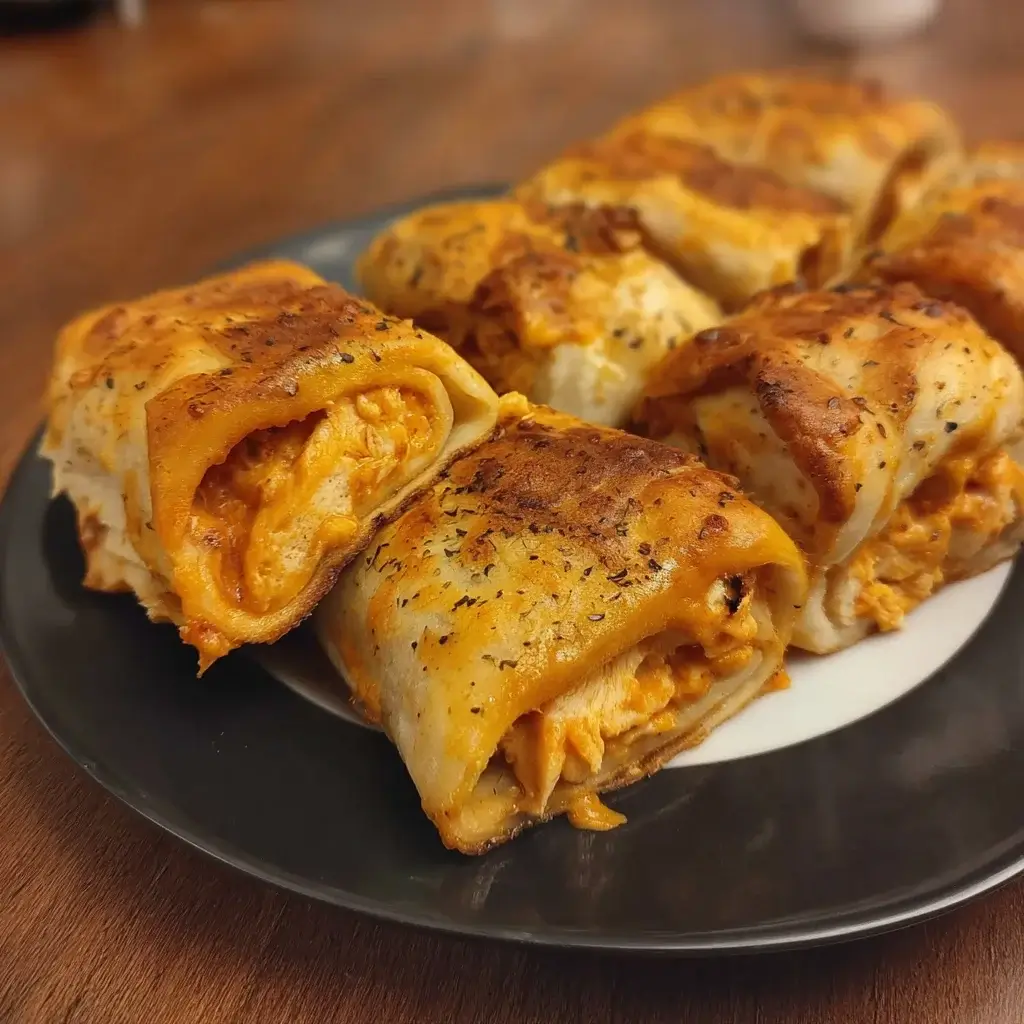

I’ll be honest, my air fryer sat in its box for an embarrassingly long time. I was a skeptic, convinced it was just another countertop gadget destined to collect dust. Then came the impromptu game day gathering. I had friends coming over in two hours, a package of chicken breasts, and a desperate need for a crowd-pleasing appetizer that didn’t involve a vat of hot oil. That’s when I finally unboxed the air fryer and threw together a concoction I now call Air Fryer Buffalo Chicken Roll Ups. I mixed shredded chicken with creamy, tangy buffalo sauce and cheese, rolled it all up in flour tortillas, and hoped for the best. What emerged from that basket 10 minutes later was nothing short of a culinary revelation. The tortillas had transformed into an impossibly crispy, golden-brown shell, shattering with each bite. Inside, the filling was a molten river of spicy, cheesy, creamy goodness. They disappeared from the platter in minutes, with my friends begging for the recipe. These roll-ups are now my go-to for literally any occasion—they have the soul of a messy plate of buffalo wings but are delivered in a neat, easy-to-eat, and addictively crunchy package.
Why These Air Fryer Buffalo Chicken Roll Ups are a Certified Hit
This recipe is more than just a quick snack; it’s a perfect example of how the air fryer can revolutionize your cooking. It takes a classic, beloved flavor profile and makes it faster, easier, and arguably more delicious. Here’s a deeper look at why this recipe works so well and will undoubtedly become a favorite in your household.
- The Air Fryer Advantage: Unbeatable Crunch without the Grease: The number one reason this recipe is a knockout is the texture. Traditional rolled tacos or chimichangas are deep-fried to achieve their signature crunch, which is messy, uses a ton of oil, and can leave them feeling heavy and greasy. The air fryer circulates superheated air around each roll up, creating an intensely crispy, blistered, and golden-brown exterior that mimics the texture of deep-frying with just a light spritz of oil. You get all the satisfying crunch with a fraction of the fat, making them feel lighter and letting the flavor of the filling shine through.
- The Perfect Marriage of Creamy and Spicy: The filling is the heart of this dish, and it’s all about balance. The star is the tangy, spicy kick of a good buffalo sauce. However, pure buffalo sauce can be overwhelmingly sharp. This recipe mellows it perfectly with the addition of softened cream cheese and your choice of ranch or blue cheese dressing. The cream cheese adds a rich, velvety body and a slight tang that complements the vinegar in the hot sauce, while the dressing provides a cooling, herbaceous counterpoint. This creamy base ensures that every bite is a perfect harmony of spicy heat and smooth, luscious texture.
- Effortless Preparation for Any Occasion: Life is busy, and recipes that demand hours of prep are often unrealistic. These buffalo chicken roll ups are the epitome of low-effort, high-reward cooking. Using pre-cooked, shredded chicken (a rotisserie chicken is your best friend here) means the filling comes together in a single bowl in under five minutes. Rolling them up is quick and easy, and the air fryer does the rest of the work in about 10 minutes. This makes them an ideal solution for last-minute party appetizers, a quick and exciting weeknight dinner, or a satisfying after-school snack for hungry kids.
- Completely Customizable to Your Taste: This recipe is a fantastic template that you can easily adapt to your personal preferences. Is your family sensitive to heat? Use a mild buffalo sauce and add a little extra ranch dressing. Are you a certified spice lover? Use a ghost pepper-based wing sauce and add a dash of cayenne pepper to the filling. You can also get creative with the add-ins. A handful of finely diced celery can add a nice crunch, crumbled bacon can add a salty, smoky depth, and switching up the cheese from cheddar to a jalapeño-infused Monterey Jack can add another layer of flavor and heat.
- Neat, Tidy, and Perfect for Parties: Let’s face it, traditional chicken wings are delicious but notoriously messy. These roll-ups deliver all that iconic buffalo flavor in a clean, self-contained, and easy-to-handle package. There are no saucy fingers or piles of bones to deal with. Their individual, log-like shape makes them perfect for arranging on a platter and for guests to grab and enjoy while mingling. They are the ultimate party food: impressive, universally loved, and incredibly convenient.
Complete Ingredients for Buffalo Chicken Roll Ups
For the best flavor and texture, use good quality ingredients. Freshly shredded cheese melts better than pre-bagged, and using a rotisserie chicken is a fantastic time-saving hack.
For the Creamy Buffalo Chicken Filling:
- Cooked Chicken: 2 cups, shredded (a rotisserie chicken works perfectly)
- Cream Cheese: 4 ounces (1/2 block), softened to room temperature
- Buffalo Wing Sauce: 1/2 cup (use your favorite brand, like Frank’s RedHot Wings Sauce)
- Shredded Cheddar Cheese: 1 cup, preferably shredded from a block
- Ranch or Blue Cheese Dressing: 2 tablespoons
- Green Onions: 2, finely sliced (or 1 tablespoon of chopped chives)
- Garlic Powder: 1/2 teaspoon
- Onion Powder: 1/2 teaspoon
For Assembly:
- Flour Tortillas: 8 large (burrito-size, 10-inch) tortillas
- Olive Oil Spray or Melted Butter: For coating the roll ups
For Serving (Optional):
- Ranch Dressing
- Blue Cheese Dressing
- Celery Sticks
- Carrot Sticks
Step-by-Step Instructions
Follow these simple steps for perfectly crispy, non-soggy, and flavor-packed roll ups every time.
Step 1: Prepare the Buffalo Chicken Filling
In a medium-sized mixing bowl, add the softened cream cheese. It is crucial that the cream cheese is at room temperature to ensure it mixes smoothly without lumps. Use a spatula or a fork to mash it against the side of the bowl until it’s creamy.
To the cream cheese, add the 1/2 cup of buffalo wing sauce, 2 tablespoons of ranch or blue cheese dressing, the garlic powder, and the onion powder. Stir everything together until you have a smooth, uniform, and vibrant orange-colored sauce.
Add the 2 cups of shredded chicken, 1 cup of shredded cheddar cheese, and the finely sliced green onions to the bowl. Use your spatula to fold and mix all the ingredients together until every shred of chicken is thoroughly coated in the creamy buffalo mixture.
Step 2: Assemble the Roll Ups
Lay a flour tortilla flat on a clean work surface. To make the tortillas more pliable and prevent them from cracking when you roll them, you can warm them slightly. Stack the tortillas on a plate, cover them with a damp paper towel, and microwave for 20-30 seconds.
Spoon approximately 1/4 to 1/3 cup of the buffalo chicken filling onto the lower third of one tortilla. Spread it out into a horizontal log shape, leaving about a 1-inch border on the left and right sides.
Fold the left and right sides of the tortilla in over the edges of the filling. This will seal the ends and prevent the filling from oozing out in the air fryer. Starting from the bottom (the side closest to you), roll the tortilla up as tightly as you can into a neat, compact log. If needed, you can secure the final seam with a toothpick, but a tight roll is often sufficient. Repeat this process with the remaining tortillas and filling.
Step 3: Prepare for Air Frying
Preheat your air fryer to 380°F (190°C) for about 3-5 minutes.
Lightly spray the entire outside of each roll up with olive oil spray or brush them with a thin layer of melted butter. This is the key to achieving that super crispy, golden-brown, fried-like texture.
Step 4: Air Fry to Crispy Perfection
Place the roll ups in the air fryer basket in a single layer, seam-side down. It is very important not to overcrowd the basket. Cook them in batches if necessary to ensure the hot air can circulate freely around each one.
Air fry at 380°F (190°C) for 8-12 minutes, flipping them over halfway through the cooking time. The roll ups are done when they are a deep golden brown, feel crisp to the touch, and the filling is hot and bubbly. Cooking time may vary slightly depending on your specific air fryer model.
Step 5: Rest and Serve
Carefully remove the hot roll ups from the air fryer basket using tongs. Let them rest for 2-3 minutes before serving. This allows the molten cheese filling to set up slightly. Serve immediately with your favorite dipping sauces like ranch or blue cheese dressing and classic veggie sticks.
Nutrition Facts
Please note, this is an estimation. The final nutritional value will depend on the specific brands of tortillas, sauce, cheese, and dressing you use.
- Servings: 8 roll ups
- Calories per serving: Approximately 350-450 kcal per roll up
Preparation Time
- Prep Time: 15 minutes
- Cook Time: 10 minutes per batch
- Total Time: Approximately 25 minutes
How to Serve Air Fryer Buffalo Chicken Roll Ups
These versatile roll ups can be the star of a party platter or a satisfying weeknight dinner. Here’s how to serve them for maximum enjoyment.
- The Classic Appetizer Platter:
- Dipping Sauces: The quintessential pairing. Set out small bowls of creamy ranch dressing and tangy blue cheese dressing. An extra bowl of warm buffalo sauce is also a great option for those who want an extra kick.
- Cooling Veggie Sticks: Arrange classic celery and carrot sticks on the platter. Their cool, crisp crunch is the perfect refreshing contrast to the warm, spicy, and creamy roll ups.
- Presentation: Slice the roll ups in half on a diagonal to show off the beautiful cheesy filling. Arrange them on a large platter surrounded by the sauces and veggies for a visually appealing and inviting spread.
- As a Fun and Easy Main Course:
- Serving Size: Serve two to three whole roll ups per person.
- Side Salad: Pair them with a simple side salad to make it a more balanced meal. A crisp wedge salad with blue cheese dressing and bacon bits is a fantastic thematic pairing. A simple mixed green salad with a light vinaigrette also works well to cut through the richness.
- Other Sides: A side of seasoned french fries, tater tots, or a simple corn salad would also complement the dish beautifully.
- Game Day Glory:
- The Ultimate Snack Spread: Make these roll ups part of a larger game day feast. They sit perfectly alongside other air-fried favorites like jalapeño poppers, mozzarella sticks, and potato skins.
- Keep them Warm: If you’re serving a crowd over a longer period, you can keep the cooked roll ups warm in an oven set to 200°F (95°C) on a wire rack set inside a baking sheet.
Additional Tips for a Flawless Result
These five tips will help you master this recipe and troubleshoot any potential issues.
1. Warm Your Tortillas to Prevent Cracking
Flour tortillas straight out of the package, especially if they are cold, can be stiff and prone to cracking and tearing when you try to roll them tightly. The easiest way to avoid this is to warm them first. Stack them, wrap them in a slightly damp paper towel, and microwave for 20-30 seconds. This makes them soft, steamy, and pliable, allowing you to create a very tight, neat roll without any breakage.
2. Don’t Overfill the Roll Ups
It’s tempting to pack as much of that delicious filling into each tortilla as possible, but this is a common mistake. Overfilling makes the tortillas difficult to roll tightly and, more importantly, increases the risk of the filling exploding out of the sides during the cooking process. Stick to a modest 1/4 to 1/3 cup of filling per large tortilla, spread it out evenly, and leave a clear border around the edges.
3. Freshly Shredded Cheese is Superior
While convenient, pre-shredded bagged cheese contains additives like potato starch and cellulose to prevent the shreds from clumping. These anti-caking agents inhibit melting, leading to a less gooey and sometimes slightly grainy texture. For the ultimate creamy, ooey-gooey cheese pull, buy a block of sharp cheddar and shred it yourself just before mixing the filling. The difference in meltability is significant.
4. Give Them Space in the Air Fryer
The magic of the air fryer comes from the hot air circulating around the food. If you overcrowd the basket, the roll ups will steam instead of “frying.” This results in a soft, sometimes soggy exterior instead of the crispy, golden shell you’re aiming for. Always place the roll ups in a single layer with space between each one. Cook in batches if your air fryer is small. It’s worth the extra few minutes.
5. Prep Them Ahead for Ultimate Convenience
You can fully assemble the roll ups (through Step 2) hours or even a day ahead of time. Place the rolled, uncooked roll ups on a baking sheet lined with parchment paper, making sure they aren’t touching. Cover them tightly with plastic wrap and refrigerate. When you’re ready to eat, simply take them out, spray them with oil, and air fry as directed. This is a fantastic strategy for stress-free party planning.
Frequently Asked Questions (FAQ)
Here are answers to some of the most common questions about making these air fryer roll ups.
1. Can I make these in a conventional oven if I don’t have an air fryer?
Yes, you absolutely can! The texture won’t be quite as crispy as the air fryer version, but they will still be delicious. To bake them, preheat your oven to 425°F (220°C). Assemble the roll ups as directed and place them seam-side down on a baking sheet lined with parchment paper or a wire rack. Spray or brush them with oil, just as you would for the air fryer. Bake for 15-20 minutes, flipping them once halfway through, until they are golden brown and crisp.
2. What is the easiest way to get shredded chicken?
The absolute easiest and most flavorful option is to buy a pre-cooked rotisserie chicken from the grocery store. Simply pull the meat off the bones and shred it with two forks. Alternatively, you can easily cook your own. Place two boneless, skinless chicken breasts in a pot, cover with water or chicken broth, bring to a boil, then reduce to a simmer and cook for 15-20 minutes until cooked through. Let them cool slightly before shredding. You can also shred them easily by placing the warm, cooked chicken breasts in the bowl of a stand mixer with the paddle attachment and mixing on low speed for 30 seconds.
3. How can I adjust the spice level?
This recipe is very easy to customize to your preferred heat level. For a milder version, use a sauce labeled “Mild Buffalo Sauce” and consider increasing the amount of ranch or blue cheese dressing to add more cooling creaminess. For a spicier version, use a “Hot” buffalo sauce, add a few dashes of your favorite hot sauce (like Tabasco or Cholula) to the filling, or mix in 1/4 teaspoon of cayenne pepper.
4. Can I freeze these buffalo chicken roll ups?
Yes, they freeze beautifully, making them a great make-ahead snack. You can freeze them either before or after cooking.
- To Freeze Uncooked: Assemble the roll ups, but don’t spray them with oil. Place them on a baking sheet and “flash freeze” for one hour until solid. Then, transfer them to a freezer-safe zip-top bag. They can be air-fried directly from frozen; just add 4-6 minutes to the total cooking time.
- To Freeze Cooked: Let the cooked roll ups cool completely. Flash freeze them on a baking sheet, then transfer to a freezer bag. Reheat them in the air fryer at 350°F (175°C) for 6-8 minutes, or until heated through and re-crisped.
5. My tortillas got too dark on the outside before the filling was hot. What went wrong?
This usually means your air fryer’s temperature was too high. All air fryers heat a little differently, and some models run hotter than others. If the outside is browning too quickly, the heat doesn’t have enough time to penetrate and warm the cheesy filling. The solution is to lower the temperature slightly—try 360°F or 370°F—and increase the cooking time by a few minutes. This will allow the roll ups to cook more evenly, crisping the outside while ensuring the inside is perfectly hot and melted.

Air Fryer Buffalo Chicken Roll Ups recipe
Ingredients
For the Creamy Buffalo Chicken Filling:
-
Cooked Chicken: 2 cups, shredded (a rotisserie chicken works perfectly)
-
Cream Cheese: 4 ounces (1/2 block), softened to room temperature
-
Buffalo Wing Sauce: 1/2 cup (use your favorite brand, like Frank’s RedHot Wings Sauce)
-
Shredded Cheddar Cheese: 1 cup, preferably shredded from a block
-
Ranch or Blue Cheese Dressing: 2 tablespoons
-
Green Onions: 2, finely sliced (or 1 tablespoon of chopped chives)
-
Garlic Powder: 1/2 teaspoon
-
Onion Powder: 1/2 teaspoon
For Assembly:
-
Flour Tortillas: 8 large (burrito-size, 10-inch) tortillas
-
Olive Oil Spray or Melted Butter: For coating the roll ups
Instructions
Step 1: Prepare the Buffalo Chicken Filling
In a medium-sized mixing bowl, add the softened cream cheese. It is crucial that the cream cheese is at room temperature to ensure it mixes smoothly without lumps. Use a spatula or a fork to mash it against the side of the bowl until it’s creamy.
To the cream cheese, add the 1/2 cup of buffalo wing sauce, 2 tablespoons of ranch or blue cheese dressing, the garlic powder, and the onion powder. Stir everything together until you have a smooth, uniform, and vibrant orange-colored sauce.
Add the 2 cups of shredded chicken, 1 cup of shredded cheddar cheese, and the finely sliced green onions to the bowl. Use your spatula to fold and mix all the ingredients together until every shred of chicken is thoroughly coated in the creamy buffalo mixture.
Step 2: Assemble the Roll Ups
Lay a flour tortilla flat on a clean work surface. To make the tortillas more pliable and prevent them from cracking when you roll them, you can warm them slightly. Stack the tortillas on a plate, cover them with a damp paper towel, and microwave for 20-30 seconds.
Spoon approximately 1/4 to 1/3 cup of the buffalo chicken filling onto the lower third of one tortilla. Spread it out into a horizontal log shape, leaving about a 1-inch border on the left and right sides.
Fold the left and right sides of the tortilla in over the edges of the filling. This will seal the ends and prevent the filling from oozing out in the air fryer. Starting from the bottom (the side closest to you), roll the tortilla up as tightly as you can into a neat, compact log. If needed, you can secure the final seam with a toothpick, but a tight roll is often sufficient. Repeat this process with the remaining tortillas and filling.
Step 3: Prepare for Air Frying
Preheat your air fryer to 380°F (190°C) for about 3-5 minutes.
Lightly spray the entire outside of each roll up with olive oil spray or brush them with a thin layer of melted butter. This is the key to achieving that super crispy, golden-brown, fried-like texture.
Step 4: Air Fry to Crispy Perfection
Place the roll ups in the air fryer basket in a single layer, seam-side down. It is very important not to overcrowd the basket. Cook them in batches if necessary to ensure the hot air can circulate freely around each one.
Air fry at 380°F (190°C) for 8-12 minutes, flipping them over halfway through the cooking time. The roll ups are done when they are a deep golden brown, feel crisp to the touch, and the filling is hot and bubbly. Cooking time may vary slightly depending on your specific air fryer model.
Step 5: Rest and Serve
Carefully remove the hot roll ups from the air fryer basket using tongs. Let them rest for 2-3 minutes before serving. This allows the molten cheese filling to set up slightly. Serve immediately with your favorite dipping sauces like ranch or blue cheese dressing and classic veggie sticks.
Nutrition
- Serving Size: one normal portion
- Calories: 350-450 kcal


