


Of all the culinary experiments I’ve conducted in my kitchen, few have been as surprisingly delightful as baking bread in my air fryer. I was skeptical, to say the least. My trusty oven has always been my go-to for achieving that perfect, golden-brown crust and soft, airy crumb. The idea of entrusting such a delicate process to a compact countertop appliance seemed almost sacrilegious. But one busy Tuesday evening, with a craving for fresh bread and no desire to heat the entire house, I decided to give it a try. The result was nothing short of a revelation. A small, perfectly formed loaf emerged, with a crust so audibly crispy it made my family come running. The inside was steamy, tender, and every bit as delicious as its oven-baked counterpart. It has since become our “emergency bread” – the quick, no-fuss loaf we can whip up for a weeknight soup or a weekend brunch. It’s a game-changer, proving that you don’t need a huge oven or hours of time to enjoy the simple, profound pleasure of homemade bread.
Why You’ll Fall in Love with This Air Fryer Bread Recipe
Baking bread can feel like a monumental task, but this recipe harnesses the power of your air fryer to make it accessible, fast, and incredibly rewarding. If you’re on the fence, here are a few reasons why this will become your new favorite way to bake:
- Energy and Time Efficient: Forget preheating a massive oven for a single loaf. The air fryer heats up in minutes and uses significantly less energy, making it a more economical and eco-friendly choice for small-batch baking.
- Perfect for Beginners: This is a fantastic entry point into the world of bread making. The process is straightforward, the ingredient list is simple, and the hands-on time is minimal. The contained environment of the air fryer provides a consistent heat that is very forgiving.
- Unbelievable Texture: The magic of an air fryer is its powerful convection fan, which circulates hot air at high speed. For bread, this translates into a magnificent crust. You get a deeply golden, shatteringly crisp exterior that gives way to a surprisingly soft and fluffy interior.
- Ideal for Small Households: This recipe yields a perfect “boule” or small loaf, ideal for one or two people. There’s no waste, and you can enjoy the unparalleled taste of freshly baked bread whenever you like without committing to a giant loaf that might go stale.
- Year-Round Baking: On a sweltering summer day, the last thing anyone wants is to turn on the oven and heat up the entire kitchen. The air fryer keeps the heat contained, allowing you to enjoy fresh, warm bread even in the middle of July.
The Science: Can You Really Bake Bread in an Air Fryer?
The short answer is a resounding yes! To understand why, it’s helpful to remember what an air fryer actually is: a small, high-powered convection oven. It doesn’t “fry” in the traditional sense; it bakes and roasts by circulating superheated air around the food.
This very mechanism is what makes it so brilliant for bread. Here’s a breakdown of the science at play:
- Rapid, Even Heat: The compact size and powerful fan ensure that the dough is hit with consistent, even heat from all sides. This contributes to a phenomenon called “oven spring,” where the yeast gets a final, vigorous burst of activity before it dies, causing the loaf to puff up beautifully.
- The Maillard Reaction on Overdrive: The intense, dry heat is perfect for promoting the Maillard reaction—a chemical reaction between amino acids and reducing sugars that gives browned food its distinctive flavor and color. This is why the crust on air fryer bread gets so deeply golden and flavorful in a relatively short amount of time.
- A Contained, Steamy Environment: While the air is dry, the moisture escaping from the dough itself gets trapped in the small basket, creating a steamy environment during the initial phase of baking. This steam keeps the crust soft at the beginning, allowing the loaf to expand to its full potential before the crust sets and becomes crisp. It mimics the effect of a professional baker’s steam-injected oven on a much smaller scale.
So, you’re not just “making do” by using an air fryer; you’re leveraging its unique properties to create a loaf with a character and texture all its own.
Essential Equipment for Air Fryer Baking
While the recipe is simple, having the right tools will make the process seamless. You don’t need much, but these items are key.
The Air Fryer Itself
Not all air fryers are created equal when it comes to baking.
- Basket-Style vs. Oven-Style: Both will work, but a basket-style air fryer with a flat bottom is often easier for this type of recipe.
- Size Matters: The most important factor is the size of your air fryer’s basket or tray. You need to ensure your baking pan or the dough itself has at least an inch of clearance on all sides to allow for proper air circulation. A 5-quart or larger air fryer is ideal.
The Perfect Baking Vessel
You can’t just toss the dough into the basket. You’ll need a container to help it hold its shape.
- Mini Loaf Pan: A small metal or silicone loaf pan (around 6×3 inches) is a great option for a traditionally shaped sandwich loaf.
- Small Cake Pan: A 6-inch round cake pan or springform pan is perfect for creating a round “boule” shape. Ensure it’s not too tall for your air fryer.
- Parchment Paper with a Sling: This is a brilliant hack. You can create a “sling” out of parchment paper to easily lower your dough into the hot air fryer basket and lift it out when it’s done. This is especially useful for free-form rustic loaves.
- Silicone Molds: Heat-safe silicone molds are flexible, non-stick, and work wonderfully in an air fryer.
Ingredient Spotlight: The Building Blocks of Your Bread
This recipe uses a handful of pantry staples. Understanding the role of each ingredient will not only make you a better baker but will also empower you to troubleshoot and experiment down the line.
Flour: The Foundation
For this recipe, you can use either All-Purpose Flour or Bread Flour.
- Bread Flour: This is the preferred choice. It has a higher protein content (typically 12-14%), which develops into stronger gluten strands. Gluten is what gives bread its structure and that satisfying, chewy texture.
- All-Purpose Flour: This will also work beautifully! Your bread might be slightly softer and less chewy, with a more tender crumb, which many people prefer. It has a moderate protein content (10-12%).
Yeast: The Magic Ingredient
Yeast is a living organism that eats the sugars in the flour and releases carbon dioxide gas. These gas bubbles are what make the bread rise.
- Instant Yeast (or Rapid-Rise): This is what the recipe calls for. It can be mixed directly in with the dry ingredients and doesn’t require activation. It’s reliable and fast-acting.
- Active Dry Yeast: If this is all you have, you can absolutely use it. However, you’ll need to “proof” or activate it first. To do this, dissolve the yeast in the warm water with the sugar and let it sit for 5-10 minutes until it becomes foamy. This proves the yeast is alive and ready to work. Use the same amount as called for in the recipe.
Liquid: The Hydrator
- Water: The temperature is crucial. It should be warm to the touch, like a baby’s bath (around 105-115°F or 40-46°C). Too cold, and the yeast won’t activate properly. Too hot, and you’ll kill the yeast.
Sweetener: The Yeast’s Fuel
- Granulated Sugar or Honey: A small amount of sugar does more than add a hint of flavor. Its primary role is to provide readily available food for the yeast, helping it to activate quickly and kickstart the fermentation process.
Salt: The Flavor and Control
- Fine Sea Salt or Kosher Salt: Salt is non-negotiable in bread. It not only provides essential flavor (bread without salt is bland and flat) but also plays a vital role in strengthening the gluten structure and regulating the yeast’s activity, preventing it from fermenting too quickly.
Fat: The Tenderizer
- Olive Oil or Melted Butter: Fat enriches the dough, resulting in a softer crumb, a more flavorful crust, and a longer shelf life. It coats the gluten strands, which shortens them slightly, leading to a more tender final product.
Air Fryer Bread: A Complete Step-by-Step Guide
This recipe is designed for simplicity and success. Follow these steps closely, and you’ll be rewarded with a beautiful, delicious loaf.
Complete Ingredients List
- 2 ½ cups (300g) Bread Flour or All-Purpose Flour, plus more for dusting
- 1 ½ teaspoons (6g) Instant Yeast
- 1 ½ teaspoons (7g) Granulated Sugar or Honey
- 1 teaspoon (6g) Fine Sea Salt
- 1 cup (240ml) Warm Water (105-115°F / 40-46°C)
- 1 tablespoon (15ml) Olive Oil or Melted Unsalted Butter
Instructions
Step 1: Combine the Dry Ingredients
In the bowl of a stand mixer fitted with the dough hook attachment, or in a large mixing bowl, whisk together the flour, instant yeast, sugar, and salt. This ensures all the ingredients are evenly distributed before you add the liquid.
Step 2: Add Wet Ingredients and Mix
Pour the warm water and olive oil into the bowl with the dry ingredients. Mix on low speed with the dough hook until a shaggy, cohesive dough begins to form. If mixing by hand, use a wooden spoon or spatula to bring the ingredients together.
Step 3: Knead the Dough
Increase the mixer speed to medium-low and knead the dough for 6-8 minutes. The dough should become smooth, elastic, and pull away from the sides of the bowl. It should be slightly tacky but not sticky. To check for doneness, perform the “windowpane test”: tear off a small piece of dough and gently stretch it between your fingers. If you can stretch it thin enough to see light through it without it tearing, the gluten is well-developed.
- By Hand: If kneading by hand, turn the dough out onto a lightly floured surface. Knead for 8-10 minutes by pushing the dough away from you with the heel of your hand, folding it over, giving it a quarter turn, and repeating. It’s a great workout and very satisfying!
Step 4: The First Rise (Bulk Fermentation)
Lightly oil the mixing bowl you used (no need to wash it). Form the kneaded dough into a smooth ball and place it in the bowl, turning it over once to coat it lightly with oil. Cover the bowl with plastic wrap or a damp kitchen towel. Let it rise in a warm, draft-free spot for 1 to 1.5 hours, or until it has doubled in size.
Step 5: Shape the Loaf
Gently punch down the risen dough to release the air. Transfer it to a lightly floured surface. Gently knead it for a minute, then shape it into your desired form.
- For a Round Boule: Gently flatten the dough into a disc, then fold the edges into the center, pinching them together to create a seam. Flip the dough over so the seam is on the bottom and use your cupped hands to rotate the ball on the counter, creating surface tension for a tight, smooth ball.
- For a Small Loaf: Pat the dough into a rectangle, then roll it up tightly into a log shape, pinching the seam and ends to seal.
Step 6: The Second Rise (Proofing)
Place your shaped dough into your prepared baking pan (e.g., a 6-inch cake pan lined with parchment paper) or directly onto a piece of parchment paper that will fit in your air fryer basket. Cover it loosely with plastic wrap and let it rise again for another 30-45 minutes, or until it looks puffy and has increased in size by about 50%.
Step 7: Prepare the Air Fryer and Bake
About 5 minutes before the second rise is complete, preheat your air fryer to 350°F (175°C). Once the dough has finished its second rise, you can optionally brush the top with a little milk or an egg wash for a shinier crust, or score the top with a sharp knife or razor blade to control how it expands.
Carefully place the pan or the parchment sling with the dough into the preheated air fryer basket. Bake for 18-22 minutes.
Step 8: Check for Doneness and Cool
The bread is done when the crust is a deep golden brown, and it sounds hollow when you tap the bottom. For ultimate precision, use an instant-read thermometer; the internal temperature should be between 190°F and 200°F (88°C and 93°C). If the top is browning too quickly, you can loosely cover it with a small piece of aluminum foil for the last 5-7 minutes of baking.
Carefully remove the bread from the air fryer and transfer it to a wire cooling rack. It is crucial to let the bread cool for at least 30 minutes before slicing. This allows the internal structure to set; cutting into it while it’s hot can result in a gummy texture.
Nutrition Facts
- Servings: 8 slices
- Calories per serving: Approximately 165 kcal
Disclaimer: Nutritional information is an estimate and can vary based on the specific ingredients and brands used.
Preparation Time Breakdown
- Active Prep Time: 15 minutes (mixing and kneading)
- First Rise: 1 hour to 1.5 hours
- Second Rise: 30 to 45 minutes
- Cook Time: 18 to 22 minutes
- Total Time: Approximately 2 hours 30 minutes
How to Serve Your Homemade Air Fryer Bread
The beauty of a fresh loaf is its versatility. Here are some of our favorite ways to enjoy it, from sunrise to sunset.
- For a Perfect Breakfast:
- Thickly sliced and toasted, slathered with salted butter and raspberry jam.
- As the base for the ultimate avocado toast, topped with everything bagel seasoning.
- Cubed and turned into decadent French toast sticks, perfect for dipping in maple syrup.
- As a side for scrambled eggs and bacon.
- For a Satisfying Lunch:
- The star of a classic grilled cheese sandwich, paired with a hearty tomato soup.
- Sliced for a robust turkey and Swiss or a Caprese sandwich with fresh mozzarella, tomatoes, and basil.
- Toasted and cut into croutons to elevate any salad.
- As an open-faced sandwich with tuna melt or egg salad.
- For a Hearty Dinner:
- Served alongside a rich beef stew or a creamy chicken noodle soup for dipping.
- Toasted and rubbed with a garlic clove, then drizzled with olive oil to create instant bruschetta.
- As the perfect vehicle for mopping up the last bits of pasta sauce from your plate.
- As the base for mini pizzas, topped with sauce, cheese, and your favorite toppings and popped back in the air fryer for a few minutes.
5 Additional Tips for Flawless Air Fryer Bread
- Know Your Machine: Every air fryer brand and model cooks a little differently. Your first loaf is a learning experience. It might cook faster or need a minute or two longer than the recipe states. Use an instant-read thermometer for guaranteed perfect results every time.
- The Parchment Paper Sling is Your Best Friend: Creating a “sling” by leaving two sides of the parchment paper long makes it incredibly easy and safe to lower your proofed dough into a hot air fryer basket and lift the finished loaf out without any risk of burns or dropping the bread.
- Don’t Be Afraid to Tent with Foil: If you notice the top of your loaf is getting very dark before the baking time is up, don’t panic. Loosely place a small piece of aluminum foil over the top. This will shield the crust from the direct heat, allowing the inside of the loaf to finish cooking through without burning the top.
- Create a Humid Environment for Rising: If your house is cold or dry, it can slow down the rise. Create a DIY proofing box by placing your covered bowl of dough in an oven (that is turned OFF) with a pan of hot, steamy water on the rack below it. The warm, humid air will encourage the yeast to be more active.
- Let It Cool Completely (Seriously!): We can’t stress this enough. The temptation to slice into a warm, fragrant loaf is immense. But while the bread is cooling, it’s still cooking internally. The steam is redistributing, and the starches are setting. Slicing too early will halt this process, leading to a gummy, doughy texture. Patience will be rewarded with the perfect slice.
Frequently Asked Questions (FAQ)
1. Do I absolutely need to preheat my air fryer for this recipe?
Yes, preheating is highly recommended. Dropping the dough into a hot environment gives it that initial blast of heat needed for a good oven spring, helping it rise beautifully. It also ensures the baking time is more accurate and consistent. Most air fryers only take 3-5 minutes to preheat.
2. Can I use whole wheat flour in this recipe?
You can, but it’s best to substitute it gradually. Whole wheat flour is denser and absorbs more liquid than white flour. Start by replacing 25% of the bread flour (about ½ cup + 2 tablespoons) with whole wheat flour. You may need to add an extra tablespoon or two of water to get the right dough consistency. The resulting loaf will be denser and have a nuttier flavor.
3. Can I make this air fryer bread recipe without a stand mixer?
Absolutely! This is a fantastic recipe to make by hand. You will simply combine the ingredients in a large bowl with a wooden spoon, then turn the dough out onto a lightly floured counter and knead by hand for about 8-10 minutes. It’s a very therapeutic process and connects you more with the dough.
4. My loaf came out quite small. Is that normal?
Yes, this recipe is specifically designed to create a small loaf that fits easily into most standard air fryers. It’s perfect for 1-4 people and ensures the bread gets eaten while it’s still fresh. It’s not meant to be a full-sized sandwich loaf like you’d buy at the store.
5. Can I double this recipe for a larger loaf?
It’s not recommended unless you have a very large, oven-style air fryer. Doubling the recipe would create a loaf that is likely too large for a standard air fryer basket. It would be too close to the heating element, causing the top to burn, and would prevent proper air circulation, leaving the center undercooked. It’s better to bake two small loaves back-to-back.
Conclusion: Your New Favorite Kitchen Hack
Embracing your air fryer for more than just fries and chicken wings opens up a new world of culinary possibilities. This air fryer bread recipe is a testament to the appliance’s versatility and power. It demystifies the bread-making process, turning it into a simple, manageable, and deeply satisfying activity for any day of the week. The aroma of freshly baked bread filling your home is a reward in itself, but the real prize is that first bite: the crunchy, golden crust yielding to a warm, soft, and pillowy interior. So, dust off that countertop marvel, grab your flour, and prepare to be amazed. You’re just a couple of hours away from a perfect loaf of bread that will change the way you think about baking forever.
Print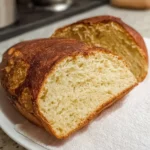
Air Fryer Bread recipe
Ingredients
-
2 ½ cups (300g) Bread Flour or All-Purpose Flour, plus more for dusting
-
1 ½ teaspoons (6g) Instant Yeast
-
1 ½ teaspoons (7g) Granulated Sugar or Honey
-
1 teaspoon (6g) Fine Sea Salt
-
1 cup (240ml) Warm Water (105-115°F / 40-46°C)
-
1 tablespoon (15ml) Olive Oil or Melted Unsalted Butter
Instructions
Step 1: Combine the Dry Ingredients
In the bowl of a stand mixer fitted with the dough hook attachment, or in a large mixing bowl, whisk together the flour, instant yeast, sugar, and salt. This ensures all the ingredients are evenly distributed before you add the liquid.
Step 2: Add Wet Ingredients and Mix
Pour the warm water and olive oil into the bowl with the dry ingredients. Mix on low speed with the dough hook until a shaggy, cohesive dough begins to form. If mixing by hand, use a wooden spoon or spatula to bring the ingredients together.
Step 3: Knead the Dough
Increase the mixer speed to medium-low and knead the dough for 6-8 minutes. The dough should become smooth, elastic, and pull away from the sides of the bowl. It should be slightly tacky but not sticky. To check for doneness, perform the “windowpane test”: tear off a small piece of dough and gently stretch it between your fingers. If you can stretch it thin enough to see light through it without it tearing, the gluten is well-developed.
-
By Hand: If kneading by hand, turn the dough out onto a lightly floured surface. Knead for 8-10 minutes by pushing the dough away from you with the heel of your hand, folding it over, giving it a quarter turn, and repeating. It’s a great workout and very satisfying!
Step 4: The First Rise (Bulk Fermentation)
Lightly oil the mixing bowl you used (no need to wash it). Form the kneaded dough into a smooth ball and place it in the bowl, turning it over once to coat it lightly with oil. Cover the bowl with plastic wrap or a damp kitchen towel. Let it rise in a warm, draft-free spot for 1 to 1.5 hours, or until it has doubled in size.
Step 5: Shape the Loaf
Gently punch down the risen dough to release the air. Transfer it to a lightly floured surface. Gently knead it for a minute, then shape it into your desired form.
-
For a Round Boule: Gently flatten the dough into a disc, then fold the edges into the center, pinching them together to create a seam. Flip the dough over so the seam is on the bottom and use your cupped hands to rotate the ball on the counter, creating surface tension for a tight, smooth ball.
-
For a Small Loaf: Pat the dough into a rectangle, then roll it up tightly into a log shape, pinching the seam and ends to seal.
Step 6: The Second Rise (Proofing)
Place your shaped dough into your prepared baking pan (e.g., a 6-inch cake pan lined with parchment paper) or directly onto a piece of parchment paper that will fit in your air fryer basket. Cover it loosely with plastic wrap and let it rise again for another 30-45 minutes, or until it looks puffy and has increased in size by about 50%.
Step 7: Prepare the Air Fryer and Bake
About 5 minutes before the second rise is complete, preheat your air fryer to 350°F (175°C). Once the dough has finished its second rise, you can optionally brush the top with a little milk or an egg wash for a shinier crust, or score the top with a sharp knife or razor blade to control how it expands.
Carefully place the pan or the parchment sling with the dough into the preheated air fryer basket. Bake for 18-22 minutes.
Step 8: Check for Doneness and Cool
The bread is done when the crust is a deep golden brown, and it sounds hollow when you tap the bottom. For ultimate precision, use an instant-read thermometer; the internal temperature should be between 190°F and 200°F (88°C and 93°C). If the top is browning too quickly, you can loosely cover it with a small piece of aluminum foil for the last 5-7 minutes of baking.
Carefully remove the bread from the air fryer and transfer it to a wire cooling rack. It is crucial to let the bread cool for at least 30 minutes before slicing. This allows the internal structure to set; cutting into it while it’s hot can result in a gummy texture.
Nutrition
- Serving Size: one normal portion
- Calories: 165


