
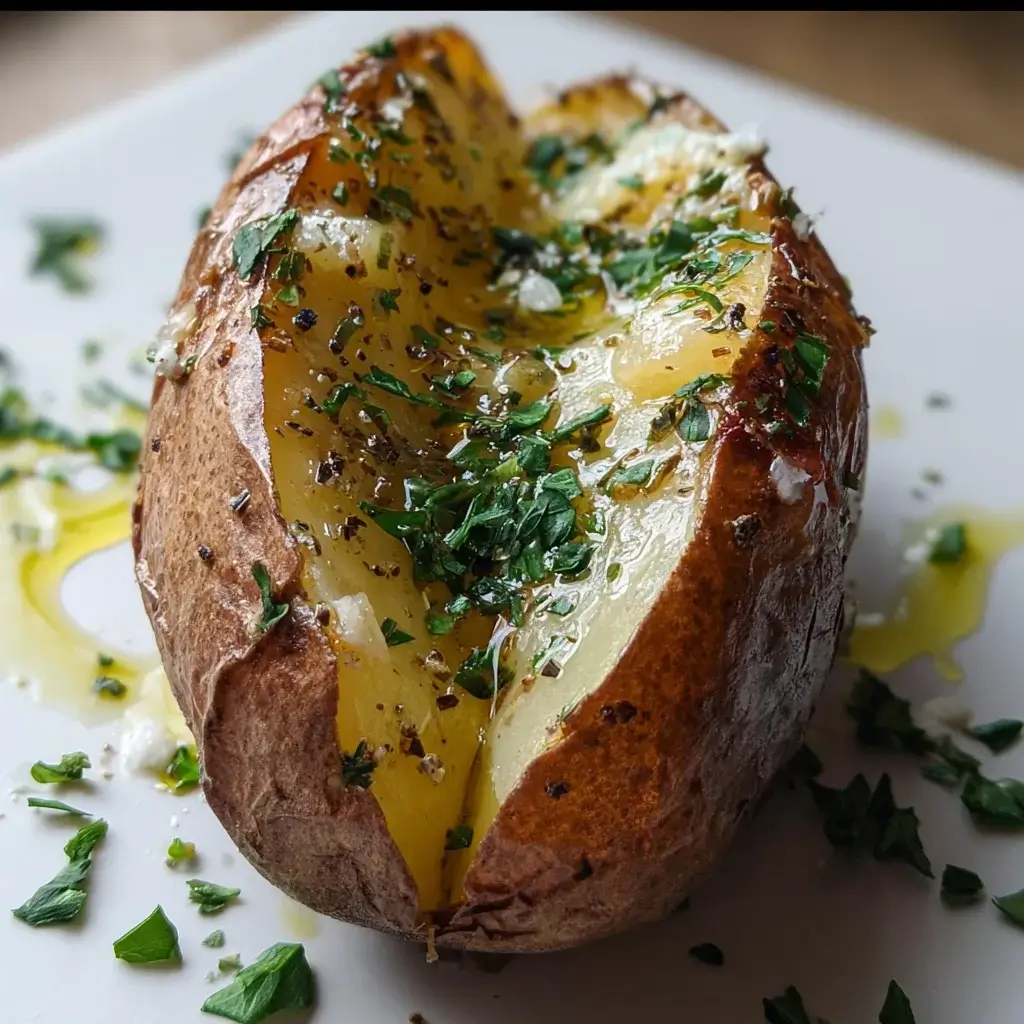

There are some kitchen moments that feel like a small, personal victory. For me, that moment arrived on a hectic Tuesday evening. The family was hungry, I was short on time, and the craving for pure, unadulterated comfort food was strong. The thought of waiting over an hour for oven-baked potatoes was deflating. On a whim, I turned to my trusty air fryer, armed with a few humble potatoes, a drizzle of good olive oil, and a sprinkle of herbs from the garden. What emerged 40 minutes later was nothing short of a revelation. The skin wasn’t just cooked; it was shatteringly crisp, crackling under the fork like a potato chip. The inside wasn’t just soft; it was impossibly fluffy, steamy, and light as a cloud. The aroma of roasted garlic and rosemary filled the kitchen, transforming a simple side dish into the star of the show. That night, the “Air Fryer Baked Potato” became a legend in our house, my secret weapon for delivering maximum comfort with minimal effort. It’s more than just a recipe; it’s a method that fundamentally changes the baked potato game, and I’m genuinely thrilled to share every detail so you can experience this same simple, delicious magic.
The Ultimate Air Fryer Baked Potato: A Symphony of Crispy and Fluffy
Before we dive into the process, let’s gather our simple yet crucial components. The beauty of this recipe lies in its minimalism, allowing the quality of each ingredient to shine. Choosing the right potato and a good quality oil is half the battle won.
Yields: 4 Servings
Prep time: 5 minutes
Cook time: 40-50 minutes
Ingredients
- Potatoes: 4 medium-sized Russet potatoes (about 6-8 ounces / 170-225g each)
- Olive Oil: 2 tablespoons of high-quality extra virgin olive oil
- Coarse Salt: 1 teaspoon of coarse sea salt or kosher salt
- Black Pepper: ½ teaspoon of freshly ground black pepper
- Dried Herbs: 1 ½ teaspoons of your favorite dried herbs (a mix of rosemary, thyme, and a pinch of garlic powder works wonders)
A Step-by-Step Guide to Air Fryer Potato Perfection
Following these instructions precisely will guarantee you achieve that coveted texture contrast: a perfectly crisp, seasoned shell giving way to a soft, steaming interior. The air fryer does most of the work; our job is to set the stage for its success.
Instructions
- Prepare the Potatoes (The Most Important Step): Begin by thoroughly scrubbing your Russet potatoes under cold running water. Use a vegetable brush to remove any dirt or residue from the skin. After washing, it is absolutely critical to dry them completely. Use a clean kitchen towel or paper towels to pat them down until there is no surface moisture left. Water is the enemy of a crispy skin, as it will create steam instead of allowing the skin to roast and dehydrate into a crispy shell.
- Puncture for Safety and Steam Release: Using the tines of a fork or a sharp paring knife, pierce each potato 5-6 times on all sides. This step is non-negotiable. Puncturing the skin allows steam to escape from the potato as it cooks. Without these vents, pressure can build up inside, leading to a potential and messy “potato explosion” in your air fryer. This also helps the interior cook more evenly.
- The Flavor Coating: Place your dry, pierced potatoes in a medium-sized bowl. Drizzle the 2 tablespoons of extra virgin olive oil over them. Next, sprinkle the coarse salt, freshly ground black pepper, and your chosen dried herbs. Use your hands to thoroughly rub the oil and seasoning mixture all over the entire surface of each potato. Ensure every inch of the skin is lightly coated. This oil is what will “fry” the skin, and the salt will draw out the last bit of moisture, guaranteeing that incredible crispiness.
- Preheat Your Air Fryer: Just like a conventional oven, preheating your air fryer is a key step for even cooking. Set your air fryer to 400°F (200°C) and let it preheat for about 3-5 minutes. This ensures that the potatoes start cooking the moment they enter the basket, giving them a head start on developing that crispy exterior.
- Arrange in the Basket: Once preheated, carefully place the seasoned potatoes in the air fryer basket in a single layer. It is crucial that you do not overcrowd the basket. There should be space around each potato for the hot air to circulate freely. This 360-degree air circulation is the magic of the air fryer, and it’s what gives you that uniformly crispy skin. If your air fryer is too small to hold all four potatoes with adequate spacing, it’s better to cook them in two batches.
- The Cooking Process: Air fry the potatoes at 400°F (200°C) for 35-50 minutes. The exact cooking time will vary depending on the size of your potatoes and the specific model of your air fryer.
- The Mid-Cook Flip: About halfway through the cooking time (around the 20-minute mark), pause the air fryer and use tongs to carefully flip each potato over. This step promotes even browning and crisping on all sides, so you don’t end up with one side that’s softer than the other.
- Check for Doneness: The potatoes are perfectly cooked when the skin is golden brown, dry to the touch, and wonderfully crispy. To check the interior, carefully pierce the thickest part of a potato with a fork or a skewer. If it slides in easily with no resistance, the inside is perfectly fluffy and cooked through. If you feel resistance, continue to cook them in 5-minute increments until they are tender.
- Rest and Serve: Using tongs, carefully remove the hot potatoes from the air fryer. For the best texture, let them rest for a minute or two before slicing open. This allows the internal steam to settle slightly. Slice them open lengthwise, fluff the interior with a fork, and serve immediately with your favorite toppings.
Understanding the Nutritional Profile
While a “baked” potato sounds inherently healthy, the final nutritional value is heavily influenced by the toppings you choose. The potato itself, prepared this way, is a wonderful source of potassium and fiber. This information is for one plain potato prepared according to the recipe.
Nutrition Facts
- Servings: 4
- Calories Per Serving: Approximately 220-250 kcal (this is for one potato with oil and herbs, before adding any toppings like butter or sour cream).
Time is on Your Side: Preparation and Cooking Breakdown
One of the greatest advantages of this air fryer method is the significant time savings compared to a conventional oven, without sacrificing quality.
Preparation Time
- Active Prep Time: 5 minutes (for washing, drying, piercing, and seasoning).
- Cook Time: 35-50 minutes (depending on potato size and air fryer model).
- Total Time: 40-55 minutes.
How to Serve: Building Your Masterpiece Potato
A perfectly cooked baked potato is a blank canvas. The toppings are where you can express your culinary creativity. Here are some themed ideas to get you started, from the timeless classic to more adventurous combinations.
- The Classic American Diner Experience:
- A generous pat of salted butter, melting into the fluffy interior.
- A large dollop of full-fat sour cream or tangy crème fraîche.
- A sprinkle of freshly chopped chives or green onions.
- An extra dash of salt and freshly cracked black pepper.
- The Fully Loaded Extravaganza:
- A foundation of melted sharp cheddar or a Mexican cheese blend.
- A shower of crispy, crumbled bacon or pancetta.
- A spoonful of sour cream or Greek yogurt.
- A final flourish of sliced green onions.
- The Healthy & Hearty Power Meal:
- Turn it into a complete meal by topping it with a scoop of hearty beef or vegetarian chili.
- Spoon over some black beans, corn salsa, and a dollop of guacamole.
- Use plain Greek yogurt as a high-protein, healthier substitute for sour cream.
- Add a sprinkle of cilantro and a squeeze of fresh lime juice.
- The Mediterranean Twist:
- Crumble some feta cheese over the hot potato.
- Add a spoonful of chopped Kalamata olives and sun-dried tomatoes.
- Drizzle with a little extra virgin olive oil.
- Top with a sprinkle of fresh oregano or parsley.
- The Gourmet Indulgence:
- Drizzle with a touch of decadent truffle oil.
- Top with freshly grated Parmesan cheese and sautéed wild mushrooms.
- A small spoonful of Boursin or other herbed soft cheese melts beautifully.
Additional Tips for Potato Perfection
After making dozens of these potatoes, I’ve picked up a few extra tricks that take them from great to absolutely unforgettable.
- The Double Cook Method for Unbelievable Fluffiness: For the absolute fluffiest interior possible, consider this restaurant-style trick. Microwave the pierced potatoes for 4-5 minutes before you season them and put them in the air fryer. This jump-starts the cooking of the interior. Then, coat with oil and seasoning and air fry for a shorter time, about 15-20 minutes at 400°F (200°C), just until the skin is perfectly crisp. This method separates the task of cooking the inside from crisping the outside.
- The Brine-Soak for Extra Flavor: If you have an extra 30 minutes, soaking the potatoes in a saltwater brine (about 1 tablespoon of salt per 4 cups of water) can infuse the potato with seasoning from the inside out. Just be sure to dry them with extreme prejudice before oiling and air frying, otherwise you will compromise the crispy skin.
- Don’t Be Shy With The Salt: The salt on the skin does more than just add flavor; it’s a functional ingredient. The coarse salt crystals help to draw moisture out from the very outer layer of the potato skin, which is essential for achieving that dry, brittle, and ultra-crispy texture. So, ensure you have a nice, even coating.
- Know Your Air Fryer’s Hot Spots: Like ovens, most air fryers have specific hot spots where things tend to cook faster. Pay attention to your machine. You might notice the potatoes in the back get darker quicker than the ones in the front. Use this knowledge when you flip them halfway through, rotating their positions to ensure everyone gets an equal blast of hot air for uniform results.
- Cut and Fluff Immediately: Don’t let your beautiful potatoes sit around for long after they come out of the air fryer. The moment they are cool enough to handle, slice them open. Trapped steam can soften that crispy skin you worked so hard to achieve. Slicing it open releases the steam, and using a fork to immediately “fluff” up the insides not only creates a lovely texture but also allows toppings like butter to melt deep into every nook and cranny.
Frequently Asked Questions (FAQ)
Here are answers to some of the most common questions that arise when venturing into the world of air fryer baked potatoes.
1. Can I wrap my potatoes in aluminum foil in the air fryer?
No, you should absolutely not wrap your potatoes in foil. The entire principle of an air fryer is based on circulating hot air to create a dry, roasted, crispy surface. Wrapping the potato in foil traps steam, effectively steaming the potato inside the foil pouch. You will end up with a soft, wet skin, similar to a microwaved potato, which completely defeats the purpose of using the air fryer for this recipe. Let the skin be free!
2. Why didn’t my potato skin get crispy?
This is the most common issue and almost always comes down to one of three things. First: the potato was not completely dry before you added the oil. Any residual water will turn to steam and soften the skin. Second: you didn’t use enough oil. The oil is what “fries” the skin; an insufficient or uneven coating won’t work. Third: you overcrowded the air fryer basket. The potatoes need space for air to circulate. If they are touching, the contact points will steam instead of crisp up.
3. What is the best type of potato for air frying?
Without a doubt, high-starch potatoes are the best choice for a classic baked potato. Russet potatoes (also known as Idaho potatoes in the US) are the gold standard. Their high starch content and low moisture result in an interior that becomes light, dry, and fluffy when cooked. Waxy potatoes like red potatoes or new potatoes have a creamier, denser texture and will not produce the same fluffy result. They are better suited for roasting in chunks.
4. How do I store and reheat leftover air fryer baked potatoes?
To store, allow the potatoes to cool completely, then place them in an airtight container or wrap them loosely and store them in the refrigerator for up to 3-4 days. To reheat and bring back that crispy skin, the air fryer is your best friend once again! Place the cold potato back in the air fryer at 375°F (190°C) and heat for 5-8 minutes, or until it’s warmed through and the skin has re-crisped. It will be almost as good as when it was fresh.
5. Can I use a different type of oil or add other seasonings?
Absolutely! This recipe is a fantastic base for experimentation. You can use any high-smoke-point oil like avocado oil or grapeseed oil. For seasonings, the sky is the limit. Try adding smoked paprika for a smoky flavor, onion powder for a savory depth, or even a pinch of cayenne pepper for a little kick. You could also use a pre-made steak seasoning or Cajun seasoning blend for a completely different flavor profile. Just apply it at the same stage as the salt and herbs.

Air Fryer Baked Potato with Olive Oil and Herbs recipe
Ingredients
-
Potatoes: 4 medium-sized Russet potatoes (about 6-8 ounces / 170-225g each)
-
Olive Oil: 2 tablespoons of high-quality extra virgin olive oil
-
Coarse Salt: 1 teaspoon of coarse sea salt or kosher salt
-
Black Pepper: ½ teaspoon of freshly ground black pepper
-
Dried Herbs: 1 ½ teaspoons of your favorite dried herbs (a mix of rosemary, thyme, and a pinch of garlic powder works wonders)
Instructions
-
Prepare the Potatoes (The Most Important Step): Begin by thoroughly scrubbing your Russet potatoes under cold running water. Use a vegetable brush to remove any dirt or residue from the skin. After washing, it is absolutely critical to dry them completely. Use a clean kitchen towel or paper towels to pat them down until there is no surface moisture left. Water is the enemy of a crispy skin, as it will create steam instead of allowing the skin to roast and dehydrate into a crispy shell.
-
Puncture for Safety and Steam Release: Using the tines of a fork or a sharp paring knife, pierce each potato 5-6 times on all sides. This step is non-negotiable. Puncturing the skin allows steam to escape from the potato as it cooks. Without these vents, pressure can build up inside, leading to a potential and messy “potato explosion” in your air fryer. This also helps the interior cook more evenly.
-
The Flavor Coating: Place your dry, pierced potatoes in a medium-sized bowl. Drizzle the 2 tablespoons of extra virgin olive oil over them. Next, sprinkle the coarse salt, freshly ground black pepper, and your chosen dried herbs. Use your hands to thoroughly rub the oil and seasoning mixture all over the entire surface of each potato. Ensure every inch of the skin is lightly coated. This oil is what will “fry” the skin, and the salt will draw out the last bit of moisture, guaranteeing that incredible crispiness.
-
Preheat Your Air Fryer: Just like a conventional oven, preheating your air fryer is a key step for even cooking. Set your air fryer to 400°F (200°C) and let it preheat for about 3-5 minutes. This ensures that the potatoes start cooking the moment they enter the basket, giving them a head start on developing that crispy exterior.
-
Arrange in the Basket: Once preheated, carefully place the seasoned potatoes in the air fryer basket in a single layer. It is crucial that you do not overcrowd the basket. There should be space around each potato for the hot air to circulate freely. This 360-degree air circulation is the magic of the air fryer, and it’s what gives you that uniformly crispy skin. If your air fryer is too small to hold all four potatoes with adequate spacing, it’s better to cook them in two batches.
-
The Cooking Process: Air fry the potatoes at 400°F (200°C) for 35-50 minutes. The exact cooking time will vary depending on the size of your potatoes and the specific model of your air fryer.
-
The Mid-Cook Flip: About halfway through the cooking time (around the 20-minute mark), pause the air fryer and use tongs to carefully flip each potato over. This step promotes even browning and crisping on all sides, so you don’t end up with one side that’s softer than the other.
-
Check for Doneness: The potatoes are perfectly cooked when the skin is golden brown, dry to the touch, and wonderfully crispy. To check the interior, carefully pierce the thickest part of a potato with a fork or a skewer. If it slides in easily with no resistance, the inside is perfectly fluffy and cooked through. If you feel resistance, continue to cook them in 5-minute increments until they are tender.
-
Rest and Serve: Using tongs, carefully remove the hot potatoes from the air fryer. For the best texture, let them rest for a minute or two before slicing open. This allows the internal steam to settle slightly. Slice them open lengthwise, fluff the interior with a fork, and serve immediately with your favorite toppings.
Nutrition
- Serving Size: one normal portion
- Calories: 220-250 kcal


